dog-eared, Easy, Gluten-free, Medium Time, One-pots, Side Dishes, Vegetables

5 Resolutions to Make You a Better Home Cook (+ Pot-Roasted Collard Greens )

_TJH6714 (1)To be honest I lost interest in New Year’s Eve a long time ago. If memory serves me, the last New Year’s Eve I celebrated was sometime late last century. For that matter, I am not sure what year it was that I last made it to midnight.

It doesn’t mean I don’t celebrate, I do, I am just not in a rush to do so as the bell tolls. I guess I prefer to ease into it casually, like when my eyes pop open after a good night’s rest.

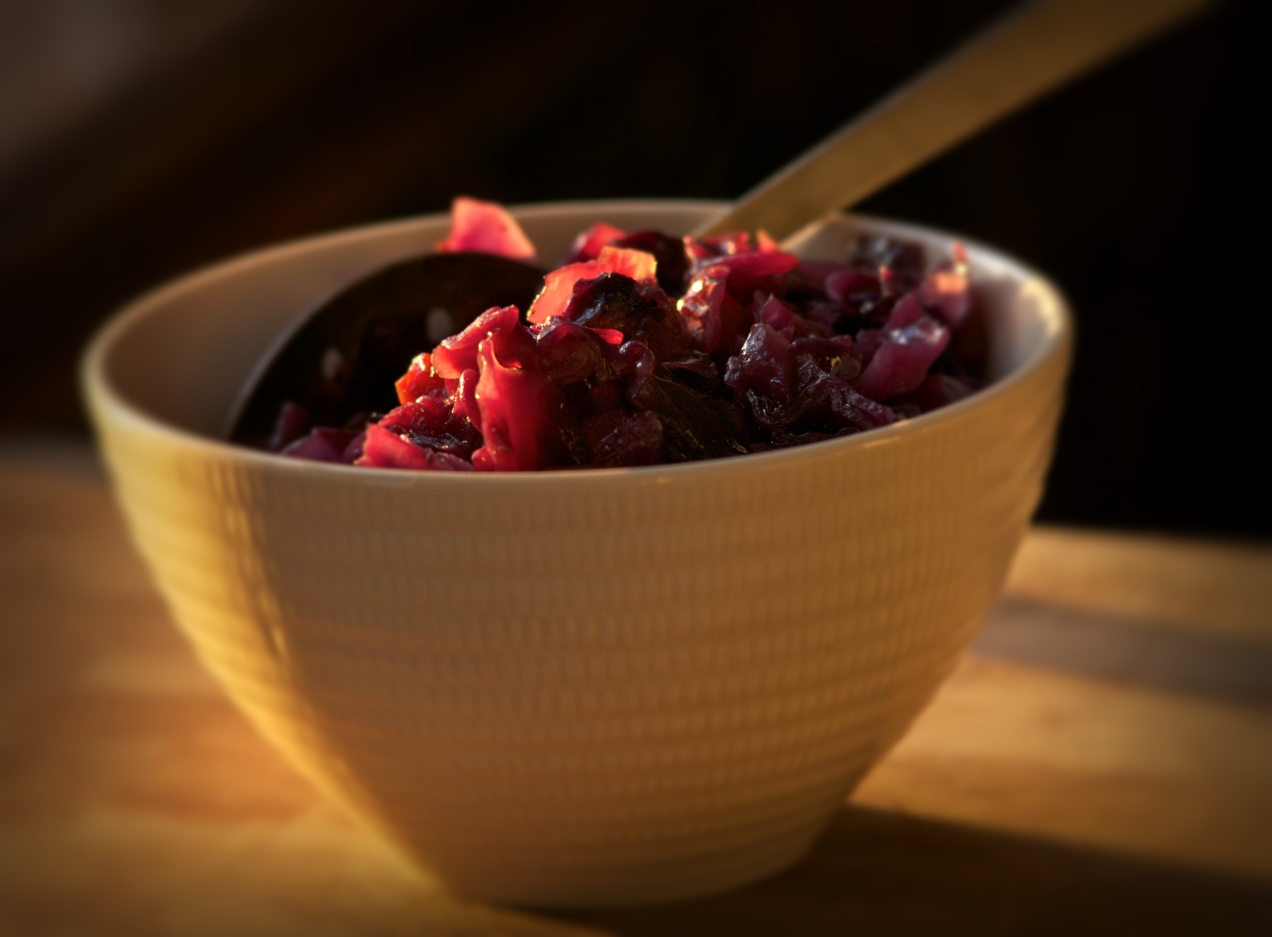
But let me just add: I am skeptical of New Year’s too. Maybe because we try to inject new vigor into failed promises, or because we also act as though eating a particular meal, either cleansing or lucky, is going give the rest of the year promise. The whole holiday feels dubious to me, with one exception: collard greens.

The caramelized smear on the bottom of the pot is an indication you collards are cooked perfectly.

The caramelized smear on the bottom of the pot is an indication you collards are cooked perfectly.

As always, combine collards with beans and rice and you can feel as though you are entering the new year at a low with nowhere to go but up. But there is another way of looking at it too. In my family, collard greens are not a one-hit wonder only to be served once during the year. Nor are they a fad. They are steadfast and as honest as the day is long. Sure you could hang out with the pretty people and eat kale, but kale isn’t collards. Neither are mustard or turnip greens. For me, because they are like the brainy girl who likes to read, collards are far more interesting. So much so that you want them around all year and with collards around there is no need to go up.

But, as always, sometime between Christmas and the new year I will put on the horsehair shirt, become all monkish and reflective, and try to set a direction for the new year ahead. I can assure you, in the kitchen, collards will act as a reliable compass.


Five Kitchen Resolutions for the New Year to Make You a Better Home Cook

1. Try to follow fewer fads and learn more technique. Take collards, for example. I had always simmered them in the typical manner with pork, pepper flakes, and liquid. While I still love cooking them this way, it wasn’t until I learned to pot-roast them vis-à-vis Thomas Keller that I picked up a new technique. And, I might add, one I am grateful to have in my tool kit.

2. It has been a battle this year with getting the kids to eat what is put in front of them, but, rather than forcing them to try new things, I am going to make more kid-friendly meals (that doesn’t mean junk) with the expectation they eat other meals without complaint. I also have this notion that if I feed them exotic foods all the time they will have to deal with the law of diminishing returns in that they will become bored with food. I also suppose I want them to have things left to explore and look forward to as they grow older.

3. Break out of your routine and explore other cuisines more often.

4. Choose three new dishes to master and do so. You know some say it takes cooking something a thousand times before you really understand how to cook it. While this might be a little extreme, I do like to be able to cook a dish multiple times and have it turn out the same each time. This takes practice.

5. Search out and explore five new ingredients.

Pot-Roasted Collard Greens ( Recipe adapted from Thomas Keller’s Ad Hoc at Home )

Serves 4

8 cups collard greens, stems removed and leaves chopped into 1-inch squares, then rinsed twice and dried
1/2 cup bacon lardons
1 tablespoon unsalted butter
Kosher salt and freshly ground black pepper

  1. Heat the oven to 300˚ F.
  2. Place a heavy-bottomed pot or Dutch oven (with a tight-fitting lid) over medium heat. Add the bacon and let it start to render, then add the butter.
  3. Once the butter has melted, add half of the greens. Season them with a heavy pinch of salt and freshly ground pepper. Stir and turn under the greens so they are coated with fat. Add the rest of the greens and repeat the seasoning and turning.
  4. Cover the pot with the tight fitting lid and slide it into the oven. Roast for 1 hour to 1 hour and 15 minutes. Remove from the oven, remove the lid, and stir. Taste and adjust the seasoning. Put the lid back on and let the collards set until ready to serve.
Advertisement
Standard
Side Dishes, Vegetables

Braised Red Cabbage

Braised red cabbage

This dish will not be the same without the duck fat but that does not mean it won’t be equally as good. Bacon, bacon grease and even butter would all be good choices since I know most people don’t keep duck fat around or have access to it.

If planted midsummer red cabbage will mature just about the time of the first frost. As long as it is harvested before the first hard freeze it will last in storage until about the beginning of the year. Depending of the variety and the conditions under which it is stored it might last a little longer.

Whether you grow it or buy it red cabbage is a great winter vegetable that is under utilized by the home cook. It can easily be whipped into a tasty Asian slaw, turned into a comforting bowl of borscht or a wonderful braised red cabbage. This dish is perfect with pork chops or pork roasts and is also a fine accompaniment to ham or cured and smoked pork chops. Continue reading

Standard
Dinner, Main Dishes, One-pots, Pork

Pork Pazolé

Chili is great, and a favorite, but sometimes it is nice to find an alternative. This is a nice change for sure. The sourness of the tomatillos cuts the richness of the pork while still letting the pork taste rich. The other thing about the tomatillos is the juice from them thickens the broth. The whole thing comes together easily and could even be pulled off on a weeknight by the ambitious.

Serves 4

2 tablespoons lard

2 1/2 lbs. pork shoulder, cut into 1 inch cubes

1 cup yellow onion, small dice

1 lb. tomatillos, paper skins removed

1/4 cup coarsely chopped garlic

2 teaspoons Mexican oregano

1 tablespoon dark chile powder

1 tablespoon tomato paste

one 14.5 ounce can yellow hominy

kosher salt and fresh ground pepper

1/4 cup cilantro, chopped

toppings: more cilantro, shredded cabbage, lime wedges, red onion, sour cream and cheese

1. Preheat the broiler. Place the tomatillos onto a sheet tray with sides, they will exude lots of juice, and broil them until they are charred nicely. Remove them from the oven and turn the oven off.

2. Season the pork with salt and pepper. Heat the lard over medium high heat in a 3 1/2 quart Dutch oven and add the pork. Brown it deeply on all sides taking care not to not to burn the fond forming on the bottom of the pot and reducing the heat if necessary.

3. After the pork has browned remove it from the pot to a plate. Add the onions to the pot and saute them until they start to become tender. Add the garlic, chili powder, tomatillos with all their juice, and the tomato paste. Stir to combine and let the mix become fragrant.

4. Add the pork, and accumulated juices, back to the pot and enough water to come just to the top of the pork. Let the pozole come back to a boil and then reduce the heat to a simmer.

5. Simmer until the pork is tender, about an hour, then add the hominy and the chopped cilantro and cook another 10 minutes. Ladle into bowls and serve with additional toppings and lots of home made corn tortillas.

Standard
Soup, Stocks & Basics

Three Onion Chowder

Three Onion Chowder with Parsleyed Oyster Crackers

I really like chowders and really like French onion soup. I don’t like pasty chowders so I didn’t thicken it except for the starch released from the potatoes. One tip I learned from Jasper White’s 50 Chowders is to let the chowder rest covered for thirty minutes. It is really does make a difference by allowing the flavors to come together.

SERVES 4 TO 6

For the Soup:

3 ounces pancetta, 1/4 inch dice

2 cups yellow onion, peeled and julienned

2 leeks, rinsed, white parts only, sliced into half moons

4 shallots, peeled and sliced

1/3 cup celery, 1/4 inch dice

1 1/2 tablespoon fresh garlic, minced

1 teaspoon fresh thyme, minced

1 bay leaf

2 cups chicken stock

2 cups half and half

3 russet potatoes, peeled and cut into 1/2 dice

1 tablespoon Italian parsley, minced

1 tablespoon fresh chives, chopped

Kosher salt and fresh ground pepper

Parsleyed Oyster Crackers:

1 tablespoon unsalted butter

1 cup oyster crackers

1 tablespoon Italian parsley, minced

Fine sea salt and fresh ground pepper

1. In a 3 quart Dutch oven or sauce pan add the butter and pancetta and place it over medium heat to render the pancetta. Once some of the fat has been released add the onions, shallot and celery. Saute until they are just becoming golden. You don’t want them to brown too much or the soup will be brown. Add the leeks, garlic and thyme. Cook until the leeks are just becoming soft. Add the bay leaf and chicken stock. Bring it to a boil and add the half and half and the potatoes. Bring the soup back to a boil and then immediately turn off the heat and cover the pot. Allow it to rest for at least thirty minutes.

2. Heat a small saute pan over medium high heat. Add the butter and once it has stopped bubbling but is not brown, add the oyster crackers and toss the crackers to coat with the butter. Season with salt and pepper. Stir in the parsley and toss the crackers gently in order to coat all the crackers with the parsley. Pour out onto a baking sheet and let cool.

3. To finish the soup reheat it but don’t let it boil. Taste a potato to check and see if it is done and adjust the seasoning if necessary. If the potatoes are not done then cook over low heat for 15 minutes. Stir in the parsley and chives and then ladle into cups or bowls. Top with a few oyster crackers and serve.

Standard

Bacon Fried Rabbit

The difference between Edna Lewis’ book The Taste of Country Cooking and countless other cookbooks is she truly celebrates food. Not only is it a celebration but it is the gospel of farm to table eating, a hymn of fresh, great tasting, whole food that should be sung loudly as the new testament of eating seasonally. In short, it just might save your soul and at the very least it is extremely soul satisfying.

What drew me in the first time I opened the book was a breakfast menu that simply read Fall Breakfast and the second item listed in the menu was smothered rabbit. As if this wasn’t enough the first time I made Miss Lewis’s pear preserves I became teary eyed because it reminded me of the taste of a long-forgotten-that-was-now-brought-to-mind memory of my grandmother and the pear preserves she made.

When you realize this was published in 1976 it becomes apparent this is a last bastion to how rural America once ate. It isn’t the French influenced food made in a California restaurant kitchen that now stands as the talisman of sustainable eating, but rather, it is 100% American food made with ingredients had on hand and in season. It was written at a time when women wanted out of the kitchen instead of in and the burger joint was still a treat but unfortunately fast becoming a standard.

The book is not a retrospective of days past and food that is dated by out of style trends but it is a classic that is as current and in touch today, maybe even more so,  as it was when written.

Miss Lewis does nothing short of pen a rural American classic that treats food with respect and knowledge of how to use the ingredients at hand and get the most out of them. There is nothing fussy about her food and there needn’t be because its simplicity and freshness is what makes it delicious.

In short if you care about sustainable local food you should get yourself a copy. It will fast become your how to manual.

This recipe is based loosely on Miss Lewis’s fried chicken recipe.

Bacon Fried Rabbit

Serves 4

2 fryer rabbits, cut into 6 to 8 pieces

1 piece of slab bacon, cut about 1/4 inch thick

2 cups flour, seasoned with 2 teaspoons black pepper, 1 teaspoon each of thyme and paprika, and 1 teaspoon of salt

buttermilk

peanut oil

kosher salt

1. Season the rabbit with salt and set it aside to let the salt dissolve into the meat.

2. In a large cast iron Dutch oven add enough oil to come up the side by no more than a third. Add the bacon.

3. Turn the heat to medium high and place your fry thermometer into the oil. Place the seasoned flour into a plastic bag with the rabbit. Toss the rabbit around to give it a good coating. Remove the pieces from the flour and let them soak a in the buttermilk. Remove each piece and let the excess drip off. Put the pieces back into the flour for their final coat. Don’t do this to far in advance or the coating gets brittle when fried.

4. When the temperature gets to 350F˚ remove the bacon if it is crispy and start frying the rabbit until golden brown and delicious. If you need to do this in batches do. Don’t over crowd the pot or you will have a greasy mess. So to do this heat the oven to 250˚F. As the rabbit pieces come out of the grease place them on a sheet tray fitted with a wire rack and keep them in the oven till all are done.

5. Serve.

WebRep
currentVote
noRating
noWeight
cookbooks you should own, foodquarterly recipes, The Library, Wild Game

Edna Lewis: The Taste of Country Cooking

Image