Beef, Beef/Veal, Easy, Gluten-free, Grill, Grilling, Sandwiches

Building a Better Burger

If you think about it, a hamburger is nothing more than a sausage without a casing. Once you accept this notion, you open yourself up to endless burger possibilities! I mean really, there are as many burger recipes as there are cooks. Everyone has their own little tweaks and a go-to recipe.

With that being said, I am not going to sit here and try to convince you this is a recipe for the best hamburger in the world — even though it is — because someone will undoubtedly draw a line in the sand, slap me with gloves in hand, and challenge me to a duel. It’s inevitable. Continue reading

Advertisement
Standard
Chicken and Poultry, dog-eared, Easy, honest, journalism, Main Dishes

Marie’s Freedom Station and Crispy BBQ Chicken Thighs

Marie’s Freedom Tire Shop

Marie, in her sixties, ran Freedom’s Tire Shop in Freedom Indiana. It had been years since anyone bought tires but they kept coming for the gasoline. The station sat at the edge of town across the street from the only grocery. Marie’s husband had been dead 15 years when I met her in the late 1980’s. Her only source of income had been her husband and his business. When he died she decided she would run the gas station and each day, with walking stick in hand, she would walk to work. She had never had possession of a drivers license nor did she want too. Continue reading

Standard
Barbecue, Chicken and Poultry, dog-eared, Easy, Main Dishes

The Midwest, Barbecue, And Zeb’s All Purpose Mambo Sauce

Midwesterners like pork and we like beef, even chicken but we do not like change.

Well, that’s not exactly true. We understand that change is inevitable, we just don’t like it sneaking up behind us and yelling BOO. We prefer change we don’t see, change that slips on like a comfortable pair of socks that go unnoticed throughout the day, not a constant reminder like a fancy necktie.

Growing up in suburban 1970’s Indianapolis “barbecue” meant baking a chicken and basting it in a bottled sauce.  If there was smoke it was liquid, if there was fire it was a heated oven. This was the logical extension of my mother’s Midwest, the pot-roast, chicken-and-dumplings-tuna casserole Midcentury Midwest. Spice was reserved for vacations south of the Mason Dixon line. But even as we were tucking into ketchup-mild barbecued chicken, tiny outposts of smoke, fire and mostly pig, had long-since migrated north.

Stubbs, you see, is tall. His cowboy hat makes him taller. His hands make him appear well, like a folkloric hero, his hands are big enough to palm a turkey, thick and calloused and more heat resistant than a fireman’s glove.

One was Zeb’s barbecue, a shack I spied from the back window of the station wagon as I was ferried to Saturday morning art lessons. The place billowed smoke. I was sure that one Saturday we’d see a line of fire trucks, the red glare of emergency lights, firemen unfurling their hose to do battle with a five alarm, sirens blaring.

But week after week, the cloud of smoke billowed across the avenue without a fire truck in sight. The smoke smelled like Sunday morning bacon — and slow cooked pork. Continue reading

Standard
Beef, Dinner, dog-eared, Easy, Main Dishes, Pasta or Noodles

RECIPE CARD: 3 Cheese Beef & Noodles + How To Get The Most Out Of Prep Day

I have always said, “if I am going to cook one chicken, I might as well cook two.”  It’s not really any more work.  I have come to believe the same about pot roast, pork roast, and just about anything that is braised, smoked or roasted.
Continue reading

Standard
Appetizers/Starters, Easy, recipe card, Seafood

RECIPE CARD: All-American Crab Cakes

I can’t tell you how many times I made crab cakes while working at different restaurants.  I am pretty sure even I don’t  want to know.  What I do know is many times they had lots of flavors sans one, crab and I often thought the cakes were more bread crumb than crab.  So here is a quick, easy, and very crab tasting recipe that can be made any night of the week.  This recipe makes a lot of cakes but realize you can make the cakes and freeze them in sets of 4 cakes or whatever works for you. Continue reading

Standard
Easy, Grains/Legumes, Meatless Monday, Pantry meals, Salad, Vegetarian

Barley Salad with Kalamata Olives, Sun-dried Tomatoes, and Parsley

I have cooked with whole grains for a long time.  My fascination began, simply enough, with bulgur wheat used to make tabouleh.  It was a gateway to all sorts of other grains; winter wheat, soft summer wheat, oat groats, farro,  you get the idea.  There are lots of grains readily available that a few short years ago were very difficult to locate.  A good earthy health food store went a long way to rectifying the shortage but now about every food store carries some sort of whole grain. Continue reading

Standard
Bread, Easy, Meatless Monday, Sandwiches, Stocks & Basics, Uncategorized, Vegetarian

Cheats, Lies, and Hucksters (How to Cook a God Damned Grilled Cheese Sandwich)

As a kid, learning to cook a fried egg and bologna sandwich is like teaching me how to load a gun without establishing any safety guidelines. While the combination of griddled bread, egg yolk, mayonnaise, seared bologna, and American cheese is white trash foie gras, perfecting the fried bologna without having made a grilled cheese, well, it is Picasso without a Blue Period, Miles Davis having composed no song book before Bitches Brew. There is no reference and no history, a drifting ship with no anchor. At the time, I didn’t understand the damage done by using the cliff notes without ever reaching for the novel.

But here we are, in that time of year when we think about grilled cheese. It is the age old discussion, as if we forgot the combination to the safe and it needs to be cracked again, of how to cheat a grilled cheese. As if the answers locked away are new kinds of offerings; in a waffle maker, with an iron, use mayonnaise instead of butter, or turn a toaster on its side.

So I am just going to say it, I am tired of hucksters and cheats. It pains me to be over sold or even worse, blatantly lied too. I am not putting myself on a pedestal, far be it from me to cast stones, I am no practicing perfectionist and neither am I an Elmer Gantry. I have my faults and I try to be honest about them. Even so, when I witness an egregious wrong I can’t keep my mouth shut. After all, I can’t have my children wondering around this world thinking they will be able to succeed without ever learning the fundamentals. It happens everywhere and now, of all arenas, the kitchen is under attack.

Why can’t we just learn to cook a god damned grilled cheese? What are we afraid of, actually learning how to cook? There are so many basics to be learned by placing a sauté pan onto the stove to griddle two pieces of bread with cheese stuck in between and yet at all costs we try to avoid it. I don’t care what kind of cheese is put between the slices of bread, I don’t even care what kind of bread you use but I do care that you know how the different kinds of bread are going to react to the heat, that types of bread with more sugars and fats are going to brown faster then lean breads made with nothing more then water, flour, and yeast. Or that certain kinds of cheese are so stringy when you go to take the first bite every bit of the cheese is going to come along with it.

Cheats and shortcuts are wonderful but only after you know how to cook the original dish in the tried and true fashion, only after you have mastered the grilled cheese is it okay to riff on it. If you ignore, or fail to recognize, the subtle nuances of cooking you can follow a recipe to the T and still have it fail. It is because there are so many variables that can lead you down the path to disappointment that it becomes imperative to learn how to cook, which is wildly different from simply following a recipe.

DSC_1312

Grilled Cheese Sandwich (makes 2 sandwiches)

4 slices Pullman bread
1 1/2 cups gruyere cheese, grated
1 1/2 teaspoons prepared horseradish
1 tablespoon green onion, minced
a splash of heavy cream
fresh ground black pepper
unsalted butter, softened

1. Combine the grated gruyere, horseradish, green onions, and a splash cream in a medium sized bowl. Add a grind or two of fresh ground black pepper. Mix everything with a spoon to combine.

2. Place a 12-inch sauté pan over medium heat. Liberally butter one side of each of the pieces of bread making sure to cover the whole surface. Place the bread, buttered side down into the pan. Top each piece with one quarter of the cheese mixture. Turn the heat to medium low.

3. Once the cheese begins to compress and soften check the bottom of the bread. If it is browning to fast turn the heat down. Once the bread is browned and the cheese melted put the sandwiches together. Cut the sandwiches into 4 crusty cheese sticks and serve.


Standard
Braised, dog-eared, Easy, Gluten-free, Paleo, Side Dishes, vegetablees

Middle Eastern Braised Green Beans

I don’t know when it came to be that chefs and cooks decided that your veggies needed to be cooked al dente. While I know they retain more of their vitamins when cooked a minimal amount I also know it’s not like the vitamins just vaporize into thin air but instead I am pretty sure, and take note I am not a scientist, that they wind up in the cooking broth.

Either way and no matter how you slice it I like veggies that can stand up to multiple cooking methods giving me choices as how best to enjoy them. I like green beans blanched then sautéed al dente but then I also like them long cooked. That doesn’t mean I want mush because I want something that still has character and a bite.

So after cooking green beans and eating green beans pretty much all my life with potatoes or onions, and even bacon and onions I was looking for a change. This last summer I found a wonderful recipe for okra that was stewed and I liked the recipe so much I made it two or three times.

The other night I was thinking how good that recipe would be with green beans and, actually even easier and less time consuming then the okra. So here is a link to the original article and recipe from the New York Times’ Recipes for Health by Martha Rose Shulman http://tinyurl.com/7ebxpk3 just in case you have any interest in the original okra recipe which I will make again this coming summer.

Middle Eastern Braised Green Beans  (Serves 6)

1/4 cup extra virgin olive oil
2 cups onion, thinly sliced
3 cloves garlic, minced
1 teaspoon all spice
1/2 teaspoon sugar
1 1/2 pounds green beans, clipped and cleaned
1 teaspoon pomegranate molasses
juice of half a lemon
14 oz chopped tomatoes
2 teaspoons tomato paste
kosher salt and fresh ground black pepper

  1. Place a large heavy bottomed pot over medium heat. Add the olive oil and once it is hot add the onions. Season the onions with a pinch of salt and some pepper. Sweat the onions until they begin to soften trying not to brown them.
  2. Add the garlic and once it becomes fragrant add the all spice and sugar. Then add the beans and stir them to coat with the oil.
  3. Now add the rest of the ingredients and stir to combine. Cook on medium until you hear the pot sizzling then reduce the heat to low, cover, and cook for an hour remembering to stir about every twenty minutes. They may take longer the an hour but not much.
  4. Taste, adjust the salt and pepper and serve.
Standard
Easy, Gluten-free, Grains/Legumes, Main Dishes, Meatless Monday, One-pots, Stocks & Basics, Vegan, Vegetarian

A Delicious Lentil Soup With A Dirty Little Secret

What you need to know about lentil soup is everyone has their “simple” version.  Knowing this, it reminds me how easy it is to get a nutritious hot bowl of soup to the table.  It also tells me that it must taste really good if there is a reason to keep publishing simple lentil soup recipes, and we do keep publishing them and it does taste good.

The hardest part of  making this soup is cutting the vegetables, which with the exception of the potatoes, can be done up to two days in advance as long as the vegetables are stored in an airtight container in the refrigerator. The recipe calls for four types of lentils but the truth of the matter is, I had just a small portion of different kinds of lentils I needed to use up.  It so happens that the different textures and subtle flavor differences in the legumes was a welcome addition but if you don’t have but one kind of lentil in the house the soup is still really good.

And here is the secret, soups depend on good broth but sometimes the broth isn’t strong enough.  Without a good broth soups come off as watery and bland and no amount of salt is going to change this.  This fact, and this fact alone, is enough of a reason to keep bouillon cubes in the pantry, or some sort of stock base, that can be used more as a seasoning then as an actual broth.  The idea is to taste the soup after it has cooked and if it comes off as a little flat you add a quarter teaspoon or more of stock base or break off a small piece of bouillon cube to kick up the flavor.  Add the base to the pot, let the it dissolve, stir, and taste again. Keep adding a small piece if needed until the soup is delicious.  Get the picture?  It works, makes the soup more exciting, even if it is a dirty little secret.

©Tom Hirschfeld 2016 All Rights Reserved

©Tom Hirschfeld 2016 All Rights Reserved

4 Lentil Soup (makes 6 servings)

2 tablespoons extra-virgin olive oil
1 medium yellow onion, peeled, small dice
3 carrots, peeled and cut into thin rounds
1 large celery stalk, small dice
3 medium yellow potatoes, cubed
1 cup lentils, a mix of beluga, du pays, yellow, and red
3 garlic cloves, minced
2 tsp. fresh rosemary, minced
1 tsp. dried oregano
2 tsp. fresh thyme
1 cup crushed tomatoes
salt
pepper
vegan sodium free bouillon cube
5 cups homemade vegetable stock or no-sodium vegetable stock
2 handfuls baby spinach
1.Place a 3 1/2 quart (3.5l) enameled Dutch oven over medium heat and add olive oil. Once the oil is warm add onions, carrot, celery, and garlic.

2. Season with 1/2 teaspoon kosher salt. Stir, and sauté the vegetables until they are soft, about 3 minutes

3. Add oregano, thyme, and rosemary. Stir again and add potatoes and lentils. Stir. Add tomatoes, broth, and bouillon cube. Season with a pinch of salt and fresh ground pepper.

4. Bring the broth to a boil, reduce the heat to a simmer and cover. Cook for 20 to 25 minutes, or until the lentils are tender.

5. Remove the lid, taste the soup, and add any seasoning necessary. Add 2 big handfuls of fresh spinach and stir it into the soup. Once the spinach is wilted, ladle up bowls of soup and serve.

Standard
Dinner, Easy, Ham, Main Dishes, Noodles/pasta

Pasta Carbonara (A Midwestern Hybrid)

I melt for this pasta.  I always have.

As a kid I grew up on heavy, roux laden Fettuccini Alfredo.  It was the rigor of the day and it was served everywhere and with everything mixed into the noodles, from shrimp to broccoli.  Unfortunately, and even though it was a childhood favorite, cream based pastas in the Midwest were bad, no, they were awful.

Fettucini Alfredo in the Midwest became a Parmesan cream with noodles.  Sometimes more soup then pasta.  The Italian heritage of the dish suddenly was nowhere to be found.  Alfredo in Italy is simply a pasta of butter and Parmesan cheese much like carbonara but without using egg yolks as an emulsifier.  When the noodles are hot out of the cooking water butter and parmesan are tossed with the pasta and melt into a beautiful, silky coat for each noodle.  Fettuccini Alfredo in its Italian form has nothing to do with buckets of cream reduced or thickened with a flour and butter roux.

In the same breath, Carbonara had its day too but it also comes with its own set of problems.  Eggs used to enrich the bacon lardon and Parmesan base often become gloppy and sometimes make the pasta more dry then wet while at other times, because to much egg is used,  the dish ends up with the noodles stuck together in a pasta pancake better cut with a knife then twirled onto a fork.   When made right carbonara can be sublime but when done wrong it can be one of the worst pastas in the world.   Making carbonara involves proper technique and quality ingredients if the finished pasta is to be anywhere close to extraordinary.

This pasta is not a carbonara but neither is it an Alfredo.  It is what I like to think of as a Midwestern hybrid.  Something we do really well here in the middle states, for better or worse, we make dishes to our liking.  For me,  I like several things about this pasta.  To begin, I like the use of ham instead of bacon.  There is no rendering of any fat and yet the typical Midwestern farm ham, piquant with its rosy cure, matches perfectly with the peas, garlic, and pasta.  While the recipe calls for cream it uses far less then one might imagine and the use of starch heavy pasta water to thicken the sauce is a perfect alternative to a classic roux or eggs.  While they might look like an unnecessary garnish,  the parsley and chives are important in flavoring the final dish and should be added in the last minutes of cooking.

©Tom Hirschfeld 2016 all rights reseerved

©Tom Hirschfeld 2016 all rights reseerved

Midwest Carbonara (Serves 4)

1 tablespoon unsalted butter (55g)
1 tablespoon garlic
8 oz. ham, small dice (225g)
1/2 cup heavy cream (110g)
1/2 cup pasta water (110g)
3/4 cup frozen peas (170g)
1/2 cup sugar snap peas (110g)
1 tablespoon parsley, minced
1 tablespoon chive, minced
kosher salt
fresh ground white pepper
1/2 cup Parmesan cheese, grated (110g)
1 pound vermicelli pasta (450g)

  1. Place a 6 quart (5.51l) pot, filled with 4 quarts (4l) of water, onto the stove. Add 2 tablespoons kosher salt and bring the water to a boil.
  2. While you are waiting for the water to boil heat a 14” inch (35.5cm) over medium heat. Add unsalted butter and let it melt. Add ham, stir then add garlic.
  3. When the garlic becomes fragrant but not brown add cream. Bring the cream to a boil and turn off the heat.
  4. This is about timing. The vermicelli only takes minutes to cook but if you are using a different noodle that takes longer adjust you timing.
  5. Add the vermicelli to the boiling water and cook according to the package instructions.
  6. Place the cream back onto the stove top and turn the heat to medium high. Bring the cream to a boil, add peas, season with white pepper.
  7. If the cream reduces to fast add pasta water by the 1/4 cup. Use pasta water because the starch will thicken the sauce.
  8. Drain the noodles when the finish cooking. Add noodles to sauté pan, carefully toss them with the cream. Add half the cheese and carefully toss the noodles with the cream. Taste, add salt if necessary, and a few grinds of fresh ground white pepper, half the chives and parsley. Carefully toss again taking note that it will be hard to get the peas and ham to mix into the pasta. This is okay.
  9. Pay attention in order to keep the pasta from scorching on the bottom of the pan.
  10. When everything is hot, use you tongs to place the pasta onto a large platter. Top the pasta with remaining peas and ham. Sprinkle on the remaining cheese, and top with remaining chives and parsley. Serve.


Standard
best in the world, Bread, Easy, Sandwiches, Seafood

Pan Bagnat – Summer’s Best Sandwich

DSC_0785In a sense, to smush, press, or mash a sandwich could feel redundant but it’s not.  It is a tool employed to make certain kinds of sandwiches better.  Case in point, a Cuban, panini, a shooter’s sandwich, and pan bagnat.

I love all these sandwiches.  Classics, each and everyone.

In the heat of summer, I rely on the pan bagnat, which when translated means bathed bread.  It is a vegetable based sandwich from the south of France, it is light and I find it refreshing.  Often the ingredients list is patterned after a Salad Nicoise subbing in anchovies for the tuna.  For me I like to use omega-3 oil rich sardines but use whatever tinned fish you fancy.

The sandwich is built in layers, wrapped tightly in plastic wrap, and then some sort of weight is put on top of it.  At my house the sandwich gets sandwiched between sheet trays and the milk and juice jugs set on top compress it.  Because the sandwich is lightly salted and weighted after a couple of hours under pressure a lot of liquid is released only to be soaked back up by the bread.

And that’s the genius of this sandwich.  In my experience it never gets soggy but instead it becomes meltingly tender, the juices mingle, and in the end this makes for a perfect sandwich on a hot summer day.

Pan Bagnat (makes 1 sandwich)

a 6-inch (15.25cm) piece of French baguette

1 tin skinless, bonleless, sardines in oil

1 small cucumber, peeled

1 medium sized tomato, sliced

5 or 6 thinly sliced red onion rings, skin removed

8 picholine olives or olive of you choice

salsa verde

mayonnaise

kosher salt

fresh ground black pepper

  1. Slice the baguette in half lengthwise.  On one piece of the bread coat the interior with mayonnaise.  On the other spread out a tablespoon or two of salsa verde.
  2. Using the peeler, peel thin strips of cucumber, 10 or more of them.  Lay them in an even layer across the salsa verde side.  Give the cucumbers a sprinkle of salt.
  3. Top the cucumber with the sardines, on top of the sardines lay out the tomatoes.  Season the tomatoes with a sprinkle of salt and fresh ground black pepper.
  4. Top the tomato with red onion.  Place the olives onto the mayonnaise so they stick.
  5. Place the olive/mayonnaise bread on top of the sandwich.  Wrap it tightly with plastic wrap and then either place a brick on top, a sheet tray with weight, something heavy.  Let the sandwich remain weighted for at least three hours to overnight.
  6. To serve remove the plastic wrap, slice on the diagonal, and serve with a glass of chilled dry white wine.


Standard
dog-eared, Easy, Gluten-free, Grains and Legumes, op-ed, pressure cooking, Side Dishes, Vegetables, Vegetarian

The Best Corn on the Cob in the World

foodquarterlySomething as simple as good corn on the cob shouldn’t be elusive.  There shouldn’t be any big secrets but there is and it is this, the best corn on the cob in the world is cooked in a pressure cooker.   It couldn’t be simpler to do  and the results are divine.

I live in corn country.  If there was a vortex for the center of a corn universe I am at ground zero.  And if not the exact center I am still close enough that if it shook in the middle of the night it would knock me out of bed.  What I am saying is in the Midwest we know corn, and all you have to do is visit any state fair to know I am telling you the truth.

We roast it, boil it, we scrap it off the cob, we make it into pudding, make chowder out of it, we slather ears of it with mayonnaise and sprinkle it with any number of spices, and we even deep fry it like it is a corn dog.

But when a real treat is in order, in the heat of late-summer,  we set up a table under the shade tree, even put a table cloth on it along with plates and silverware.  Then we grill some thick cut pork chops, cut thick slabs of ripe homegrown tomatoes and lightly salt them, maybe a green salad with a sugary vinegar and oil dressing, and  we steam perfectly rip ears of sweet corn under pressure, slip the ear out of the husk from the stalk end and roll the perfectly steamed ears through sun softened sticks of butter.

Pressure cooking an ear of corn does something magnificent.  It gives the kernels a snap, and by leaving the husk on the ears develop a robust corn flavor, much like wrapping tamales in a dried husk.  It tastes like corn should, pure and simple.

This slideshow requires JavaScript.

The Best Corn on the Cob in the World

(serves 6 to 8 people)

When buying ears of corn look for husk that are vibrant and fresh.  It is also always best to cook sweet corn the same day you buy it.

8 ears of sweet corn still in the husk (buy ears that fit your cooker)

1 cup water

1 stick of unsalted butter

sea salt

fresh ground black pepper

Equipment: a 6 or 8 quart pressure cooker with a steamer basket

1. Set an ear of corn onto a cutting board.  Using a good chef’s knife trim the stalk end back so that there is no stalk showing just kernels, about a 2-inch piece.  Repeat with all the ears of corn.

2. Place each ear of corn cut end down into the steamer basket.

3. Place the cooker over medium-high heat.  Add 1 cup of water and bring it to a boil.  Slip the steamer basket with the corn into the pot.

4. When the water returns to a boil, lock on the lid, and bring the pressure to level 2, or high.  Once pressure is reached lower the heat while maintaining pressure.

5. Set a timer for 6 minutes.  When the timer sounds perform a quick or cold water release.

6. Remove the lid and use a pair of tongs to lift out the steamer basket.

7. Using a dry and clean kitchen towel grab and ear of corn by the silk and push the ear out of the husk toward the stalk end.  The silks should come along with husk and the ear should be clear of silk.  Repeat for all the ears.  Serve immediately with lots of butter, salt, and fresh ground pepper.

(A tangent: If you own a pressure cooker you are in luck, if you don’t then you are going to want one. So go buy one, I am serious, and I don’t peddle stuff on here.  Not only do pressure cookers cook things well they are going to help save the planet one meal at a time by conserving energy, water, and time.  If you like that sort of stuff, conservation, then you have to get one.  A 6 or 8 quart stove top cooker will feed your family delicious meals for years to come.)


Standard
Chicken/Poultry, Easy, Eggs/Dairy, Gluten-free, lunch, Salad, Side Dishes

With What Remains of Summer: Two Salad Dressings

Something like you find at a pizza shop, made of Romaine and iceberg  lettuce cut into chunks, mini-wedges meant to soak up a heady dressing and topped with everything but the kitchen sink, this salad is a simple summer salad.

It doubles as a full on dinner salad or as a side.  It is laced with shredded red cabbage and carrots added every bit as much for taste as color.  It is topped with your hearts desire, in this case crisp cucumbers, muddy black olives, protein rich eggs,  raisiny grape tomatoes, and sharp red onions.  I even threw in a little bit of last nights roast chicken but chopped ham, bacon bits, or whatever you have on hand works good too.

Sometimes I like it dressed with Thousand Island, other times Ranch, and occasionally Catalina but whatever I use it is always homemade.  Today I made a Blue Cheese Vinaigrette.  Feel free to use whatever dressing you like but I am begging you with what remains of summer to make them homemade.

DSC_0179

Blue Cheese Vinaigrette (makes 1/2 cup)

1 TBS. shallot, peeled and grated on a micro-planer

1 tsp. garlic, grated on a micro-planer

1/2 tsp dried oregano

3 TBS. red wind vinegar

1/2 cup extra-virgin olive oil

1/4 cup blue cheese, crumbled (don’t like blue cheese, use goat cheese)

1/8 tsp fresh ground black pepper

a pinch of kosher salt

1. Combine all the ingredients in a pint Ball Mason jar.  Screw the lid on tightly and shake like hell.

note: this dressing is best if made in advance.  An hour will suffice but as it ages it gets better and better.


Thousand Island Dressing (make 1 cup)

2/3 cup mayonnaise

3 TBS. ketchup

2 TBS. bread and butter pickles, minced

1 TBS. shallot, peeled and minced

2 tsp. pickle juice

pinch of kosher salt

1/8 tsp fresh ground black pepper

1. Place everything into a mixing bowl.  Combine with a whisk.  Store in the refrigerator in a tightly sealed glass jar.


Garden Salad (serves 4 as a side salad or 2 as an entree)

1/2 large head iceberg lettuce, cored and cut into 1-inch (2.5cm) chunks (about 2 cups)

1 romaine heart, outer leaves removed, core discarded, and cut into 1-inch (2.5cm) chunks

1/3 cucumber, peeled and thinly sliced (8 rounds)

1 medium carrot, peeled and grated on the large wholes of a grater (about 1/4 cup)

1/2 cup shredded red cabbage

10 California black olives

8 grape tomatoes, halved

8 thinly sliced rings of red onion, minus any paper skin

2 hard boiled eggs, shelled and quartered

1. Place the greens in a large salad bow.

2. Attractively arrange the vegetables over the top of the greens.  Dollop with 1/3 to 1/2 cup of dressing.  At the table mix the dressing into the greens and vegetables using a pair of salad tongs.  Serve.


Standard
dog-eared, Easy, Medium Time, Salad, Sandwiches, Sandwiches/Snacks, Seafood

The Lobster Roll’s Better More Lovable Brother

It is almost August.  The month in which my parents would always load me and my siblings up in the car and we would head to the east coast for vacation.  It was as much a search for a cool ocean breeze as it was a temporary reprieve from the mundane everyday Midwest. Continue reading

Standard
Appetizers/Starters, dog-eared, Easy, Gluten-free, Sandwiches/Snacks, Snack, Snacks/Appetizers, Vegetarian, vegetarian option

No Recipe Greek Nachos

Greek Nachos

You don’t need a recipe.  You can make these from scratch and it will take you less then 10 minutes.  Of course that doesn’t include grocery time, I am making the assumption you did a little pre-planning.  Although when I made this the other day it came out of leftovers, no planning required.  (Don’t want to make the tzatziki, sub in ranch dressing and go for it.)

Pile good quality corn chips onto a plate.  If you are making the ranch/tzatziki sauce scoop about 1/2 cup of mayonnaise into a bowl, just eyeball it don’t dirty a measuring cup.  Add a splash of buttermilk, milk, or kefir and whisk it to make a smooth dressing.  To thick, thin it out with another splash of liquid.  Add a half a tablespoon of chopped dill.  No dill, use dried oregano just make sure to let it sit and hydrate in the dressing for a few minutes.   Again just put it into the palm of your hand, does it look like half a tablespoon?  Toss it in, add salt, pepper and a little lemon juice if you want.  Stir it again then set it aside until you get the rest of the ingredients together.

Slice some grape tomatoes in half, cut some olives, pit them if you have the fancy kind but pitted California black olives work fine.  Chop some cucumbers, I like the baby kind but big ones work too.  Any kind of cooked chopped-up ground meat works here.  Don’t have any animal protein around, drain a can of chickpeas and rinse them.

Drizzle the chips with the tzatziki, top with everything else, add a bit of crumbled feta, a sprinkle of minced parsley and green onion, if your heart is in it, and serve.

Standard
Easy, Medium Time, Seafood

Shrimp and Okra Stew

Some lucky people grew up eating okra; there are even families with rich okra histories that they pass on from generation to generation. I am not one of those lucky people.

I came late to okra — or at least my love for it did. Since I didn’t come from a family of okra-eaters, I always remained skeptical of the vegetable. My relationship with it was like that of boys and girls at an elementary school dance: standing at opposite corners of the room. It’s not that I didn’t like okra — it was that I had no idea what to do with it. I preferred to stay in my comfort zone and stick to eating green beans. Continue reading

Standard
Dinner, dog-eared, Easy, Main Dishes, Seafood, Short Time

Greek Style Shrimp in Tomato Sauce (+ 10 Tips to Better Sautéing)

Greek Style Shrimp There is something wonderful about a one-pan sauté. Sure, a quick dinner and easy clean-up would be enough to pass muster for most, but what I love is how wonderfully delicious dinner becomes as you build flavors in the pan. Starting at the bottom of the pan, there is an order to how things go; it is not a dump-it-and-go process. Continue reading

Standard
Dinner, dog-eared, Easy, Gluten-free, Grains and Legumes, Main Dishes, Meatless Monday, Medium Time, Moderate, Noodles, Pantry meals, Vegan, Vegetarian

Spicy Chickpea and Sour Tomato Curry with Pasta

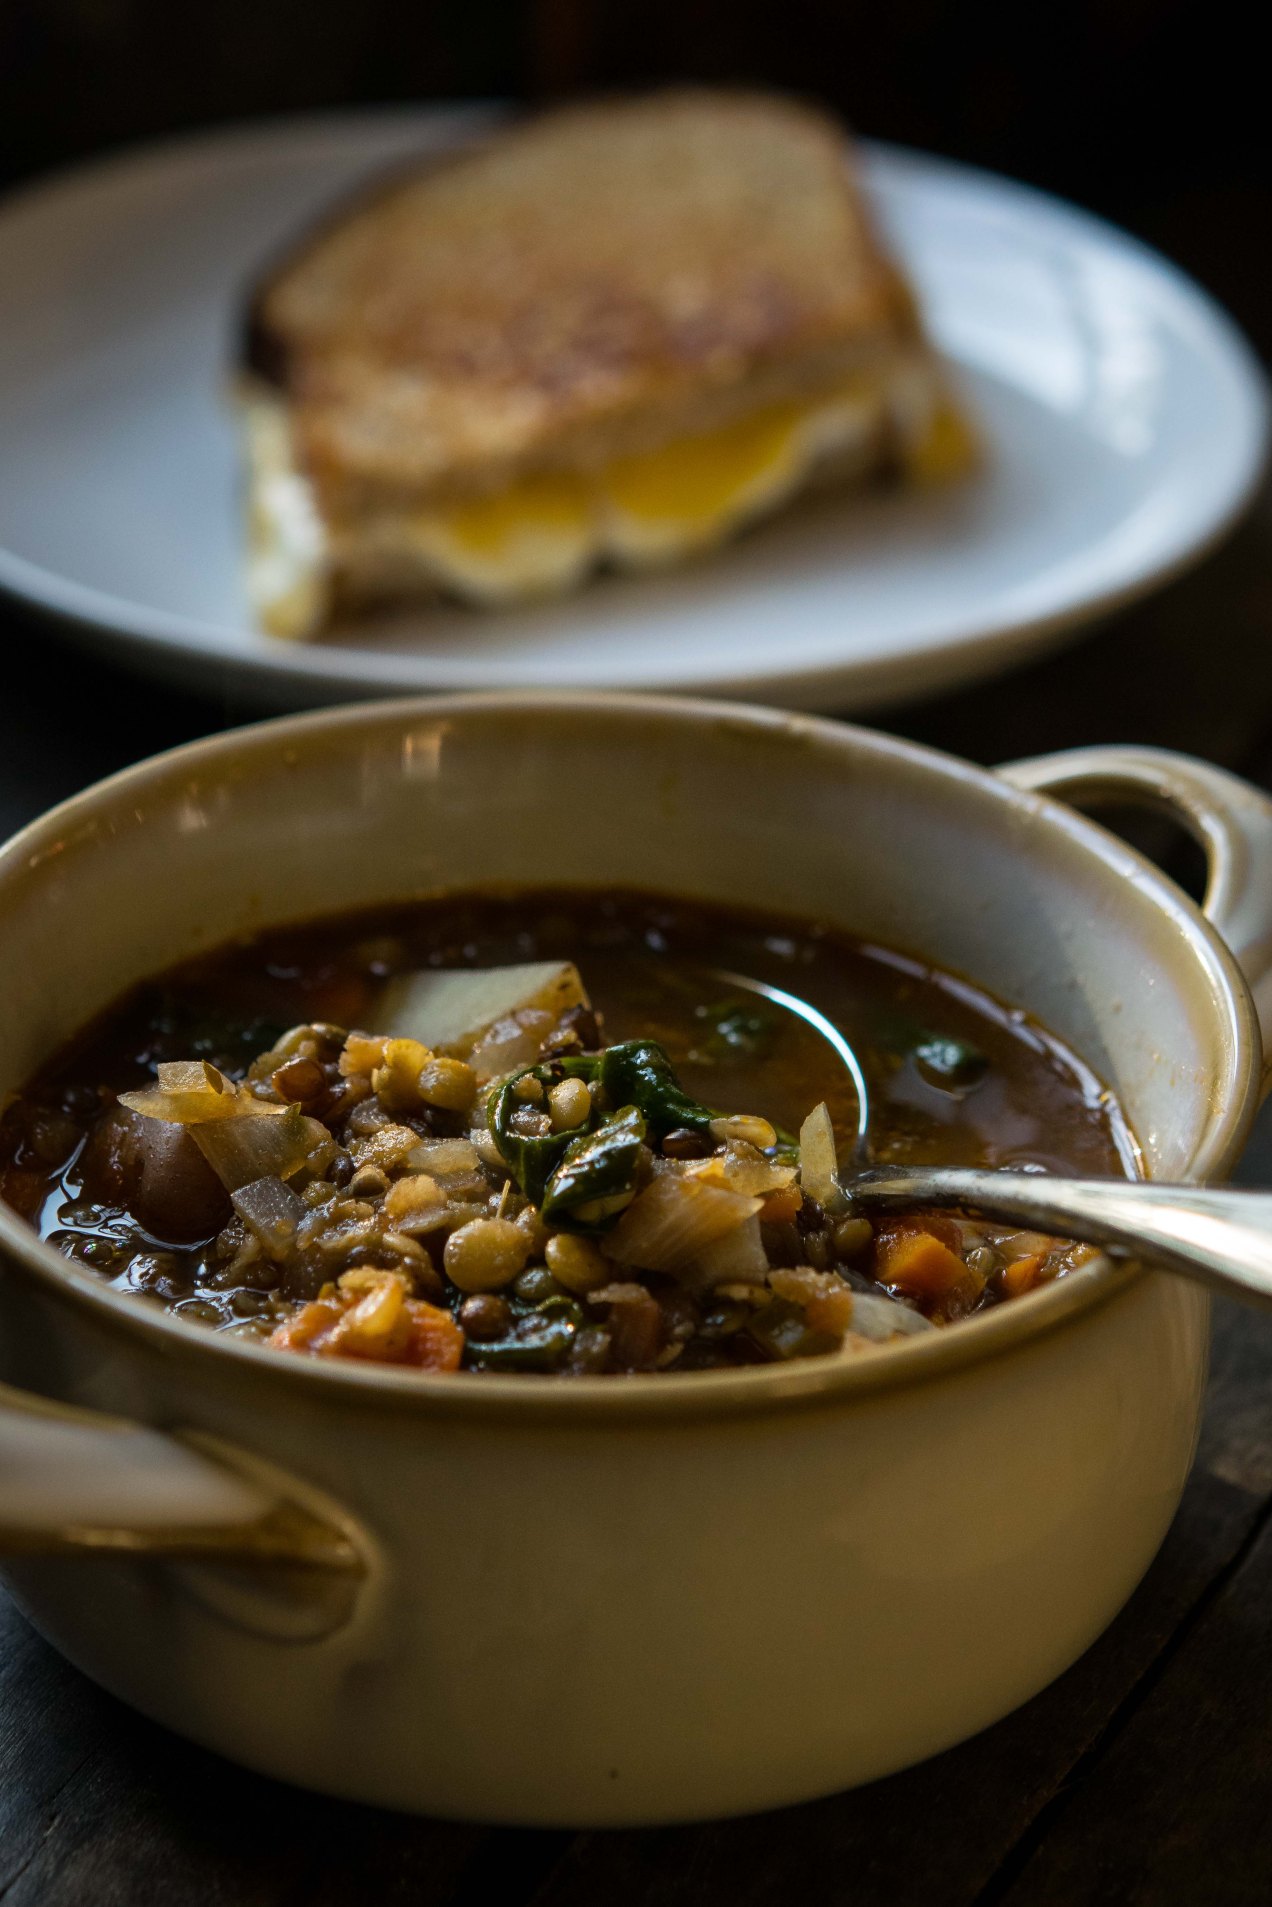
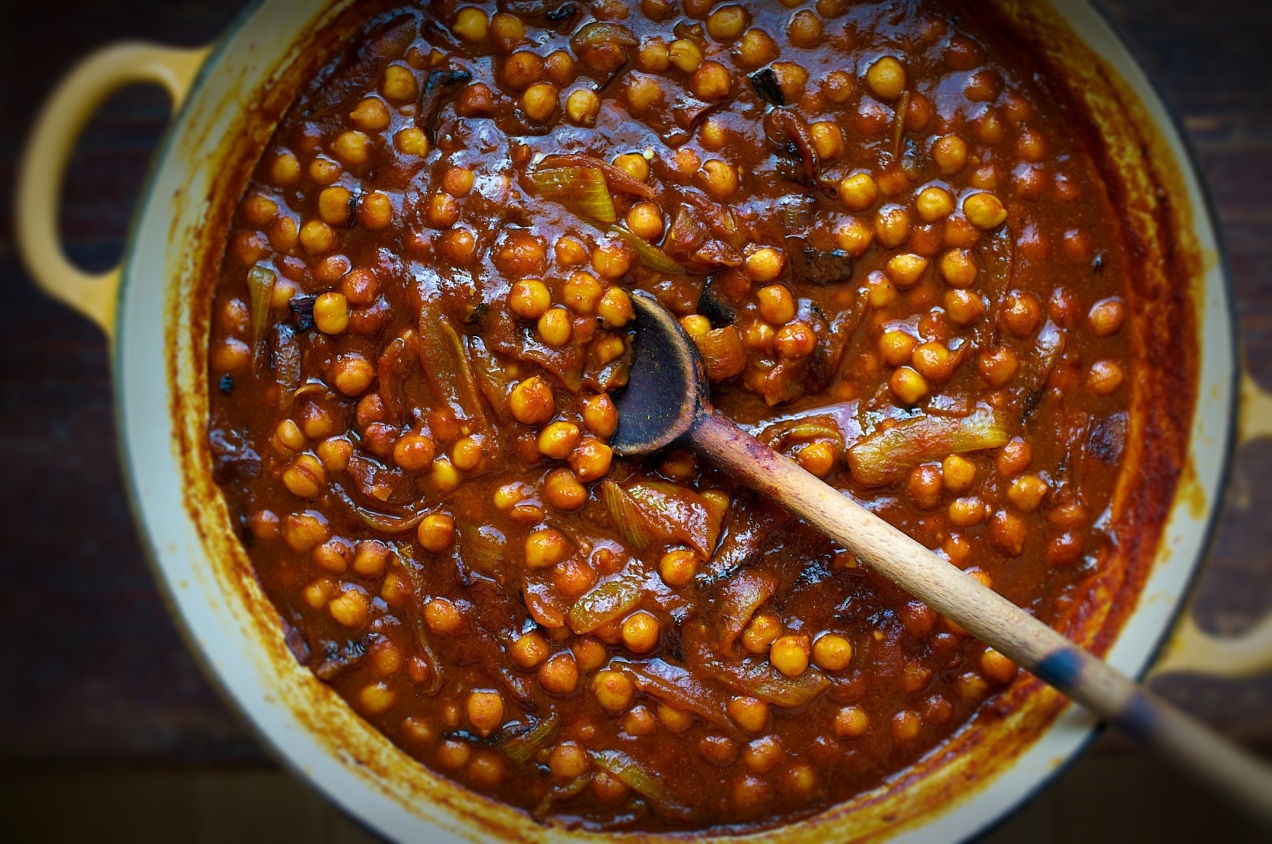
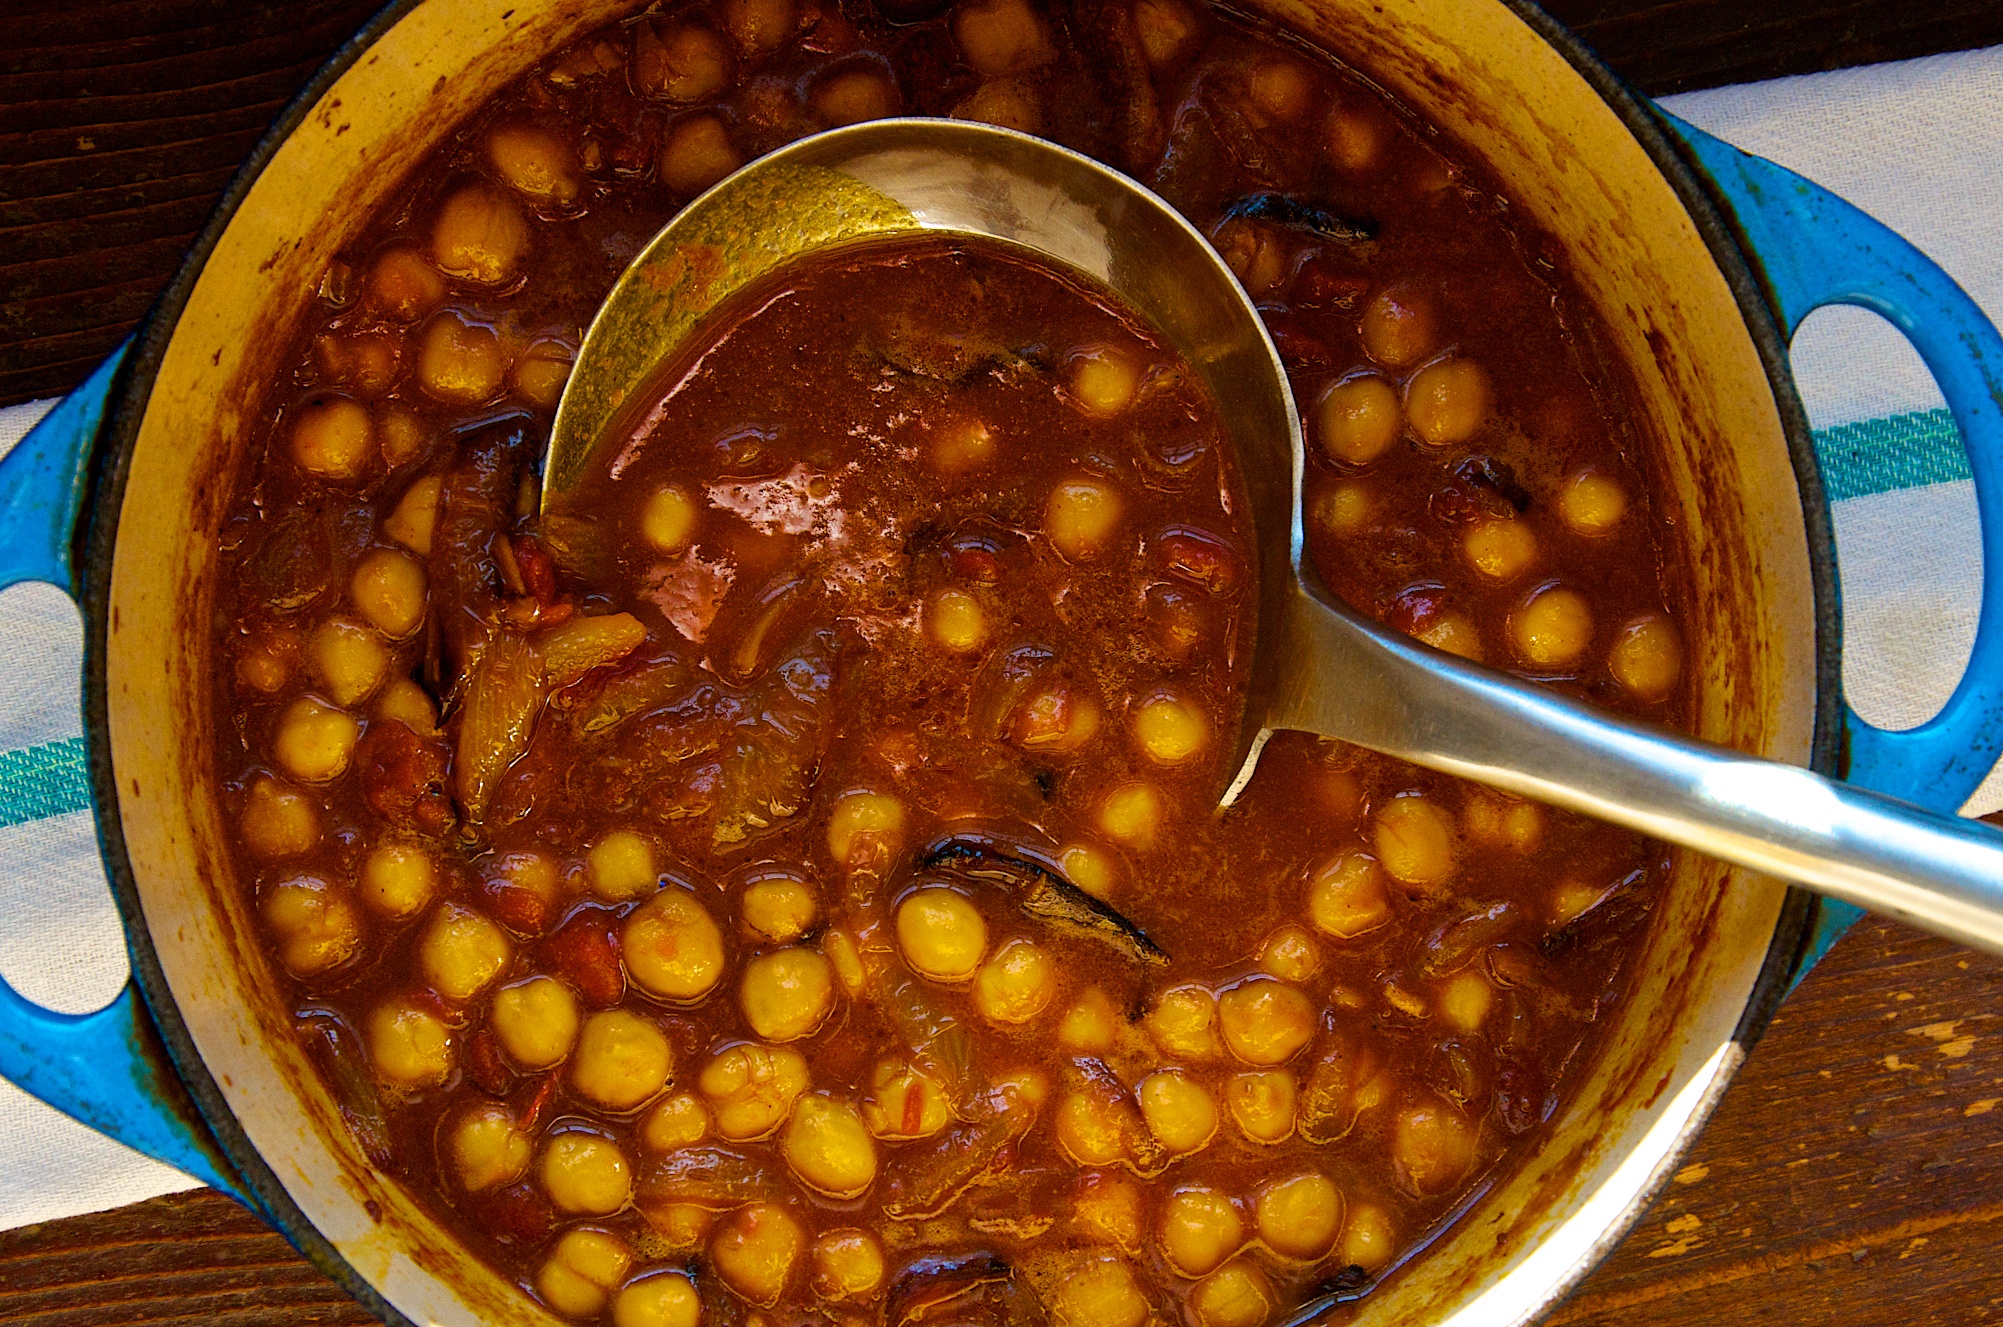
Whenever a simple, delicious dish — like this spicy chickpea curry — is placed next to me at the table, it doesn’t just make me happy; I become protective of it in a selfish, rabid dog sort of way.

This recipe is based on Indian khatte channe, which is grounded on good Indian home cooking — but to be fair, it could also have easily been born out of a 1970’s hippie cafe in which cheap eats and a flair for the exotic were popular. In fact, Moosewood Restaurant and its cookbooks always come to mind when I cook this stew. But no matter where it came from or how it found its way to my table, I can tell you that there is a lot to like about this pasta, from the first forkful of twisted noodles loaded with tangy sauce to the last spoonfuls of creamy chickpeas.

I could start with the fact it is vegan, but that will scare some of you off, just as if I said it was gluten-free. In this case it is both, but the good news is that after you try this dish, it won’t really matter.

What does matter is how easily it comes together and the fact it can easily come from your pantry. When I make this, I head to the pantry with a tray in hand and begin by collecting all my ingredients and equipment.

What stands out during the pantry search-and-seizure is tamarind concentrate. It is a bit of an oddball ingredient, but one I always have on hand. Unlike tamarind paste, which requires soaking and straining, this concentrate dissolves easily in water. It has the consistency of molasses, and it gives this stew its characteristic tang. A popular substitute for tamarind is equal parts lime juice and brown sugar, but this only works when a small amount of tamarind is called for in a recipe, so it probably wouldn’t work here. If you like Pad Thai and ever wanted to cook it at home, tamarind really is an essential ingredient to have on hand.

When it comes to curry powder, I prefer Madras — I like the fragrance of kari leaves — but feel free to use your favorite. For more heat, you can add more cayenne; just be sure you know how hot your curry powder is before you get too crazy.

As always, when it comes to caramelizing onions, I don’t know how long it will take for them to become a deep, dark brown. It could be 15 minutes or 45, and maybe more depending on your pan, the heat, and the sugar content of your onions. I do know, however, that you shouldn’t cheat yourself; color them deeply, as they are essenial to this dish.

Assuming you have done your prep, once the onions are caramelized, this becomes a dump-and-pour procedure followed by a short simmering period just for good measure.

Spicy Chickpea and Sour Tomato Curry with Pasta

Serves 6

Two 14.5-ounce cans of chickpeas, drained

1 to 2 tablespoon tamarind concentrate mixed with 1/2 cup of water (more tamarind will make the dish more sour)

3 tablespoons olive oil

2 cups yellow onion, julienned

1 tablespoon fresh garlic, minced

2 cups tomato sauce

1 tablespoon fresh ginger, peeled and minced

1 teaspoon turmeric

1/4 teaspoon cayenne

2 teaspoons Madras curry powder, or your favorite kind

1 teaspoon cumin seeds, coarsely ground

Kosher salt and freshly ground pepper

Cilantro, green onion, or both

1 pound thin long noodles: wheat or rice or gluten free, use whatever floats you boat

1. Place a 3 1/2-quart heavy-bottomed pot over medium heat. Add 3 tablespoons of oil to the pot and then the onions. Season the onions with salt. Cook the onions, patiently, until they begin to brown and become deeply colored. Stir them often enough that the onions on top brown at the same pace as those on bottom. Don’t do this too fast; you want melted, gooey onions, not seared onions. Take your time; it takes a while.

2. Once the onions are browned to your liking, add the garlic. Once you smell the garlic, add the turmeric, curry powder, cumin, and cayenne pepper. Give it a stir then add the tamarind, tomatoes, chickpeas and ginger. Reduce the heat and let the sauce simmer. Taste the sauce for salt and adjust as necessary.

3. Cook the noodles.

4. Once the noodles are done, drain them, and put them on a platter. Top the noodles with the chickpea stew and top with green onions or cilantro or both. Serve.

Standard
dog-eared, Easy, Gluten-free, Medium Time, One-pots, Side Dishes, Vegetables

5 Resolutions to Make You a Better Home Cook (+ Pot-Roasted Collard Greens )

_TJH6714 (1)To be honest I lost interest in New Year’s Eve a long time ago. If memory serves me, the last New Year’s Eve I celebrated was sometime late last century. For that matter, I am not sure what year it was that I last made it to midnight.

It doesn’t mean I don’t celebrate, I do, I am just not in a rush to do so as the bell tolls. I guess I prefer to ease into it casually, like when my eyes pop open after a good night’s rest.

But let me just add: I am skeptical of New Year’s too. Maybe because we try to inject new vigor into failed promises, or because we also act as though eating a particular meal, either cleansing or lucky, is going give the rest of the year promise. The whole holiday feels dubious to me, with one exception: collard greens.

The caramelized smear on the bottom of the pot is an indication you collards are cooked perfectly.

The caramelized smear on the bottom of the pot is an indication you collards are cooked perfectly.

As always, combine collards with beans and rice and you can feel as though you are entering the new year at a low with nowhere to go but up. But there is another way of looking at it too. In my family, collard greens are not a one-hit wonder only to be served once during the year. Nor are they a fad. They are steadfast and as honest as the day is long. Sure you could hang out with the pretty people and eat kale, but kale isn’t collards. Neither are mustard or turnip greens. For me, because they are like the brainy girl who likes to read, collards are far more interesting. So much so that you want them around all year and with collards around there is no need to go up.

But, as always, sometime between Christmas and the new year I will put on the horsehair shirt, become all monkish and reflective, and try to set a direction for the new year ahead. I can assure you, in the kitchen, collards will act as a reliable compass.


Five Kitchen Resolutions for the New Year to Make You a Better Home Cook

1. Try to follow fewer fads and learn more technique. Take collards, for example. I had always simmered them in the typical manner with pork, pepper flakes, and liquid. While I still love cooking them this way, it wasn’t until I learned to pot-roast them vis-à-vis Thomas Keller that I picked up a new technique. And, I might add, one I am grateful to have in my tool kit.

2. It has been a battle this year with getting the kids to eat what is put in front of them, but, rather than forcing them to try new things, I am going to make more kid-friendly meals (that doesn’t mean junk) with the expectation they eat other meals without complaint. I also have this notion that if I feed them exotic foods all the time they will have to deal with the law of diminishing returns in that they will become bored with food. I also suppose I want them to have things left to explore and look forward to as they grow older.

3. Break out of your routine and explore other cuisines more often.

4. Choose three new dishes to master and do so. You know some say it takes cooking something a thousand times before you really understand how to cook it. While this might be a little extreme, I do like to be able to cook a dish multiple times and have it turn out the same each time. This takes practice.

5. Search out and explore five new ingredients.

Pot-Roasted Collard Greens ( Recipe adapted from Thomas Keller’s Ad Hoc at Home )

Serves 4

8 cups collard greens, stems removed and leaves chopped into 1-inch squares, then rinsed twice and dried
1/2 cup bacon lardons
1 tablespoon unsalted butter
Kosher salt and freshly ground black pepper

  1. Heat the oven to 300˚ F.
  2. Place a heavy-bottomed pot or Dutch oven (with a tight-fitting lid) over medium heat. Add the bacon and let it start to render, then add the butter.
  3. Once the butter has melted, add half of the greens. Season them with a heavy pinch of salt and freshly ground pepper. Stir and turn under the greens so they are coated with fat. Add the rest of the greens and repeat the seasoning and turning.
  4. Cover the pot with the tight fitting lid and slide it into the oven. Roast for 1 hour to 1 hour and 15 minutes. Remove from the oven, remove the lid, and stir. Taste and adjust the seasoning. Put the lid back on and let the collards set until ready to serve.
Standard
Beef, Beef/Veal, Dinner, dog-eared, Easy, Gluten-free, Main Dishes, Recipes, Stocks & Basics, Uncategorized

While it might not be haute cuisine, chopped meat is surely economical, flavorful, and versatile. From meatballs to croquettes to tacos, it can do it all and can do it with ease. It is an uncomplicated ingredient, often interchangeable, and more often than not is a beacon signaling out comfort food to anyone within range.

Take for example chopped steak: it is nothing new. Salisbury steak for instance has been around since 1897. Named after a doctor, Dr. Salisbury, who created it. Salisbury was also a believer in a low-carb diet, fancy that. Continue reading

Recipe Reclamation: Bringing Back Chopped Steak

Aside
Desserts, Desserts/Sweets, Easy, Fruit, Gluten-free, Grill, Grilling, Short Time, Vegetarian

Grilled Bananas with Buttered Maple Sauce and English Toffee

Grilled Bananas

I quit eating bananas years ago because I would buy them and not eat them. They would sit in the fruit bowl idling away, eventually passing through the different stages of ripeness. I would watch, like a gambler calling another’s bluff, knowing that I had until they turned black to do something with them. It was then that I would convince myself I needed to make banana bread. I even froze them for future use and had a stack of them in the freezer, until one day they fell out onto my wife’s toe and broke it.
Continue reading

Standard
Appetizers/Starters, dog-eared, Easy, Gluten-free, Grill, Grilling, Meatless Monday, Snacks/Appetizers, Vegetables

Taco Night on the Grill


I can’t get enough of taco night. Neither can my wife Amy or my daughters. We love it, and especially me, because I can do everything — with the exception of chopping with a knife or the food processor — on the grill. It makes for easy clean-up, and who isn’t for easy clean-up?

I cut my teeth on Tex-Mex in Austin, Texas circa 1984 (does Instagram have a filter for that?). At this point in my life I hadn’t eaten that much Mexican food. For the most part it didn’t exist in Indiana outside of Chi Chi’s and my inner punk rocker wouldn’t allow me to set foot inside any place that colorful or where the waitstaff could happily sing Happy Birthday table side.

Nevertheless, when I would slide into a booth at one of the many hole-in-the-wall eateries (many of them were Spanish-speaking only), I would order as many kinds of salsa as I could point to on the menu. I didn’t know this many kinds of salsa existed, or for that matter soft shell tacos, or the food love of my life, tamales.

As I ate my way around both sides of Highway 35, little did I realize I was becoming an addict, to Texas country music, chili, and to Austin itself. It was hard to come home, and once I was back in Indiana it didn’t take long before I began jonesing for Texas Hill Country, salsa included.

All About Grilled Salsa

The grill is a great way to make an old salsa recipe feel new.
I couldn’t even guess how many varieties of salsa there are in the world, but I do know I haven’t found one yet that can’t be made on the grill. I like a fresh raw salsa as much as the next person, but sometimes I like to shift the flavor and it is an easy thing to do on the grill.

Chile oils on your hands are not your friend.
Be careful with hot chile peppers. I used to go at them in the manly man way and just tough it out, but the night I rubbed my eyes after working with Thai birds I thought a different approach might be appropriate. If you choose to go with bare naked hands in handling them, just realize you will quickly find out just how many places on your body you actually touch and how many places are very sensitive to capsaicin oils.

Get in touch with your inner caveman or woman.
I used to put my peppers and tomatoes on the grill grate and then one day I just decided to plop them right on the coals. It sears them very quickly while leaving the interior raw — the best of both worlds. You can roast whole heads of garlic too, but they need to be left to the side of the coals so they cook and soften slowly or you will burn the cloves which makes them bitter.

Liquidy or dry, it all depends on your tomato variety.
A lot of fresh tomatoes have a high liquid content. If you use too many tomatoes, your salsa will be watery, which isn’t always a bad thing. If you want a thicker salsa, it is a good idea to use plum or San Marzano tomatoes.

The finishing touches matter.
To the finished salsa I always like to add a drizzle of olive oil for mouthfeel and a splash of acid, be it lime, red wine vinegar, or whatever. Make sure you season your salsa with salt and black pepper.

Corn tortillas or flour both can be warmed on the grill, and should be.
I prefer corn tortillas over flour and my preference for cooking corn tortillas is right on the grill. They puff up and blacken in spots and become yummo-licous. Just make sure after searing them to wrap them in foil so they stay soft and don’t dry out.

Choose your toppings accordingly.
Almost every person I have ever met who hails from Central America prefers green cabbage, sliced razor thin, to lettuce for their tacos. It gets even better when you dress the cabbage with a touch of red wine vinegar and olive oil. You probably won’t find a lot of sour cream or cheese on the table either. I tend to go for authentic Mexican but I like Tex-Mex too. If you want to go for healthy, grill up a bunch of vegetables to use for toppings and forgo the dairy altogether.

Grilled Salsa

Makes 1 to 1 1/2 cups

Depending on the kind and size of tomatoes you use, this salsa can be liquidy or firm. You will have to judge. Roma tomatoes have little liquid and work well for a chunkier salsa.

  • 1small head of garlic
  • 3 or 4roma tomatoes
  • 1 or 2heirloom variety tomatoes (Box Car Willies or Wisconsin 55 are good)
  • 1poblano pepper or 3 jalapeños or your choice
  • 3 to 4half-inch-thick slices of red onion, left intact
  • Kosher salt and freshly ground pepper
  • Handful of cilantro
  • Splash of red wine vinegar
  • Drizzle of olive oil
  1. Fire up your charcoal grill. Let the coals get blazing hot.
  2. Wash the vegetables.
  3. Place the garlic off to the side of the coals where it will brown the paper skins but not burn the cloves. The garlic will take the longest to cook of everything. Let it get good and brown on all sides.
  4. Now place the tomatoes and peppers right on the coals. Let them blister and blacken. Remove them to a tray. Let the juices collect in the tray.
  5. Place the grill grate on the grill and grill the onions until they are caramelized and soft.
  6. If you plan to grill more stuff, like a nice skirt steak, you will probably need to add a few more coals to the fire. You be the judge.
  7. Peel the pepper, being carful not to spill or lose any pepper juices. I remove the seeds and, obviously, the stems. Put peeled peppers, tomatoes, onion, and peeled roasted garlic cloves into the bowl of a food processor. Add the tomato and pepper juices that collected in the bottom of the tray.
  8. Add a two-finger pinch of salt, some pepper, half the cilantro, the red wine vinegar, and olive oil. Pulse the processor until the salsa reaches your desired consistency. I like this particular salsa smoother than most but still chunky. Taste the salsa and adjust the seasoning as necessary.
  9. Pour into a serving bowl, garnish with cilantro, and serve
Standard
Chicken and Poultry, Chicken/Poultry, Easy, Medium Time

A Delicious Roast Chicken for Any Night

I have a simple rule, whenever I figure out what good restaurant cooks like to make at home I follow suit.  It’s because most professional cooks like simple but deeply satisfying meals, roast chicken is one of those, it is a cook’s meal.  When I say simple I don’t mean in flavor and not necessarily in ease of cooking but more that it falls into the category of not being fussy.

And really, that is it isn’t it, that roast chicken is delicious, very satisfying and not at all fussy. Most importantly though it is easy on the cook and that is always something to grasp hold of and learn how to do.    So this is how I do it, I try not to complicate roast chicken, I use only a few dried spices  and I try to follow some simple guidelines I have come to trust over the years.

Roast Chicken Know-How:

  • Season the chicken with salt the day before you want to cook it.  Then set it into a tray with sides.  Place it uncovered into the refrigerator to dry out the skin and soak up the salt.  This drying of the skin makes for a deeply colored crispy skin.  The salt helps keep the chicken moist.
  • Trussing the chicken helps the chicken to cook evenly.  Besides we eat as much with our eyes so why not make it pretty.
  • You can cook the chicken on top of vegetables if you like letting the juices drip down onto them making for a wonderful side dish.  I do this as often as not but I never throw out the pan juices.  The pan juices make a wonderful addition to all sorts of things from pasta to…well, anything.
  • Adjust the top rack of your oven so the top of the bird is 5 to 7 inches from the top of the oven.  If it is to close to the top it will brown the skin well before the meat is cooked.
  • Avoid buying birds that are more the 4 or 5% juices added.  The birds that are 12% are brined and they are very, very salty.
  • Save any and all pan juices.  Use them in a vinaigrette to dress a salad, in pasta or in chicken salad but don’t waste them.

Cost to roast a chicken:  it depends on what kind of chicken and where you buy it but anywhere between 6 and 10 dollars for a 4 pound bird.  It should feed four with the added bonus of making soup from the carcass.

Click here for a pasta recipe using roast chicken leftovers: Chicken, Black Olives and Lemon with Spaghetti

This slideshow requires JavaScript.

To Roast a Chicken:

kosher

1 teaspoon fennel seeds

3/4 teaspoon dried thyme

1 teaspoon paprika

1/4 teaspoon black pepper

1 chicken, about 4 pounds

1. Salt the chicken the day before you want to cook it or at least 4 hours before you want to cook it.  To do this sprinkle salt onto all sides of the bird including inside the cavity.  Place the bird onto a tray with side and put it back into the fridge.

2. Crush the fennel seeds either using the bottom of a heavy pan to grind it or with a mortar and pestle.  Combine the fennel with the rest of the spices and, again, sprinkle the spice rub all over the bird including the cavity.

I like to slice the chicken before serving. I like to slice the breast off the bone so I have a carcass for soup at the end of the night.

I like to slice the chicken before serving. I like to slice the breast off the bone so I have a carcass for soup at the end of the night.

3. Let the bird sit at room temperature for a half an hour or up to an hour.

4. Heat the oven to 400˚ F.  Place the chicken, still on a tray with sides, into the oven and let it roast for 30 minutes.  Bast the chicken with the pan juices.  Bake another 35 minutes.  Check to see  if it is done.  I can usually tell by the legs.  If the meat has pulled away from the knee bones then there is a good chance the rest of the bird is done.  Wiggle a thigh.  If it seems loose then you are probably good to go.  Tilt the bird backwards and see if the juices running out from the cavity are red.  If  all three of these test are passed letting the bird rest will finish the cooking.   Let the bird rest cover with foil for 15 minutes.

5. Carve and serve.

Standard
Easy, Grains and Legumes, Medium Time, Pantry meals, Recipes, Vegetables, Vegetarian

Chickpeas in a Spicy Tomato Gravy

Khatte Channe

A wonderful blend of deeply caramelized onions, spicy tomato broth and creamy chickpeas.  Khatte Channe, as it is know in India, is traditionally served with a flatbread but as it is cooked in this recipe it has lots of sauce so it makes sense to serve it with simple steamed rice and some sort of green vegetable.

I don’t like to use a lot of canned goods but beans are one that I rely on.  They are no fuss, no standing over the stove stirring or adding liquid because they are already cooked.  In fact I think this dish benefits from canned because the peas stand out by not absorbing all the gravy flavors that long cooking would have infused in them .

There is some extra expense in buying spices for the dish but if you have an ethnic grocery nearby, either Asian or Indian, you should be able to find the ingredients.  Buy the smallest amount they sell and if you like the spices and find yourself using them to make other dishes then buy bigger quantities.

The thing I really like about this dish and these kind of bean dishes is even though it is of Indian descent it still feels familiar, I think of it as soul food.  It is warm with a hint of spice and very much like bean dishes from Central America and Mexico.  The dish is comfortable.

Cost to make this meal:

  • three 14oz. cans organic garbanzo beans $1.49 each or $4.47
  • 2 large onions .74 cents
  • one 14 ounce can crushed tomatoes .99 cents
  • at my local Indian grocery an 8 ounce bag costs $3.oo dollars or 2 teaspoons .12 cents
  • 1 head of garlic .99 cents 4 cloves about . 50 cents
  • fresh ginger 3.99 per pound 2 ounces at .48 cents
  • 48 oz vegetable oil  $2.99 or 3 tablespoons at .10 cents
  • cumin seeds vary in price greatly depending on where you purchase them  1 teaspoon at .25 cents
  • my recipe calls for tamarind but substitute a 2 tablespoon of vinegar to give the dish its sourness

Total cost range is from  $7.65 to  $9.00 and if you are only serving 4 you should have a couple of lunches.

This recipe is adapted from Julie Sahni’s Classic Indian Cooking.  If you enjoy Indian food her books are a must for you shelf.

Makes 8 to 10 servings

3 (14.5 oz.) cans chickpeas/garbanzos (drained and liquid reserved)

2 tablespoons tamarind paste mixed with half a cup of water (or substitute 2 tablespoon of vinegar with no water)

3 vegetable oil

2 cups yellow onions, peeled and thinly sliced

2 tablespoons garlic, peeled and minced

1 teaspoon turmeric

1/2 teaspoon cayenne pepper

1 (14.5 ounce) can crushed tomatoes

1 tablespoon fresh ginger, peeled and minced finely

2 teaspoons curry powder

1 teaspoon ground cumin, toasted

kosher salt and fresh ground pepper

1. Place a 3 1/2 quart heavy bottomed pot over medium heat.  Add 3 tablespoons of oil to the pot and then the onions.  Season the onions with salt.  Cook the onions, patiently, until they begin to brown and become deeply colored. Stir them often enough that the onions on top brown at the same pace as those on bottom.   Don’t do this to fast you want melted gooey onions not seared.  Take your time it takes a while.

2. Once the onions are browned to your liking add the garlic.  Once you smell the garlic add the turmeric and cayenne pepper.  Give it a stir then add the tamarind,  tomatoes and ginger.  Reduce the heat and let the tomatoes simmer.

3. Add 1 cup of  the reserved bean liquid along with the cumin and curry powder.  Bring the liquid back to a boil reduce the heat and add the beans.

4. Cook the rice.  

5. By the time you finish the rice the beans will be warmed through and the flavors will have come together nicely.  Taste the peas and adjust the seasoning.  Serve over the rice.

Standard
Chicken and Poultry, Easy, Recipes, Short Time

Turkey Burgers with Lemon Parsley Butter

These burgers are great bun or no.  The key here, at least for me, is not to use breast only ground turkey which really dries out but a combination of ground thigh and breast. Read the labels  on the packages carefully.

Lemon parsley butter is a natural for these.  While you make more butter then you need,  through out the week you can easily use it up.  Simply use the compound butter in all sorts of things like sauteed green beans, broccoli or Brussels sprouts.  It is delicious way to finish off veggies and all you have to do is add it at the end of the cooking time, stir it around to just melt it, and voilà,  an extra punch at the table.

Cost to make the burgers:

  • Ground turkey $4.29
  • Curley leaf parsley .69 cents
  • Dried herbs and lemon $1.50
  • Butter $2.99 per pound or 1 stick @.75 cents

Total cost: $7.23

Makes 4 six ounce patties

For the patties:

1 pound 3 ounces ground turkey, a mix of breast and thigh

2 teaspoons curly leaf parsley

2 teaspoons lemon juice

1/2 teaspoon dried thyme

1/2 teaspoon garlic powder

a heavy 1/2 teaspoon salt

canola oil for sautéing

For the butter:

1 stick unsalted butter at room temperature

2 teaspoons fresh lemon juice

2 teaspoons lemon zest

1 tablespoon curly leaf parsley, minced

two finger pinch of salt

1. Combine all the patty ingredients in a mixing bowl.  Using your hands need it all together until it is well mixed.  Let the mixture sit, refrigerated for at least an hour.

2. While the turkey is melding, combine all the butter ingredients and mix well.  Set aside.

3. Form 4 patties of equal size.

4. Heat a heavy bottomed pan over medium high heat.  Add a glug of oil to coat the bottom of the pan.  Add the patties and brown them on each side.  Adjust the heat as necessary so you can brown them but also cook them through without burning them.  Serve topped with a dollop of lemon parsley butter.

Standard
Condiments, Easy, Medium Time, Recipes

Pickled Green Onion Ranch

Pickled Green Onion Ranch

Grilled Pork Steaks with Ranch Dressing is yet another great use for the dressing.

Grilled Pork Steaks with Ranch Dressing is yet another great use for the dressing.

The only way buttermilk will go to waste is if you if you have a lack of ideas for using it and because of this don’t.   It can hang out longer then regular milk because of the live culture but it will eventually go bad.

This dressing alone can be used as a base, minus the green onions,  and  you can make parmesan black peppercorn or fresh herb ranch.  Then there are all the other products too, real Southern cornbread, buttermilk pancakes, bread and of course biscuits.

Buttermilk is full of probiotics.  Rumor has it the beneficial bacteria will help you to maintain a healthy stomach which helps in fighting off other sicknesses.   This, though, is if you drink it or use it uncooked.  The label should read live active culture in order for you to get the benefits.

There is a term in cooking, and at culinary school, that asks for you to cook a liquid or combine ingredients to a thickness that will coat the back of a spoon.  You go about this by dipping the spoon into the liquid and then, while holding it sideways, run your finger across the convex side.  The liquid should hang there for a second or two before closing the gap your finger created.

Cost:

  • 1 head of garlic .42 cents
  • 2 bunches of green onions $1.49
  • 1 quart Organic Valley buttermilk $3.25 or .40 cents per 1/2 cup
  • 30 oz. Hellman’s Real Mayonnaise $5.49 or $1.46 per cup
  • 12 oz. rice vinegar (do not buy seasoned rice vinegar) $1.48 or .25 cents per 1/4 cup

Total cost to make the dressing:  $4.02 for 12 ounces

Makes 1 1/2 cups plus

10 to 12 green onions, trimmed of roots

1 garlic clove, minced

1/2 cup water

1/4 cup rice vinegar

3 tablespoons sugar

1 heaping teaspoon kosher salt

2 teaspoons fresh lemon juice

1/2 cup buttermilk

1 cup mayonnaise

1 1/2 tablespoon pickling liquid

fresh ground black pepper

salt

1. About three inches from the root end cut the green onions.  Reserve the green tops for another use (buttermilk green onion smashed potatoes comes to mind).  Place the green onions and garlic into a small heat proof container.DSCF5970

2. Heat the water, vinegar, salt and sugar in a small sauce pan set over high heat.  Bring it to a boil and let the salt and sugar dissolve.

3. Pour the hot liquid over the green onions and garlic.  Let the onions pickle for at least two hours.

4. Once the green onions are olive drab and soft remove them and the garlic from the liquid.  Mince them fine.

5. Combine the mayo, buttermilk, reserved 1 1/2 tablespoons of pickling liquid and lemon juice in a mixing bowl.  Add the green onions and garlic along with fresh ground black pepper to taste.

Standard