
Tag Archives: tom hirschfeld


The Wonder Of Store-Bought Crackers
I have a deep affinity for crackers. Not gourmet varieties, or even homemade, but good old plain Jane everyday crackers, be it Captain’s wafers, or saltines, and especially any kind that comes two-to-a-pack.
I don’t think anyone needs a reason to like crackers but my fondness, I am certain, begins with my childhood memory of inexpensive family restaurants and sit down pizza joints that bring cracker baskets to the table instead of bread. I love the cracker basket and who in their right mind doesn’t? They hold something for everyone after all. Remember those crunchy breadsticky thingys, the sesame rounds, or the oblong townhouse crackers shaped like flattened capsules all wrapped up, by twos, in cellophane.
Wandering along my merry way as we do in life, I eat crackers. I eat crackers without much thought. I eat Club crackers wrapped in thinly sliced bacon and then baked, I learn it is okay to drink a martini with saltines topped with pickled bologna and American cheese because they are a match made in heaven, I will never forget having Georgia cracker salad and realizing it is nothing more than a tomato, mayo, whitebread sandwich on steroids, and my favorite, I use all kinds of crushed crackers as croutons for my salad. To this day every time I walk past a stick of butter I can’t help but want to drag a saltine down the length of the stick before popping it into my mouth, the perforations at the edges of the cracker leaving the soft butter to look like a perfectly raked zen garden. Continue reading
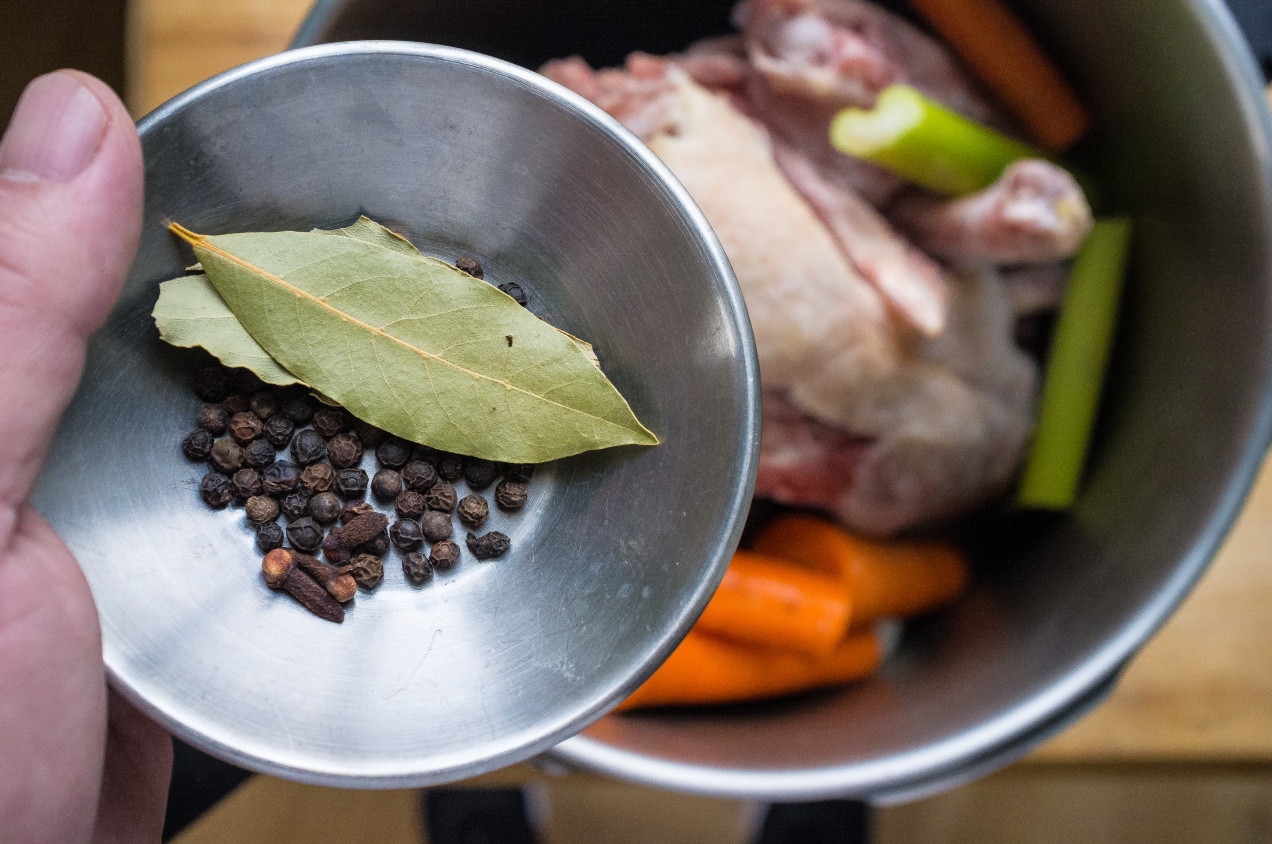
Day One: My Turkey Stock Recipe
It’s my favorite holiday, Thanksgiving is.
Amy is lying down and not feeling good when I walk into the bedroom to ask if she wants to have Thanksgiving dinner at our house this year. She hesitates, not saying what we both already know, about how we are planning to put the house up for sale, but by the look in her eyes I know she wants too so I jump in and tell her I think we should and she agrees. Continue reading
Morels with Asparagus & Five Reason to Eschew Recipes

There was a time when my father and I would have walked the distance up the hill to Gordon’s Rocky Top. We would have crossed the creek, stepping gingerly across the slick rocks like seasoned hopscotch players, hiked to the fork in the path, taken the trail on the left, and then quietly ascended the long, wooded hill. On our way, we would have walked past the pond, and if we were lucky, we might have spooked an owl or happened upon some white tail deer. Continue reading
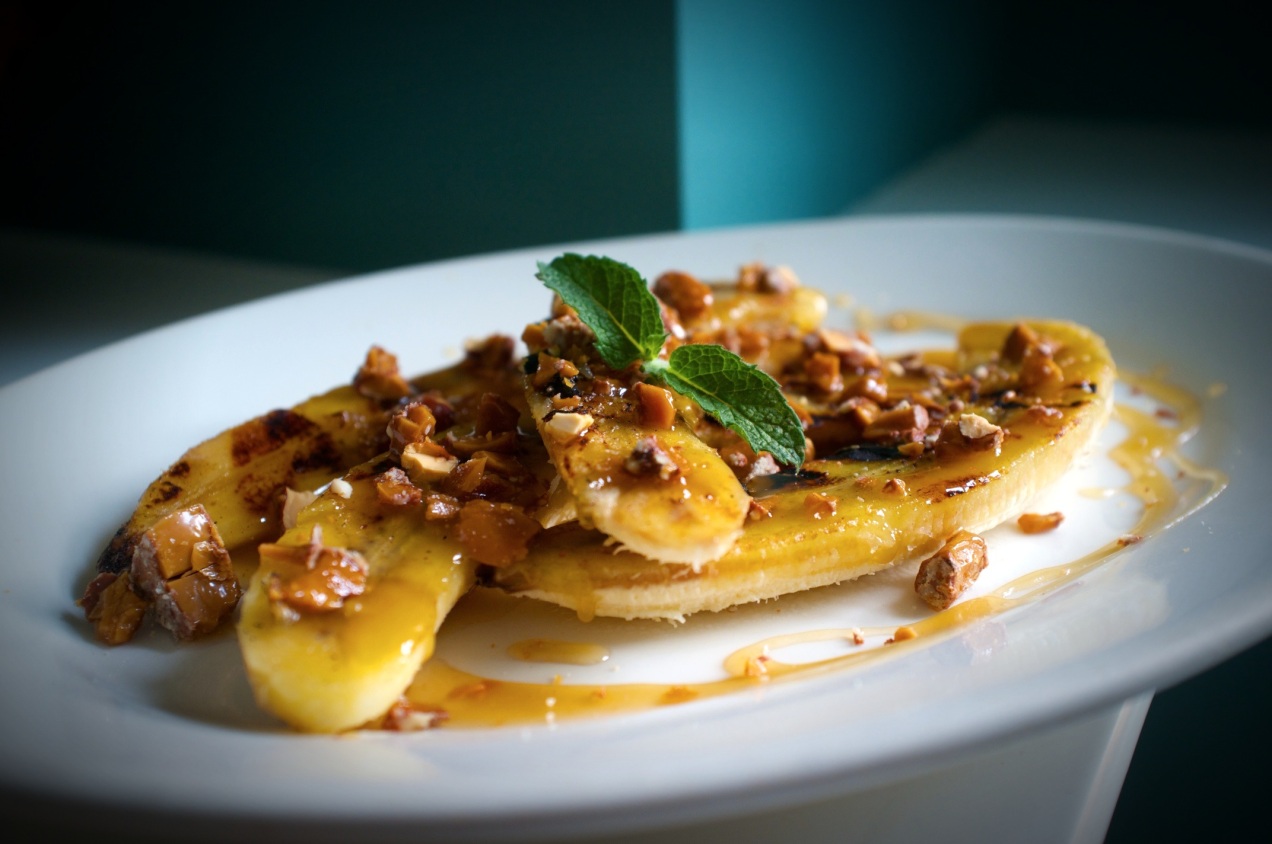
Grilled Bananas with Buttered Maple Sauce and English Toffee

I quit eating bananas years ago because I would buy them and not eat them. They would sit in the fruit bowl idling away, eventually passing through the different stages of ripeness. I would watch, like a gambler calling another’s bluff, knowing that I had until they turned black to do something with them. It was then that I would convince myself I needed to make banana bread. I even froze them for future use and had a stack of them in the freezer, until one day they fell out onto my wife’s toe and broke it.
Continue reading
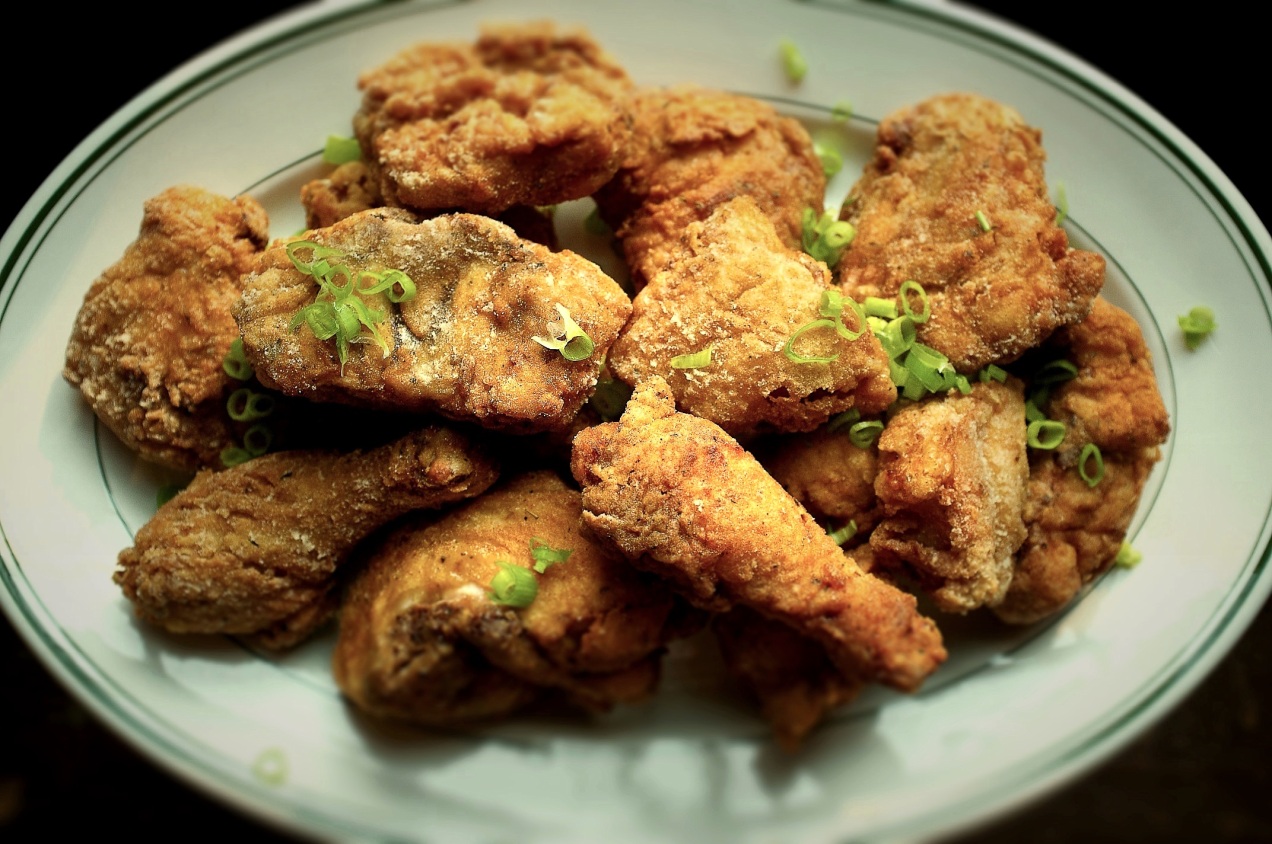
The Art of Honest Fried Chicken (A Lifestyle Choice)
Frying chicken, at its best, is a state of mind formed much in the same way as the quiet back beats of a porch-sitting session with a dear friend. It has a rhythm. It is good company on a sunny summer afternoon. It is pointless to rush. Futile, even. Besides, the comfort of a good friend comes from the effortlessness of meaningful conversation and is further heightened by the knowledge you have nothing you would rather do. Continue reading

Kebabs Come of Age

Inside the house a Frank Sinatra record blares loudly from the phonograph, a big stereophonic console meant to look like a fancy sideboard. The family room windows of the atomic ranch-style house are open wide. The music makes its way through the open windows to the patio, soft enough to be background music for the adults socializing on the small concrete patio.
There are tall, slender glass pitchers of Tom Collins set on a picnic table bar next to a faux gold ice bucket, highball glasses, and an assortment of potluck appetizers. The parents sip cocktails and have lively chats. Their laughter can be heard four houses down at the babysitter’s, where all the children are being housed for the evening. Tiki torches release black citronella smoke meant to keep mosquitoes at bay, and in the belly of the kettle-shaped grill the coals glow the color of the suburban sunset. Continue reading
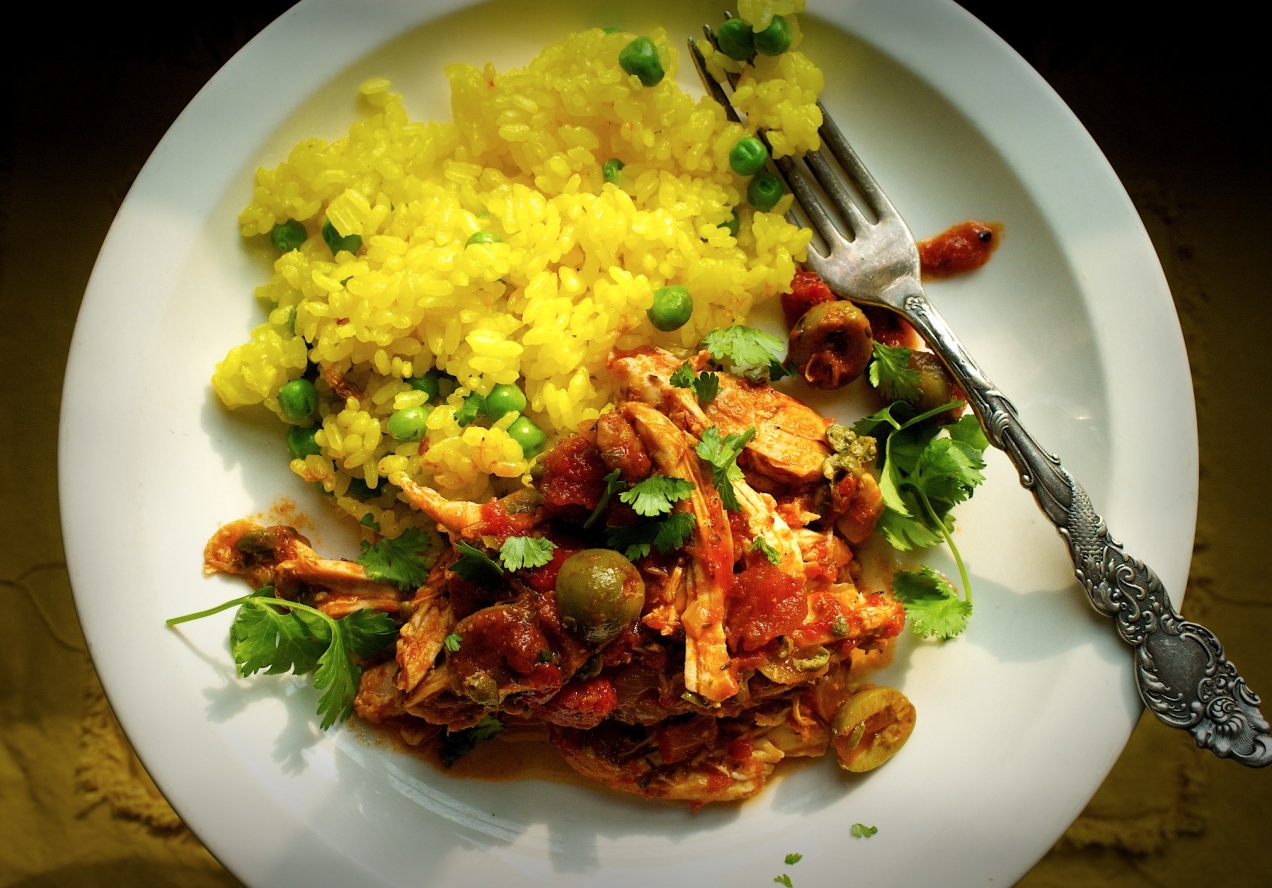
Island Style Chicken Fricassee
 In the summertime, I want food that is casual, soulful, and unpretentious — food that can double as a family meal and an intimate dinner for entertaining. Any dish that almost needs to be eaten with the hands (but not quite) or that can be scooped-up with röti, flatbread, or tortillas and goes well with ice cold beer is a grand slam. Suffice it to say, Caribbean food does all of these things well. And besides, I love island food.
Julia Child describes a fricassee as a dish somewhere between a sauté and a stew. Because this definition is so broad, it lends itself to a heated discussion over a cook’s creative latitude. Plant this culinary seed in an area with lots of islands and diverse cultural heritage and you end up with a menagerie of spectacular dishes. In the Caribbean alone I can think of several fricassees, like the Cuban classic Ropa Vieja or Jamaican Brown Stewed Chicken, which is more a fricassee then the name suggests.
A good fricassee is a rustic dish. It starts with browning the meat — usually bone-in to add flavor to the dish’s self-created broth — and then following with a heady dose of aromatics typically consisting of onions, peppers, garlic, and herbs. Depending on which island you’re on, a fricassee might either incorporate lots of peppery heat or be mild, but all will have notes of African or Indian flavors.

For my tastes, I like to add a tomato product, be it canned or fresh, and some sort of other acid, such as vinegar or wine. In the case of this particular dish, however, I replace the usual vinegar or wine with green olives and capers.
While I have stripped the meat from the bone, it isn’t necessary. Being a rustic dish, it would be perfectly acceptable to leave the cut chicken as is. You could easily add more heat or do as I did and separate a mild portion for the kids before adding some hot peppers to the adult portion. The amount of spicy heat is left up to the discretion of the cook who knows firsthand the preferences of the eaters.
Be it plain or with the addition of saffron and peas (as in my picture), rice is important to a fricassee. Generally speaking fricassees are not one-pot meals, but rather are served with rice, röti, and a vegetable. The rice shouldn’t outshine the main dish: the two should enhance each other in a sort of partnership. In some sense it is like this is like a pasta dish: the fricassee is used as a condiment to the rice in the same way that sauce flavors noodles.
I like dishes that don’t control my schedule. The final big plus to this kind of food is that cooking it in increments can even improve the final product. I rarely go to the kitchen anymore and cook something from start to finish in one session — most days, I just don’t have the time. Often, I find myself with snippets, 10 minutes here or an hour there, which I put to use. I may prep everything in between making the girls’ breakfast and getting them off to camp. After camp drop-off, I might run an errand before heading home to caramelize the meat and sear the veggies. If I have enough time, I’ll add the liquids and let the dish finish until the chicken is tender. Then, it can all go in the fridge until dinner, allowing the meal to be as casual as I like my summers to be.
Fricassee en Pollo (serves 6 to 8)
1 whole 3 pound chicken, cut into 10 pieces
1 tablespoon expeller pressed peanut oil
1/2 cup red bell pepper, small dice
1 cup onion, small dice
3 tablespoons fresh garlic, minced
1 tablespoon dried oregano
1 tablespoon dried thyme
1 tablespoon cumin, crushed
2 teaspoons paprika
2 bay leaves
16 ounces crushed tomatoes
2/3 cups green olives, halved
1/2 tablespoon capers, minced
kosher salt and fresh ground pepper
2 tablespoons hot pepper of your liking, minced
- Season the chicken with salt and pepper. Place a large heavy bottomed pot over medium high heat. Add the peanut oil and swirl it around in the pan to coat the bottom. When the oil is hot add the chicken skin side down and brown it deeply on all sides. Adjust the heat as necessary to avoid scorching the oil. Once the chicken is caramelized remove it to a plate.
- Add the onions, pepper and garlic to the pan. Sweat the vegetables until they just become tender then add the dried spices. Stir the spices into the vegetables and let them toast until they become fragrant. Add the tomato and a cup of water. Season the sauce with a pinch of salt and a few grinds of pepper reminding yourself that the olives and capers are salty so don’t season with a heavy hand. Taste and make adjustments.
- Add the chicken back to the broth and then bring the whole thing to a boil. Reduce the heat to a simmer. Cook until the chicken is just tender. If you plan to strip the meat from the bones remove it and place it on the same plate you used before. While it is cooling let the sauce reduce until it becomes unctuous.
- Cook your rice according to the instructions on the bag or box or however it works best for you.
- Add the pulled chicken (or chicken pieces) back to the reduced sauce. Add the olives, capers and any hot peppers your might want to add. Taste and add more salt if needed. Warm through and serve with rice.

Stanley Coats: An Introduction
 Stanley Coats, sprawled out in his overalls and dozing on the porch swing, knows he’s becoming the old dog with the saggy balls. The one beginning to get gray around the snout. At the sound of tires on gravel, he lifts his head a little. The dog dozing on the porch floor below him does the same, and they both crack an eye open to see who’s coming up the drive.
The searing pain behind his other eye has abated. Stanley refuses to believe it could have anything to do with a hangover and instead diagnoses himself with becoming his mother. He hopes it’s not terminal.
It’s not that he doesn’t love his mother. It’s the naps. For as long as Stanley can remember, sometime between two or three in the afternoon, his mother always took what he has come to call a twenty-minute sink-down. Continue reading
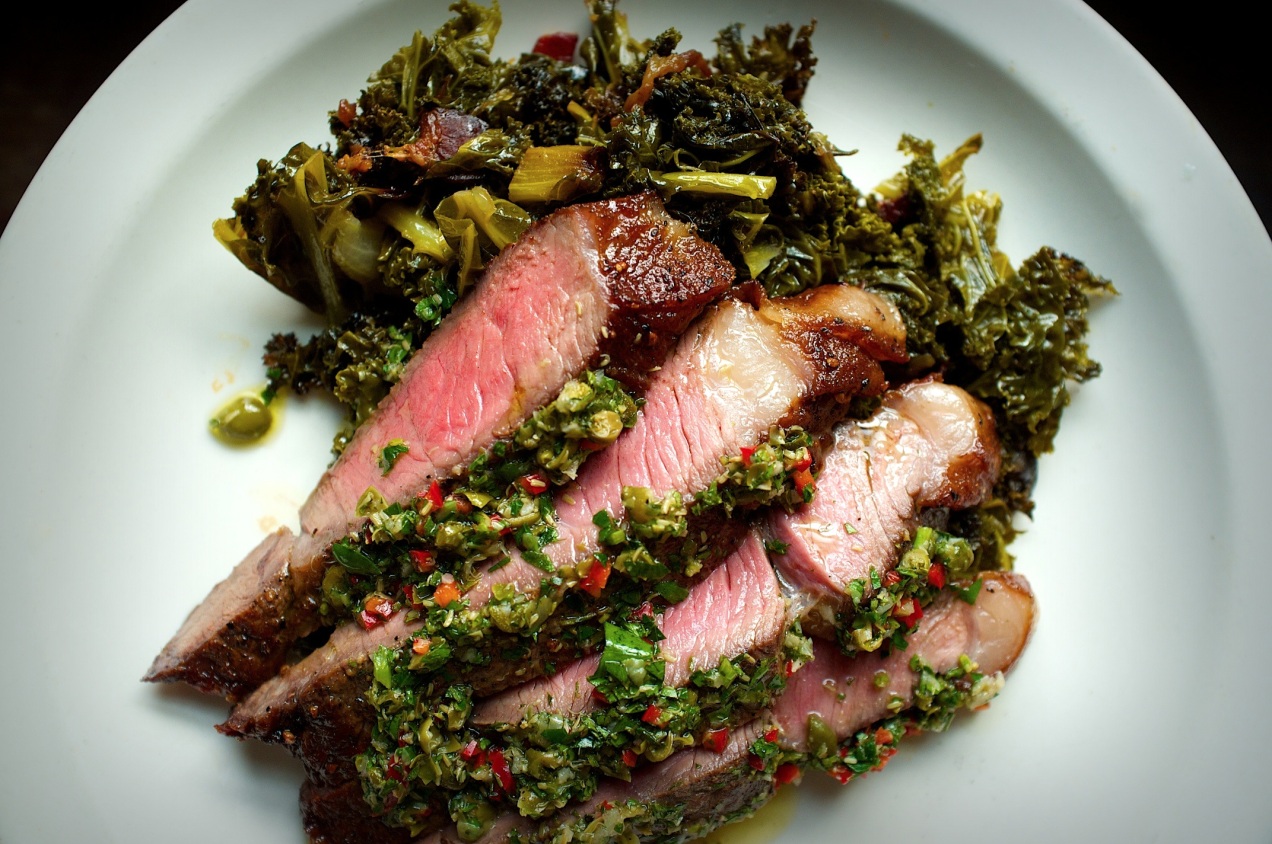
Using Herbs with Abandon
 If I didn’t already have a list of reasons I need lots of herbs in my life, Italian Salsa Verde (green sauce) alone would be enough to convince me. It’s delicious on almost anything. Take my dinner tonight: salsa verde is outstanding on steak and takes long-cooked kale up a notch. And when I got a little on my baked potato with sour cream, it was no longer a plain old baked potato. It was sublime. Continue reading
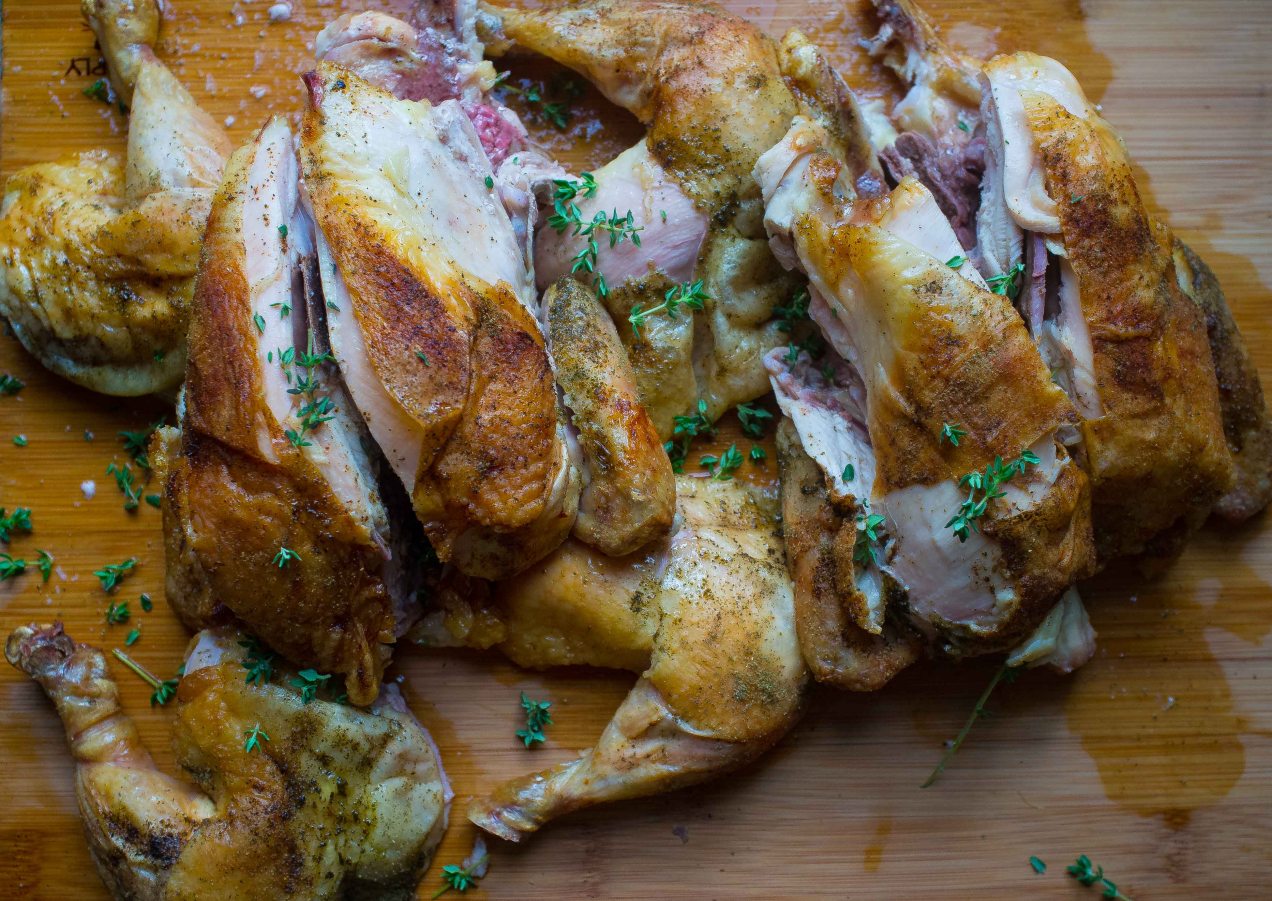
A Delicious Roast Chicken for Any Night
I have a simple rule, whenever I figure out what good restaurant cooks like to make at home I follow suit. It’s because most professional cooks like simple but deeply satisfying meals, roast chicken is one of those, it is a cook’s meal. When I say simple I don’t mean in flavor and not necessarily in ease of cooking but more that it falls into the category of not being fussy.
And really, that is it isn’t it, that roast chicken is delicious, very satisfying and not at all fussy. Most importantly though it is easy on the cook and that is always something to grasp hold of and learn how to do. So this is how I do it, I try not to complicate roast chicken, I use only a few dried spices and I try to follow some simple guidelines I have come to trust over the years.
Roast Chicken Know-How:
- Season the chicken with salt the day before you want to cook it. Then set it into a tray with sides. Place it uncovered into the refrigerator to dry out the skin and soak up the salt. This drying of the skin makes for a deeply colored crispy skin. The salt helps keep the chicken moist.
- Trussing the chicken helps the chicken to cook evenly. Besides we eat as much with our eyes so why not make it pretty.
- You can cook the chicken on top of vegetables if you like letting the juices drip down onto them making for a wonderful side dish. I do this as often as not but I never throw out the pan juices. The pan juices make a wonderful addition to all sorts of things from pasta to…well, anything.
- Adjust the top rack of your oven so the top of the bird is 5 to 7 inches from the top of the oven. If it is to close to the top it will brown the skin well before the meat is cooked.
- Avoid buying birds that are more the 4 or 5% juices added. The birds that are 12% are brined and they are very, very salty.
- Save any and all pan juices. Use them in a vinaigrette to dress a salad, in pasta or in chicken salad but don’t waste them.
Cost to roast a chicken: it depends on what kind of chicken and where you buy it but anywhere between 6 and 10 dollars for a 4 pound bird. It should feed four with the added bonus of making soup from the carcass.
To Roast a Chicken:
kosher
1 teaspoon fennel seeds
3/4 teaspoon dried thyme
1 teaspoon paprika
1/4 teaspoon black pepper
1 chicken, about 4 pounds
1. Salt the chicken the day before you want to cook it or at least 4 hours before you want to cook it. To do this sprinkle salt onto all sides of the bird including inside the cavity. Place the bird onto a tray with side and put it back into the fridge.
2. Crush the fennel seeds either using the bottom of a heavy pan to grind it or with a mortar and pestle. Combine the fennel with the rest of the spices and, again, sprinkle the spice rub all over the bird including the cavity.

I like to slice the chicken before serving. I like to slice the breast off the bone so I have a carcass for soup at the end of the night.
3. Let the bird sit at room temperature for a half an hour or up to an hour.
4. Heat the oven to 400˚ F. Place the chicken, still on a tray with sides, into the oven and let it roast for 30 minutes. Bast the chicken with the pan juices. Bake another 35 minutes. Check to see if it is done. I can usually tell by the legs. If the meat has pulled away from the knee bones then there is a good chance the rest of the bird is done. Wiggle a thigh. If it seems loose then you are probably good to go. Tilt the bird backwards and see if the juices running out from the cavity are red. If all three of these test are passed letting the bird rest will finish the cooking. Let the bird rest cover with foil for 15 minutes.
5. Carve and serve.
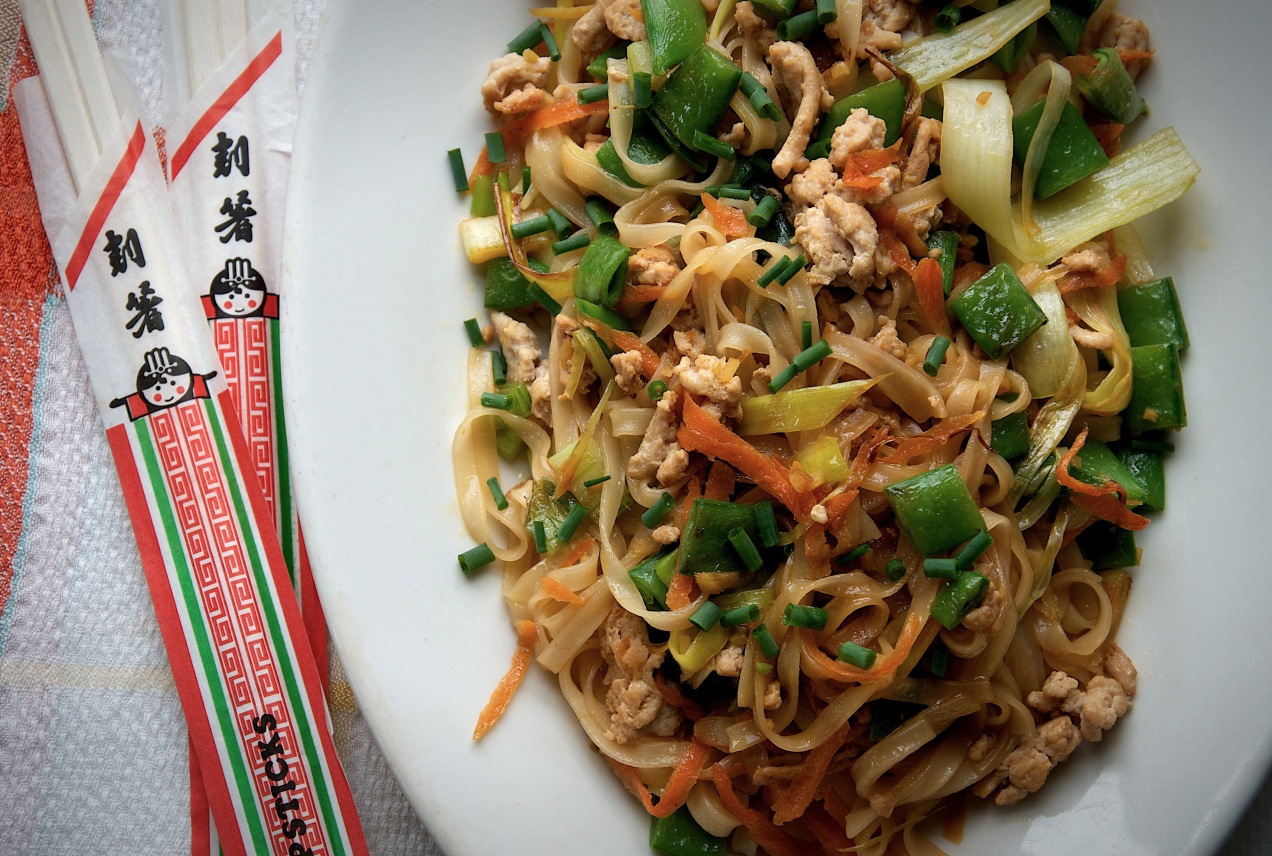
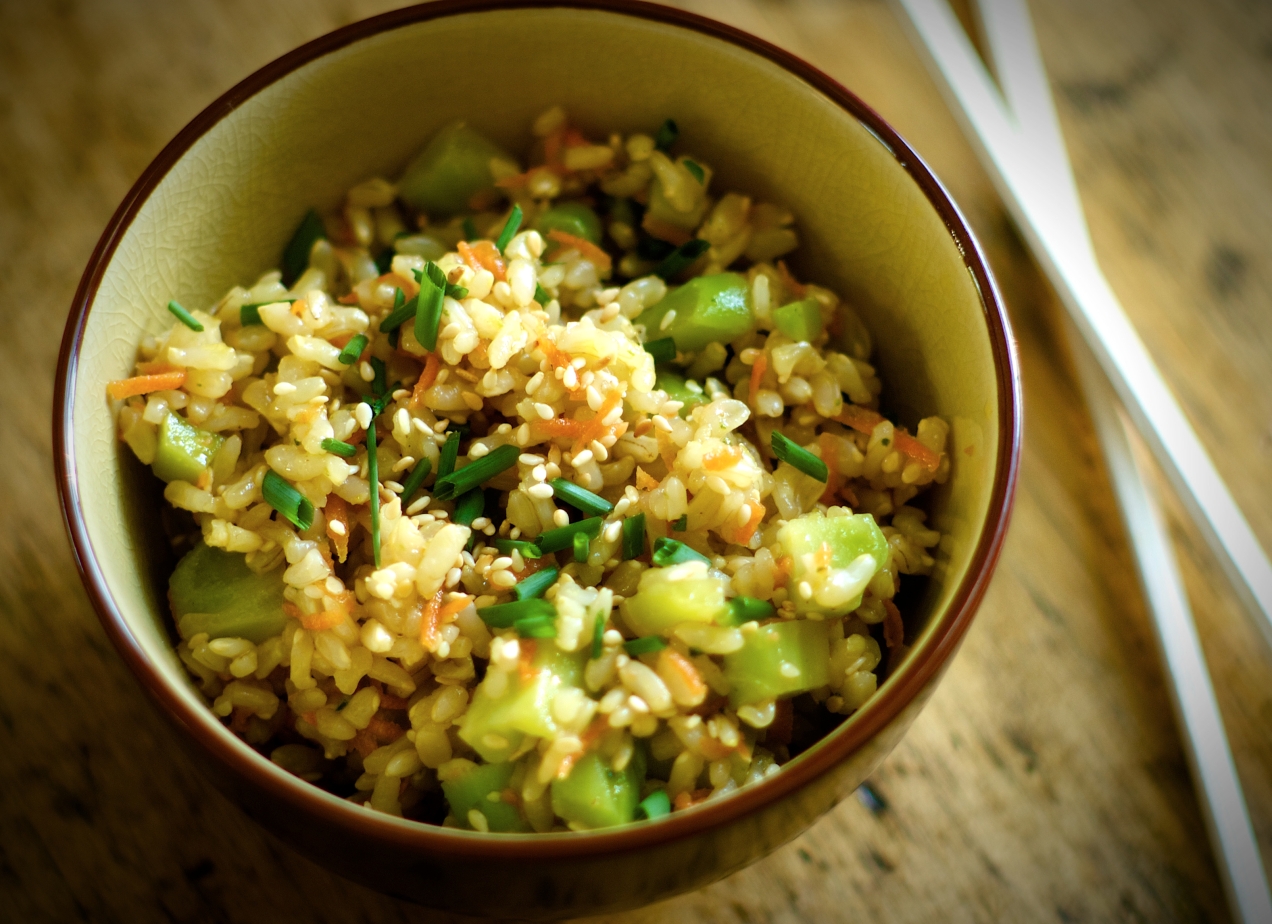
Stir Fried Noodles
There are two things I get hung up on when it comes to making Asian food at home — woks and procuring hard-to-find ingredients.
But I look at it this way: I make Italian pasta at home, so I know I can make any noodle at home.
There are a few technical issues that are really the key to stir-fry success. I need to get my pan hot enough, generally impossible to do with a wok because of the BTUs of American stoves and the thinness of the wok metal, but a non-stick skillet will do what I need it to do perfectly.
The other misstep is when I try to cram too many ingredients into the wrong-sized pan — this is my most common stir-fry failure because I get anxious or cocky. Easily solvable, with a little thing called patience.
How to Make Any Stir-Fried Noodles
Ratio: 1.5 parts protein, 1 part vegetable, 1 part noodle. For my 12 inch non-stick skillet this means 12 ounces of protein, 8 ounces of vegetables, 8 ounces cooked noodles.
1. Stir-fries cook quickly so act like a scout and be prepared. Cut all vegetables small enough that they’ll cook fast and line up all ingredients next to the stove in the order they’ll go into the pan. (Always dilute soy sauce in ratio of 1 part soy to 1 part water — when it hits the hot pan it will reduce, gaining back its strength.)
2. Choose your noodle. I find all noodles are good noodles as long as they are long. Cook them to al dente and cool them — I like to steep rice noodles instead of boiling them, which only takes about 10 minutes.
3. Cook the protein first, adding half the diluted soy after the protein has caramelized. Remove the protein to a plate, wipe out the pan and reheat it.
4. Sear the vegetables till tender. Be sure to add the vegetables that take the longest to cook to the pan first. Carrots first, ginger and garlic last.
5. Combine everything in the pan and toss just till it’s warmed through, adding the remaining diluted soy sauce last.
6. Add the garnish — here, chives and scallions — which in Asian food isn’t optional. It is an actual ingredient that needs to be added for flavor.
- Spaghetti noodles $1.05 for 16 oz.s-$o.53
- 12 ounces ground meat-$3.50
- vegetables-$4.00
- oil- $0.25
Total approx. cost for this recipe.$8.03
Ingredients ( Serves 4 when served with sides or 2 if you serve it only)
12 ounces ground beef, chicken or turkey ( I used turkey because I had it on hand)
8 ounces of veggies, I used 1 cup snow peas, small dice, 1 cup carrots, grated, 1 leek, about a cup julienned, 1 tablespoon each garlic and ginger, 1/4 cup green onions and 1 tablespoon of chives.
8 ounces of cooked and cooled noodles
1/4 cup of soy sauce diluted with a 1/4 cup of water
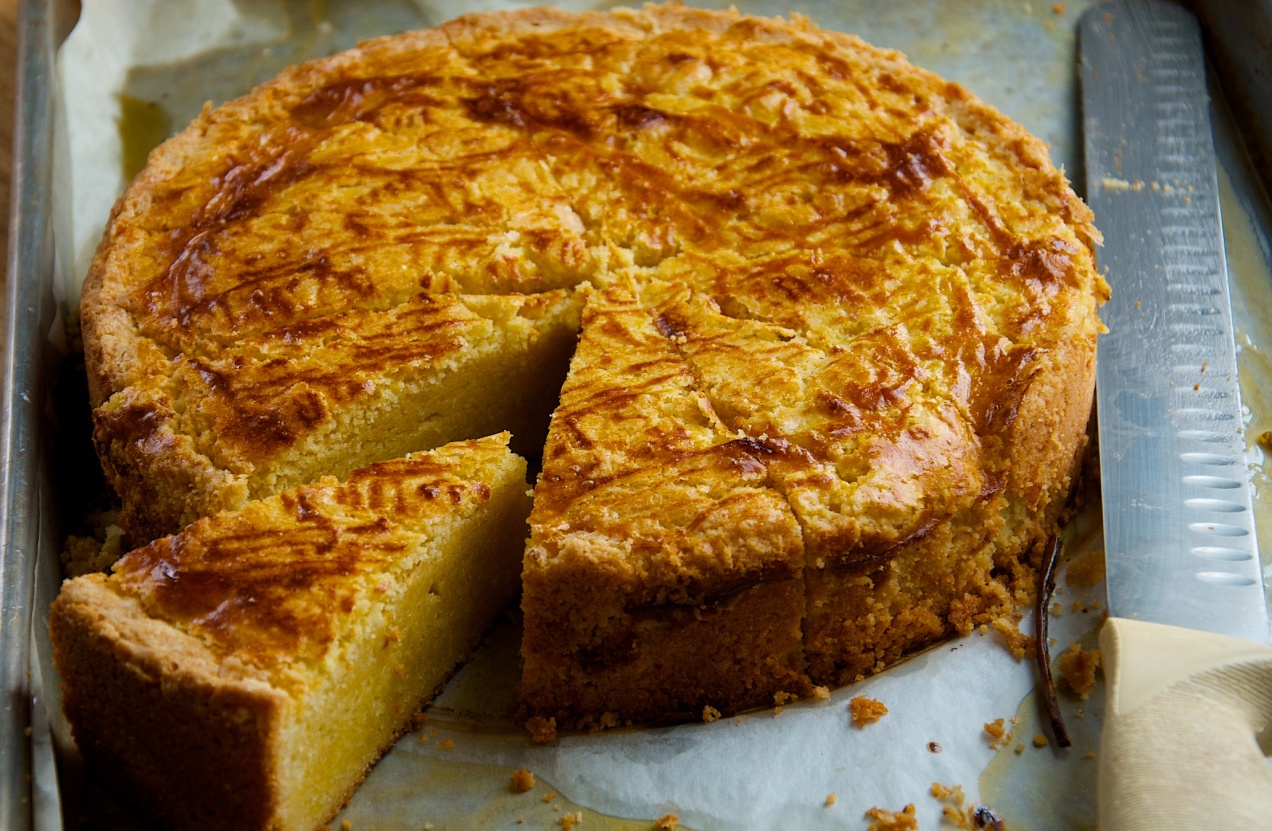
Breton Butter Cake

This morning little Lynnie keeps yelling and pointing in excitement at the cake I made for last night’s Sunday dinner. She is telling me she wants it for her birthday. The heels on the last three slices of the cake have been nibbled. Last night she kept slipping her little hand in and under the wrap so she could pinch and sneak little pieces off. The edges now look like we have a mouse in the house, and I finally had to move the cake to higher ground.
We had guest last night for dinner and while making dessert yesterday I recalled making a promise this year to make more desserts. I haven’t been. So I started thinking about this commitment while making this cake. I figured I need to sort out my likes and dislikes. Set some parameters and set myself up for success.
Most of the time I don’t want anything sweet. I am not a big sweets person. When I do a simple, small piece of dark chocolate usually suffices. I don’t want anything overly sweet.
Not only that, but as with many chefs I have a certain disdain for making desserts. It’s not that I don’t like to make them but that these grumblings occur because I usually wait till everything else is done before I think to make something. It is like opening the dishwasher to to put in dirties only to find you haven’t yet put up the clean ones. I have no explanation for this other than I think it comes with the toque. It’s why the gods made pastry chefs.
The idea of a dessert that holds the potential of a coffee or tea break snack but can double as an after-dinner treat always appeals to me. I am always out to kill two birds with one stone.
I have made this cake multiple times but I haven’t made it since I became gluten-free, so I figured now would be as good a time as any. Knowing the kind of cake it is — a very buttery shortbread — I figured it would make the conversion without suffering. It did. In all honesty I think I like it better gluten-free. The rice flour really gives it a quintessential butter cake texture in a shortbread way.
There are technical things I like about it too, or maybe I should say, the lack of technical things. It is a put-all-the-ingredients-into-a-bowl, mix, dump and bake affair. Not a lot of extras to clean up.
It holds well too. It is on day three, still on the sheet tray, covered with plastic wrap and pieces keep disappearing.
It is a cake of no regrets and, if this afternoon I do have any, they are gone by the time I have finished my last delicious bite and sip the last sip of coffee from the cup. Again, two birds with one stone.
Breton Butter Cake (Makes 12 pieces)
- 600grams King Arthur all-purpose gluten-free flour
- 30grams corn starch (1/4 cup)
- 395grams sugar (2 cups)
- 448grams salted butter, yes salted, soft (4 sticks)
- 140grams egg yolk (7 yolks)
- 22grams rum (2 tablespoons)
- 1egg yolk mixed with one tablespoon of milk
- Heat the oven to 400 degrees F.
- Sift the flour and cornstarch into the bowl of a mixer. Add the sugar and butter. Use a rubber spatula and scrape every bit of butter off the butter wrappers and put it into the bowl too. Then, using the paddle attachment, mix until combined. Add the yolks and rum. Mix till smooth.
- Using one of the butter wrappers grease the inside of a 9 inch ring mold that is 2 inches deep or spring form pan. If you use a spring form pan, dust it with flour after greasing and tilt and shift the pan so you get the sides dusted too. Shake out the excess.
- Using a spatula, scoop the batter into the mold then spread the batter out evenly. You may need to moisten the spatula with a little water to keep the dough from sticking to it.
- Using the tines of a fork make a cross hatch pattern on the surface of the cake. Using a pastry brush gently paint the top of the cake with the yolk and milk wash.
- Bake the cake for 45 minutes. Keep an eye on it and if it starts to brown to quickly reduce the heat. The top should brown and it should be firm to the touch. Remove the cake from the oven and let it cool completely before removing the ring.

When I used to go to the bookstore looking for cookbooks to add to my collection I could spend hours flipping the pages of different books. It was much like when I was younger and I would buy albums, then CDs, flipping through the alphabetized record bins searching for disk in hopes of finding something new and even more importantly, something exciting. As such I am the owner of an extensive cookbook library, or at least it feels like it to me. Not as many books as in some peoples collections but enough none the less. Back when I was really buying I would head to the bookstores and it was nothing to buy two to five new books at a time.
When I got home with my finds I would take them to my night stand and set them down. I would go about the rest of my days business but every night before bed I would thumb through the books looking for the must make recipes. Sometimes straight away I wanted to get out of bed and head into the kitchen. It was hard to contain my excitement and wait until the next day to make a new dish.
In time though I began to experience the law of diminishing returns. It began to feel as if the content of the cookbooks I was purchasing was all the same. A trend would hit and everyone would follow suite. Authors would add their little twist to the fad of the moment and publish. The fads would last about two years only to be followed by the next hot trend. Duck comes to mind, slow food, then bacon and now simple scratch cooking, vegetarian and vegan. The later, repentance for our foodie excesses I suppose.
All in all, this phenomena is what I have termed the “gold rush syndrome”. It is where food professionals scurry from one region, type or style of food to the next looking for a nugget in the terroir. One person strikes gold and everyone mines it until it runs dry. This syndrome came to reflect the foodie mentality for me and I just can’t do it anymore. It is tiring, the chase isn’t fun anymore, and once my palette became more experienced it became harder to please. Even so, there are still books being created that stand out and when I do find gold it is not hard to champion or to shout encouragement and praise. Especially when, from cover to cover, a book is full of useful wisdom.
There is no doubt April Bloomfield’s A Girl and Her Pig is one one of these great books, one of the best in this years cookbook class and upon giving it a closer look I discovered it is much more. A Girl And Her Pig resonates with libertarian resolve. It is apparent Bloomfield is someone who has taken responsibility for herself and her food and harbors no apologies. The cover is as punk as punk ever was. It is Abbey Hoffman. It is Che Guevara. It is Frieda Kahlo.
It resonates with the soul of a chef but it is a book in which a wonderful chef does what really wonderful chefs do, they please. Which is rare in theses days of pop star chefs. If Bloomfield has an ego she checked it at the door. She never leaves you with the impression she is better then you but instead you feel she is one of you. Bloomfield uses a mix of classic recipes that, with time, have become her own and then she laces the pages in-between with food she loves. Simple dishes like bubble and squeak and chicken in adobo are obviously a few of her favorite foods but they go well with the restaurant dishes too. What Bloomfield has done is spend time in the kitchen perfecting classic recipes, using her professional knowledge to create food to her liking and with her touch. It is this dedication that makes the food in this book so special.
Not surprisingly as you get to know her food you get to know Bloomfield. The pages are laced with personal tales of cooking and career and with each turn of the page her passion, which is quietly infectious, builds only to remain with you long after you closed the cover. As such Bloomfield becomes a wonderful voice to have floating around in your head while you are in the kitchen much like a favorite song that always resonates deep within your soul.
-
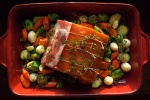
- A pork rib roast with fall vegetables ready to go into the oven.
A Girl and Her Pig
The Unctuous Possibilities of Pan Juices
 We all know gravy or pan sauce in large quantities might be good for our soul but it isn’t so good for our heart health. After all we are doing nothing more then adding flour or cornstarch to the fat in the bottom of a roasting or sauté pan to thicken it and adding back some stock, wine, or cream for volume. So we have deemed it less healthy which to me means it is an occasional treat and as such we reserve serving gravy for holiday feasts or occasional celebrations, and rightly so.
So why then when I look into the chicken-less roasting pan that held tonights dinner only a short time ago and I see those beautiful glistening juices that are on the edge of coagulating do I feel like I am throwing the baby out with the bathwater. Don’t get me wrong I am no health nut. In fact I have this beautiful physique that could make me the poster child for a Bittman campaign on obesity. I am sure it goes back to my waste not want not way of thinking. Nevertheless all this made me think. 
When I make my own stock I always cool it down, put it in the fridge and then the next day I lift the disc of fat off the top. I know the stock is pretty fat free, although I haven’t calculated it and I have know idea how to do so, but it has to be pretty lean and I also know it has very little salt because I didn’t add any. So looking at it in this light I started refrigerating the roasting pan and the next day I remove all the fat cap and what is left is the reduced intensely rich jelly. I use a rubber spatula and scrap all the jelly up and into a small Ball jar. I have already made a plan for its use, did so before I even roasted the pork, beef or chicken, so I know when I store it in the fridge it will be used up in a day or two. I could freeze it but I don’t like to collect things like this and my motto is use it or loose it.
The jelly is infinitely better then bouillon cubes or stock base and can be used in all sorts of ways. Sometimes I like the jelly to have lots of debris(meat bits and spices) and other times I don’t but it is easy to heat and strain, if you need too, just before you want to use it. While you don’t have too I often try to keep in mind the flavors of what I roasted with the flavors of what I am going to make with the pan juices just to make sure they coincide.
Pan juice possibilities:
- Of course it is always good to use the pan juices in soups. Added to the broth it can give a flat soup the kick it needs.
- Pasta or noodles of all kinds.
- For chicken pan juices: Make a simple fresh lemon juice and olive oil vinaigrette with salt and lots of fresh ground pepper, take a couple big hand fulls of baby Bibb lettuces and toss it with the dressing. Just before serving heat the pan juices and drizzle over the salad for a “healthier” wilted salad.
- For beef: You could make Grits and debris. Make a bowl of grits, pour on the warm pan juices and top with a fried egg.
- For pork: Ramen noodles.


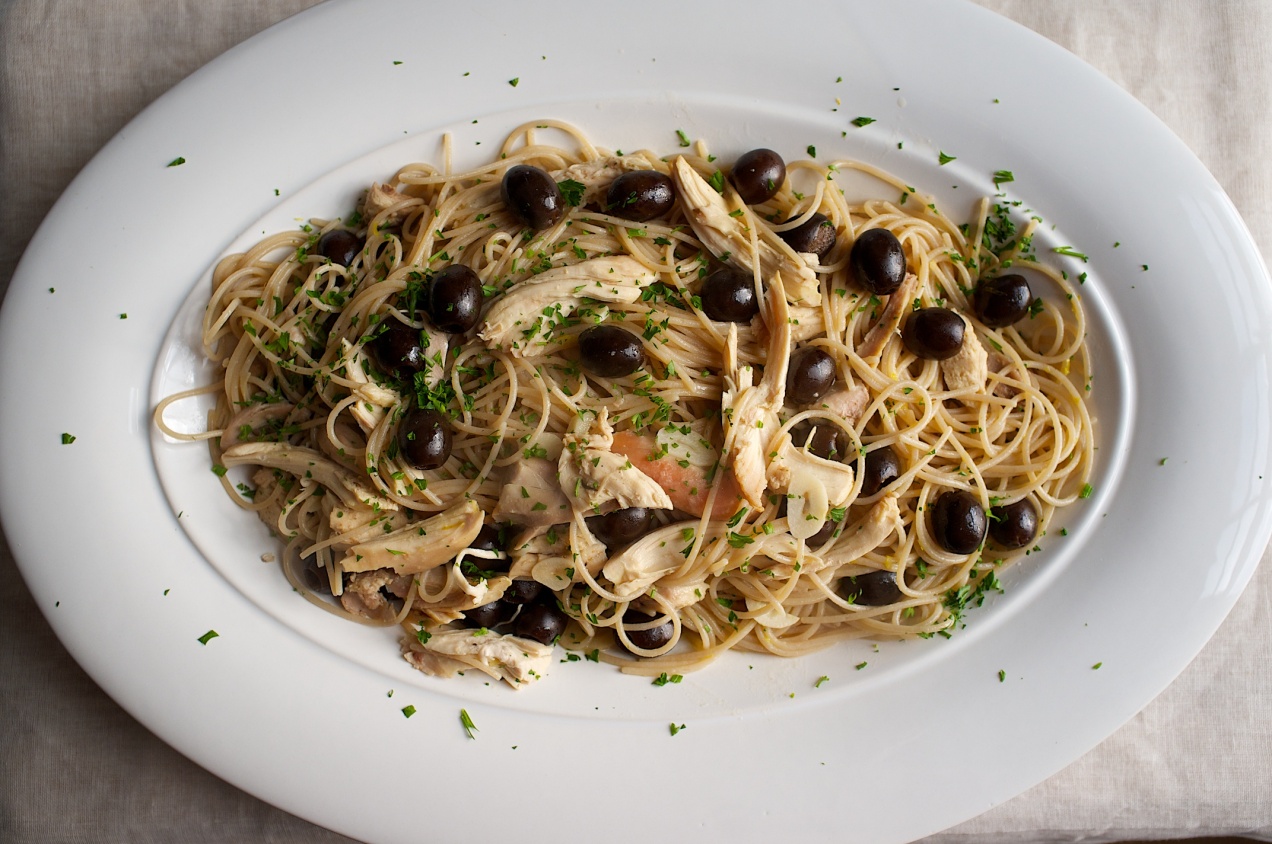
Pasta with Chicken, Black Olives and Lemon
(serves 4)
12 or 16 ounce box of spaghetti noodles
extra virgin olive oil
half a can of black olives, drained
1 1/2 cups cooked chicken meat
4 cloves of garlic, trimmed, peeled and slivered
1 1/2 teaspoons lemon zest
1/4 cup dry white wine
1 tablespoon fresh lemon juice
2/3 cup chicken stock
2 to 3 tablespoons pan juices
1 tablespoon parsley, minced
parmesan cheese
1. Place a large pot filled with 4 quarts of salted water over high heat.
2. While you are waiting for the water to come to a boil place a sauté pan over medium heat. Add a good glug or two of extra virgin olive oil. Add the garlic and let it gently cook until it just begins to turn golden, be careful because browned garlic can be very bitter. Add the white wine and let the alcohol burn off. Now add the lemon juice, stock and pan juices. Bring them to a boil and season with salt and pepper. Taste and adjust the seasoning. Reduce the heat and let the liquid reduce.
3. When the water is at a roiling boil add the spaghetti. Cook according to the directions on the box, I am guessing 10 minutes or so. Once the pasta is just tender remove a cup of pasta water and reserve it, drain the pasta and immediately add it to the pan along with the chicken, olives and lemon zest. Season the pasta with salt and fresh ground pepper. Taste and make the necessary adjustments. If it is to dry add a little bit of pasta water. This is the kind of pasta that should have a broth. Toss to combine and once the chicken is hot add the parsley toss again and serve with lots of parmesan.
Saving Grace Biscuits

Back when I thought I could eat gluten I was a biscuit hound. It was nothing for me to scarf down two or three. I have been known to forgo the rest of dinner for a good biscuit. I always considered myself a connoisseur, from angel biscuits to crescents or buttermilk to sweet potato I think I have made them all. Some of them were more fussy to make then others and all always in need of a light hand and a quick touch to keep them from being tough.
This biscuit is what I call a redneck biscuit and I call them this with fondness. They are a working mom’s weeknight biscuit. They come together quickly and without worry and they lack nothing other then fussiness. There is nothing in the instructions about overworking the dough, you don’t need to look for a cornmeal texture in the flour, there is nothing about spacing the biscuits perfectly or about flakiness or making sure you cut the edges cleanly for a good rise. No they are pretty much cream, add the liquid, stir and scoop.
They are inspired by Shirley Coriher’s Touch-of-Grace biscuits which I started making just before I found out I couldn’t eat gluten. They are the kind of biscuits that are gooey in the middle, they aren’t layered but are tender and airy. They are the kind of biscuit you might find at a really good diner. You can imagine this old dogs disappointment when I had to stop eating them. The thing is about 4 months ago I started playing around with and making gluten-free biscuits. While I found many I liked, I went nuts for none.
Then I got a burr up my craw and decided I wanted to make Shirley’s biscuits but gluten-free. It wasn’t all that tough, or I should say, maybe I got lucky. I found a recipe on Bob’s Redmill and, using it as a base and replicating what I knew about Mrs. Coriher’s biscuits, well, low and behold I struck biscuit gold.
In all honesty I like the flavor of this biscuit better then the original. The sorghum flour has such a great flavor. One of the big bonus’s if there are any left, which is a rarity around here, is they hold well into the next day or two.
Saving Grace Biscuits (inspired by Shirley Coriher’s Touch-of-Grace Biscuits)
1 cup white sorghum flour
1/2 cup potato starch
1/2 cup tapioca flour
1 teaspoon sugar
1 1/2 tablespoons baking powder
1 teaspoon kosher salt
1/2 cup unsalted butter
1 1/2 to 1 3/4 cups buttermilk
1. Heat the oven to 450˚F.
2. In a bowl combine the dry ingredients.
3. Cube the butter and add it to the flour. Using your hands work it into the flour until there are no big hunks of butter left.
4. Add the buttermilk and stir with a wooden spoon, The batter will be very loose, it should barely hold its shape before slowly begins spreading.
5. Liberally butter an eight inch cake pan. Using a half cup ice cream scoop, scoop up a ball of dough and turn it out into the pan close to the edge. Continue turning out biscuits working your way around the outside first leaving room for the seventh and final biscuit in the middle.
6. Bake the biscuits for 23 minutes or until browned on top. When you remove them from the oven they will drop. That is OK.
7. Serve with lots of butter.
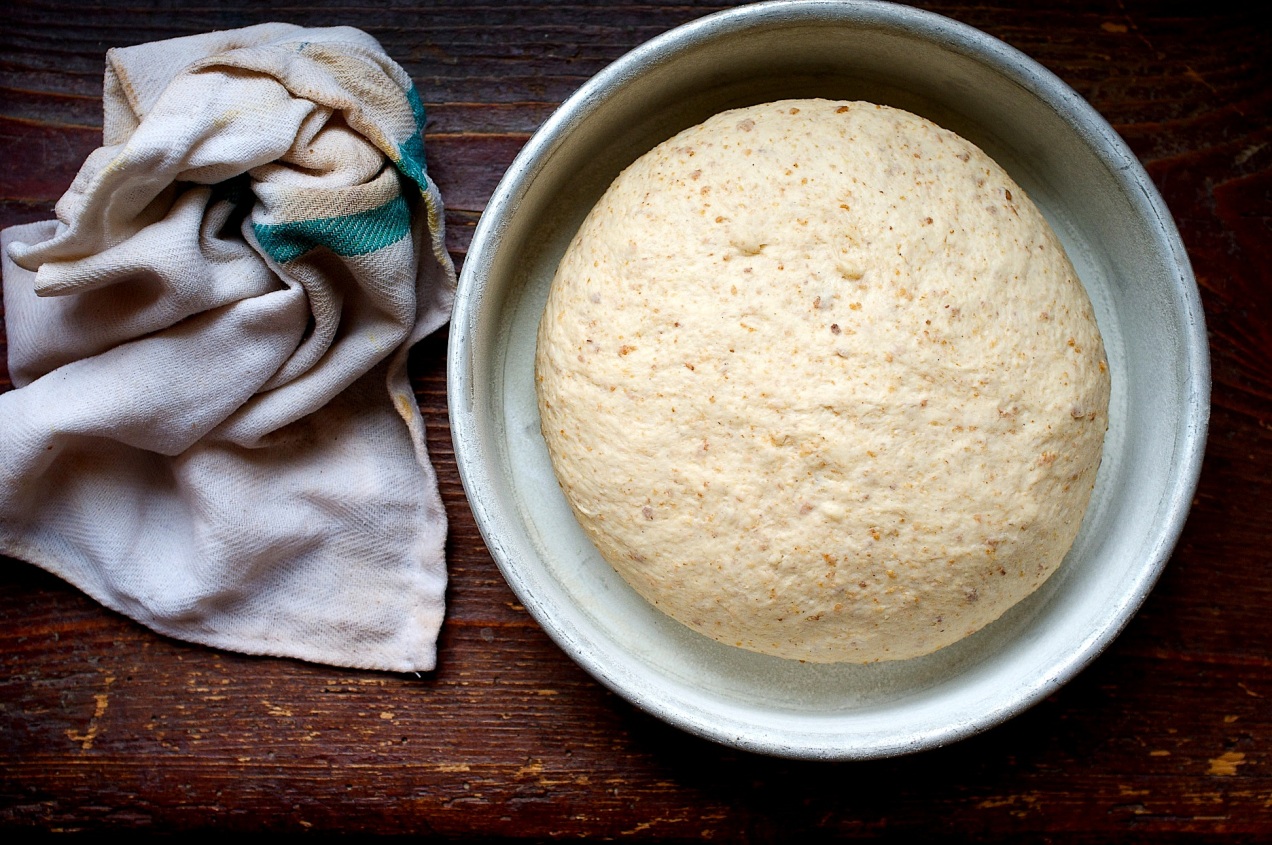
Daily Bread
I like this bread because it uses leftovers. What do I mean by leftovers? My girls don’t like heels and crusts. Sure I could force them to eat them, could throw them out or I could trim them off and save them for other uses. I could make bread crumbs or, for instance, I could make this loaf of bread.
It is pretty amazing when you think about it. Bread never wears out, you can use the same crumbs again and again in this loaf and its structure is always the same.
As long as you dry it properly, use breads without seeds, fruit or nuts, the uses of bread become endless but I really like the fact that I am not wasting anything.
It takes time to learn how to make a good loaf of bread. The good news is if it doesn’t work out perfectly the loaf is more then likely still really delicious and good to eat. So jump in and start practicing.
Recipe based on a recipe by Peter Reinhart in his book Brother Juniper’s Bread.
- King Arthur Bread Flour $3.98 for a 5 pound bag = 28 cents per cup
- 1 packet instant dry yeast = 24 cents
- total cost to make this loaf of bread = $1.00
Makes one 2 pound loaf
2 cups dried stale old bread crumbs
2 cups water
1 .25 oz. packet instant dry yeast or 1 tablespoon
1 tablespoon kosher salt
2 1/2 cups bread flour
1. In a large mixing bowl combine the bread crumbs with to cups of water. Let the bread soak up all the water. This will take about an hour and you can let it soak for 4 hours. Make the bread fit your schedule.
2. Sprinkle the yeast over the top and then stir it around and into the damp bread crumbs. Let is sit for 2 to 5 minutes to hydrate the yeast. Add the salt and bread flour.
3. Using a heavy duty wooden spoon mix the flour and crumbs until it forms a ball. Dump the ball onto the counter and start kneading. Knead the dough until it becomes smooth and elastic. This will take at least 5 minutes.
4. Form the dough into a ball and put it back into the mixing bowl. Cover it with a damp towel and set the bowl in a warm draft free place. The back of the stove is usually good.
5. Set a timer for 1 hour. At the end of the hour the dough should have doubled in size. If not let it proof a little longer. Remove the dough to the counter and knead it to degas it then shape it into a ball.
6. Place the dough into a 8 inch cake pan that has been oiled and dusted with flour. To dust the pan smear a small amount of oil onto all interior surfaces of the pan. Add a tablespoon of flour and shake it around and tilt the pan to get the flour up the sides. This will keep the bread from sticking to the pan. Cover the bread and put it back in the warm place you had it.
7. Let the bread rise until it is peaking over the top of the pan by an inch. This will take 30 to 40 minutes. About 15 minutes into the final rise turn on the oven to 375˚ F.
8. You can dust the top of the loaf with flour, cut a slash in it or just put it in the oven and bake it for 50 minutes. Remove it from the oven then remove it from the pan to a cookie rack. Let the bread cool completely. Slice and serve.

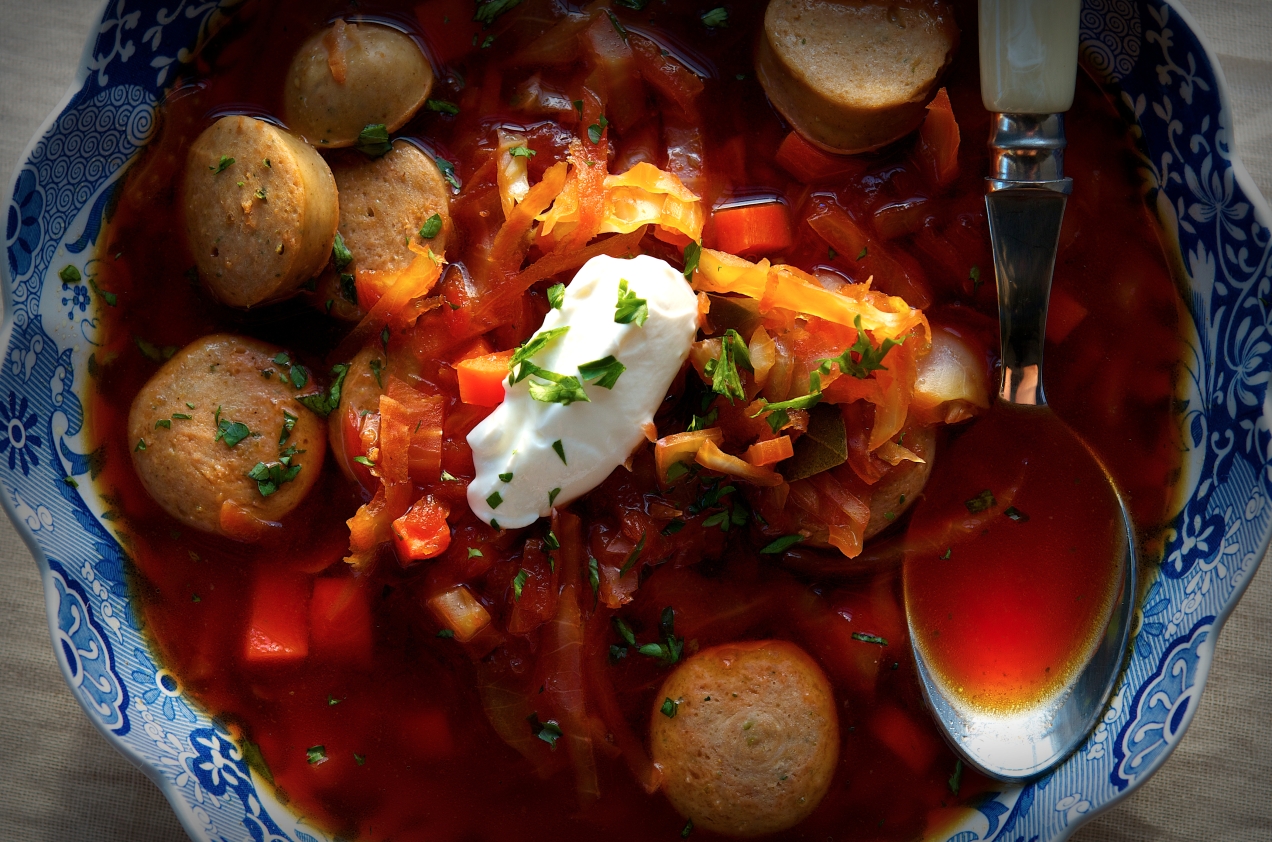
Karilean Borscht with Resolution
 It is shortly after all the present opening hullabaloo, when I look up from cutting peanut butter and jelly sandwiches in half, that I see the look on Vivian’s face. I catch a glimpse of disappointment in her eyes and it is very clearly the look of self pity caused by not getting everything she wants for Christmas.
I know exactly how she feels. I remember the first time I felt the same way. I also remember the shame I felt for being selfish and while I know which feeling is right at her young age, I am still not sure which feeling is worse.
Oddly, I guess with age I have come to have similar emotions about New Year’s.
For instance, each year when I take stock of myself in the time between Christmas and January 1st, I am always looking back in disappointment at the things I wanted to happen but didn’t, the things that went wrong, or the things that I will have to deny myself to make the coming year presumably better. It seems silly.
After all, it doesn’t take a rocket scientist to point out to me that I am a very blessed person, and really, I want for nothing. Well, I suppose I could stand to lose a few pounds, and proudly I have lost a lot this year, but a few more wouldn’t hurt. Even so, I don’t really need to deny myself. I just need to eat differently. Continue reading
Laotian Beef Salad (Larb)
 I really enjoy making and eating the foods of Southeast Asia. I make trips to the Asian grocery and buy up all kinds of different produce that aren’t found in my garden or at the local grocer. I don’t really drive but an extra five minutes to get there, the groceries cost less which makes up for the extra in gas and I usually find some gem of a new product that I have never eaten, cooked with or sometimes never even seen. It is always an adventure. This time I happened in a day or two before the Chinese New Year and in honor of the holiday they gave Lynnie a box of the funkiest most savory cookies ever. I couldn’t eat them but she loved them and this from the little girl who finds Chinese food sour.
I did something different here, something I wouldn’t normally do. Usually I would get the pan smoking hot and sear the protein but I didn’t get the wok hot enough and when meat hit metal it cooled down right away. It became a happy mistake. Instead of panicking I just let it sit. I watched as all the beef juice bubbled up around the meat and then slowly subsided until it was gone. Then the skirt steak caramelized really well and the fond, the sticky delicious stuff on the bottom of the pan, added tons of beefy flavor to the final dish.
It’s a great dish to serve with rice and a couple of nice vegetables.
Serves 4
canola oil
1 pound 2 ounces skirt steak, sliced then minced
6 garlic cloves, minced (about 2 tablespoons)
1 1/2 tablespoons lemon grass, minced
1/2 cup shallots, julienned
3 red Thai bird chile, minced
1 tablespoon fish sauce
1 tablespoon soy sauce
2 tablespoons water
1/3 cup mint leaves, torn
1/3 cup cilantro leaves, torn
1/3 cup green onion, thinly sliced
1/4 cup peanuts, smashed
1. Heat a large wok or skillet over medium high heat. Add a tablespoon of oil to the pan and when it is warm add the minced skirt steak, garlic, lemon grass and shallot. It should cool the pan down and as it cooks liquid should release from the protein. Let it gently bubble while you occasionally stir. As the juice begins to evaporate stop stirring. Patiently wait for the meat to brown and the fond to build on the bottom of the wok or pan.
2. Add the fish sauce, soy and water. Stir the larb to combine and until almost all the liquid is absorbed. Using a spoon taste the larb and add a little salt if necessary. Stir then remove the pan from the heat.
3. Once the steak isn’t so hot but still warm stir in half the chili, mint, cilantro and green onion. Plate up the salad and then top with the remaining herbs and the peanuts. Serve.


Chicken, Sausage and Red Pepper Paella
 Paella to me is the ultimate one pot meal. It also is the time of year where I am not ready for a stew but want something more substantial than the usual summer fare. Paella is a great answer. Although paella is considered Spanish I think this one is more Mediterranean. I use Italian sausages but fresh chorizo would be good, the important part is that the sausage isn’t dry cured or it would just be drier in this case. I also use arborio rice, but you could use the Spanish version of this as well.
SERVES 4-6
2 bell peppers
1/4 cup extra virgin olive oil
2 chicken legs, seasoned with salt and pepper
2 Italian sausages
2 chicken thighs, seasoned with salt and pepper
1 onion, julienned
1 fennel bulb, tops trimmed, core removed and sliced very thinly
1/4 cup garlic, peeled and thinly sliced
2 bay leaves
3 1/2 cups warm water
pinch of saffron, crumbled
3 Roma tomatoes, cut in half from top to bottom, and grated, large whole of a box grater, leaving the skin behind
1/4 cup dry white wine
2 cups arborio rice
1 1/2 teaspoon aleppo pepper
1 tablespoon flat leaf parsley, minced
2 tablespoons green onions, sliced into thin rings
kosher salt and fresh ground pepper
- Sometime during the day or when ever you have time, turn a gas burner to high. If you don’t have a gas burner turn your oven to broil and place a rack at the highest level you can. Char the peppers, top, bottom and all on sides. The idea is to char or blacken the skin without cooking the pepper through.
- Place the peppers into a container with a lid. Set aside for at least 20 minutes. Crumble the saffron into the warm water.
- If you roasted them properly the skins will easily peel right off with out running them under water.
- Peel, seed and core the peppers and then julienne them into thick strips.
- Preheat the oven to 400 degrees. Place a 16 inch paella pan or a 14 inch saute pan over medium high heat. Add the olive oil and once it is hot add the chicken, skin side down, and then the sausages. Brown them thoroughly and then remove them to a plate. You do not want them to cook all the way through. They will finish cooking in the oven so you just want to brown them.
- Turn the heat to medium and add the onion and fennel. Season them with healthy pinch of salt and pepper. Cook until they start to soften. Add the garlic, aleppo pepper and bay leaves, once fragrant add the white wine and grated tomatoes and cook for a minute or two letting the alcohol burn off. Add the saffron water and rice. Season again with a healthy pinch salt and pepper. Gently shake the pan to level out the rice. Place the chicken into the pan and arrange the red peppers around the chicken.
- Bring to a boil, place the pan into the oven and set the timer for 15 minutes. Cut the sausages in half. Once the timer goes off add the sausages and place the pan back into the oven. Set the timer for 10 minutes.
- Once the timer goes off remove the pan from the oven and place a clean towel over the top. Let the dish rest for five minutes, remove the towel and garnish with parsley and green onions, then serve.

Reviewing a website isn’t something I would normally do. In this case it isn’t the website but a feature on the site itself. You all know I call Food52 home(that is a full disclosure). I would give the site itself a triple A rating but my aim here is to call attention to a feature within the site, Genius Recipes.
If I were new to the kitchen, or an inexperienced cook, even a seasoned pro this is where I would go to get a bag full of genius recipes. It is where senior editor Kristen Miglore will make you feel and look good so your dinner guest will thank you and your children will brag about you.
I can assure you once you start cooking with these recipes you will find yourself going back time and time again because they work, are dependable and because the recipes are ridiculously delicious.
The real bonus here is they are minimally invasive. What that means is there are only a few steps and ingredients involved in getting the dish to the table. What’s the take-away? In short, it means there is no excuse not to make these recipes throughout the week. And even if you can’t the Wednesday publishing of the posts allows you to collect the ingredients and prep the recipe for the weekend.
The author behind the feature, Kristen Miglore, does all the hard work for you. Whats not to love about that? Fortunately for her readers she brings us a five star recipe each week and then sets it up for success. She tests the recipes and navigates you effortlessly through the steps as if you were following the blue dot on Google maps to a dive restaurant. People, she gives you the keys to the Mercedes, I mean how awesome is that.
So you have a great writer giving you the low down on why this recipe is so good with her fast paced prose, sprinkled with a pinch of humor and it’s always concise. If asked she will be humble and give all the credit to the community members who pass along recipes but in the end it is Miglore who spots the winners and it is not always easy to recognize great recipes. She has mad skills is all I can say.
I will vouch for any of these recipes and I can say many have fallen into the weeknight rotation of family favorites. The Al Forno Penne with Tomato Cream and 5 Cheeses is one of my and the girls favorites. Nobu’s Fried Asparagus with Miso Dressing became a regular this summer substituting in yard long beans, walnuts and shallots. In fact, I can’t wait to plant yard longs in the garden again just to make this one recipe. The Domino Potatoes scored big when the juices from the resting lamb chops co-mingled into the buttery potatoes to create one of the easiest best potato sides ever. Most recently I have been making Momofuku’s Roasted Brussels Sprouts with Fish Sauce Vinaigrette and alternating in an oyster sauce. I have also deep fried the sprouts and wow, if you care to take the extra step, do.
Next up will be Nigella Lawson’s Dense Chocolate Loaf Cake. I am making two of them, one for home and one for the school bake sale and while I am sifting the flour I will be thanking Kristen for sifting through all these recipes and pointing me in the direction of the truly genius ones.
Need more genius? Click here.
Deep Fried Brussels Sprouts with Oyster Sauce
1 pound Brussels Sprouts, trimmed and halved
vegetable oil for frying
2 1/2 tablesoons oyster sauce
1 1/2 tablespoons tamari soy sauce
1 tablespoon water
1 1/2 teaspoons fresh ginger, very finely minced
1 1/2 teaspoons garlic, very finely minced
1 tablespoon green onions, minced
1 tsp honey
1. Combine the oyster sauce, soy, water, ginger, garlic, green onions and honey in a large mixing bowl. Whisk to combine it all. Set aside.
2 Add enough oil to a heavy bottomed 4 quart pot ( I used an enameled Dutch oven) to come no more then a third up the sides of the pot. Turn the heat to medium high.
3. Test the oil by dropping in a sprout leaf. There should be a pause, then, it should rapidly sizzle.
4. Add half of the Brussels sprouts carefully, they will bubble and pop, then add the rest of the sprouts. Fry until brown. Remove them from the oil to drain on a paper towel lined plate. Toss the sprouts with the oyster sauce and serve immediately.

Pork Pazolé
Chili is great, and a favorite, but sometimes it is nice to find an alternative. This is a nice change for sure. The sourness of the tomatillos cuts the richness of the pork while still letting the pork taste rich. The other thing about the tomatillos is the juice from them thickens the broth. The whole thing comes together easily and could even be pulled off on a weeknight by the ambitious.
Serves 4
2 tablespoons lard
2 1/2 lbs. pork shoulder, cut into 1 inch cubes
1 cup yellow onion, small dice
1 lb. tomatillos, paper skins removed
1/4 cup coarsely chopped garlic
2 teaspoons Mexican oregano
1 tablespoon dark chile powder
1 tablespoon tomato paste
one 14.5 ounce can yellow hominy
kosher salt and fresh ground pepper
1/4 cup cilantro, chopped
toppings: more cilantro, shredded cabbage, lime wedges, red onion, sour cream and cheese
1. Preheat the broiler. Place the tomatillos onto a sheet tray with sides, they will exude lots of juice, and broil them until they are charred nicely. Remove them from the oven and turn the oven off.
2. Season the pork with salt and pepper. Heat the lard over medium high heat in a 3 1/2 quart Dutch oven and add the pork. Brown it deeply on all sides taking care not to not to burn the fond forming on the bottom of the pot and reducing the heat if necessary.
3. After the pork has browned remove it from the pot to a plate. Add the onions to the pot and saute them until they start to become tender. Add the garlic, chili powder, tomatillos with all their juice, and the tomato paste. Stir to combine and let the mix become fragrant.
4. Add the pork, and accumulated juices, back to the pot and enough water to come just to the top of the pork. Let the pozole come back to a boil and then reduce the heat to a simmer.
5. Simmer until the pork is tender, about an hour, then add the hominy and the chopped cilantro and cook another 10 minutes. Ladle into bowls and serve with additional toppings and lots of home made corn tortillas.

Plastic Dough Scrapers

Plastic dough scrapers make one of the best dirty dish cleaning tools around. For my pans they are non-scratch, get into the crooks and crannies removing all the stuck on stuff in a jiff. I always have two on hand just for dirty jobs like getting the ring of crud around the top of a pot knocked loose, or that thin layer of cake stuck to the bottom of the cake pan. They are bendable, have different shaped edges for different jobs and big enough you can get a good grip on them. This is a great tool to have when you need it and they are cheap, 99 cents or so.
Stems and Seeds

Hippy food has long been a bastion of vegetarian eats for many reasons. Some political, some personal but in all honesty mostly because it is cheap and often utilizes every last morsel sharing some of the same philosophy as head to tail eating, ironic?, well, yes. Never mind the reasons though because that doesn’t mean it doesn’t taste great and utilizing every part means new tastes and textures from veggies you have long grown tired of.
There is nothing better than to take a bite of something and not only have it taste good but when it feels good, or nutritious, as you eat it it is all the better. Having said it time and time again there are certain dishes that hit that button and, man, there is no better eating. This salad hits that button.
So get out your tie dies and put on your birks, crank up the Dead and get in touch with your inner vegetarian, oh, and make extra because the nice thing about this salad is it is no worse for the wear the next day.
The soy ginger vinaigrette in this recipe was adapted from Jean-Georges Vongericthen’s Simple Cuisine. Learn this recipe you because will find yourself using it on everything. It is a genius recipe.
Makes 4 servings
For the vinaigrette:
2 1/2 tablespoons soy sauce
2 tablespoons lemon juice
1 teaspoon ginger, finely minced
1/3 cup canola or unflavored oil
1/3 cup extra virgin olive oil
kosher salt and fresh ground pepper
1 1/2 tablespoons water
Put all the ingredients into a pint mason jar and screw the lid on tightly. Shake the hell out of it. Set the dressing aside.
For the salad:
1 to 1 1/2 cups blanched broccoli stems, 1/4 inch dice
1/2 cup carrots, grated
3 cups cooked brown rice
1/4 cup sesame seeds
1 1/2 tablespoon chives, minced
soy ginger vinaigrette
kosher salt and fresh ground pepper
1. Place all the ingredients, except the dressing in a large bowl and toss to combine. Add 1/3 of a cup of the dressing and combine everything. Taste, adjust the salt and pepper and add more dressing if you like.
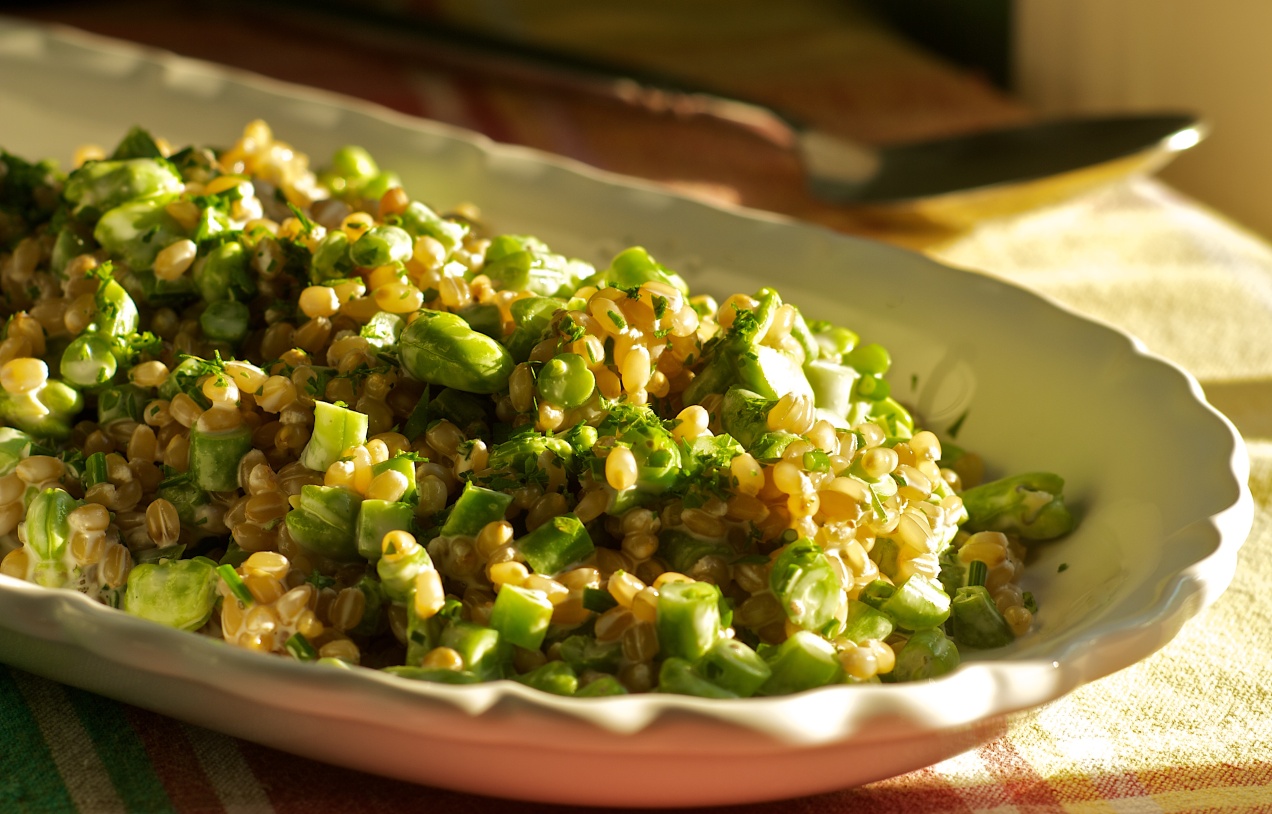
White Wheat Berry Salad with Fresh Beans
 If you have ever had fresh raw fava beans then you know the wonderful tender pop, the tender chew and the juicy flavor. It goes wonderfully here with the green beans and the dressing.
Wheat berries are another wonderful addition to your repertoire. They add a subtle chew and give the dish a pasta flavor while digesting at a lower glycemic level because they are a whole grain.
This is one of those dishes that is here because it is delicious and, luckily, it just happens to be very good for you too.
Serves 6 as a side dish
1 cup soft white wheat berries, rinsed
3/4 cup green beans, blanched and chopped into 1/4 inch pieces
1 cup fresh fava beans, lima, or edamame, shells and outer skin removed
1 1/2 tablespoons chives, chopped
2 teaspoons fresh thyme, minced
1/4 cup mayonnaise
1/3 cup buttermilk
2 teaspoons lemon juice
kosher salt and fresh ground pepper
1. Place the wheat berries into a large pot and cover them with cold water by two inches. Place the pot over high heat and bring it to a boil. Boil for two minutes then turn off the heat, cover the pot and let it sit for two hours.
2. After two hours add a couple of pinches of salt and then place the pot back over the heat and bring the berries to a boil again. Now reduce the heat to medium and let them simmer until soft, or the texture you want, about 15 minutes.
3. Drain the berries in a colander and let them cool to room temperature.
4. In a large mixing bowl combine the mayo, buttermilk and lemon juice. Season it with salt and pepper then add the thyme and chives. Add the rest of the ingredients and mix to combine. Taste and adjust the seasoning. It is nice if you can let it sit for at least a half hour to let the flavors meld and even overnight is good.
5. Serve
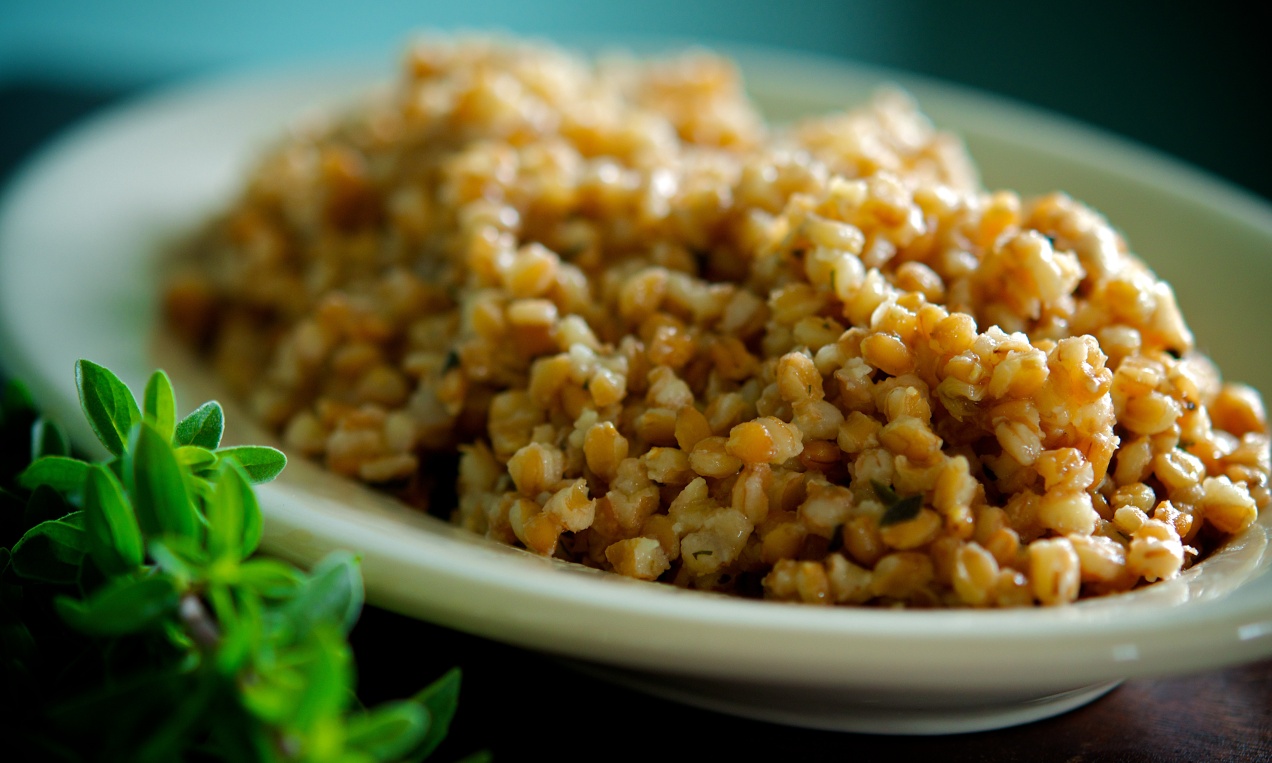
Farro and Roasted Garlic Pilaf
 The term farro can be very confusing. If you look it up you will see no one really wants to pin the tail on the donkey, and as such, all the authors of the articles seem to want to avoid naming a specific grain as farro.
People really want spelt to be farro but I can say spelt is not farro. Spelt is much larger and has a sweeter flavor to me. What I have found is farro can come in different sizes, roasted, and for lack of a better term, par cooked or pearled which means it cooks quicker.
In this recipe I use piccolo farro from Anson Mills. It is easy to cook, is extremely delicious and quite honestly I have become enamored with it as well. I think I can say with all clarity it should be spelled Pharroh because it is the food of gods. It feels nourishing to eat and is such a refreshing change, or I should say replacement, from rice or potatoes.
I always cook extra and use the grain, plain, when baking bread and I plan to save the cooking water next time and use it as well.
Serves 4 to 6
1 cup farro piccola
2 heads of garlic
1 stick unsalted butter
1 tablespoon marjoram
kosher salt
fresh ground pepper
1. Preheat the oven to 325˚F. Slice the heads of garlic across the top at a point where you will remove enough to expose as many cloves as possible but not so much that you loose a lot of the head. Usually I slice off about the top third of the head. Place the heads in a small ovenproof gratin or some other dish. Smear the heads with 1/2 teaspoon of butter and then salt and pepper them. Cover tightly with foil and bake the garlic for one hour. At the end of the hour remove the foil and bake another fifteen minutes to brown up the cloves.
2. Using a strainer rinse the farro under cold water. Place the farro into a 3 quart heavy bottomed sauce pan with a lid. Cover the farro with cold water to cover by two to three inches and add a two finger pinch of salt.
3. Place the pan over high heat and bring it to a boil. Turn off the heat and cover the pan. Let the farro sit in the pan for an hour to two or until the grains have popped.
4. Use a large strainer or colander and drain the farro.
5. Wipe out the pan and put the pan back on the stove over medium low heat. Add the remaining stick of butter. Let it melt gently and then add the drained cooked farro, marjoram and squeeze the roasted garlic into the pot. Stir in the creamy soft garlic smearing it into the farro. Season the pilaf with salt and pepper to taste.
6. Once it is hot, bowl it up, and serve.
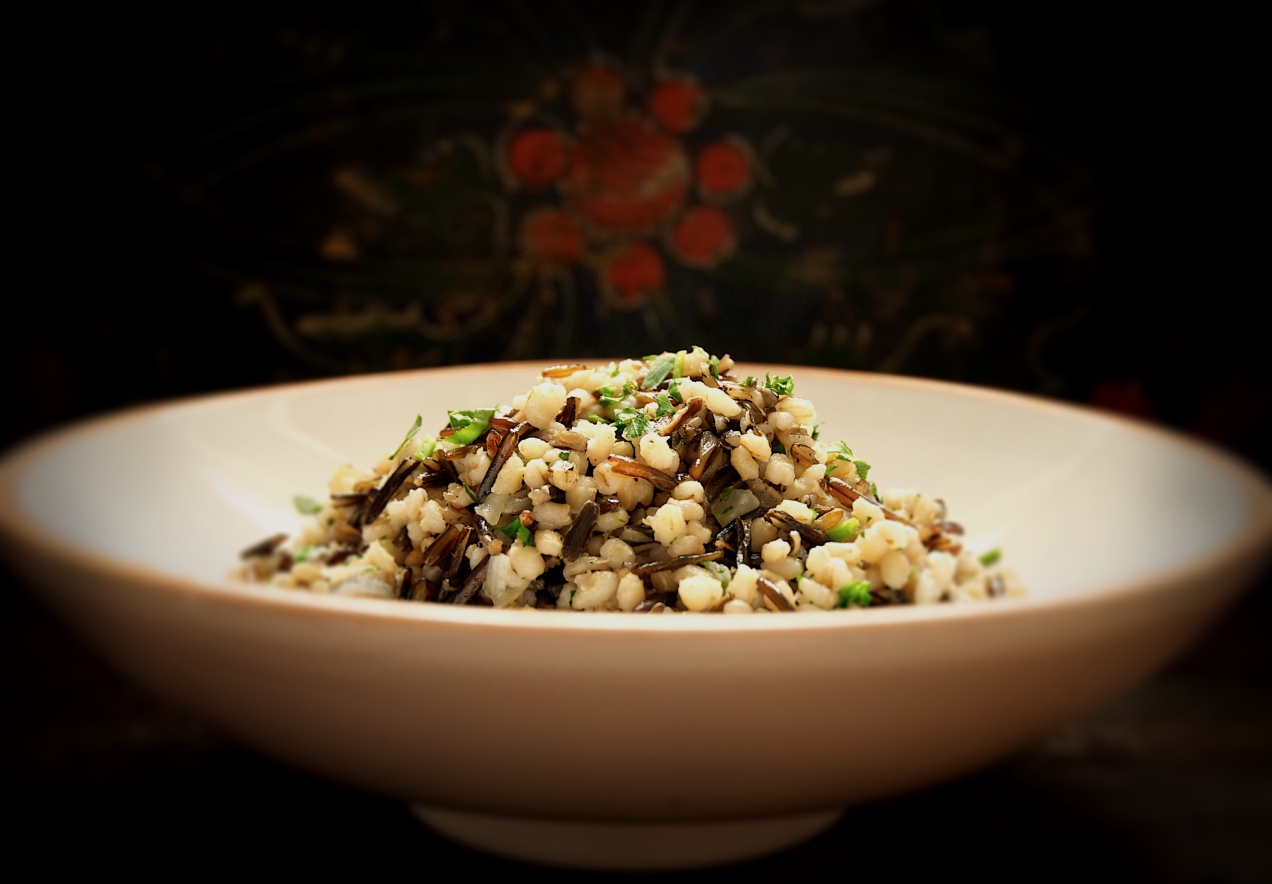
Wild Rice and Barley Pilaf
 This is so good for you you won’t even know it taste really delicious. Seriously good eats and a great side dish for roast birds of any kind and I’ll even throw salmon onto that list.
Yes, I know it uses two sauce pans but, please, neither grain leaves behind a sticky mess. You could almost just wipe the pan with a towel after emptying it of the grains. Don’t get any ideas I said almost.
Makes 6 to 8 servings
3/4 cup wild rice
3/4 cup pearl barley
1/2 cup yellow onion, small dice
1/4 cup flat leaf parsley, minced
3 to 4 tablespoons unsalted butter
kosher salt and fresh ground black pepper
1. Put the grains into two different sauce pans. Add water to cover by 2 inches and add a two finger pinch of salt to both pots.
2. Bring the water to a boil then reduce the heat to a gentle but continuous bubble. Cook both grains until they are tender. The barley should take about 30 minutes and the rice maybe 40. The rice will just begin to open up its pod.
3. Drain both grains. The dish can be done up to a day in advance at this point.
4. Put the larger of the two sauce pans over medium heat and add the butter. Once it has melted add the chopped onion and sweat it until it is tender. Add both grains and season everything with salt and pepper. I like lots of pepper but season to your liking. Heat everything until hot, taste, and if it needs more add more butter or even a dash of water. Stir in the parsley, plate it and serve immediately.

Depression Cookies

Sugar cookies
Yes, I could imagine a cookie just like this being created during the Great Depression. The nutmeg lends itself to the past and makes the cookie feel like something a grandmother would make for her grandchildren on a Sunday afternoon. She might also make it when she notices her grandchildren are a little sad. Whatever the reason they are a cure for depression. They will bring you out of your funk with a heavy dose of the warm and fuzzies.
MAKES 2 DOZEN
1 cup sugar
3/4 teaspoons nutmeg
1 vanilla bean, split and seeds scraped
2 cup all purpose flour
1/2 teaspoon baking powder
1/2 teaspoon Kosher salt; if you sub table salt cut it to 1/4 teaspoon
12 tablespoons unsalted butter
4 tablespoons vegetable shortening
1 tablespoon honey, something with citrus notes is good
1 large egg
1/2 cup sugar for rolling the cookies
1. Make sure you have an oven rack placed dead in the middle of your oven. Preheat the oven to 375 degrees. In a mixing bowl combine the flour, baking powder and salt. Stir it with the measuring spoon to mix.
2. Place the sugar, nutmeg and vanilla seeds into the bowl of a mixer and mix for two minutes to distibute. Turn off the mixer and add the butter and shortening. I use cold, when I squeeze it it just gives, butter because I personally think it creams better. You do not want this to look granular and you don’t want the fat to break out and look similar to cottage cheese either. It should look like ice cream just scooped from the container. Start out on low speed and when the butter starts to cream gradually increase the speed to medium and cream for about 2 minutes total.
3. Scrape down the sides with a spatula. Add the egg and mix to combine. Add the honey and mix briefly.
4. Adding the flour in thirds, to keep it from flying out of the mixing bowl, mix at low speed and mix until all is incorporated. Scrape down the sides of the bowl if necessary.
5. Place the remaining half cup of sugar into a seperate bowl. Line two 12 x 17 baking sheet pans with parchment paper.
6. Using a tablespoon or a number 40 scoop, scoop out some dough. Using your hands roll it into a ball and then roll it around in the sugar until coated. Place it onto the baking sheet. Repeat until you have 12 cookies on the tray. Using a fork, flatten the cookies to about a 1/2 inch thickness.
7. Place tray into the oven and set the timer for 10 minutes. While they are cooking roll and coat the remaining twelve cookies. When the timer goes off check the cookies. They should be browning at the edges but still light in the middle. If they’re not, leave them in the oven for another few minutes. Remove them and let them cool for 3-5 minutes before changing them to a cooling rack to finish cooling. Place the other tray of cookies into the oven and repeat this step.
Teddy Roosevelt Fished Here

My nephew and I amble slowly up to the creek bank. It’s early enough that the cold morning air causes a light fog to rise off the warm, black water, but does nothing to lift the low-lying cover fogging my brain. I yawn. I wish I’d had that second cup of coffee.
It’s hard to believe Teddy Roosevelt ever came here to fish, here at this nothing stream that runs along the backside of my property. As the story has it, an Indiana politician brought him here for no more than an hour or two. They got off the campaign train, took a break, and fished. But, of all places, why here?
Soon enough the morning sun awakens and colors the tips of the trees on the south bank a glowing yellow, as if someone turned on the kitchen lights. I sit down on a rock, one of those big ones, gray and smooth, jutting out from the edge of the bank. I look across a pool of still water, not studying or thinking, just staring, then I slip one leg into my waders, making sure to get my leg inside the suspenders. In goes the other leg and up and over my shoulders come the suspenders.
My nephew, bare-legged and anxious, has already broken the water and the ripples disrupt the deep blue reflection of the cloudless sky. He strips fly line off the reel and the sound of the drag gears zipping backwards hangs in the air like a fiddle solo in a gospel song on Sunday. A few small mayflies lift off the surface of the water, fluttering haphazardly to freedom.
I’ve long heard that Cicero Creek is a world-class smallmouth bass river, but it’s never been enough to motivate me. I’ve lived on the creek for eight years now and not once fished. I gave up my obsession with fly fishing when I left New York. I always fly fished for trout. Trout seem noble. I have two young daughters who take up my time now, and happily so. Besides, when you ask anyone if they eat the fish, they always say no, the river is polluted.
I watch my nephew back cast and hear the delayed whistle of the fly line as it whips forward. The tippet rolls out and drops the fly perfectly into the water on the upriver side of a sunken log with a forked branch sticking out.
It’s obvious by the force and violence with which the smallmouth bass breaks the surface that it is hungry. The sound grabs my attention, the fish grabs the fly, and Will’s rod doubles down.
It’s a beautiful smallmouth, a glistening seaweed-green on its back with a pearl-white belly. I feel a little of the old adrenaline coursing. It’s way more invigorating than that second cup of coffee would have been.
It suddenly dawns on me that something very similar probably happened, nearly a hundred years ago, maybe right in this spot, at this hole that’s holding some really big fish. I nod my head, understanding, and the vision is clear.
The train, an old wood-fired locomotive, leaving a campaign stop in Indianapolis and now headed to Chicago, stops in the small town nearby. Roosevelt and a few other men get off the train at the small station, and a young kid who knows the stream like the back of his hand, like my nephew does, is waiting to take them by carriage the short distance to this unremarkable little creek.
When they arrive creekside, the elder statesmen look at each other, shrug, and wonder what, if anything, they will catch. Maybe they even wonder why they got off the train, smiling at each other, knowing this kid has no idea of the amazing fishing they’ve done and the beautiful, rushing rivers they’ve seen.
The farmboy, kindly urged on by Roosevelt, goes first, casting under the branch line that hangs out over the water and up close to the embankment. The same thing that happened this morning happens then: BAM! A big smallmouth bass takes the hook and runs the line upstream. Now the two statesmen are really smiling, grateful for this moment of relief from their busy schedule, and they begin to fish.
It’s a banner day; they’re hooking them left and right, talking and fishing without a thought of politics or business. Their guide, the kid, can’t get the fish off the hooks quickly enough. He releases most of them, but some are the right size, perfect for eating, and he puts these on a stringer that is quickly getting full.
The flurry of activity only lasts an hour or two, the same length of time that all good fishing lasts. Theodore Roosevelt, 26th President of these United States, and company pack up and head back to the Arcadia station.
My nephew and I are doing the same, heading to the car.
I ask, “You ever eat any of the fish you catch out of here?”
He replies, “No, the river’s polluted.”
Click here for the recipe: Pan Fried Red Snapper with Tarragon Tartar Sauce

Hachis Parmentier

Hachis Parmentier
One of the things I like best about the French dish Hachis Pamentier is the looseness of the recipe. Unlike Shepard’s Pie which connotates lamb as the central ingredient Hachis Parmentier quite often simply lists chopped meat and then leaves it to your discretion. So anything on hand, usually cooked, usually leftovers which is generally combined with Sauce Lyonnaise.. Then add potatoes, again, mashed, leftover bakers or boiled, pretty much anything you can crush with a fork.
In my book anything Lyonnaise is good and more likely great. The reality, though, of most classic French sauces is, who has demi-glace on hand and who is going to make it for this dish? Not many home cooks do, nor should they. So if you take the base ingredients of the sauce minus the demi-glace you have a vinegar based dressing. In other words something to cut into the richness of the meat and potatoes and a simple balsamic dressing does this just fine.
The reason I chose salmon for this version is it doesn’t need to be cooked before hand. You can put it right into the ring molds raw to be cooked in the oven. Salmon has enough natural collagen that it will bind on its own, no mayonnaise, no egg, no nothing.
What I have tried to do here, and I think with great success, is make a family style dish into something worthy of a fancy sit down dinner and even the main course to a dinner party. You can make the individual servings ahead of time (hint: my ring molds are water chestnut cans with both ends removed, cheap and simple) by putting the molds onto a parchment lined sheet tray, then layering them with the ingredients, covering them and storing them in the fridge.
On the other hand, you needn’t invite anyone for dinner to make this dish it is just as delicious for two as ten and if you want family style just chuck the whole ring mold idea and use a large gratin.
Serves 4
1 pound salmon, skin removed and cubed into 1/4 inch chunks
1/2 cup celery, finely minced
1 teaspoon capers, minced
1/2 teaspoon lemon zest, finely zested
1 teaspoon dill, minced
1 teaspoon chives, minced
1/2 cup comte or Gruyère cheese, grated
3 potatoes, sliced into 1/8 inch or thinner rounds
1 cup milk
1 teaspoon garlic, minced
water
kosher salt and fresh ground pepper
a handful of arugula leaves, rinsed and dried
1/2 teaspoon Dijon
1 teaspoon balsamic vinegar
1 1/2 tablespoons olive oil
1. Place the potatoes, garlic and milk into a medium size pot. Add enough water to cover the potatoes by an inch. Add a teaspoon of salt and a few grinds of pepper. Place the pot over medium heat and slowly bring it to a boil. Cook the potatoes until just tender, being especially careful not to cook them to mush but if you do don’t get you undies in a bundle they will still cook and taste the same. Drain the potatoes.
2. If you plan to cook the dish now heat the oven to 375˚ F.
3. Place the salmon, celery, capers, lemon zest, dill and chives into a mixing bowl. Add 3/4 teaspoon of salt and some fresh ground white pepper and mix the salmon being sure to incorporate all the ingredients and evenly distribute them throughout.
4. Place a piece of parchment paper onto a sheet tray. Place four ring molds onto the tray. Lightly butter the interior walls of the molds and then divide the salmon mixture into four equal portions and pat firmly/gently it into the molds.
5. Taste a potato testing for salt content. Take the potato slices and fan them into the top of each mold making two to three layers. If the potatoes were salty enough when you tasted them then don’t season them anymore but if the need it season each layer with a pinch of salt and pepper. Top with a little cheese and a spritz of olive oil. Bake in the heated oven for 25 to 30 minutes.
6. While the salmon is baking combine the mustard and balsamic adding a pinch of salt and a grind or two of pepper. Then add the oil and mix to combine.
7. When the salmon is done remove it from the oven. Using a spatula and a dry towel remove each mold to a plate placing it in the center. Using a paring knife run it around the edges to loosen the salmon. Gently hold down on the potatoes with a spoon as you lift the mold.
8. Toss the arugula with the dressing and top each hachis parmentier with a bit of greens. Serve with a crisp fruity white wine.
Madeira Tart

Madeira Tart
This is a tart with an agenda. Its roots are old fashioned and small town but don’t let that fool you. It is as luscious and silky as Scarlett Johansson sauntering the red carpet. It is as lascivious as True Blood and as beaten-up as Mickey Rourke on a bad day.
There are tarts and then there are tarts. The best are the kind that even your mama would like. Never suspecting or questioning what makes up its character but just enjoying it for what it is because it is so good. All the while, later, you know you are going to lick your fork like…well, lets just say it is a tart that likes to please and it will.
Truly, it is like fine champagne on a Sunday afternoon. The basis of this tart has been around for a long time, the old fashioned egg custard pie, you know the one with nutmeg that has shown up at every family reunion since people started having reunions.
Well, take that base and an idea from Alice Waters and her Marsala cream pots, add in the videos on the FOOD52 site from Shuna Lydon about cooling your custard and then use duck eggs(again Waters idea) which make for an even silkier tart and what you come up with is nothing less than sexy. Never fear, I have written the recipe to use chicken eggs but if you ever come across fresh duck eggs by all means use them to make a custard.
SERVES 8
For the crust::
1 cup all purpose flour
1/4 cup semolina flour
1/4 cup sugar
1/2 cup unsalted butter, softened
2 finger pinch of salt
For the custard::
1 1/2 cup whole milk
1/2 cup sugar
1/2 teaspoon salt
2 tablespoons madeira
4 large eggs, or 3 duck eggs
For the custard:
1. Place the milk into a sauce pan and scald it over medium high heat. Remove the pan from the burner. In a mixing bowl whisk together the eggs, sugar, madeira and salt. Temper the eggs by whisking in a 1/2 cup of warm milk and then add the rest while whisking. Cover the bowl and place the custard base into the fridge. You want it to be cold. It can sit in the fridge overnight which is probably best but at least let it get to 35 or so degrees. You could do this in an ice bath if you are in a hurry.
To finish the tart:
1. Heat the oven to 350 degrees. In a large mixing bowl and using a large wooden spoon mix all the crust ingredients smashing the butter into the mixture with the back of the spoon until you have a cornmeal and cous cous looking crumble. You can use your hands rubbing them together with the mixture between them to make some of the bigger chunks smaller.
2. Place an 8 inch tart pan onto a sheet tray. This will make it easier to move around and get out of the oven. Dump the crumbles into the tart pan. Press the dough up the sides, packing it tightly as you go, and then work toward the center until you have a crust. Bake the crust for 20 minutes. Remove it from the oven.
3. Turn the oven up to 400 degrees. Strain the chilled custard through a fine mesh strainer to remove any albumen pieces. Pour the custard into the tart till it is half full. Place the tart into the oven and then finish filling the tart. You will probably have about a 1/2 cup of base left. I made a little extra so you wouldn’t come up short in case your tart pan was a little bigger.
4. Back the tart for 15 minutes and then reduce the heat to 350 degrees and bake it for another 20 to 30 minutes or until set. Depending on how cold you custard is will lengthen or shorten the baking time. If you give the sheet tray a gentle but sharp shake the tart should jiggle like jello if it is done. If it creates waves that look like you dropped a pebble into still water continue cooking.
5. When the tart is done remove it from the oven and let it cool completely. Cut and serve.

Smoked Herring Salad

Smoked Herring Salad
Why do so many people fear canned fish? I don’t mean tuna, it doesn’t even count. Was there some massive food poisoning event in the United States back in 1908 or something and the canned fish market never recovered or do we just have a lot of closet canned fish eaters in this country.
Canned fish is brilliant, don’t laugh, I am being totally serious. It is really tasty, it harmlessly sits in your pantry ready to be used and is as tasty as the day it was packed.
Maybe people don’t know how to use it or maybe when they were little their parents always told them they wouldn’t like it and so they never have. My guess is most people who say they don’t like it have never tried it or it has been served to them right out of the can bathed in some sort of funky sauce.
No, what I am talking about is fish packed in oil, be it, mackerel, herring or sardines, smoked and not smoked. The omega-3 dense bait fish, well not mackerel it is higher up the chain then the other two, but fish oil rich nonetheless.
It’s as if you have to go to Eastern Europe, Nordic countries or Russia for your recipes and I am good with that. These countries now what to do when it comes to canned fish. I trust them.
This recipe is of Dutch descent. Being the herring eaters they are you can count on them for good recipes.
Serves 4
1 1/2 tablespoons mayonnaise
1 teaspoon Dusseldorf mustard or Dijon
1 teaspoon whole grain mustard
1/2 teaspoon red wine vinegar
1 tin smoked herring or mackerel
2/3 cup celery, chopped
1 cup yukon gold potatoes, boiled and cubed
6 cornichons, chopped
2 to 3 beets, roasted, peeled and cubed
2 hard boiled eggs, shelled
a handful of peas, fresh or frozen
2 teaspoons chives, chopped
2 shallots, peeled and sliced into thin rounds
salt and fresh ground black pepper
1. Combine the mayonnaise, mustards and vinegar in a large mixing bowl. Whisk to combine.
2. Add the celery, potato, cornichons, peas and herring. Smash the eggs into chunks and add them to the bowl. Stir to combine. The herring will break up into small pieces with some hunks much like if you were making tuna salad. If you want big hunks of herring then garnish the salad with it.
3. Divide among 4 plates and garnish with the beets and shallot rings. Garnishing with the beets keeps the salad from turning pink.
4. Serve

Pot Roasted Collards and Purple Hull Pea Fritters with Spicy Buttermilk Gravy

Pot Roasted Collard Greens and Purple Hull Pea Fritters
The one thing that stays the same around my kitchen, has been a continuous thread, is collard greens.
Collard recipes have been prepared in many incarnations but eventually I rendered them all down the most basic of recipes. I like collards in every fashion imaginable, and while I can spoon potlikker right out of the pot and onto a slab of buttered cornbread, making me perfectly happy, I have grown to like my greens best when they are pot roasted. I used to render bacon, butter or pancetta into the pot first, the fatty crispy strips of cured pork to be fought over at dinner. Then there came a time when I needed to make the greens vegan. I started using peanut oil and ever since it has become a fast favorite which is strange since we are big pork eaters.
What happens to greens when they are pot roasted is the natural sugars break out and much like caramelizing onions you start to build flavors that just don’t exist when collards have been boiled. I liken the building of flavors to a fine cigar, great coffee or a complex wine.
As the thick and leathery fall collards, greens which have taken a frost or two, cook down a toothsome quality develops that is very satisfying to eat. You also get these rogue bits that didn’t get as much oil as they should and they become crispy and blistered which contributes a nice contrast. A sure sign that you have roasted your greens right is the smear of brown juice that paints the bottom of the pot when you stir.
We eat greens cooked like this as part of three dinners each week, at least, and in general Amy and I will fight over the leftovers at breakfast time.
Seves 4
For the fritters:
16 oz. field peas, cooked, either black eyed or you favorite type I used purple hull, two 14 oz. cans, drained works too
1 cup carrots, grated
1/4 cup rice flour, or all purpose flour
2 teaspoons shallots, minced
2 teaspoons garlic, minced
1 1/2 teaspoons dried thyme
kosher salt
fresh ground pepper
For the collards:
8 to 10 cups collards, cut into 1 inch stirps, rinsed multiple times to get rid of sand and dirt
peanut oil
kosher salt
fresh ground black pepper
For the buttermilk gravy:
1 1/2 cups live culture buttermilk
1 teaspoon creole seasoning
1/2 teaspoon dried thyme
1 1/2 teaspoon shallot, peeled and minced
1 teaspoon garlic, peeled and minced
1.Heat the oven to 325˚ F. Combine all the gravy ingredients in a small bowl and mix to combine. Set aside to let the flavors build.
2. Place a 6 quart enameled Dutch oven with a lid over medium high heat. Add some peanut oil to the pot being generous with the peanut oil and making sure you coat the bottom of the pan plus a touch more. Add half the greens and season them with a two finger sprinkle of salt and a few grinds of pepper. Turn the green giving them a hot oil bath. You want the leaves to be coated, not greasy though. Add the rest of the greens. Season them with salt and pepper too. Turn them into the first batch of greens being sure they get an oil coat as well. Put the lid on the pot, slide it into the oven and roast the collards for 1 hour and 15 minutes making sure to stir the pot at the half way point.
3. Place the cooked peas into the bowl of a food processor. Pulse to grind the peas. When it becomes mealy add the rest of the fritter ingredients and pulse until smooth, moist and will hold together. The key here is to adjust the moisture content. If it is too wet add rice flour a tablespoon at a time letting the mix rest a bit so the flour can hydrate and thicken the fritter mix. If it is too dry add water by the tablespoon and do the same. My way to test patties of all types is to make a patty and then throw it against the side of the mixing bowl. If it flattens and holds its shape I am happy.
4. Once your consistency is right make 8 equal sized patties. Place a nonstick pan over medium heat, add oil and fry the fritters until they are brown on both sides. Remove them from the pan to a brown bag lined tray. Drain the excess grease. Serve while hot.

Barded Pork Rib Roast with Fall Vegetables

A pork rib roast with fall vegetables ready to go into the oven.
One perfectly good reason to buy whole slab or make your own bacon is you get the smokey rind. The pork rind is perfect for keeping a roast juicy and adds tons of great flavor, and besides, when the smokey hammy fat oozes down on the vegetables, oh my…
Wrapping a roast in fat is called barding. It is so simple and so delicious. It is a technique of days gone buy in America but I often see it done in ethnic markets and in different countries around Europe. If you live in Indianapolis Klemm’s carries the smoked rinds but you might want to call first to make sure they haven’t sold out.
If Brussel sprouts offend you, which I just don’t get, feel absolutely free to substitute other long cooking green vegetable. Parsnips, potatoes, celery root, and the list goes on, would be good too.
Serves 4
1 four rib, bone-in center cut pork loin roast
1 piece of smoked pork rind, often found at German butcher shops
4 to 5 carrots, peeled and cut into 1 inch chunks
1 lb. Brussel sprouts, trimmed and cut in half
8 to 10 pearl onions, peeled, or small onions cut into wedges
8 to 12 garlic cloves, trimmed and peeled.
a handful of thyme sprigs
kosher salt and fresh ground pepper
grape seed oil
Preheat the oven to 350 degrees.
1. Season the roast with salt and pepper. Place the bacon rind onto the meat side of the the roast and tie it into place with kitchen twine.
2. Heat a 12 inch skillet over high heat and add the grape seed oil. Add the Brussel sprouts and carrots without crowding them. You may need to do this in batches. Season them with salt and pepper. Brown them well then place them into a large casserole.
3. Brown the onions in the same pan and any remaining sprouts or carrots.
4. Place the remaining seared veggies and garlic into the same casserole and set the roast on top. Strew the thyme branches across the top of both the vegetables and the roast.
5. Place the casserole into the oven and set a timer for 30 minutes. Stir the veggies around turning them to coat them in the drippings.
6. Set the timer for another 30 minutes and stir the veggies again.
7. Go another 30 minutes but this time check to see how the roast is coming along by either the squeeze test or with an instant read thermometer. It should read 150-155 degrees.
8. If it is not done stir the vegetables and check it again after 15 minutes.
9. Once the roast is done cut it into 4 chops and serve along side the veggies.

Three Onion Chowder

Three Onion Chowder with Parsleyed Oyster Crackers
I really like chowders and really like French onion soup. I don’t like pasty chowders so I didn’t thicken it except for the starch released from the potatoes. One tip I learned from Jasper White’s 50 Chowders is to let the chowder rest covered for thirty minutes. It is really does make a difference by allowing the flavors to come together.
SERVES 4 TO 6
For the Soup:
3 ounces pancetta, 1/4 inch dice
2 cups yellow onion, peeled and julienned
2 leeks, rinsed, white parts only, sliced into half moons
4 shallots, peeled and sliced
1/3 cup celery, 1/4 inch dice
1 1/2 tablespoon fresh garlic, minced
1 teaspoon fresh thyme, minced
1 bay leaf
2 cups chicken stock
2 cups half and half
3 russet potatoes, peeled and cut into 1/2 dice
1 tablespoon Italian parsley, minced
1 tablespoon fresh chives, chopped
Kosher salt and fresh ground pepper
Parsleyed Oyster Crackers:
1 tablespoon unsalted butter
1 cup oyster crackers
1 tablespoon Italian parsley, minced
Fine sea salt and fresh ground pepper
1. In a 3 quart Dutch oven or sauce pan add the butter and pancetta and place it over medium heat to render the pancetta. Once some of the fat has been released add the onions, shallot and celery. Saute until they are just becoming golden. You don’t want them to brown too much or the soup will be brown. Add the leeks, garlic and thyme. Cook until the leeks are just becoming soft. Add the bay leaf and chicken stock. Bring it to a boil and add the half and half and the potatoes. Bring the soup back to a boil and then immediately turn off the heat and cover the pot. Allow it to rest for at least thirty minutes.
2. Heat a small saute pan over medium high heat. Add the butter and once it has stopped bubbling but is not brown, add the oyster crackers and toss the crackers to coat with the butter. Season with salt and pepper. Stir in the parsley and toss the crackers gently in order to coat all the crackers with the parsley. Pour out onto a baking sheet and let cool.
3. To finish the soup reheat it but don’t let it boil. Taste a potato to check and see if it is done and adjust the seasoning if necessary. If the potatoes are not done then cook over low heat for 15 minutes. Stir in the parsley and chives and then ladle into cups or bowls. Top with a few oyster crackers and serve.
The delicate flavor of white fleshed fish, for me, is best when cooked simply. In fact the most important thing is seasoning the fish properly and making sure not to overcook it, which is a good reason to salt it an hour before you want to eat and why it makes sense to finish cooking or re-warming the fish in the oven.
This dish is a great recipe for entertaining because you can brown the fish without cooking it completely and then when you are ready, you can finish it up in minutes in the oven. I also find it is a great dish for date night at home or a special occasion dinner for two, such as an anniversary.
Finally, the fish you use is up to you. I love Dover sole but it is hard to find, you are going to have to skin it, and then bone it too. Flounder is an excellent alternative as is halibut.
Serves 2
1 large whole Dover Sole, skinned, or other flat fish
5 fresh basil leaves
1 sprig of thyme or savory
extra virgin olive oil, plus more for cooking the fish
3 baby multi colored carrots
1 or 2 zucchini depending on their size
1 garlic clove, peeled and crushed
kosher salt and fresh ground white pepper
1. Heat the oven to 350˚ F. Salt and pepper the fish on both sides.
2. Place the herbs into a mortar. Using the pestle grind and bruise the herbs into a coarse paste. Add a pinch of salt and a grind of fresh ground pepper. Add 2 tablespoons of extra virgin olive oil and mix to combine. Set the oil aside.
3. Heat the olive oil in a skillet(non-stick if you are more comfortable with it) large enough to hold the fish easily and comfortably. When the oil is very hot but not smoking add the fish. Brown the fish on both sides it doesn’t matter if it is cooked through or not, then remove it to an oven proof tray.
4. Clean out the skillet and place it back onto the stove. Slide the fish, and two oven proof plates, into the oven to finish cooking or warming it. Add a glug or two of oil to the saute pan, add the crushed clove of garlic then add and sear the zucchini. Season it with salt and pepper then turn it and do the same to the other side.
5. Plate the fish, put the zucchini on the plate attractively and using a mandolin or by slicing the carrots thin, garnish with the carrots. Drizzle some herb oil over the fish filets.
6. Serve.
Dover Sole with Herb Oil and Zucchini
The Chicken Massacre at Crooked Creek
 Last night’s rain, soaked up by the hot earth, is rising again this morning as steam. As the truck rattles down the long gravel drive and we get close to the orchard, the apple trees emerge from the light fog, the treetops magically floating in a cloud.
Then, through the mist, I begin to see the faint outlines of chicken carcasses strewn about haphazardly–some on their sides, missing wings, their pure white feathers stained red; others with their heads folded under their chests; and some with their chests still heaving, breathing their last. It could be a black-and-white photograph of a Civil War battlefield. Except they’re chickens. My chickens.
My throat drops into my stomach. I stop the truck and put it in park. I fling the door open and jump out, telling Lynnie, my youngest, to stay put. I walk briskly out to the killing field. I pick up a couple of the dying birds and do the humane thing, wringing their necks and dropping them in a pile.
At first I think it’s a coyote massacre, but I quickly notice that most of the birds have two fang punctures in their skulls, while a few are gutted, their stomachs ripped wide open. I’ve heard that raccoons will bite the heads of chickens and lick away the blood and fluids, which makes the feathers come loose and leaves the chicken bald. When a chicken runs dry, the raccoons leave the carcass and move on. It isn’t hearsay anymore–I’m witnessing this oddity and carnage first-hand.
The sky is still gray and it’s drizzling again. The splashes of blood are diluting and spreading in the rain. As the truck idles in the driveway, I look around the scene again, then the smell of wet dead chicken on my hands and exhaust fumes makes me gag.
I walk back to the truck. I get in, my shirt wet against the seat, and look down at my lap, confused. I left the chickens in their pen this morning because we left early to run a couple of errands. I figured I would let them out when we got back. It seems the raccoon or raccoons ripped the welded wire right off the side of the pen and killed each chicken one at a time. It’s as if they’d been waiting at the woods’ edge, watching me leave, seeing those chickens penned up so they couldn’t run–just like the raccoons wanted. It’s as if they’ve been waiting and watching for months, hoping I would make this mistake.
It’s not like the chickens could have run, anyway. They were meat birds, one week away from being processed. They were plump–fat, even–and meat birds aren’t meant to run; they aren’t even meant to reproduce. But I had raised them perfectly–maybe the best flock of meat birds I’ve raised. Now 21 of 25 are laying dead in a field being rained on: a total loss; a tragic waste.
Back at the house, all I can think is how glad I am that I don’t depend on these birds for my food. Of course, I wanted them to be my food, but I can afford to buy chicken at the store because there are people who raise thousands, even millions of them, and they do it cheaply and, for a couple of extra bucks, even organically. My family and I won’t go hungry.
As tragedies will, though, this gets me thinking about how and why I raise these birds. Like wanting to have more eggs than I need, because I don’t find the ones with poop on the shell to be quaint, so I feed the ones with shit on them to the dogs and keep the clean eggs for myself. Isn’t that the idea, to have clean, fresh, great-tasting eggs? And Vivian and Lynnie like chasing the chickens around the yard and hatching the eggs in the spring, and it’s a great experience for them to take care of the hens. They love the looks on people’s faces when they ask, “What are your chickens’ names?” and the girls reply, “Breakfast, Lunch, and Dinner!” And I like that they know where their food comes from. They’ve seen a chicken butchered, watched me do the crappy job of plucking a bird, and they know that it’s a hell of a lot of work for one meal.
Raising organic birds takes time–lots of time–and money. I eat probably the most expensive eggs in the county, and, after the massacre, the most expensive chicken, too. My wife thought I was crazy to get chickens, until she tried the eggs and we breaded and deep-fried our first meat bird. But now I’m wondering if she wasn’t right. Not just because it’s an expensive venture in a bad economy, but because we’ve had some other bad luck lately. It didn’t start out that way–the honeymoon years seemed perfect–but now, four years into it, things are going wrong.
Like the time I was at the kitchen sink and looked out the window just as the big Black Langshan rooster jumped three feet into the air, put its talons out, and grabbed at Viv’s back. Viv fell down, and I dropped the dish towel and sprinted to the back door. Then I heard her scream. It wasn’t the first time I’d heard her scream, but this time she wasn’t crying wolf. She cried out in such a complete panic that I had no doubt she needed help, desperately.
I’m not a violent person, but that changed in an instant. In a fit of blind rage and adrenaline, I tackled the big rooster, grabbed it by the feet, put my foot on its head, and jerked upward. I broke its neck with such force that I pulled the head clear off, but it was still flopping and spewing dust and blood everywhere. I kicked it away like it was a poisonous snake and immediately checked on Vivian, who was huddled in a corner by the chicken shack, covered in dust and shit.
I was shaking. She was crying.
I was livid. She was scared.
But she was more scared than hurt, and she was going to be okay. The rooster had pecked her once in the face about an inch below her left eye, so she was bleeding a little, but her back, because she had on a jacket, was unharmed.
I couldn’t put all the blame on the rooster. The girls aren’t supposed to go into the pen alone. We’ve had talks about it. I’ve told them that, because they are at eye level with each other, a big rooster like Rusty will come after them because he thinks they’re going to get his hens. He’s being protective of his flock and, because they’re his size, he will attack.
Now, in my kitchen on this wet, bloody morning, I remember pushing the tear-soaked hair away from Vivian’s eyes and tucking it behind her ears, and then, through her tears, between heaving breaths, she giggled a little and asked, “Can we eat him, Dad? Can we eat the rooster?”
I know I’m going to keep raising chickens.
For the Coq au Vin recipe click here

Texas Caviar
The first time I had Texas caviar I was in Santa Fe. There I think they called it Cowgirl Caviar but that might have been the name of the restaurant. I remember lots of pictures of cowgirls. Maybe the name of the restaurant was called Cowgirl Hall of Fame. That seems more right to me.
Anyway. Texas Caviar was made famous by Helen Corbitt the food director in the 1950’s for Neiman Marcus in Dallas. Many recipes call for Italian dressing. No. Do not do it. I am sorry but bottled dressings suck. Period. This is supposed to be fresh and vibrant and everything added is meant to highlight the creamy texture of the legumes, not hide it.
Serves 6 to 8
2 ea. 15 oz cans black eyed peas, drained and rinsed
2 tablespoons red onion, minced
2 tablespoons celery, minced
1/3 cup cilantro, minced
1 tablespoon green onions, minced
1 garlic clove, minced finely
1/3 cup red wine vinegar
1/8 cup extra virgin olive oil
1/8 cup neutral flavored oil, i.e., canola, grape seed
1 to 2 dried cayennes or chile tepins cut into thin strips with scissors
kosher salt and fresh ground black pepper
corn chips
1. Combine all the ingredients into a bowl and mix to combine. Season with salt and lots of black pepper. Taste and adjust the seasoning as necessary. This gets better as it sits, 24 hours is optimal, but will also gain more Scoville heat units so keep that in mind when you decide the amount of red pepper you want to use.

Bodega Chicken Curry
I like to use a wok for these kinds of dishes. Besides everyone should own a good wok. By good I am not talking about those little non-stick thingies hanging from the wall at the five and dime. Those aren’t even big enough to make a half order of fried rice for a toddler.
What I am talking about is wandering down to your local restaurant supply store and heading for their wok section. They have blue carbon steel woks that are cheap, will last forever, are non-stick by nature and come in all sizes. I have seen one big enough that I could take a hot bath in it if I wanted but all we are looking for is a 16 to 18 inch wok. That is the measurement from one side of the rim to the other. It will seem huge but when you go to make fried rice for a family of four it all the sudden won’t seem big enough.
I use a wok for deep frying, making stews like this, fried rice and countless other dishes. It is the shape of the wok that makes it work so well.
In the end you can use a heavy bottomed pot, cast iron pot or enameled Dutch oven to make this. I just happen to like a wok.
I serve this with rice and peas and pot roasted collard greens. Roti is a must.
Serves 4
Island style curry powder:
1 tablespoon each, whole cumin, coriander, black pepper, anise seed, and brown mustard seeds
2 teaspoons whole allspice berries
1 tablespoon ground tumeric
1. Toast all the seeds and berries until fragrant in a skillet placed over medium heat. Remove them from the pan and let the spices cool.
Once cooled place everything including the turmeric into a spice grinder and grind to a fine grind.
For the curry:
peanut or canola oil
8 chicken drumsticks or thighs, skin on or off your call
2 yellow onions, about 3 1/2 cups, julienned
1 1/2 tablespoons fresh ginger, peeled and minced
1/4 cup fresh garlic, peeled, trimmed and sliced thinly
4 to 6 tablespoons curry powder
8 to 10 fingerling potatoes, peeled and chunked
6 to 8 sprigs of thyme
2 cups chicken stock
1 cup water
if you want to add heat add habanero, jalapeno or whatever diced hot pepper you want.
kosher salt and fresh ground black pepper
1. Place a wok or heavy bottomed pot over medium high heat. Add enough oil to coat the pan. Add the drumsticks or thighs and brown them on all sides. Then remove them from the pan to a plate.
2. Add the onions and more oil it needed and cook until the onions begin to soften. Add the ginger, garlic and curry powder (if you want heat add peppers now). Cook until fragrant.
3. Add the stock and water. Add the chicken back to the pot along with the potatoes and thyme. Season with salt and pepper
4. Bring the liquid to a boil and then reduce the heat to a simmer. Cover, stir now and again and simmer until tender. About 30 to 45 minutes. Taste and adjust the seasoning.
5. Serve.

A Different Sort of Education

Honey Bees Polinating Silver Queen Sweet Corn
If the number of dumb ass things you have done in life stops with the number of fingers you have you can consider yourself lucky. Since dumb ass is a matter of objectivity you may need to throw in all your toes too, even so, you should still figure yourself rightly finishing on the high side of exceptional if the number doesn’t surpass twenty.
Thus far I feel I have been lucky.
So the day I went to pick up a hive of bees and planned to put them in the back of the 4Runner I had to scratch my noggin and ask myself if I was putting myself at risk of being downgraded on the DA scale.
You have to understand I spent the better part of a day searching out a hive body full of bees that might be for sale, notice I said might. First off finding beekeepers that use a phone or those that don’t think your the census man is full time affair.
Beekeepers are borderline off-grid-aphrenics. They are skeptics at the very least or they think the world is going to end and if the world isn’t ending they are just planning for hard times. It is just their nature, a lifestyle in fact, and it is all in the oral handbook of beekeeping just ask a beekeeper.
So you have to take a Woodward and Bernstein approach when looking for a hive and start with the officers of the local beekeepers association only to have them give you a list. As you work your way around the call list they gave you you quickly learn a few things. You can never get a definitive answer from a beekeeper, you feel as though everyone is using aliases, at some point you expect to see the name Deepthroat on the call list, and they all have a perfect mid-state Hoosier accent where neck is pronounced nick and next is nixt. This is when you realize the linguistics classes you took in college weren’t for naught, even though it is some twenty years later, but that they still have no real world use.
Meanwhile you hear this lady yelling, and I mean yelling, out the front door of the house for her husband because they still have a phone with a cord that attaches to a wall and you are listening to this yelling but also thinking about linguistics and somewhat thinking your day would be complete if she only let out a hog call. A big suewwwwwwee somehow would take it over the edge.
“I don’t know where he is” she said, then instantly “Oh here he is.” like an apparition appeared before her very eyes.
“This is Garland” he says.
I go through my hole explanation of what I am looking to do only to get to the end of why I need bees, that I have a small orchard, and a huge garden, to hear Garland say he doesn’t keep bees anymore.
And I say, “but I was just talking to Orville Hegemeyer and Orville said,” I get cut short.
“How is Orville, is he doing better? I knowed he was sick for a bit. You know I don’t keep bees on a professional basis anymore I got sick a few years back, had a case of bone shaves. Sold everything but people have been calling me to get swarms, well you know if you got one hive your soon to have ten. Now that my back is better I got a few hives. This spring I am gonna put together a few hive bodies if all goes well I should have three or four to sell.”
I gave him my number, said I would buy a hive, and would wait for his call.
That spring I watched the pink and white blossoms of the apple and pear trees open, brown and drop to the ground. The asparagus came and went as did the morels. Peas and spinach were done.
The phone rang, “I got that hive body ready ‘n full of bees if’n you still want ‘em.”
“Garland I thought you forgot about me!” I said.
“No sir, this weather put things behind almost two months. You still want it.” he said.
He gave me directions.
So that is how it came to pass that I am sitting in a gravel drive with my car window cracked listening to a man with a bee veil on telling me I might want to park on the other side of the house since he really angered a bunch of bees over on this side, another reason I guess to have a door on every side of the house. So I do.
Garland lived in a small white clapboarded ranch in the middle of a small town. It was like the town was built around his seven acres though. He had it all fenced off with that woven wire fence that was big in back yards in the seventies and the house butted up to a big woods but then it was like a regular subdivision for miles surrounding him. At his house though he had peas growing up the fence and green onions planted around the fence row too. He had stuff growing everywhere. Rows and rows. He had two sheds, one for squabs the other for chickens. And bee stuff piled everywhere and hives everywhere.
He was proud of his place and gave me the grand tour as if he had been stranded on a desert island an I was the first person to come along. I enjoyed the three hour tour until finally we wound up at the hive he was wanting to sell me. Eighty bucks.
Funny thing is when I left his place I left with four live squabs, a mess of white raspberry starts and a head full of useful information just because I showed up. I figured with the raspberry starts alone I was down to twenty bucks for the hive.
The hive. I had no bee suit. I didn’t own one. I did all this stuff in such a hurry I didn’t really plan things out. Garland told me I didn’t need one that we would screen the hive entrance and that the sides were stapled to the bottom board and top. He stapled it shut with screen but bees were still flooding out of a small hole at the corner of the entrance. Seems sealing bees in royally pisses them off. I pointed this exit hole out to Garland and he shot another staple into the screen and everything seemed fine. He said besides you will want to drive with the back window down and the two front passenger windows open to keep the airflow going out the back just in case. Then he laughed which didn’t really ease my mind.
I drove with the concentration of a winning Indy race car driver on the last lap of the Indianapolis 500. Got home safe and sound. Got the hive safely to its new home.
Now, how to get that screen off with 30,000 angry bees behind it and me without a bee suit.
The Great One
 Recently, for what seems like the millionth time, I sat down and watched the original The Hustler. Not because of the story, although it’s a great story; or Paul Newman’s blazing good looks, although his blue eyes are piercing, even in black and white.
No, this time I was watching the Great One: Jackie Gleason. He completely captivated my attention. He’s not in many scenes, but he steals the ones he’s in, hands down. You can almost see Newman studying him right there on-screen, as though his blue eyes are fixed, mesmerized, on the great acting Gleason is doing.
Their first scene together might be one of the best in any movie. Gleason comes up the stairs, enters the pool hall through a set of double doors, and there he is: the presence, the clothes (who else could wear that hat?), the je ne sais quoi. Newman’s eyes might pierce, but watch the banter between the two and notice the moments when Gleason smiles and his eyes are nothing less than sparkling. That sparkle in Gleason’s eyes has fascinated me for months. I’ve gone back and watched old footage of him on talk shows and other clips of him talking with folks. I thought “je ne sais quoi” was about the best way to describe the sparkle, but then I realized it was much more. Continue reading
Fried Bologna Sandwich on Challah with White American Cheese Sauce

Fried Bologna with White American Cheese Sauce
I was probably thirteen or fourteen years-old the first time I had a fried bologna sandwich and I will never forget it. I was watching some TV show and they ate it on the show. I thought I had seen the most amazing culinary treat ever. I went to the kitchen and made one and was shocked to find bologna was even better hot.
I used to save my school lunch money, for things I shouldn’t have been buying, and came home from school starving. My mom wouldn’t make me anything to eat because it was my fault I was hungry. That said, she didn’t care if I made something for myself and from that moment on fried bologna became a staple.
This is my ode to the days of old, I don’t eat one of these often but when I do this is how I want it served.
SERVES 1
4 thin slices of good garlicky German bologna, French garlic sausage, or mortadella
2 slices of Challah, toasted
1 large egg
1/3 cup heavy cream
1 1/2 teaspoon Nathan’s mustard
3/4 cups grated white American cheese
3 dashes Worcestershire sauce
2 dashes Crystals Hot Sauce
1 tablespoon canola oil
1 green onion, sliced
1. Place a small sauce pan over medium heat and add the cream and mustard. Bring to a boil and then reduce the heat. Add the Worcestershire, hot sauce and cheese. Stir to combine and continue to heat until the cheese is melted. Remove from the heat and keep warm.
2. Place a medium saute pan over high heat.
3. Fold each piece of bologna in half and then into quarters so it looks like a triangle. Place the four triangles into the hot saute pan and sear until it looks like a hot dog that was over cooked on a campfire. Remove the bologna and place it on the bottom slice of Challah and top with the remaining toasted bread.
4. Reduce the heat on the pan and add the oil. Fry the egg to your desired doneness.
5. Pour the desired amount of sauce over the top slice of bread and then top with the egg and green onions. Serve with an ice cold Pepsi, or Coke if you must.
Meyer Lemon Tart

Meyer Lemon Tart
I have been making lemon bars for many years now from a recipe by John Taylor also known as Hoppin’ John. A while back I thought it would make a great tart, and guess what, it does. If you like Low Country cooking you should search out his cookbook Charleston, Beaufort & Savannah: Dining at Home in the Lowcountry. It seems like a good time to share this recipe.
SERVES 6 TO 8
For the crust::
1/4 cup sugar
1 cup all purpose flour
1/4 cup semolina flour
1/8 teaspoon salt
1/2 cup unsalted butter, room temperature
For the custard:
2 to 3 Meyer Lemons, zested first then squeezed for 1/3 cup juice
5 large egg yolks
3/4 cups sugar
1/2 cup ussalted butter, room temperature and cubed
zest from two Meyer lemons
powdered sugar, for dusting the tart
1. Heat the oven to 325 degrees. In the bowl of a mixer, or in a bowl and mixing with a wooden spoon, cream the butter with sugar and salt. Add the flours and mix well. The shortbread crust will look crumbly and like cous cous or cornmeal. Turn the dough out into an 8 inch tart pan and press it evenly into the pan starting with the sides and working toward the center. Place your index finger over the top of the flutes and push the crust upward using you index finger as a back stop.
2. Slide that tart shell into the oven and bake it for 20 minutes.
3. While the tart is in the oven combine the eggs, sugar, zest, 1/3 cup Meyer lemon juice in a heat proof mixing bowl and whisk to combine the ingredients.
4. Place the mixing bowl over low heat, if you are worried about this you can most certainly use a double boiler, and whisk the custard until it starts to thicken. It takes about 13 minutes on low so it will take longer in a double boiler. Once it is very thick, like warm pudding and leaving ribbons as you whisk, remove it from the heat and whisk in the butter.
5. When the tart crust is done remove it from the oven and add the lemon curd. Bake the tart another 10 minutes or until set.
6. Remove the tart from the oven and let it cool completely. Once cool sprinkle it with powdered sugar just before serving, slice and serve.

Bacon Fried Rabbit
The difference between Edna Lewis’ book The Taste of Country Cooking and countless other cookbooks is she truly celebrates food. Not only is it a celebration but it is the gospel of farm to table eating, a hymn of fresh, great tasting, whole food that should be sung loudly as the new testament of eating seasonally. In short, it just might save your soul and at the very least it is extremely soul satisfying.
What drew me in the first time I opened the book was a breakfast menu that simply read Fall Breakfast and the second item listed in the menu was smothered rabbit. As if this wasn’t enough the first time I made Miss Lewis’s pear preserves I became teary eyed because it reminded me of the taste of a long-forgotten-that-was-now-brought-to-mind memory of my grandmother and the pear preserves she made.
When you realize this was published in 1976 it becomes apparent this is a last bastion to how rural America once ate. It isn’t the French influenced food made in a California restaurant kitchen that now stands as the talisman of sustainable eating, but rather, it is 100% American food made with ingredients had on hand and in season. It was written at a time when women wanted out of the kitchen instead of in and the burger joint was still a treat but unfortunately fast becoming a standard.
The book is not a retrospective of days past and food that is dated by out of style trends but it is a classic that is as current and in touch today, maybe even more so, as it was when written.
Miss Lewis does nothing short of pen a rural American classic that treats food with respect and knowledge of how to use the ingredients at hand and get the most out of them. There is nothing fussy about her food and there needn’t be because its simplicity and freshness is what makes it delicious.
In short if you care about sustainable local food you should get yourself a copy. It will fast become your how to manual.
This recipe is based loosely on Miss Lewis’s fried chicken recipe.
Bacon Fried Rabbit
Serves 4
2 fryer rabbits, cut into 6 to 8 pieces
1 piece of slab bacon, cut about 1/4 inch thick
2 cups flour, seasoned with 2 teaspoons black pepper, 1 teaspoon each of thyme and paprika, and 1 teaspoon of salt
buttermilk
peanut oil
kosher salt
1. Season the rabbit with salt and set it aside to let the salt dissolve into the meat.
2. In a large cast iron Dutch oven add enough oil to come up the side by no more than a third. Add the bacon.
3. Turn the heat to medium high and place your fry thermometer into the oil. Place the seasoned flour into a plastic bag with the rabbit. Toss the rabbit around to give it a good coating. Remove the pieces from the flour and let them soak a in the buttermilk. Remove each piece and let the excess drip off. Put the pieces back into the flour for their final coat. Don’t do this to far in advance or the coating gets brittle when fried.
4. When the temperature gets to 350F˚ remove the bacon if it is crispy and start frying the rabbit until golden brown and delicious. If you need to do this in batches do. Don’t over crowd the pot or you will have a greasy mess. So to do this heat the oven to 250˚F. As the rabbit pieces come out of the grease place them on a sheet tray fitted with a wire rack and keep them in the oven till all are done.
5. Serve.
Edna Lewis: The Taste of Country Cooking
J.R. Craves Tex-Mex
 J.R. stands on the metal folding chair, stretches up on his toes, and exhales pot smoke into the air vents just to be an asshole. He jumps and lands on the floor with a resounding thud. The shaking floor is felt two apartments down by a Hispanic woman making cookies. He’s annoyed that the apartment next door was rented to some dude. He liked the hotty girl who lived there before; liked to watch her shower through the hole he made in the wall. Now it was some dick-weed kid who he already knew he didn’t like.
That’s not all he’s pissed about today, though. He can’t believe the super gave him an eviction notice. Not after the words they had at his apartment door when the super came knocking and tried to collect the rent. J.R. told him if he evicted him he would kill his wife right in front of his fucking eyes. He isn’t going to do it–kill the super’s wife; he just knows threats will get him what he wants if they make him seem scary and crazy enough.
He paces. He thinks. He gets more pissed off the more he thinks. He stomps a foot on the hard tile. He’s fidgety. He grabs the speed off the counter and shakes the last two pills from the bottle into his mouth, then quickly snaps his head from side to side, trying to crack his neck. He paces more rapidly now, in anticipation. His pulse picks up.
He grabs the ball-bat that some former tenant left in the corner and jerks open the door. He looks around the courtyard. No one’s out. He is barefoot, shirtless and lean like a feral cat. His jeans are too long, worn and stringy at the heels where he walks on them. He shuffles down the second-floor walkway, the denim scuffling against the concrete.
At the corner a sudden flurry of action catches his eye. His neighbor the dick-weed, propped in a chair outside the ground-floor laundry room, is falling backwards but catches himself, arms and legs flailing around. J.R. stops and thinks about going down and beating the living shit out of him, then thinks again, smiling at the thought that he’ll get to it at some point. He watches as the dick-weed takes an amateur swig of his beer and returns to his bout of bad foreplay with a burrito. The goop inside shoots out, all over the ugliest pair of new boots J.R. has ever seen; in fact, the burrito stains might be an improvement on the turquoise and red shit-kickers, which were reminiscent of a Nudie suit in the most God-awful way. The kid takes another chomp and more goop falls onto the foil sheet. J.R. thinks he should have left it wrapped around the burrito. You only peel back the foil and the deli paper as you go. It’s what keeps the whole thing together. But he can hear the kid moaning with each bite, like he’s getting laid.
J.R. sees the to-go bag and understands the moans. He knows the place that burrito came from, knows they’re that good–even makes the same sounds when he eats one. A stack of napkins, dozens of them, is starting to drift around in the wind. J.R.’s stomach growls. He smiles again at the ground-floor folly and his mood lightens, but he still has business to attend to.
By the time he finds himself at the super’s door, though, his plans have changed. He was wound up enough to bust a couple of ribs with a swing or two of the bat, but he’s lost the will. Instead, in what feels like a more half-assed attempt to make his point, he chucks the bat through the front window of the super’s apartment. The door flies open.
What happens next reminds J.R. of the time when he was a kid and he climbed a tree with a pocket full of rocks and started throwing them at a big, papery hornets’ nest hanging like an out-of-place Christmas ornament. Nothing happened until a rock finally punched a hole in it and the whole nest emptied, the hornets stinging relentlessly, and J.R. couldn’t get out of that tree fast enough and finally just fell.
And just like that time, J.R. ends up on his back. The second blast from the super’s shotgun knocks him over the railing and he lands on the hood of a car. He feels the hood ornament puncture his thigh. His head lays back off the side of the car, and he looks at the world upside-down. He stares at the kid with the burrito. His stomach grumbles, his eyes shut, and he imagines the smell of the mesquite smoke mingling with the lesser cuts of beef. They become a rich, tender kiss that makes him feel like he’s crossed the railroad tracks to the intoxicating land of the forbidden.
