
Tag Archives: Featured

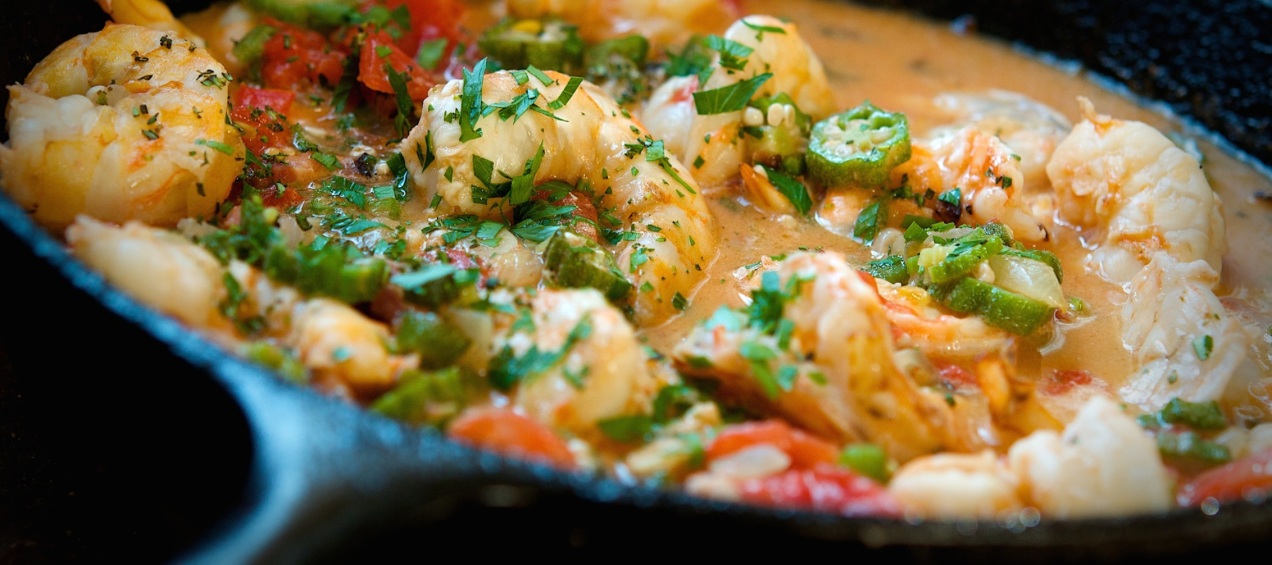
Shrimp and Okra Stew
Some lucky people grew up eating okra; there are even families with rich okra histories that they pass on from generation to generation. I am not one of those lucky people.
I came late to okra — or at least my love for it did. Since I didn’t come from a family of okra-eaters, I always remained skeptical of the vegetable. My relationship with it was like that of boys and girls at an elementary school dance: standing at opposite corners of the room. It’s not that I didn’t like okra — it was that I had no idea what to do with it. I preferred to stay in my comfort zone and stick to eating green beans. Continue reading
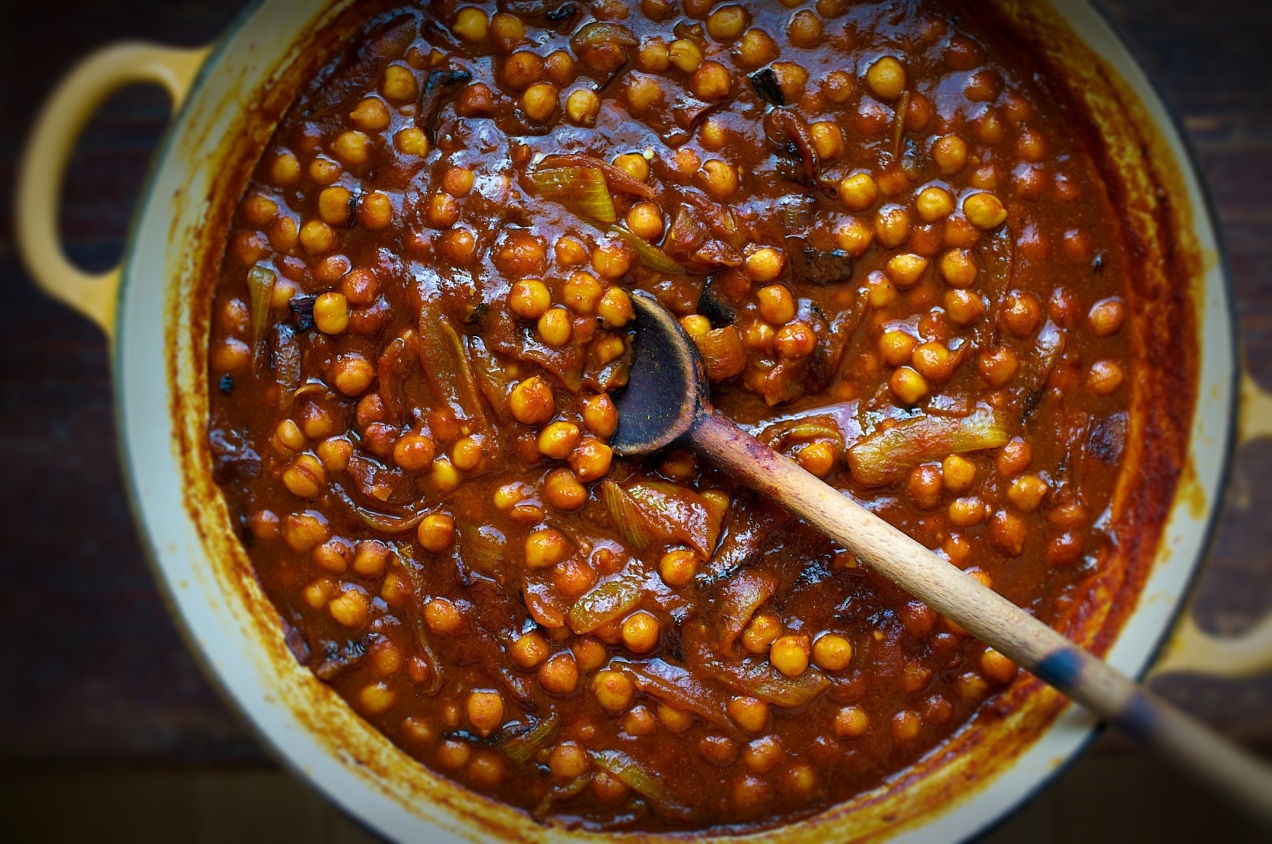
Spicy Chickpea and Sour Tomato Curry with Pasta
Whenever a simple, delicious dish — like this spicy chickpea curry — is placed next to me at the table, it doesn’t just make me happy; I become protective of it in a selfish, rabid dog sort of way.
This recipe is based on Indian khatte channe, which is grounded on good Indian home cooking — but to be fair, it could also have easily been born out of a 1970’s hippie cafe in which cheap eats and a flair for the exotic were popular. In fact, Moosewood Restaurant and its cookbooks always come to mind when I cook this stew. But no matter where it came from or how it found its way to my table, I can tell you that there is a lot to like about this pasta, from the first forkful of twisted noodles loaded with tangy sauce to the last spoonfuls of creamy chickpeas.
I could start with the fact it is vegan, but that will scare some of you off, just as if I said it was gluten-free. In this case it is both, but the good news is that after you try this dish, it won’t really matter.
What does matter is how easily it comes together and the fact it can easily come from your pantry. When I make this, I head to the pantry with a tray in hand and begin by collecting all my ingredients and equipment.
What stands out during the pantry search-and-seizure is tamarind concentrate. It is a bit of an oddball ingredient, but one I always have on hand. Unlike tamarind paste, which requires soaking and straining, this concentrate dissolves easily in water. It has the consistency of molasses, and it gives this stew its characteristic tang. A popular substitute for tamarind is equal parts lime juice and brown sugar, but this only works when a small amount of tamarind is called for in a recipe, so it probably wouldn’t work here. If you like Pad Thai and ever wanted to cook it at home, tamarind really is an essential ingredient to have on hand.
When it comes to curry powder, I prefer Madras — I like the fragrance of kari leaves — but feel free to use your favorite. For more heat, you can add more cayenne; just be sure you know how hot your curry powder is before you get too crazy.
As always, when it comes to caramelizing onions, I don’t know how long it will take for them to become a deep, dark brown. It could be 15 minutes or 45, and maybe more depending on your pan, the heat, and the sugar content of your onions. I do know, however, that you shouldn’t cheat yourself; color them deeply, as they are essenial to this dish.
Assuming you have done your prep, once the onions are caramelized, this becomes a dump-and-pour procedure followed by a short simmering period just for good measure.


Spicy Chickpea and Sour Tomato Curry with Pasta
Serves 6
Two 14.5-ounce cans of chickpeas, drained
1 to 2 tablespoon tamarind concentrate mixed with 1/2 cup of water (more tamarind will make the dish more sour)
3 tablespoons olive oil
2 cups yellow onion, julienned
1 tablespoon fresh garlic, minced
2 cups tomato sauce
1 tablespoon fresh ginger, peeled and minced
1 teaspoon turmeric
1/4 teaspoon cayenne
2 teaspoons Madras curry powder, or your favorite kind
1 teaspoon cumin seeds, coarsely ground
Kosher salt and freshly ground pepper
Cilantro, green onion, or both
1 pound thin long noodles: wheat or rice or gluten free, use whatever floats you boat
1. Place a 3 1/2-quart heavy-bottomed pot over medium heat. Add 3 tablespoons of oil to the pot and then the onions. Season the onions with salt. Cook the onions, patiently, until they begin to brown and become deeply colored. Stir them often enough that the onions on top brown at the same pace as those on bottom. Don’t do this too fast; you want melted, gooey onions, not seared onions. Take your time; it takes a while.
2. Once the onions are browned to your liking, add the garlic. Once you smell the garlic, add the turmeric, curry powder, cumin, and cayenne pepper. Give it a stir then add the tamarind, tomatoes, chickpeas and ginger. Reduce the heat and let the sauce simmer. Taste the sauce for salt and adjust as necessary.
3. Cook the noodles.
4. Once the noodles are done, drain them, and put them on a platter. Top the noodles with the chickpea stew and top with green onions or cilantro or both. Serve.
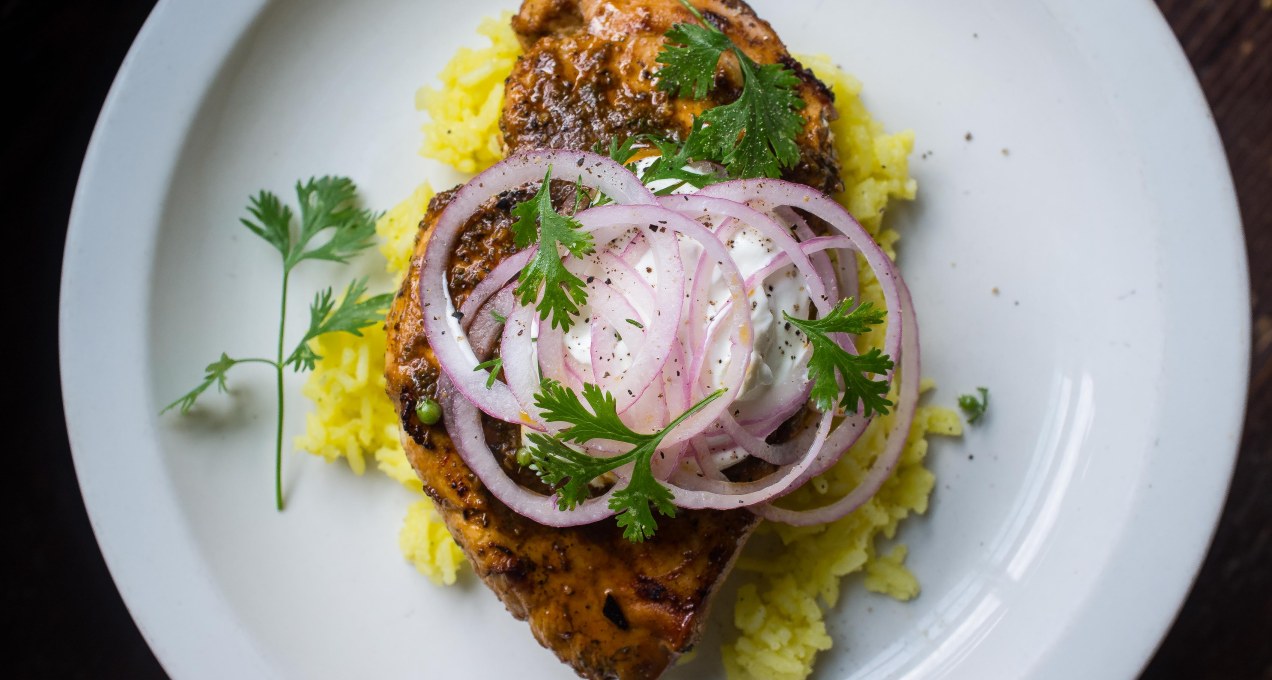
5 Tips for Better Grilled Chicken Breasts
Grilling boneless skinless chicken breast presents a set of problems. I’m a firm believer that leaving the skin on and the bones in your chicken goes a long way to alleviating tough, dried out breast. But it’s an unpopular decision, because of the convenience and the ease with which we can gobble up the boneless skinless kind.
There are ways, however, to defend yourself against dry chicken.
Bigger is not better when it comes to grilling a chicken breast.
They don’t grow them like they used to. Today’s standard meat bird is a hybrid designed to grow big breasts and nice thighs.
The birds of yesteryear, however, were all about the thighs, and the breast was almost non-existent. These days it’s not unusual to find a double lobe breast that weighs in around two pounds — or bigger. Chicken breast can be the size of a turkey breast if you want it to be.
But you can get chicken breasts in any size you want. Restaurants, for example, will often serve two 4- to 6-ounce breasts as a single serving because seeing two on the plate makes you feel as if you’ve gotten your money’s worth. Your butcher should be able to order these small breasts for you. I prefer a single 6-ounce breast per person because it seems like an appropriate portion size — especially if, like me, you like to serve lots of side dishes.
Shape matters as much as the temperature of the grill.
A chicken breast tapers at each end, more so at the tail end than the neck end, which means the tips are either cooked perfectly while the middle is rare to raw, or the tips are burnt to a crisp and the middle is perfectly cooked. It is a lose-lose scenario.
I always buy the breast still connected in double lobes.
It assures pairs of evenly sized paillards, but I always cut them before pounding them out. It is important to note that sometimes in the middle of a double lobe is a piece of cartilage that needs to be removed. Cut along each side of the center line of fat to get it out.
Choose your instruments of destruction.
I have four pictured in the photo below; any will work fine. I prefer the flat side of a meat cleaver because it’s heavy and gets the job done. If you use a mallet, you will have to start in the middle and work your way to the edges in order to end up with an evenly pounded chicken breast. The pan is a last resort, but it is by no means a slacker.
For sanitation and clean-up purposes I like to use multi-layers of plastic wrap. I place a breast to one side then fold the wrap over the top before I get out my daily aggression.
Keep it hot, but not too hot.
I like the grate to be hot but to use coals that are on their way down from their highest heat. You want grill marks that caramelize without blackening. Chicken flesh becomes stringy and chewy if it is left to dry out on the grill, so use your common sense: preheat your oven if you think you might want to finish cooking the chicken at a low temperature.
(recipe adapted from the Fog City Diner)
Serves 4
- 3ancho chiles
- 3guajillo chiles
- 1/2cup reserved soaking water
- Juice of one lime
- Juice of one orange
- 1/4cup red wine vinegar
- 1/4cup olive oil
- 3garlic cloves, minced
- 1tablespoon oregano
- 2teaspoons thyme
- 2teaspoons cumin seed, ground
- Kosher salt and freshly ground pepper
- 4single lobe chicken breasts
- 1red onion, thinly sliced
- 1lime
- Sour cream
- Cilantro
- Cut the tops off the dried peppers and shake out the seeds into the trash can. Place the peppers into a bowl and cover them with hot water. Let them soak for two hours, making sure they stay submerged. Remove the peppers from the water and place them into the bowl of a food processor. Add a 1/2 cup of the soaking liquid to the bowl. Process until you have a pepper paste. Pass the paste through a strainer set over a bowl. You are removing the skins and seeds. Don’t skip this step or you will be severely disappointed.
- Combine 3 tablespoons of the paste with the remaining marinade ingredients and mix to combine. Season it with a healthy pinch of salt and a grind or two of pepper.
- The marinade can easily be made a day or two in advance and stored in a jar in the fridge. The leftover pepper paste is great for enchiladas, black bean soup or chili. Store the paste in a jar in the the fridge. It holds for a long time.
- Pound out the chicken breasts so they are of an even thickness, then place the chicken into a casserole. Use half the marinade and coat the pieces of chicken. Let them marinate for two hours. Be sure to flip them after an hour.
- While the chicken marinates, make the lime pickled onions by tossing the red onion rings with the lime juice. Let them sit for at least 20 minutes.
- Remove the chicken from the marinade. Place the marinade into a small sauce pan and heat it over low heat. Heat the marinade to a brisk simmer.
- Fire up the grill to medium-high heat. Grill the chicken breast. Cook them till done. Serve on rice, spoon the hot marinade over the chicken, top with sour cream, then pickled onions, and garnish with cilantro.
