
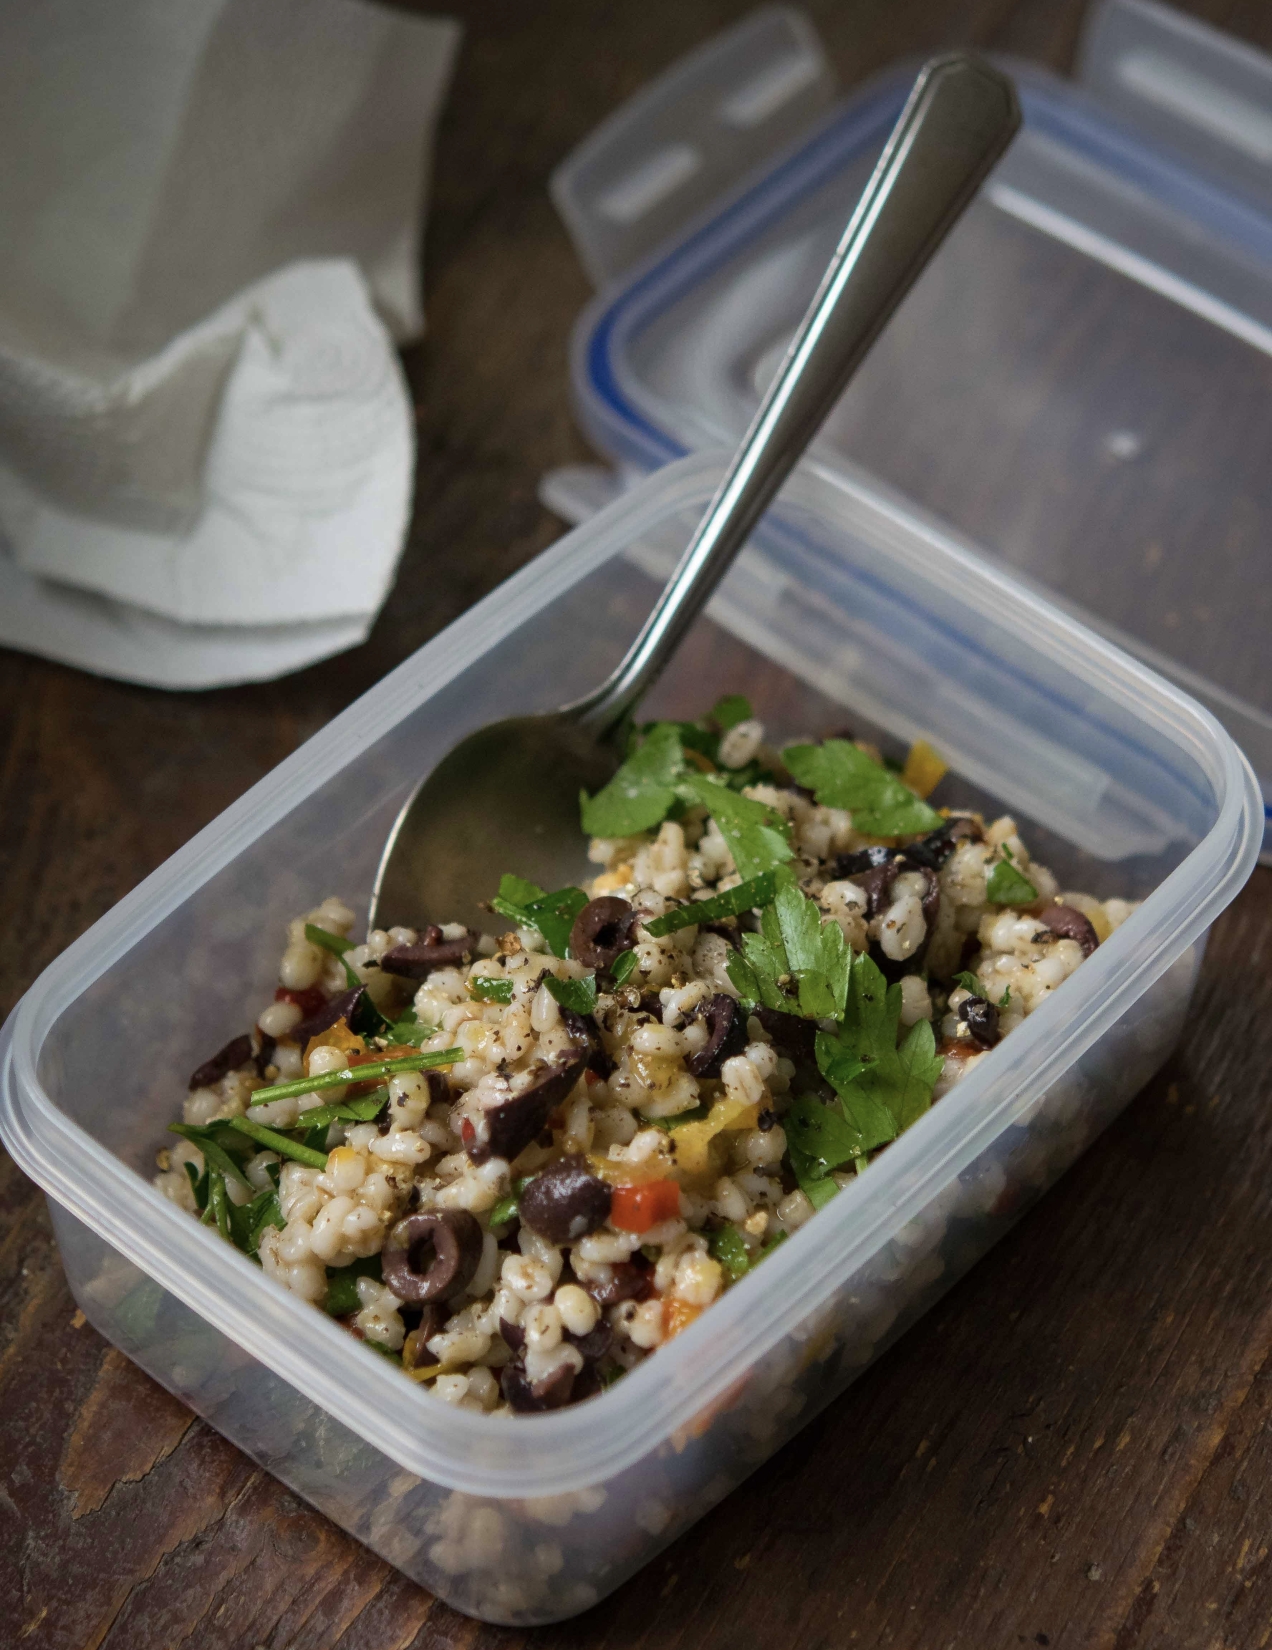
I have cooked with whole grains for a long time. My fascination began, simply enough, with bulgur wheat used to make tabouleh. It was a gateway to all sorts of other grains; winter wheat, soft summer wheat, oat groats, farro, you get the idea. There are lots of grains readily available that a few short years ago were very difficult to locate. A good earthy health food store went a long way to rectifying the shortage but now about every food store carries some sort of whole grain. Continue reading
Category Archives: Meatless Monday
Cheats, Lies, and Hucksters (How to Cook a God Damned Grilled Cheese Sandwich)
As a kid, learning to cook a fried egg and bologna sandwich is like teaching me how to load a gun without establishing any safety guidelines. While the combination of griddled bread, egg yolk, mayonnaise, seared bologna, and American cheese is white trash foie gras, perfecting the fried bologna without having made a grilled cheese, well, it is Picasso without a Blue Period, Miles Davis having composed no song book before Bitches Brew. There is no reference and no history, a drifting ship with no anchor. At the time, I didn’t understand the damage done by using the cliff notes without ever reaching for the novel.
But here we are, in that time of year when we think about grilled cheese. It is the age old discussion, as if we forgot the combination to the safe and it needs to be cracked again, of how to cheat a grilled cheese. As if the answers locked away are new kinds of offerings; in a waffle maker, with an iron, use mayonnaise instead of butter, or turn a toaster on its side.
So I am just going to say it, I am tired of hucksters and cheats. It pains me to be over sold or even worse, blatantly lied too. I am not putting myself on a pedestal, far be it from me to cast stones, I am no practicing perfectionist and neither am I an Elmer Gantry. I have my faults and I try to be honest about them. Even so, when I witness an egregious wrong I can’t keep my mouth shut. After all, I can’t have my children wondering around this world thinking they will be able to succeed without ever learning the fundamentals. It happens everywhere and now, of all arenas, the kitchen is under attack.
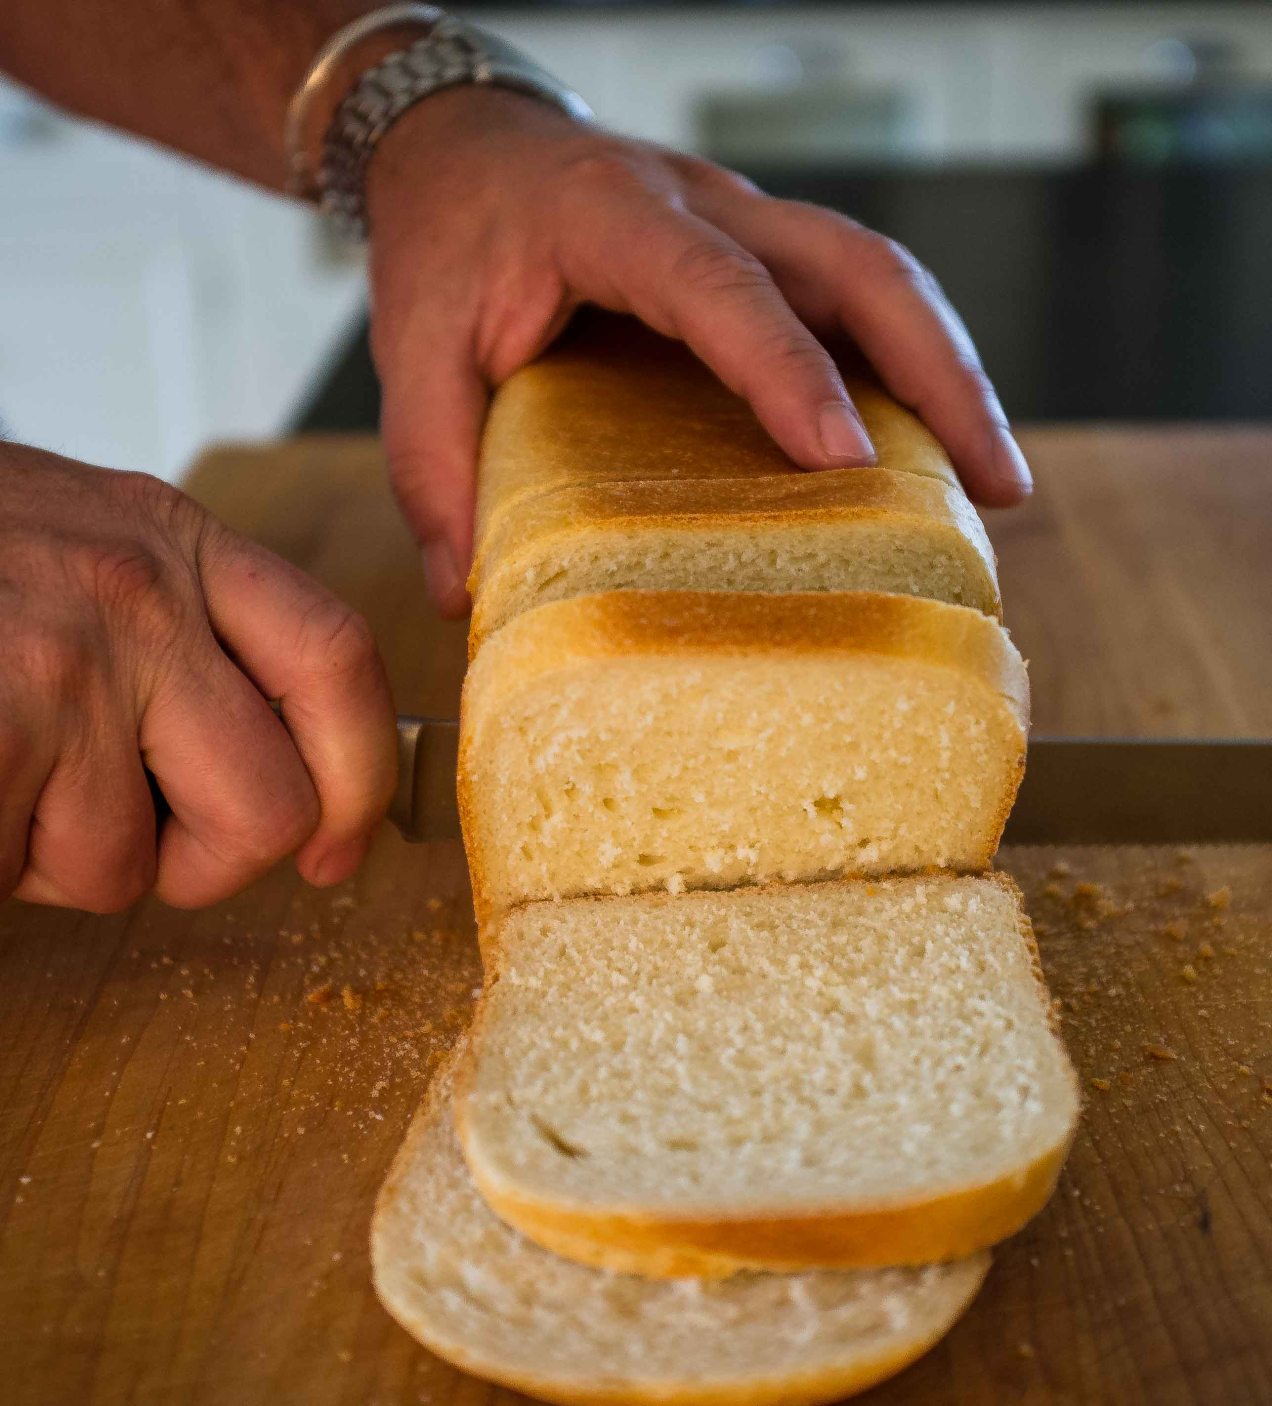
Why can’t we just learn to cook a god damned grilled cheese? What are we afraid of, actually learning how to cook? There are so many basics to be learned by placing a sauté pan onto the stove to griddle two pieces of bread with cheese stuck in between and yet at all costs we try to avoid it. I don’t care what kind of cheese is put between the slices of bread, I don’t even care what kind of bread you use but I do care that you know how the different kinds of bread are going to react to the heat, that types of bread with more sugars and fats are going to brown faster then lean breads made with nothing more then water, flour, and yeast. Or that certain kinds of cheese are so stringy when you go to take the first bite every bit of the cheese is going to come along with it.
Cheats and shortcuts are wonderful but only after you know how to cook the original dish in the tried and true fashion, only after you have mastered the grilled cheese is it okay to riff on it. If you ignore, or fail to recognize, the subtle nuances of cooking you can follow a recipe to the T and still have it fail. It is because there are so many variables that can lead you down the path to disappointment that it becomes imperative to learn how to cook, which is wildly different from simply following a recipe.


Grilled Cheese Sandwich (makes 2 sandwiches)
4 slices Pullman bread
1 1/2 cups gruyere cheese, grated
1 1/2 teaspoons prepared horseradish
1 tablespoon green onion, minced
a splash of heavy cream
fresh ground black pepper
unsalted butter, softened
1. Combine the grated gruyere, horseradish, green onions, and a splash cream in a medium sized bowl. Add a grind or two of fresh ground black pepper. Mix everything with a spoon to combine.
2. Place a 12-inch sauté pan over medium heat. Liberally butter one side of each of the pieces of bread making sure to cover the whole surface. Place the bread, buttered side down into the pan. Top each piece with one quarter of the cheese mixture. Turn the heat to medium low.
3. Once the cheese begins to compress and soften check the bottom of the bread. If it is browning to fast turn the heat down. Once the bread is browned and the cheese melted put the sandwiches together. Cut the sandwiches into 4 crusty cheese sticks and serve.
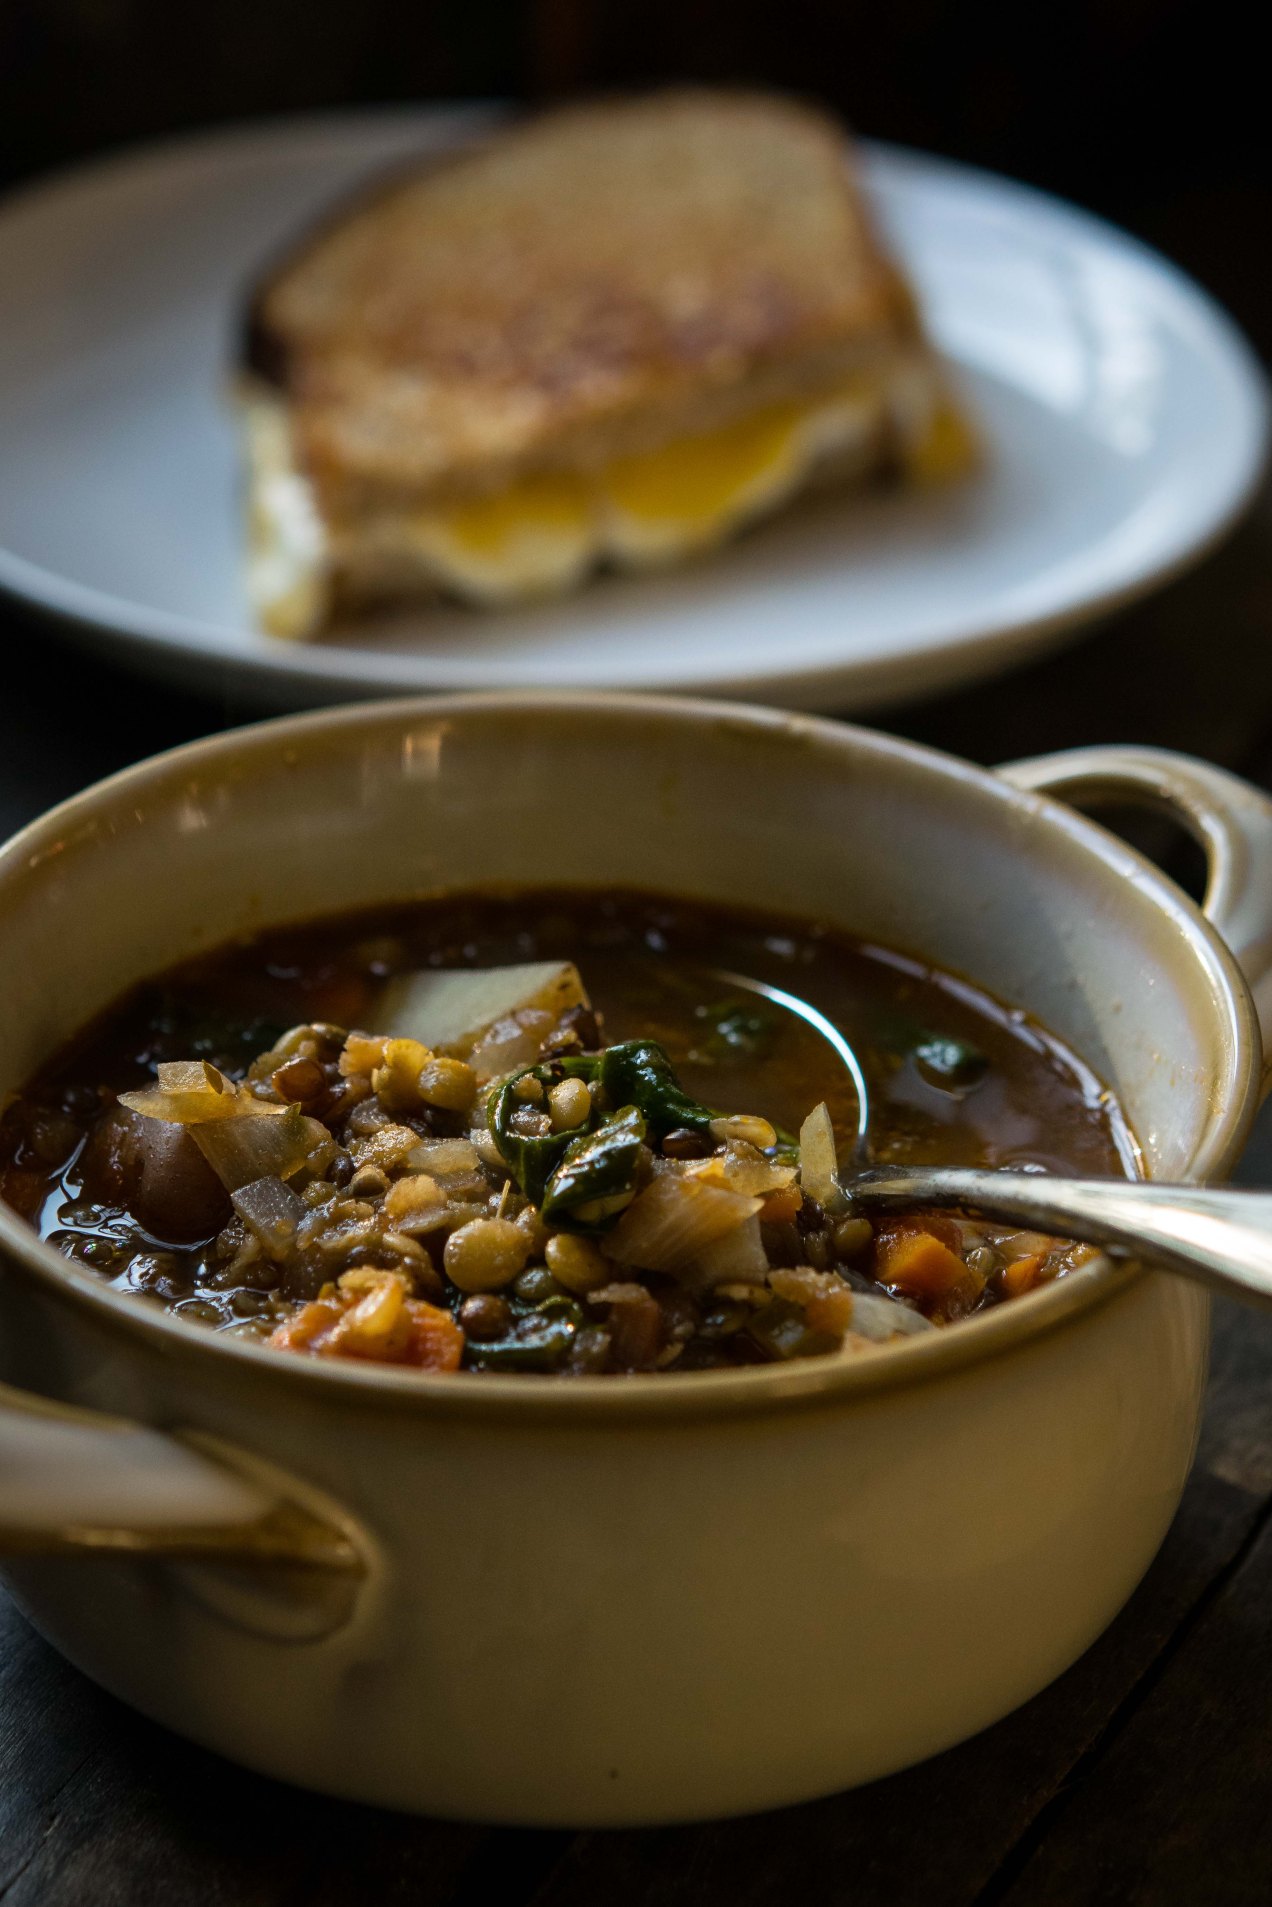
A Delicious Lentil Soup With A Dirty Little Secret
What you need to know about lentil soup is everyone has their “simple” version. Knowing this, it reminds me how easy it is to get a nutritious hot bowl of soup to the table. It also tells me that it must taste really good if there is a reason to keep publishing simple lentil soup recipes, and we do keep publishing them and it does taste good.
The hardest part of making this soup is cutting the vegetables, which with the exception of the potatoes, can be done up to two days in advance as long as the vegetables are stored in an airtight container in the refrigerator. The recipe calls for four types of lentils but the truth of the matter is, I had just a small portion of different kinds of lentils I needed to use up. It so happens that the different textures and subtle flavor differences in the legumes was a welcome addition but if you don’t have but one kind of lentil in the house the soup is still really good.
And here is the secret, soups depend on good broth but sometimes the broth isn’t strong enough. Without a good broth soups come off as watery and bland and no amount of salt is going to change this. This fact, and this fact alone, is enough of a reason to keep bouillon cubes in the pantry, or some sort of stock base, that can be used more as a seasoning then as an actual broth. The idea is to taste the soup after it has cooked and if it comes off as a little flat you add a quarter teaspoon or more of stock base or break off a small piece of bouillon cube to kick up the flavor. Add the base to the pot, let the it dissolve, stir, and taste again. Keep adding a small piece if needed until the soup is delicious. Get the picture? It works, makes the soup more exciting, even if it is a dirty little secret.

©Tom Hirschfeld 2016 All Rights Reserved
4 Lentil Soup (makes 6 servings)
2 tablespoons extra-virgin olive oil
1 medium yellow onion, peeled, small dice
3 carrots, peeled and cut into thin rounds
1 large celery stalk, small dice
3 medium yellow potatoes, cubed
1 cup lentils, a mix of beluga, du pays, yellow, and red
3 garlic cloves, minced
2 tsp. fresh rosemary, minced
1 tsp. dried oregano
2 tsp. fresh thyme
1 cup crushed tomatoes
salt
pepper
vegan sodium free bouillon cube
5 cups homemade vegetable stock or no-sodium vegetable stock
2 handfuls baby spinach
1.Place a 3 1/2 quart (3.5l) enameled Dutch oven over medium heat and add olive oil. Once the oil is warm add onions, carrot, celery, and garlic.
2. Season with 1/2 teaspoon kosher salt. Stir, and sauté the vegetables until they are soft, about 3 minutes
3. Add oregano, thyme, and rosemary. Stir again and add potatoes and lentils. Stir. Add tomatoes, broth, and bouillon cube. Season with a pinch of salt and fresh ground pepper.
4. Bring the broth to a boil, reduce the heat to a simmer and cover. Cook for 20 to 25 minutes, or until the lentils are tender.
5. Remove the lid, taste the soup, and add any seasoning necessary. Add 2 big handfuls of fresh spinach and stir it into the soup. Once the spinach is wilted, ladle up bowls of soup and serve.
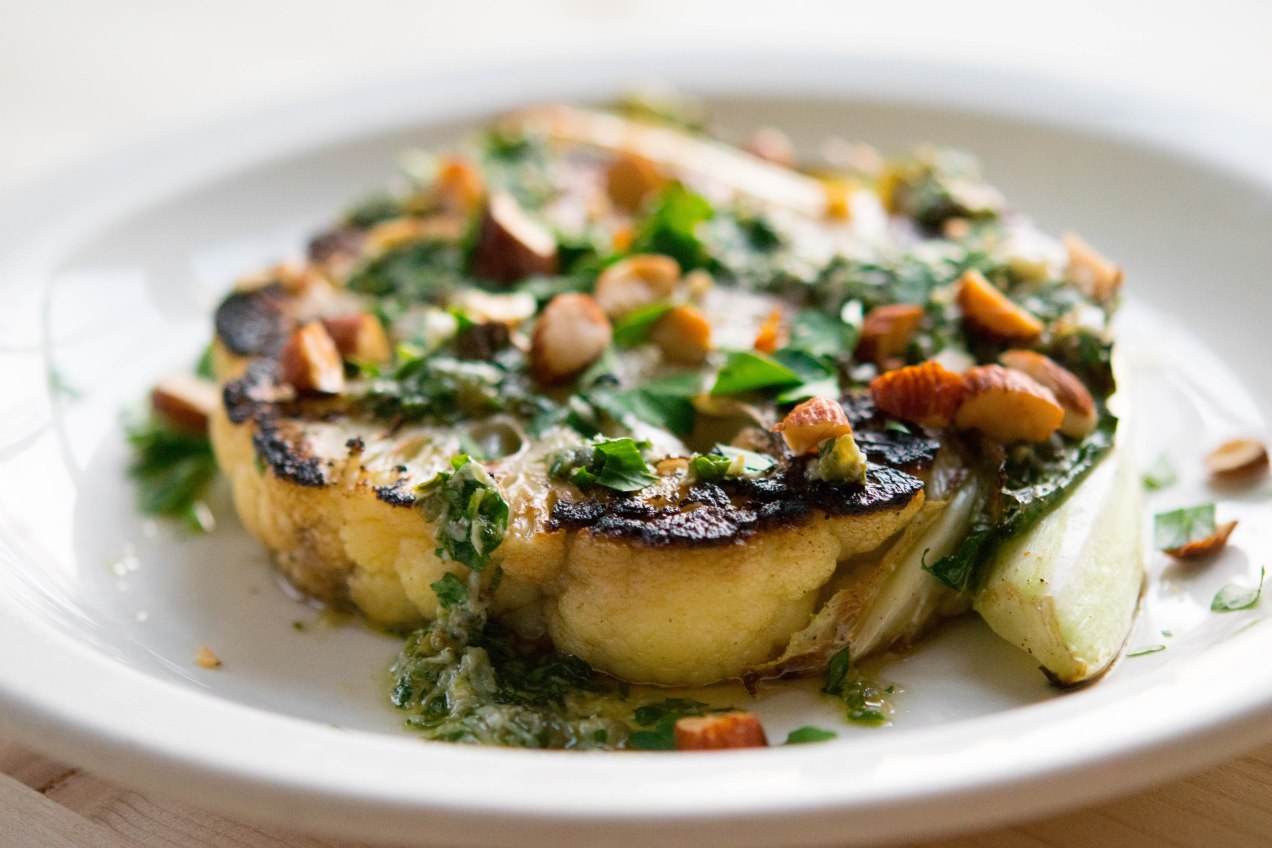
A Real Winner: Seared Cauliflower Steaks with Salsa Verde and Almonds

Some people collect cars, for others it is playing golf, for me, it’s barbecues. I don’t collect them per se but rather I cook with them. Their value isn’t termed by condition but in hours of use. Much like a cast iron skillet I can gauge the worth of a good smoker by the black patina that coats its inside. While many men might spend their weekends under a car, I prefer to smell like hickory rather then gasoline and motor oil. It’s how I get my kicks.
So you can imagine my excitement to I discover I won a Big Green Egg! Yea, I won. I never win anything but Debra Smith at SmithBites pulls my name from a hat of entrants and I win, I never win. Nevertheless, it is like getting the Most Improved trophy in grade school. I sort of treat it like that, it sort of looks like that and I couldn’t be any happier then to be a proud owner of one. Hell, I park it in the garage if that tells you anything. I don’t even put my car in the garage, the garage is for my tractor, and now the grill.
 The whole time I am assembling my grill I think about what I am going to cook first. A steak, a brisket, venison, burgers, pork chops, butt steak, I go through all the possibilities and my head spins in anticipation. The dogs look on with concern for my well being, TrixieB even comes over and gives me a lick on the face and some big sad eyes of worry.
As I said, I don’t collect grills. I have three. One is a smoker, that is all it does, it smokes meat, charcuterie and hams at low temperatures. My other grill I hand made. It is a street food kind of contraption meant to cook fast and furious. It is for meat on a stick, small stuff that cooks through quickly. Both serve their purpose. So maybe I don’t consider my self an aficionado but I do consider myself an expert. It was my station each day at the restaurant. I worked the grill day-in and day-out for seven years. I can cook a steak, a boneless chicken breast and any kind of fish you can imagine but, like professional ball players who sometimes hit a foul ball, I do sometimes miss the mark but rarely, and I mean rarely, do I over cook a steak.
My point being, I am excited to try what many consider to be the Mercedes of grills, the Big Green Egg but I am a little apprehensive having never used one. Don’t think I wasn’t a little more then cautious too, I bought a high end Wolfe stove and it’s a piece of crap, so I know just because something has a name doesn’t mean it is going to work but I have to be on my game also. I am approaching this with a certain err of caution.
But then it hits me. Friends often accuse me of using appliances differently then anyone else, most recently crock pots were entered as evidence into this court of opinion. So I asked myself, “why would I grill a steak?” It took all of a second to answer my own question, “why not sear cauliflower steaks in a pan on the grill?” That was easy enough, decision made.
Here is why I wanted to cook cauliflower steaks. The Big Green Egg people claim a lot of things about their grill. You can cook pizza on it, bread, grill steaks or smoke brisket is what they say. Which I get, it is sort of like a wood burning oven. It is ceramic, it holds heat, and it gets very, very hot but can also hold a low temperature for a long time. It holds a lot of promise. So my thinking is, I want to put a cast iron pan on the heat, see how hot it gets and how well it sears. I know, I know, you can cook with a cast iron skillet on your stove. True, but my stove won’t impart a smokey flavor to whatever I am cooking. And that is it, that is what I want to find out, is what is the smoke flavor of the Big Green Egg going to be like. It is the one character trait I am most interested in. Will it be bitter and heavy or will it be just right. When it comes to vegetables the right amount of smoke goes a long way. To much and you have a very bitter ash tray kind of experience that will keep you from tasting any other part of your meal. And seriously, antacids are no kind of dessert.
I am not going to bore you with blow by blow cooking details other then to say the grill is great. It lights fast, it gets very hot quickly and it imparts a great flavor to whatever you are cooking. My cast iron casserole heated quickly, I actually thought it might get to hot and burn the cauliflower before it became tender on the inside, but it didn’t. It cooked the cauliflower with a perfectly light kiss of smokey flavor. Since then I have roasted chickens to great applause from the family, from me too. A tri-tip roast delicious, pork chops amazing, cauliflower steaks a home run, and the Big Green Egg, a real winner.

Seared Cauliflower Steaks (serves 2)
2 small heads of organic cauliflower
1/3 cup flat leaf parsley, minced
1 small garlic clove, grated on a microplane
1 tablespoon lemon juice
1 anchovy, rinsed
1/4 cup Asiago cheese
extra virgin olive oil
half a cup of salted almonds, chopped
1. Build a charcoal fire for direct heat grilling in your grill. You want it to be very hot. Place a large cast iron skillet right in the middle of the grilling rack. Cover the grill. What happens when you cover the grill is the heat builds, the pan becomes very hot and the lid keeps a little bit of smoke flavor circulating.
2. While the grill is heating make the salsa verde. In the bowl of a mortar and pestle combine the lemon juice, garlic, anchovy, and parsley. Beat it up with the pestle. Add a two finger pinch of salt, a dash of black pepper and a few glugs worth of olive oil. Stir to combine, taste and add more oil it the salsa is to tart. Stir in the cheese.
3. Trim the stalk ends of the cauliflower. Using a good sharp knife cut one steak each out of the center of each head. To do this turn the floret side of the cauliflower down. Hold it firmly and place you knife onto the stalk. Cut through to the florets. Roughly gauge and inch in width and make another cut leaving yourself a nice center cut cauliflower steak. Repeat these steps with the second head of cauliflower. Use the loose outer edges of the cauliflower for another dish.
4. Drizzle the steaks with olive oil and season them with salt. Take them out to the grill. If you have a thermometer on your grill it should read about 600˚ F. Nevertheless when you open the lid the cast iron pan should be beginning to smoke and when you place the cauliflower into the pan it should sizzle. Cook each side until of the steak until it is very deeply caramelized. Remove the steaks from the pan.
5. Drizzle the steaks with the salsa verde, top with almonds, minced parsley and serve.
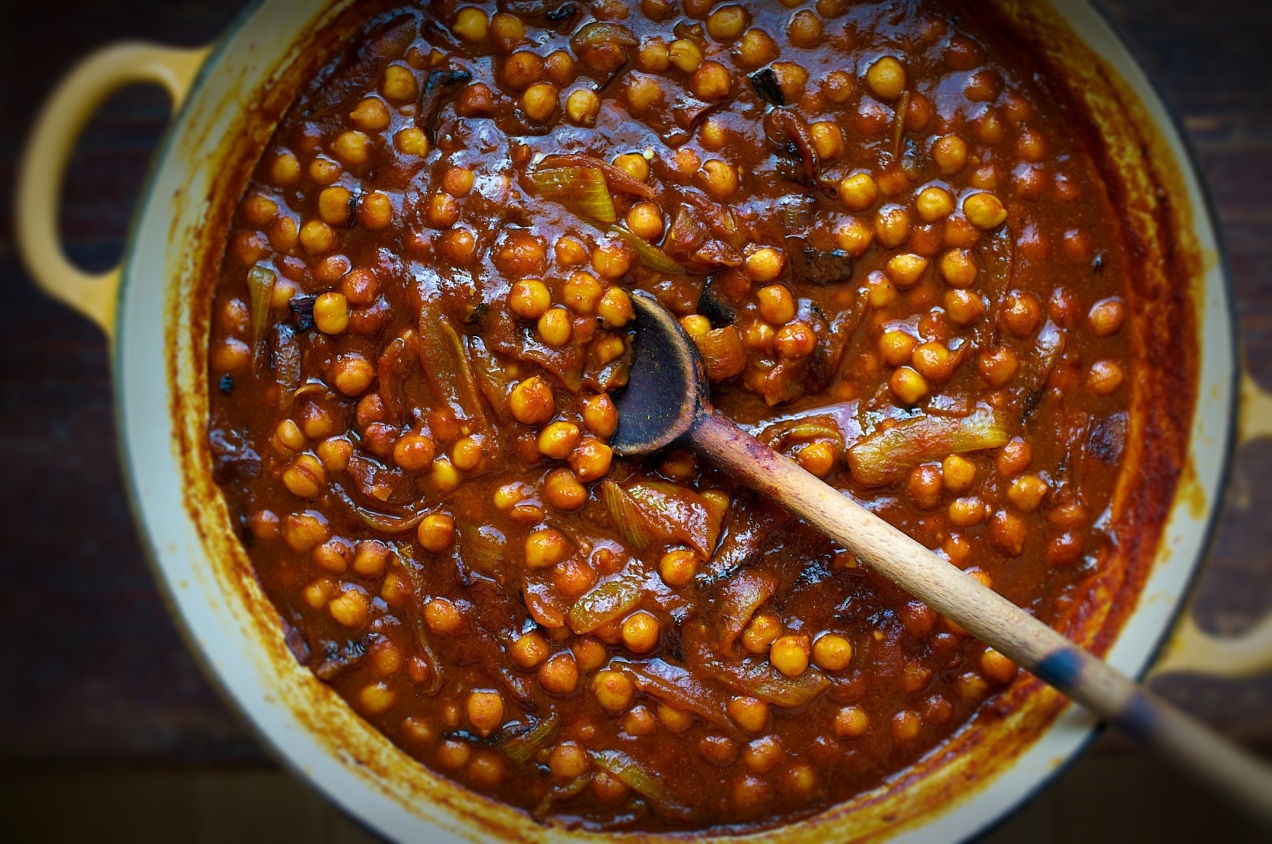
Spicy Chickpea and Sour Tomato Curry with Pasta
Whenever a simple, delicious dish — like this spicy chickpea curry — is placed next to me at the table, it doesn’t just make me happy; I become protective of it in a selfish, rabid dog sort of way.
This recipe is based on Indian khatte channe, which is grounded on good Indian home cooking — but to be fair, it could also have easily been born out of a 1970’s hippie cafe in which cheap eats and a flair for the exotic were popular. In fact, Moosewood Restaurant and its cookbooks always come to mind when I cook this stew. But no matter where it came from or how it found its way to my table, I can tell you that there is a lot to like about this pasta, from the first forkful of twisted noodles loaded with tangy sauce to the last spoonfuls of creamy chickpeas.
I could start with the fact it is vegan, but that will scare some of you off, just as if I said it was gluten-free. In this case it is both, but the good news is that after you try this dish, it won’t really matter.
What does matter is how easily it comes together and the fact it can easily come from your pantry. When I make this, I head to the pantry with a tray in hand and begin by collecting all my ingredients and equipment.
What stands out during the pantry search-and-seizure is tamarind concentrate. It is a bit of an oddball ingredient, but one I always have on hand. Unlike tamarind paste, which requires soaking and straining, this concentrate dissolves easily in water. It has the consistency of molasses, and it gives this stew its characteristic tang. A popular substitute for tamarind is equal parts lime juice and brown sugar, but this only works when a small amount of tamarind is called for in a recipe, so it probably wouldn’t work here. If you like Pad Thai and ever wanted to cook it at home, tamarind really is an essential ingredient to have on hand.
When it comes to curry powder, I prefer Madras — I like the fragrance of kari leaves — but feel free to use your favorite. For more heat, you can add more cayenne; just be sure you know how hot your curry powder is before you get too crazy.
As always, when it comes to caramelizing onions, I don’t know how long it will take for them to become a deep, dark brown. It could be 15 minutes or 45, and maybe more depending on your pan, the heat, and the sugar content of your onions. I do know, however, that you shouldn’t cheat yourself; color them deeply, as they are essenial to this dish.
Assuming you have done your prep, once the onions are caramelized, this becomes a dump-and-pour procedure followed by a short simmering period just for good measure.


Spicy Chickpea and Sour Tomato Curry with Pasta
Serves 6
Two 14.5-ounce cans of chickpeas, drained
1 to 2 tablespoon tamarind concentrate mixed with 1/2 cup of water (more tamarind will make the dish more sour)
3 tablespoons olive oil
2 cups yellow onion, julienned
1 tablespoon fresh garlic, minced
2 cups tomato sauce
1 tablespoon fresh ginger, peeled and minced
1 teaspoon turmeric
1/4 teaspoon cayenne
2 teaspoons Madras curry powder, or your favorite kind
1 teaspoon cumin seeds, coarsely ground
Kosher salt and freshly ground pepper
Cilantro, green onion, or both
1 pound thin long noodles: wheat or rice or gluten free, use whatever floats you boat
1. Place a 3 1/2-quart heavy-bottomed pot over medium heat. Add 3 tablespoons of oil to the pot and then the onions. Season the onions with salt. Cook the onions, patiently, until they begin to brown and become deeply colored. Stir them often enough that the onions on top brown at the same pace as those on bottom. Don’t do this too fast; you want melted, gooey onions, not seared onions. Take your time; it takes a while.
2. Once the onions are browned to your liking, add the garlic. Once you smell the garlic, add the turmeric, curry powder, cumin, and cayenne pepper. Give it a stir then add the tamarind, tomatoes, chickpeas and ginger. Reduce the heat and let the sauce simmer. Taste the sauce for salt and adjust as necessary.
3. Cook the noodles.
4. Once the noodles are done, drain them, and put them on a platter. Top the noodles with the chickpea stew and top with green onions or cilantro or both. Serve.
Everything but the Hamburger, Special Sauce Included

Sadly, as I sit at the bus stop watching my daughters play, I have to tell myself: summer is so last season.
All summer I have been grilling vegetables for salads. Mostly zucchini and summer squash; I char it deeply and then chop it and toss it with basil, lemon juice, and olive oil, in sort of a grilled chopped salad. It captures all the flavors of early summer one could want. But at some point, either the zucchini or I tire and the dish no longer appears on the table. At least not until next summer, when the annual craving for these flavors peaks again. Continue reading

Taco Night on the Grill
I can’t get enough of taco night. Neither can my wife Amy or my daughters. We love it, and especially me, because I can do everything — with the exception of chopping with a knife or the food processor — on the grill. It makes for easy clean-up, and who isn’t for easy clean-up?
I cut my teeth on Tex-Mex in Austin, Texas circa 1984 (does Instagram have a filter for that?). At this point in my life I hadn’t eaten that much Mexican food. For the most part it didn’t exist in Indiana outside of Chi Chi’s and my inner punk rocker wouldn’t allow me to set foot inside any place that colorful or where the waitstaff could happily sing Happy Birthday table side.
Nevertheless, when I would slide into a booth at one of the many hole-in-the-wall eateries (many of them were Spanish-speaking only), I would order as many kinds of salsa as I could point to on the menu. I didn’t know this many kinds of salsa existed, or for that matter soft shell tacos, or the food love of my life, tamales.
As I ate my way around both sides of Highway 35, little did I realize I was becoming an addict, to Texas country music, chili, and to Austin itself. It was hard to come home, and once I was back in Indiana it didn’t take long before I began jonesing for Texas Hill Country, salsa included.


All About Grilled Salsa
The grill is a great way to make an old salsa recipe feel new.
I couldn’t even guess how many varieties of salsa there are in the world, but I do know I haven’t found one yet that can’t be made on the grill. I like a fresh raw salsa as much as the next person, but sometimes I like to shift the flavor and it is an easy thing to do on the grill.
Chile oils on your hands are not your friend.
Be careful with hot chile peppers. I used to go at them in the manly man way and just tough it out, but the night I rubbed my eyes after working with Thai birds I thought a different approach might be appropriate. If you choose to go with bare naked hands in handling them, just realize you will quickly find out just how many places on your body you actually touch and how many places are very sensitive to capsaicin oils.
Get in touch with your inner caveman or woman.
I used to put my peppers and tomatoes on the grill grate and then one day I just decided to plop them right on the coals. It sears them very quickly while leaving the interior raw — the best of both worlds. You can roast whole heads of garlic too, but they need to be left to the side of the coals so they cook and soften slowly or you will burn the cloves which makes them bitter.
Liquidy or dry, it all depends on your tomato variety.
A lot of fresh tomatoes have a high liquid content. If you use too many tomatoes, your salsa will be watery, which isn’t always a bad thing. If you want a thicker salsa, it is a good idea to use plum or San Marzano tomatoes.
The finishing touches matter.
To the finished salsa I always like to add a drizzle of olive oil for mouthfeel and a splash of acid, be it lime, red wine vinegar, or whatever. Make sure you season your salsa with salt and black pepper.
Corn tortillas or flour both can be warmed on the grill, and should be.
I prefer corn tortillas over flour and my preference for cooking corn tortillas is right on the grill. They puff up and blacken in spots and become yummo-licous. Just make sure after searing them to wrap them in foil so they stay soft and don’t dry out.
Choose your toppings accordingly.
Almost every person I have ever met who hails from Central America prefers green cabbage, sliced razor thin, to lettuce for their tacos. It gets even better when you dress the cabbage with a touch of red wine vinegar and olive oil. You probably won’t find a lot of sour cream or cheese on the table either. I tend to go for authentic Mexican but I like Tex-Mex too. If you want to go for healthy, grill up a bunch of vegetables to use for toppings and forgo the dairy altogether.

Makes 1 to 1 1/2 cups
Depending on the kind and size of tomatoes you use, this salsa can be liquidy or firm. You will have to judge. Roma tomatoes have little liquid and work well for a chunkier salsa.
- 1small head of garlic
- 3 or 4roma tomatoes
- 1 or 2heirloom variety tomatoes (Box Car Willies or Wisconsin 55 are good)
- 1poblano pepper or 3 jalapeños or your choice
- 3 to 4half-inch-thick slices of red onion, left intact
- Kosher salt and freshly ground pepper
- Handful of cilantro
- Splash of red wine vinegar
- Drizzle of olive oil
- Fire up your charcoal grill. Let the coals get blazing hot.
- Wash the vegetables.
- Place the garlic off to the side of the coals where it will brown the paper skins but not burn the cloves. The garlic will take the longest to cook of everything. Let it get good and brown on all sides.
- Now place the tomatoes and peppers right on the coals. Let them blister and blacken. Remove them to a tray. Let the juices collect in the tray.
- Place the grill grate on the grill and grill the onions until they are caramelized and soft.
- If you plan to grill more stuff, like a nice skirt steak, you will probably need to add a few more coals to the fire. You be the judge.
- Peel the pepper, being carful not to spill or lose any pepper juices. I remove the seeds and, obviously, the stems. Put peeled peppers, tomatoes, onion, and peeled roasted garlic cloves into the bowl of a food processor. Add the tomato and pepper juices that collected in the bottom of the tray.
- Add a two-finger pinch of salt, some pepper, half the cilantro, the red wine vinegar, and olive oil. Pulse the processor until the salsa reaches your desired consistency. I like this particular salsa smoother than most but still chunky. Taste the salsa and adjust the seasoning as necessary.
- Pour into a serving bowl, garnish with cilantro, and serve
The Asparagus Has Not Sprung


The rain is really coming down now.
On the few days it has been nice I have been to the garden looking for the tiniest hints of spring. Maybe thin asparagus tips might be peeking at me through the damp dirt. The tarragon is growing, so is the sorrel and savory. The purple chive blossoms are ready to burst open and there are strong whiffs of lovage. I have already made my beloved lovage cream cheese spread even if it is only beloved by me.
I know I could go to the store and buy asparagus. I know it would taste good. I have already seen countless asparagus recipes tempting me, one for an asparagus tart that looks amazing.
The mustard greens are blooming now, a toad has dug his way up from the mud. Around dinner time he wrestles himself in between clumps of dirt getting himself as close to the earth’s warmth as he can. He needs to protect himself from the night time cold. During the heat of the day a snake is searching the compost pile for mice. Soon…I think to myself…soon you will get to taste the sweetness of the asparagus that only happens when you grow your own. Continue reading
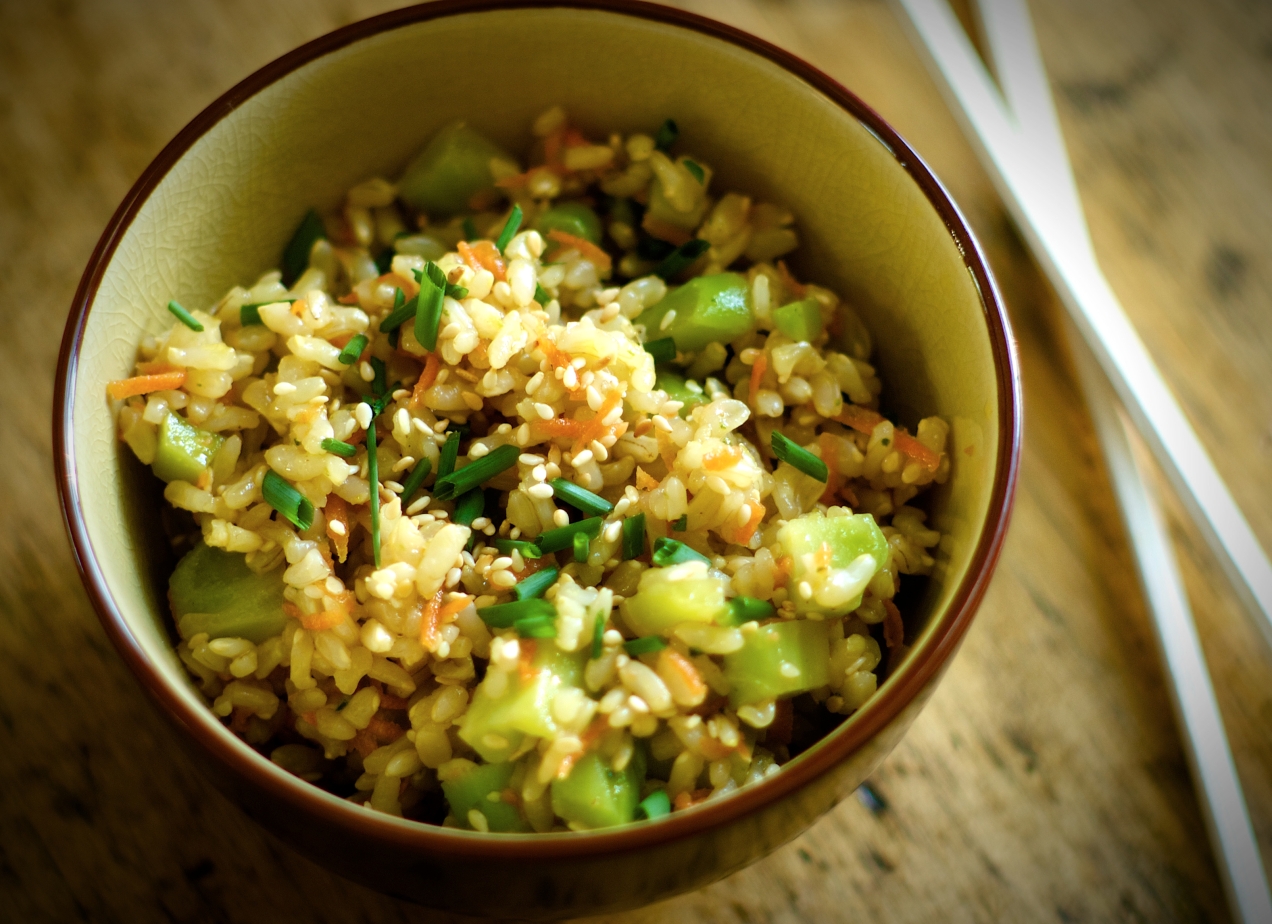
Stems and Seeds

Hippy food has long been a bastion of vegetarian eats for many reasons. Some political, some personal but in all honesty mostly because it is cheap and often utilizes every last morsel sharing some of the same philosophy as head to tail eating, ironic?, well, yes. Never mind the reasons though because that doesn’t mean it doesn’t taste great and utilizing every part means new tastes and textures from veggies you have long grown tired of.
There is nothing better than to take a bite of something and not only have it taste good but when it feels good, or nutritious, as you eat it it is all the better. Having said it time and time again there are certain dishes that hit that button and, man, there is no better eating. This salad hits that button.
So get out your tie dies and put on your birks, crank up the Dead and get in touch with your inner vegetarian, oh, and make extra because the nice thing about this salad is it is no worse for the wear the next day.
The soy ginger vinaigrette in this recipe was adapted from Jean-Georges Vongericthen’s Simple Cuisine. Learn this recipe you because will find yourself using it on everything. It is a genius recipe.
Makes 4 servings
For the vinaigrette:
2 1/2 tablespoons soy sauce
2 tablespoons lemon juice
1 teaspoon ginger, finely minced
1/3 cup canola or unflavored oil
1/3 cup extra virgin olive oil
kosher salt and fresh ground pepper
1 1/2 tablespoons water
Put all the ingredients into a pint mason jar and screw the lid on tightly. Shake the hell out of it. Set the dressing aside.
For the salad:
1 to 1 1/2 cups blanched broccoli stems, 1/4 inch dice
1/2 cup carrots, grated
3 cups cooked brown rice
1/4 cup sesame seeds
1 1/2 tablespoon chives, minced
soy ginger vinaigrette
kosher salt and fresh ground pepper
1. Place all the ingredients, except the dressing in a large bowl and toss to combine. Add 1/3 of a cup of the dressing and combine everything. Taste, adjust the salt and pepper and add more dressing if you like.
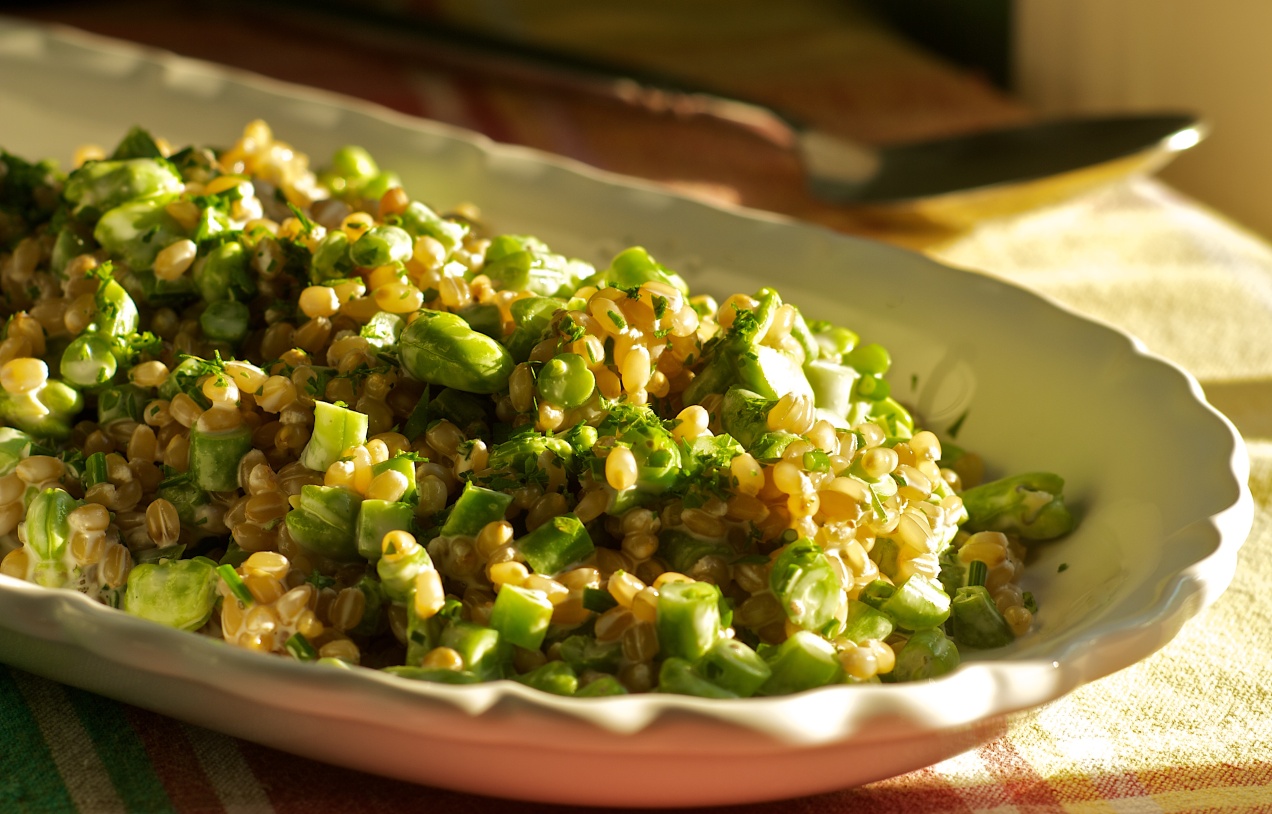
White Wheat Berry Salad with Fresh Beans
 If you have ever had fresh raw fava beans then you know the wonderful tender pop, the tender chew and the juicy flavor. It goes wonderfully here with the green beans and the dressing.
Wheat berries are another wonderful addition to your repertoire. They add a subtle chew and give the dish a pasta flavor while digesting at a lower glycemic level because they are a whole grain.
This is one of those dishes that is here because it is delicious and, luckily, it just happens to be very good for you too.
Serves 6 as a side dish
1 cup soft white wheat berries, rinsed
3/4 cup green beans, blanched and chopped into 1/4 inch pieces
1 cup fresh fava beans, lima, or edamame, shells and outer skin removed
1 1/2 tablespoons chives, chopped
2 teaspoons fresh thyme, minced
1/4 cup mayonnaise
1/3 cup buttermilk
2 teaspoons lemon juice
kosher salt and fresh ground pepper
1. Place the wheat berries into a large pot and cover them with cold water by two inches. Place the pot over high heat and bring it to a boil. Boil for two minutes then turn off the heat, cover the pot and let it sit for two hours.
2. After two hours add a couple of pinches of salt and then place the pot back over the heat and bring the berries to a boil again. Now reduce the heat to medium and let them simmer until soft, or the texture you want, about 15 minutes.
3. Drain the berries in a colander and let them cool to room temperature.
4. In a large mixing bowl combine the mayo, buttermilk and lemon juice. Season it with salt and pepper then add the thyme and chives. Add the rest of the ingredients and mix to combine. Taste and adjust the seasoning. It is nice if you can let it sit for at least a half hour to let the flavors meld and even overnight is good.
5. Serve

Pot Roasted Collards and Purple Hull Pea Fritters with Spicy Buttermilk Gravy

Pot Roasted Collard Greens and Purple Hull Pea Fritters
The one thing that stays the same around my kitchen, has been a continuous thread, is collard greens.
Collard recipes have been prepared in many incarnations but eventually I rendered them all down the most basic of recipes. I like collards in every fashion imaginable, and while I can spoon potlikker right out of the pot and onto a slab of buttered cornbread, making me perfectly happy, I have grown to like my greens best when they are pot roasted. I used to render bacon, butter or pancetta into the pot first, the fatty crispy strips of cured pork to be fought over at dinner. Then there came a time when I needed to make the greens vegan. I started using peanut oil and ever since it has become a fast favorite which is strange since we are big pork eaters.
What happens to greens when they are pot roasted is the natural sugars break out and much like caramelizing onions you start to build flavors that just don’t exist when collards have been boiled. I liken the building of flavors to a fine cigar, great coffee or a complex wine.
As the thick and leathery fall collards, greens which have taken a frost or two, cook down a toothsome quality develops that is very satisfying to eat. You also get these rogue bits that didn’t get as much oil as they should and they become crispy and blistered which contributes a nice contrast. A sure sign that you have roasted your greens right is the smear of brown juice that paints the bottom of the pot when you stir.
We eat greens cooked like this as part of three dinners each week, at least, and in general Amy and I will fight over the leftovers at breakfast time.
Seves 4
For the fritters:
16 oz. field peas, cooked, either black eyed or you favorite type I used purple hull, two 14 oz. cans, drained works too
1 cup carrots, grated
1/4 cup rice flour, or all purpose flour
2 teaspoons shallots, minced
2 teaspoons garlic, minced
1 1/2 teaspoons dried thyme
kosher salt
fresh ground pepper
For the collards:
8 to 10 cups collards, cut into 1 inch stirps, rinsed multiple times to get rid of sand and dirt
peanut oil
kosher salt
fresh ground black pepper
For the buttermilk gravy:
1 1/2 cups live culture buttermilk
1 teaspoon creole seasoning
1/2 teaspoon dried thyme
1 1/2 teaspoon shallot, peeled and minced
1 teaspoon garlic, peeled and minced
1.Heat the oven to 325˚ F. Combine all the gravy ingredients in a small bowl and mix to combine. Set aside to let the flavors build.
2. Place a 6 quart enameled Dutch oven with a lid over medium high heat. Add some peanut oil to the pot being generous with the peanut oil and making sure you coat the bottom of the pan plus a touch more. Add half the greens and season them with a two finger sprinkle of salt and a few grinds of pepper. Turn the green giving them a hot oil bath. You want the leaves to be coated, not greasy though. Add the rest of the greens. Season them with salt and pepper too. Turn them into the first batch of greens being sure they get an oil coat as well. Put the lid on the pot, slide it into the oven and roast the collards for 1 hour and 15 minutes making sure to stir the pot at the half way point.
3. Place the cooked peas into the bowl of a food processor. Pulse to grind the peas. When it becomes mealy add the rest of the fritter ingredients and pulse until smooth, moist and will hold together. The key here is to adjust the moisture content. If it is too wet add rice flour a tablespoon at a time letting the mix rest a bit so the flour can hydrate and thicken the fritter mix. If it is too dry add water by the tablespoon and do the same. My way to test patties of all types is to make a patty and then throw it against the side of the mixing bowl. If it flattens and holds its shape I am happy.
4. Once your consistency is right make 8 equal sized patties. Place a nonstick pan over medium heat, add oil and fry the fritters until they are brown on both sides. Remove them from the pan to a brown bag lined tray. Drain the excess grease. Serve while hot.
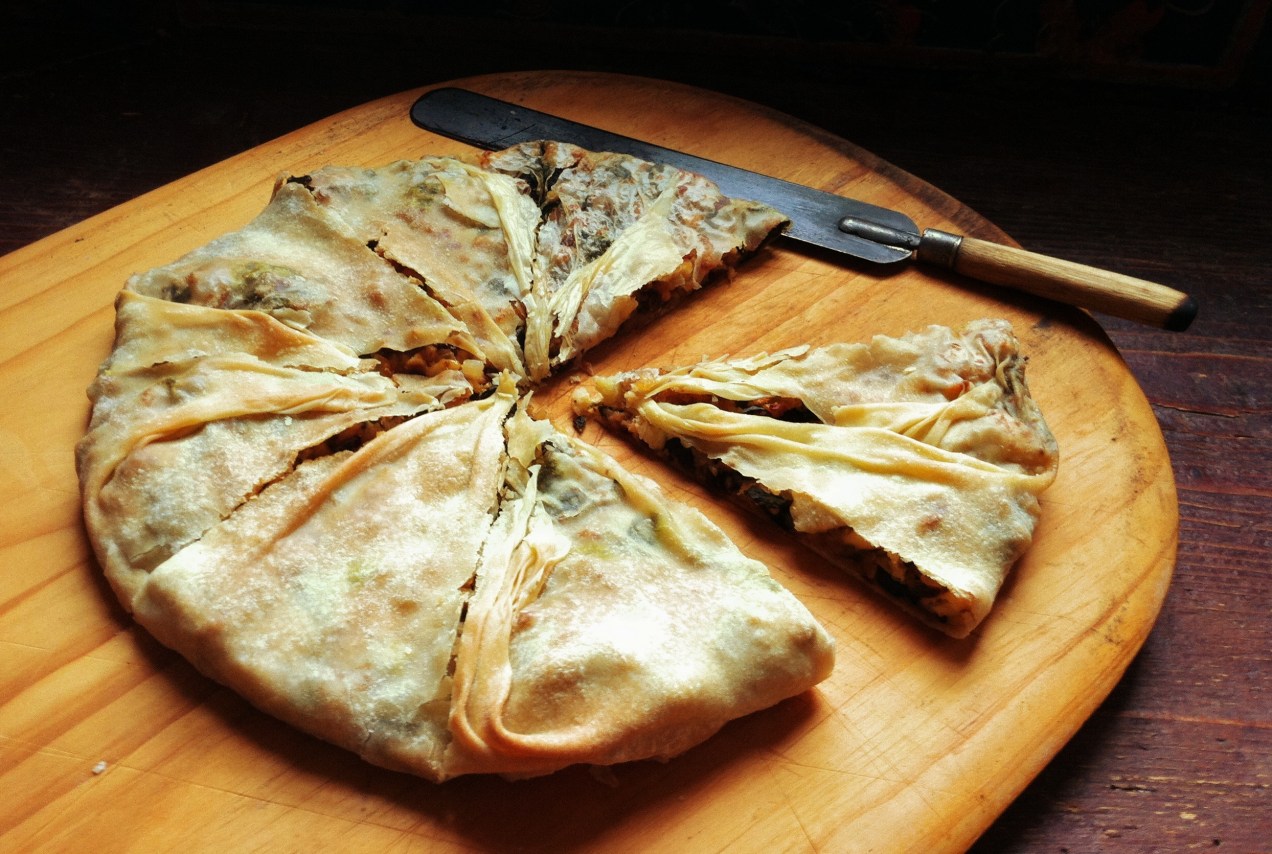
Spinach and Feta Pie

Spinach and Feta Pie
Most people, it seems, remember the first time they ate spinach pie. Chances are you were at an ethnic restaurant, maybe on your first food adventure to a Greek establishment, feeling continental and worldly. Maybe you where in college and eating at the local hippie restaurant where they also introduced you to North African Peanut Stew with Tofu, bags of tamari pepitas and herbal tea.
The joint smelled of clove cigarettes, Turkish coffee and sweat. Hank Williams and Lefty Frizzell tunes rained down from the speakers above and mingled with the smell of patchouli making you think it was the birth of cool. There are newspapers hanging on bamboo racks, a clothesline drying out today’s laundry, for anyone to pick up and read. People played checkers and chess and snacked on millet muffins.
It was a health food restaurant without a non-smoking section. In the kitchen Moosewood cookbooks lined the shelf above the stove. The food was vegetarian except on Sunday morning when all of campus lined up for a killer breakfast that included sausage and bacon. Sunday being the only day the restaurant actually made money.
Just sitting in the pine high-backs with a good cup of your daily grind and a used but unopened copy of The Sheltering Sky, lying face up on the table, made you feel smart. Lots of broody wannabes wrapped in black with their berets mimicking Kerouac, but really, all of them a breed of Caulfield. Each with tattered composition notebooks lying open to the first page waiting for that initial first stroke of the pen.
It was an ocean of intellectual doldrums, bitter hopes and angst filled dreams. Everyone who came here was looking for more than a good meal. They had either lost the wind in their sails or were looking for an intellectual soul mate with which to share their troubled waters, if not their sheets.
And, yet, you came back. Somehow at this place in time, the angst ridden shirt feels comfortable, it fits and you fit or maybe the spinach pie, really, was just that good.
Serves 4 as part of a larger meal
For the strudel dough:
1 1/4 cup all purpose flour dough
1 tablespoon plus 2 teaspoons safflower oil
5 to 7 tablespoons cold water
♣
For the filling:
2 tablespoons olive oil
2 cups yellow onion, small dice
1 1/2 tablespoons garlic, minced
two 1 x 4 inch pieces of orange zist
1 teaspoon finely grated orange zest
10 oz. baby spinach, washed
1 cup fresh bread crumbs
1/2 cup crumbled feta cheese
1/2 to 1 teaspoon red pepper flakes
2 tablespoons currants
kosher salt and fresh ground black pepper
1. Place the flour, safflower oil and water into the bowl of a mixer and using the paddle attachment mix the ingredients until they become well combined and elastic.
2. Turn the dough out and need it till it is satiny smooth. Wrap in plastic wrap and let it rest for 1 hour. You can make the dough up to a day in advance and store it, wrapped, in the fridge. Just be sure to let it come to room temperature before shaping the dough.
3. Place a large saute pan over medium high heat and add the olive oil. Add the orange zest strips and let them bubble away for a few minutes. Remove the strips.
4. Add the onions and cook them until they just start to turn golden at the edges. Season them lightly with salt and pepper, remember feta is salty. Add the garlic and chili flakes and stir until fragrant.
5. Add the spinach and turn it with tongs in the pan to coat it with oil and to wilt it. Once it is mostly wilted turn it out into a clean kitchen towel that is set in a colander. Pull the edges of the towel together then place your tongs around the towel, like a hair pin, and use the tongs to twist the towel into a ball around the spinach and squeeze out the moisture.
6. Place the pan back over the heat and add a more olive oil. Add the bread crumbs and brown them. Add the grated zest and the cooked spinach to the pan and mix to combine. Remove from the heat and cool. Once cool add the feta and currants. Taste and adjust the seasoning as necessary.
7. Preheat the oven to 375 ˚F.
8. A large 18 x 24 wood cutting board works great for this but the corner of a counter or table will do as well. Cover the cutting board with a large, non terry cloth, towel or apron. Dust it with flour.
9. Flatten the dough into an 8 inch disk and dust it with flour. Work it out with you hands into a larger disk. 12 to 14 inches round. Now, hook an edge of the dough onto a corner of the board. Using the backs of your hands, tucked under the dough, start stretching and pulling, gently, the underside of the side of the dough towards the empty corners of the board. If you get a whole just pinch the dough back together and continue. You can stretch the thicker edges from time to time with your hands. Keep stretching from the underside of the dough with the backs of you hands until the dough is transparant and eggshell thin and is 18 x 18 inches.
10. Sprinkle the dough with a little bit of olive oil and using a pastry brush gently and lightly coat the dough with the oil.
11. Lift the dough into a 12 inch non-stick saute pan leaving the edges of the dough to hang over the sides. Trim off the thick edges of the dough with scissors.
13. Place the filling ingredients into the center of the dough. Grab the edges of the dough and bring then to the center of the pan. Pinch the center and twist the dough. Pinch of the dough ball in the center.
14. Bake in the preheated oven for 45 minutes or until brown and crusty. Remove from the oven and let the pie rest for 20 minutes. Cut into wedges and serve.

Smokin’ Black-eyed Sandwich
This is a perfect example of vegetarian food that stands on its own. Not much different than falafel which has stood its ground for years. Your could in fact replace the mayonnaise with a yogurt sauce of your liking. Something with tomato and cucumber would draw down the heat nicely. It would go well with grilled pitas too so if you wanted to you could take the whole meal and easily give it a Middle Eastern flare. When it is a sandwich like the above I really like it with crunchy shoestring fries and I have even been known to stack the fries right between the bread with the fritter for a nice crunch.
Serves 6
2 each 14 oz. cans black eyed peas, drained
1/2 to 2/3 cup rice flour
1/2 onion minced
2 cloves of garlic, chopped
3/4 teaspoon dried thyme
1/2 teaspoon cayenne pepper
kosher salt and fresh ground pepper
2 carrots, peeled and grated, about 1 cup
lettuce, shaved
vegetable oil
bread, buns or pitas
mayonnaise or you choice of condiment
1. Place the drained peas, 1/2 cup rice flour, onion, garlic, thyme, cayenne and a 1/2 teaspoon of kosher salt and some fresh ground pepper into the bowl of a food processor. I like the mix to maintain some chunkiness but it is important for it to be fairly smooth so it holds together. Add up to 1/3 cup more rice flour as needed. So process until smooth but it doesn’t by any means need to be perfectly smooth. Add the carrots and mix, not process, them in thoroughly with a spatula. I like to let this sit for at least an hour so the rice flour has time to hydrate and thicken the mix so it stays together better. You could even cover it and refrigerate overnight. If it seems loose before you are getting ready to cook it add more rice flour.
2. Heat a large non-stick skillet over medium high heat. Add the oil and let it get hot. Form the mix into 6 balls and then shape them into patties. Fry then until crispy on both sides. Build you sandwiches and serve.
Smokin’ Black-eyed Sandwich

Gumbo Z’herbes with Yeasted Corn Biscuit Dumplings

Gumbo Z’herbes
If you know me you know I love greens. I go to them for comfort, for quick meals and just about any reason, now that I think about it, I am not even sure I need a reason.
There was a day not all that long ago when I would always add some sort of smoked pork or, at the very least, smoked turkey legs to the greens. At some point we started to eat less meat and started to enjoy vegetables for being vegetables. Since those days of long ago I have added the pork back to my greens on occasion and each time I do I always say to myself, “well, that was a mistake.” For me, I have found I like greens for greens and the pork just overpowers them.
Even so there are dishes were not adding the requisite pork is damn near criminal and it might be in some states south of the Ohio River. I thought not adding tasso ham to my Gumbo Z’herbes might be one such crime but then I got to thinking about it and I came to understand, for the most part, it is the herbs used to cure the tasso that I like.
I am sure you see where this is going.
The biscuits dumplings aren’t traditional but the gooey bottoms and crunchy tops sure are a plus in my mind.
Note: the yeast used in the biscuits is really more for the yeasty flavor then it is to make them rise. While I am sure it helps them rise it is not the reason they rise the baking soda is. So don’t omit the soda because there is yeast in the recipe. Also, not only are these really good as dumplings but they are just as good when baked as biscuits.
Serve 4 to 6
For the gumbo:
peanut oil
1 1/2 cups yellow onion, peeled trimmed and cut into a small dice
3/4 cup green pepper, membranes and seeds removed, cut int a small dice
3/4 cup celery, cut into a small dice
3 tablespoons, garlic, minced
1/4 teaspoon cayanne
1/2 teaspoon marjoram
1/2 teaspoon allspice
1/2 teaspoon fresh ground white pepper
7 cups vegetable broth
1 teaspoon gumbo file
8 cups mixed greens, collards, turnip, or kale, rinsed at least three times and chopped into thin ribbons
kosher salt
For the biscuits:
1 cup buttermilk, room temperature
2 teaspoons active dry yeast
1 teaspoon sugar
1 1/2 cups all-purpose flour
1 cup corn flour, not cornmeal
1 teaspoon baking soda
1 teaspoon salt
1/2 cup unsalted butter, cold and cubed
extra flour for dusting
1. Place a 3 1/2 quart cast iron Dutch oven over medium heat. Add enough oil to the pot to just cover the bottom. Add the onion, peppers and celery. Season them with salt and pepper and stir them to keep them from browning but let them become soft.
2. Add the garlic, cayenne, marjoram, allspice and white pepper. Stir until everything becomes fragrant with out letting the garlic brown. Add the vegetable stock and bring it to a boil.
3. Add the greens by the handful until each addition is wilted and you can add more to the pot. Do this till all 8 cups have been added.
4. Bring the gumbo back to a boil then reduce the heat to a simmer. Simmer uncovered for 1 hour. At the end of the hour add the gumbo file and stir it into the broth. The greens will be tender and gooey.
5. Heat the oven to 425˚ F. While the oven is heating combine the yeast and buttermilk and let the yeast dissolve.
6. In the bowl of a stand mixer fitted with a paddle attachment, or by hand using a heavy duty wooden spoon, combine the flour, cornmeal, sugar, baking soda, and salt with the butter. Mix the flour with the butter until it has the appearance of coarse cornmeal. Add the buttermilk and process until the biscuit dough is just combined.
7. You can use a small ice cream scoop, make sure you don’t sink the biscuits into the liquid, and make a drop biscuit topping by gingerly and gently plopping the dough right out of the scoop and into the gumbo or you can turn the dough out onto a lightly floured surface roll it, cut it into rounds, and then lay these on top of the gumbo.
8. Either way be careful not to sink the dumplings. Place the pot into the oven and bake the whole thing, uncovered, for 20 minutes or until the biscuits have browned nicely.
6. Serve

The Poor Wretches Pasta

Street walkers pasta and now poor wretches pasta. Leave it to the Italians to come up with an interesting name for their local eats. This is Sicilian by birth. The pine nuts and currants aren’t traditional but I like what they bring to this dish.
Eggplants are abundant at the moment. You could take the time to make eggplant parm, moussaka or some other multi-step dish or you could keep it simple and make this. It is simple but that doesn’t mean it isn’t flavorful. I have made it twice already and probably will make it again. I am not doing so because I have eggplants, and lots of them, but because I like it that much.
Makes 4 to 6 servings
good quality olive oil
2 or 3 eggplant, depending on size, peeled and cubed into 1 inch pieces, about 5 cups
2 cups tomato sauce
2 teaspoons red pepper flakes
3 tablespoons currants
2 tablespoons pine nuts
1/2 cup fresh bread crumbs
16 oz. penne pasta
kosher salt and fresh ground pepper
1. Add 1 1/2 tablespoons of olive oil to a small saute pan. Once it is hot add the bread crumbs and pine nuts. Season them with salt and pepper and cook them until they are browned. Add the currants and toss a few times. Empty the pan into a small bowl and let the topping cool.
2. About one hour before you start cooking put the eggplant cubes into a colander. Season the cubes with a fair amount of salt and either place the colander in the sink to drain or in a large bowl.
3. Place a large pot of generously salted water over high heat.
4. While the water is coming to a boil place a 14 inch saute pan over high heat and add 1/3 cup of olive oil. Once it is shimmering but not smoking add the eggplant. It might splatter a little if there is a lot of water clinging to the pieces so be careful. Brown the eggplant.
5. Add the red pepper flakes, a little more oil if the pan looks dry, and then the tomato sauce. Reduce the heat and simmer the sauce.
6. Add the pasta to the big pot of boiling water and cook the pasta according to the cooking time listed on the box. Once they are done, add a 1/2 to 1 cup of the starchy pasta cooking liquid to the sauce depending on how reduced it has become.
7. Strain the noodles and add them to the sauce. Toss to combine and coat the noodles. Pour the pan out into a large bowl and top with the bread-crumb-currant-pine-nut topping and serve.
These cakes have become a standard in our rotation. Not always as Indian cuisine but as other styles too. The Lentil du Puy base is a really good foil for all kinds of flavors and the texture of the meal is toothsome which is also very satisfying. I would imagine the possibilities to be endless and I will let you know if we make any discoveries that deem reporting back to you.
Serves 4
For the Lentil Cakes:
1 cup dried Lentil du Puy, rinsed and picked over for stones
1/2 yellow onion, small dice
1 tablespoon fresh grated ginger
1 tablespoon cilantro, minced
2 teaspoons garam masala
1/4 cup flour, I used millet flour
1 egg
3/4 teaspoons kosher salt
For the Sauce:
1/2 yellow onion small dice
1 cup tomato sauce
1/2 cup cream
1/2 cup plain yougurt
pinch cinnamon
pinch tumeric
2 teaspoons cilantro
canola oil
1. Place the lentils into a 3 quart pot and cover with water by two or more inches. Add the minced onion. Place the pot over medium heat. Slowly bring the lentils to a boil then reduce the heat to a simmer and cook the lentils until tender adding a pinch or two of salt in the last 10 minutes of cooking. This should take approximately 30 minutes.
2. Drain the lentils. Let them cool but puree them in a food processor while they are still warm. They will be easier to handle when warm.
3. Add the remaining lentil cake ingredients and pulse the cakes a few more times until the rest of the ingredients are combined into the mix. Taste the lentil puree then season the puree with kosher salt and a few grinds of pepper. Taste again and adjust the seasoning.
4. Let the cakes sit for a few minutes to hydrate the flour. Take a tablespoon of the mix and make a ball. Is it really wet or is it too stiff? You want the mix to hold its shape but not be overly stiff otherwise they can be dry when cooked. It should just hold its shape. Add more flour a tablespoon at a time if you need to letting the additional flour hydrate before testing. Divide the lentils into eight balls.
5. Add enough oil to cover the bottom of a heavy bottomed sauté pan by an 1/8 inch. Heat the oil over medium high heat. Test the oil by dropping a pinch of lentil to the pan. It should begin to sizzle right away but not violently sizzle and pop.
6. When the oil is ready take each lentil ball and smash it down gently forming it into 1/2 inch thick cakes and add them to the oil. Let each side brown nicely and then remove them to a tray lined with a brown bag to soak up the oil. Keep the cakes warm, either in a low, 200 degree oven or in a warm place on the stove.
7. Drain the oil from the pan, place it back on the heat and then add the remaining diced onion. Sauté until tender then add the rest of the sauce ingredients. Stir to combine, bring to a boil then reduce the heat. Let it simmer for ten minutes to come together. You can puree the sauce to make it smooth or leave the onion chunky making the sauce rustic.
Serve with rice.
