
I have cooked with whole grains for a long time. My fascination began, simply enough, with bulgur wheat used to make tabouleh. It was a gateway to all sorts of other grains; winter wheat, soft summer wheat, oat groats, farro, you get the idea. There are lots of grains readily available that a few short years ago were very difficult to locate. A good earthy health food store went a long way to rectifying the shortage but now about every food store carries some sort of whole grain. Continue reading
Category Archives: Vegetarian

Peanut Butter, Butter, and Lingonberry Jam Sandwiches
I went to my regular restaurant, the one I favor over all others. I ordered my favorite dish only to be disappointed. It lead me to wonder why it wasn’t as good as usual. In my head I worried the quality of the restaurant was slipping, are they ordering a lower quality product that isn’t as flavorful? To be fair I stopped and thought it might be me, maybe my taste buds were off that night. It happens.
I think a lot about taste, not so much about the five taste receptors; bitter, sour, sweet, salty, and umami but more about the law of diminishing returns. Take for instance today, I am making a tomato soup that clearly states in its recipe title it’s the only recipe I will ever need. I hope it’s that good and it may well be delicious but I also know after I eat it 5 or 6 times I will more then likely move on to another recipe for tomato soup, say, the world’s best tomato soup. Knowing my taste buds become familiar with tastes, if the food on the plate in front of me becomes to familiar at some point it is less likely to excite me. I also know there are people who don’t care. They eat simply to survive, their interest lies elsewhere, or they want the familiar. I don’t.
How many times have you eaten a peanut butter and jelly sandwich? Are you ever excited to eat them anymore? As a kid I could eat them breakfast lunch and dinner if my mother would have let me but they began to wear thin and I started to eat ham sandwiches or turkey, sometimes a grilled cheese. As an adult there are times I get a kick out of eating a PBJ but they never seem to match the intensity and joy of eating them as a child. I compare it to going back to the neighborhood sledding hill as an adult only to find what at one time seemed like the Rocky mountains now looks more like a speed bump. Childhood can make experiences larger then life.
Peanut Butter, Butter, and Lingonberry Jam Sandwiches
While I am and always have been enamored with simple foods that use honest ingredients it doesn’t mean I don’t stray from time to time. My cooking has become more about good technique and nurturing rather then showmanship. In a way simple food is like going back to my childhood experiences without fear of being disappointed.
1 brioche hamburger bun or 2 slices of brioche, toasted almost burnt
1 1/2 tablespoons Skippy Natural Peanut Butter
2 unsalted butter pats, about 2 teaspoons at room temperature
1 tablespoon lingonberry jam or red currant jam
Maldon Sea Salt (this is a big flaky sea salt meant for finishing dishes)
- When the bread has cooled enough not to melt the peanut butter spread the peanut butter evenly across the bottom bun. On the top bun smear the butter and top it with the lignonberry jam.
- Sprinkle the peanut butter with Maldon salt to taste. Smush the top bun onto the bottom and serve.
Cheats, Lies, and Hucksters (How to Cook a God Damned Grilled Cheese Sandwich)
As a kid, learning to cook a fried egg and bologna sandwich is like teaching me how to load a gun without establishing any safety guidelines. While the combination of griddled bread, egg yolk, mayonnaise, seared bologna, and American cheese is white trash foie gras, perfecting the fried bologna without having made a grilled cheese, well, it is Picasso without a Blue Period, Miles Davis having composed no song book before Bitches Brew. There is no reference and no history, a drifting ship with no anchor. At the time, I didn’t understand the damage done by using the cliff notes without ever reaching for the novel.
But here we are, in that time of year when we think about grilled cheese. It is the age old discussion, as if we forgot the combination to the safe and it needs to be cracked again, of how to cheat a grilled cheese. As if the answers locked away are new kinds of offerings; in a waffle maker, with an iron, use mayonnaise instead of butter, or turn a toaster on its side.
So I am just going to say it, I am tired of hucksters and cheats. It pains me to be over sold or even worse, blatantly lied too. I am not putting myself on a pedestal, far be it from me to cast stones, I am no practicing perfectionist and neither am I an Elmer Gantry. I have my faults and I try to be honest about them. Even so, when I witness an egregious wrong I can’t keep my mouth shut. After all, I can’t have my children wondering around this world thinking they will be able to succeed without ever learning the fundamentals. It happens everywhere and now, of all arenas, the kitchen is under attack.
Why can’t we just learn to cook a god damned grilled cheese? What are we afraid of, actually learning how to cook? There are so many basics to be learned by placing a sauté pan onto the stove to griddle two pieces of bread with cheese stuck in between and yet at all costs we try to avoid it. I don’t care what kind of cheese is put between the slices of bread, I don’t even care what kind of bread you use but I do care that you know how the different kinds of bread are going to react to the heat, that types of bread with more sugars and fats are going to brown faster then lean breads made with nothing more then water, flour, and yeast. Or that certain kinds of cheese are so stringy when you go to take the first bite every bit of the cheese is going to come along with it.
Cheats and shortcuts are wonderful but only after you know how to cook the original dish in the tried and true fashion, only after you have mastered the grilled cheese is it okay to riff on it. If you ignore, or fail to recognize, the subtle nuances of cooking you can follow a recipe to the T and still have it fail. It is because there are so many variables that can lead you down the path to disappointment that it becomes imperative to learn how to cook, which is wildly different from simply following a recipe.


Grilled Cheese Sandwich (makes 2 sandwiches)
4 slices Pullman bread
1 1/2 cups gruyere cheese, grated
1 1/2 teaspoons prepared horseradish
1 tablespoon green onion, minced
a splash of heavy cream
fresh ground black pepper
unsalted butter, softened
1. Combine the grated gruyere, horseradish, green onions, and a splash cream in a medium sized bowl. Add a grind or two of fresh ground black pepper. Mix everything with a spoon to combine.
2. Place a 12-inch sauté pan over medium heat. Liberally butter one side of each of the pieces of bread making sure to cover the whole surface. Place the bread, buttered side down into the pan. Top each piece with one quarter of the cheese mixture. Turn the heat to medium low.
3. Once the cheese begins to compress and soften check the bottom of the bread. If it is browning to fast turn the heat down. Once the bread is browned and the cheese melted put the sandwiches together. Cut the sandwiches into 4 crusty cheese sticks and serve.
A Delicious Lentil Soup With A Dirty Little Secret
What you need to know about lentil soup is everyone has their “simple” version. Knowing this, it reminds me how easy it is to get a nutritious hot bowl of soup to the table. It also tells me that it must taste really good if there is a reason to keep publishing simple lentil soup recipes, and we do keep publishing them and it does taste good.
The hardest part of making this soup is cutting the vegetables, which with the exception of the potatoes, can be done up to two days in advance as long as the vegetables are stored in an airtight container in the refrigerator. The recipe calls for four types of lentils but the truth of the matter is, I had just a small portion of different kinds of lentils I needed to use up. It so happens that the different textures and subtle flavor differences in the legumes was a welcome addition but if you don’t have but one kind of lentil in the house the soup is still really good.
And here is the secret, soups depend on good broth but sometimes the broth isn’t strong enough. Without a good broth soups come off as watery and bland and no amount of salt is going to change this. This fact, and this fact alone, is enough of a reason to keep bouillon cubes in the pantry, or some sort of stock base, that can be used more as a seasoning then as an actual broth. The idea is to taste the soup after it has cooked and if it comes off as a little flat you add a quarter teaspoon or more of stock base or break off a small piece of bouillon cube to kick up the flavor. Add the base to the pot, let the it dissolve, stir, and taste again. Keep adding a small piece if needed until the soup is delicious. Get the picture? It works, makes the soup more exciting, even if it is a dirty little secret.

©Tom Hirschfeld 2016 All Rights Reserved
4 Lentil Soup (makes 6 servings)
2 tablespoons extra-virgin olive oil
1 medium yellow onion, peeled, small dice
3 carrots, peeled and cut into thin rounds
1 large celery stalk, small dice
3 medium yellow potatoes, cubed
1 cup lentils, a mix of beluga, du pays, yellow, and red
3 garlic cloves, minced
2 tsp. fresh rosemary, minced
1 tsp. dried oregano
2 tsp. fresh thyme
1 cup crushed tomatoes
salt
pepper
vegan sodium free bouillon cube
5 cups homemade vegetable stock or no-sodium vegetable stock
2 handfuls baby spinach
1.Place a 3 1/2 quart (3.5l) enameled Dutch oven over medium heat and add olive oil. Once the oil is warm add onions, carrot, celery, and garlic.
2. Season with 1/2 teaspoon kosher salt. Stir, and sauté the vegetables until they are soft, about 3 minutes
3. Add oregano, thyme, and rosemary. Stir again and add potatoes and lentils. Stir. Add tomatoes, broth, and bouillon cube. Season with a pinch of salt and fresh ground pepper.
4. Bring the broth to a boil, reduce the heat to a simmer and cover. Cook for 20 to 25 minutes, or until the lentils are tender.
5. Remove the lid, taste the soup, and add any seasoning necessary. Add 2 big handfuls of fresh spinach and stir it into the soup. Once the spinach is wilted, ladle up bowls of soup and serve.
A Simple Pot Of Beans (And Tips For Pressure Cooking Them)

©Tom Hirschfeld 2016 all rights reserved
Just about anything can be cooked in a pressure cooker. It does lots of things well. Stews, roasts, soups and one pots all come to the table hot and delicious. Even so, what really keeps the pressure cooker on the stove top is the basics. A pressure cooker cooks beans, grains, rice, and stocks effortlessly and it cooks them perfect every time. A pressure cooker is a natural in the kitchen. Not only that, as everybody knows, the pressure cooker saves time and when it comes to cooking beans it saves lots of time.
Bean Myths
We live in a world of bean myths. A world where bits of anecdotal information is passed from one generation of cooks to another. Dried beans carry suitcases full of informational baggage around with each and every pound. But what is truth and what is fiction and how should it all be sorted out?
Dried beans
There are a lot of choices when it comes to the kinds of beans you choose to cook. There are all the traditional beans -‑ black, pinto, garbanzo, navy, and kidney but there are also limitless kinds of heirloom beans with fancy names like Tiger Eye, Eye of the Goat, and Snowcap. There are even more.
When combined with a grain, more often then not rice, beans make a complete protein. This makes beans one of the least expensive healthy foods to put onto the stove. Combine them with a few spices and herbs and it becomes a flavorful dish the whole family will love.
To buy the best beans frequent a grocery that has a high turnover of dried beans. The newer the bean the better it cooks. Beans that have been around for a long time might not ever soften no matter how long you cook them. It pays to pay a little extra for good quality beans.
There are other legumes too. Split peas, lentils, and field peas cook up just as wonderfully in a pressure cooker as any of their cousins mentioned above. These legumes don’t need any kind of soak either, they can go right into the pot and cook in no time at all.
To Soak or Not to Soak?
This is a personal question. It is up to the cook whether or not to soak the beans overnight. In pressure cooker you do not need to soak the beans but there may be reasons why you want to.
One reason would be how are the beans going to be used. If they are to be pureed soaking isn’t necessary but if they are to be left whole a pressure cooker often splits beans leaving them cracked. If this is important then soak the beans.
Under pressure dried beans are cooked in minutes. Not something that can happen when they are cooked traditionally. The question becomes one of digestibility. If the beans are soaked a good deal of the gas causing chemical, phytic acid, is leached out into the soaking water which is discarded and fresh water is then added for cooking. If gastrointestinal issues are a factor presoaking is mandatory.
So while you can eliminate the soaking water when pressure cooking here is another reason it might not be a good idea. Almost any presoaked bean cooks in 10 to 14 minutes in a pressure cooker. That is what is amazing. Cooked delicious beans in such a short amount of time!
A Quick Soak
If you should forget to soak you beans you can still get a pot of beans to the table with a quick soak. Simply put the amount of beans you want to cook into the pressure cooker and for every 1 cup of beans add 4 cups of water. Bring the water to a boil and lock on the pressure cooker lid. Bring to pressure and set a timer for 2 minutes. When the timer sound turn off the heat and let the beans sit for 20 minutes or until the pressure has released. Drain the soaking liquid and proceed.
Salt
There is an old wives tale about salt and beans. It says that salting beans extends their cooking time and makes the beans tough. It does not. Salting beans is paramount to great tasting beans. It is best to salt them during the soak time. About 2 teaspoons of salt per 4 cups of water is sufficient.
Foaming
Foaming is always a concern when using a pressure cooker. Foam carries particulate which can lodge and clog the pressure valves. It is best to add a tablespoon of oil or fat to the cooking liquid. This will help to prevent foaming. It is also best to use a natural or cold water release beans for the same reasons.
When To Add Acids
Tomato sauce and vinegars are often added to beans for flavor. The acids in these products can cause the beans to toughen and take longer to cook. It all depends on how much you add. A can of tomato sauce is going to affect the cooking time, a tablespoon probably not. Nevertheless, it is always best to add any of these products toward the end of the cooking time.
Baking Soda
There is no good reason to add baking soda to beans.
A Simple Pot Of Beans
2 cups pinto beans, rinsed and picked over for debris soaked in 8 cups of salted water for 4 hours to overnight
1 small yellow onion, peeled, small dice (about 3/4 cup)
3 garlic cloves, minced (about 1 TB.)
1 tsp. kosher salt
1 bay leaf
[1/2] tsp. fresh ground black pepper
- Drain the beans into a colander and strain. Rinse the beans.
- Place the beans into a 6 quart (5.51l) or larger pressure cooker. Add enough water to cover the beans by about 1-inch (2.5cm) about 5 or 6 cups.
- Add onion, cloves, garlic, salt, bay leaf, and pepper to the pot. Bring the water to a boil over medium high heat (traditional)/high(electric).
- Lock on the lid, bring the pressure to level 2(traditional)/high (electric). Set a timer for 10 to 12 minutes.
- After the time sounds either perform a natural or quick release. Serve or cool and refrigerate beans until needed.

Pimento Cheese Sandwiches
Is it the heat in August, or the midday cicadas—grinding, grinding, grinding—that reminds me of the time of year? The horizon, corn pollen and gravel dust, is smudged. This is the first August I can ever remember going outside after lunch to find it refreshing instead of repressing. The sun is as bright as on a crisp fall afternoon and the humidity is nowhere to be found—grinding, grinding, grinding.
I like to hear the corn grow and without the humidity there is nothing from which the growing pains can echo. An ambulance, siren blaring, leaves town. The sirens grow louder until the emergency vehicle turns north on the state highway. The sirens begin to fade.
It has been like this all summer and I am being robbed. I like the heat. It is the humidity and heat that makes my vegetables grow. I have nothing growing in my garden this year. By rights I should be eating okra. I should have so much zucchini I have to feed it to the chickens. I should be looking forward to garden succotash and fried chicken but my lima beans died long ago in the continual down pours of early spring. I should be picking fresh field peas and pole beans but I never even got the baskets down from the cabinet. I should be cutting sweet corn from the cob and freezing it.
I rock gently in an easy chair on the front porch and eat a pimento cheese sandwich. From out across the fields I can hear the announcer for the high school football game calling plays. I think back to all my first days back at school. I feel the butterflies in my stomach, another summer grows quite.
Pimento Cheese
(Makes 2 cups)
3 cups cheddar cheese, grated (about an 8oz. block)
2 teaspoons yellow onion, grated on a micro plane
3 tablespoons jarred pimentos plus 1 tablespoon pimento juice
2/3 cup mayonnaise
1 tablespoon Nathan’s mustard
1 tablespoon cider vinegar
1 tablespoon Tabasco sriracha
1 tablespoon ketchup
fresh ground black pepper to taste
- Place all the ingredients into a mixing bowl. Stir gently with a spoon until everything is combined. Let sit for an hour before serving. Store in the refrigerator tightly covered.

The Best Corn on the Cob in the World
 Something as simple as good corn on the cob shouldn’t be elusive. There shouldn’t be any big secrets but there is and it is this, the best corn on the cob in the world is cooked in a pressure cooker. It couldn’t be simpler to do and the results are divine.
I live in corn country. If there was a vortex for the center of a corn universe I am at ground zero. And if not the exact center I am still close enough that if it shook in the middle of the night it would knock me out of bed. What I am saying is in the Midwest we know corn, and all you have to do is visit any state fair to know I am telling you the truth.
We roast it, boil it, we scrap it off the cob, we make it into pudding, make chowder out of it, we slather ears of it with mayonnaise and sprinkle it with any number of spices, and we even deep fry it like it is a corn dog.
But when a real treat is in order, in the heat of late-summer, we set up a table under the shade tree, even put a table cloth on it along with plates and silverware. Then we grill some thick cut pork chops, cut thick slabs of ripe homegrown tomatoes and lightly salt them, maybe a green salad with a sugary vinegar and oil dressing, and we steam perfectly rip ears of sweet corn under pressure, slip the ear out of the husk from the stalk end and roll the perfectly steamed ears through sun softened sticks of butter.
Pressure cooking an ear of corn does something magnificent. It gives the kernels a snap, and by leaving the husk on the ears develop a robust corn flavor, much like wrapping tamales in a dried husk. It tastes like corn should, pure and simple.
The Best Corn on the Cob in the World
(serves 6 to 8 people)
When buying ears of corn look for husk that are vibrant and fresh. It is also always best to cook sweet corn the same day you buy it.
8 ears of sweet corn still in the husk (buy ears that fit your cooker)
1 cup water
1 stick of unsalted butter
sea salt
fresh ground black pepper
Equipment: a 6 or 8 quart pressure cooker with a steamer basket
1. Set an ear of corn onto a cutting board. Using a good chef’s knife trim the stalk end back so that there is no stalk showing just kernels, about a 2-inch piece. Repeat with all the ears of corn.
2. Place each ear of corn cut end down into the steamer basket.
3. Place the cooker over medium-high heat. Add 1 cup of water and bring it to a boil. Slip the steamer basket with the corn into the pot.
4. When the water returns to a boil, lock on the lid, and bring the pressure to level 2, or high. Once pressure is reached lower the heat while maintaining pressure.
5. Set a timer for 6 minutes. When the timer sounds perform a quick or cold water release.
6. Remove the lid and use a pair of tongs to lift out the steamer basket.
7. Using a dry and clean kitchen towel grab and ear of corn by the silk and push the ear out of the husk toward the stalk end. The silks should come along with husk and the ear should be clear of silk. Repeat for all the ears. Serve immediately with lots of butter, salt, and fresh ground pepper.
(A tangent: If you own a pressure cooker you are in luck, if you don’t then you are going to want one. So go buy one, I am serious, and I don’t peddle stuff on here. Not only do pressure cookers cook things well they are going to help save the planet one meal at a time by conserving energy, water, and time. If you like that sort of stuff, conservation, then you have to get one. A 6 or 8 quart stove top cooker will feed your family delicious meals for years to come.)
I often wonder what makes a recipe so good it goes viral. I am sure it’s lots of factors. Sometimes it’s the recipe itself, other times it is what the author expresses in words through their post, and sometimes it is simply because the author is very famous. This recipe, originally posted on the blog My New Roots, has shown up on lots of other sites and was even a Genius Recipe on Food 52, and rightly so. At the very least it has gone viral in my circles.
There are lots of things to like about this bread, like stacking it with thinly sliced crisp cucumbers, topped with oily mackerel, shallots, and parsley like in the picture above. I also like it with thick cut bacon and peas shoots, or simply toasted and topped with butter and lingonberry jam. It is delicious bread. I even bake it on my Big Green Egg to give it a more authentic, and Danish, baked-in-the-dying-embers of a wood fired oven flavor.
My only problem is if I make the loaf of bread following the original recipe it comes up short. I heard the same words of disappointment from others who tried it too. The bread can be fussy, difficult to cut, crumbles, and becomes dry. Many I know have given up making it.
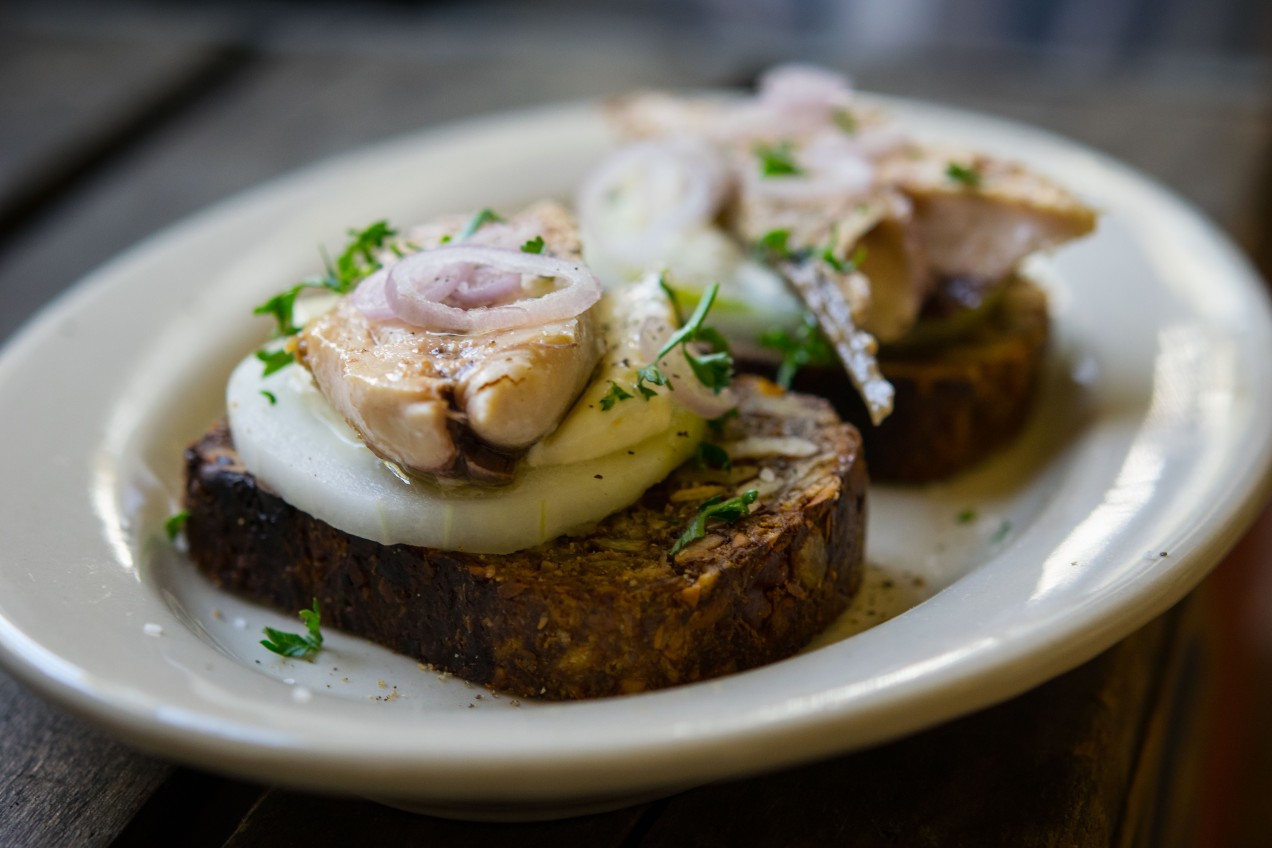
One of my favorite ways to top this bread is with thin slices of cucmber, mackeral, parsley, and shallot.
I am sure the loaf bakes up perfect and to the satisfaction of many people every time. It doesn’t for me, but I understand when it comes to cooking and baking there are so many variables that to place fault elsewhere is simply not taking responsibility for ones own abilities. After all, it is up to the cook to get what they want from a recipe. It is why you need to know how to cook rather then simply follow directions. Just like different musicians playing the same piece of sheet music. The song sounds very different depending on the players abilities. It is only because there are so many things about this loaf of bread I like that I stuck with it, experimented with it, until I got the loaf of bread I wanted, until I heard the song I wanted to hear.
I didn’t change much, although I used pumpkin seeds instead of sunflower and ground psyllium instead of seeds and I ground a portion of the oats and pumpkin seeds to create a finer crumb in the end product. And while I use coconut oil in some recipes I didn’t use it here nor did I use maple syrup but instead brown rice syrup was substituted. For me all these small touches made for a more manageable loaf in the end.
The fact is, made from the original recipe this loaf of bread is delicious, the taste is very satisfying, nutty, feels good to eat, and it is nourishing. I simply made adjustments which gave me the product I wanted to eat. Rest assured though, for those on a restricted diet, and those that aren’t, this seed bread is an important find. It’s worth practicing to get it right.

Seed bread packed into a pate mold and waiting to be wrapped up for a rest before baking. Notice the parchment handles.

This recipe creates a less delicate loaf.
Seed and Grain Bread (adapted from My New Roots)
1 cup unsalted pumpkin seeds (1/2 cup coarsely ground)
1/2 cup golden flax meal, ground
1/2 cup walnuts
1 1/2 cups rolled oats ( I generally grind 1/2 cup coarsely in a coffee grinder )
2 tablespoons chia seeds
3 tablespoons powdered psyllium
1 teaspoon kosher salt
1 tablespoons brown rice syrup or whatever syrup you have and want to use
3 tablespoons spectrum vegetable shortening (it’s palm oil and non-hydrogentated) or unsalted butter
1 1/2 cups hot water
1. Combine all the ingredients in a bowl. Using your hands work the mass until the shortening or butter and the other ingredients are evenly distributed.
2. Line a pate mold, or small loaf pan, with parchment. To remove air bubbles, literally, pack the dough into a 3 x 4 x 10 pate mold. Wrap the whole thing in plastic wrap and let it sit for 1 to 2 hours.
3, Heat the oven to 350˚F. Remove the plastic wrap, place the loaf pan onto a baking sheet and bake the bread for 25 minutes.
4. At the end of the baking time remove the tray from the oven and using excess parchment paper as handle lift the loaf from the pan. Place the loaf, with the parchment still under it, back onto the sheet tray and bake the bread for another 20 minutes.
5. When the timer sounds, roll the loaf so that a new side is flush with the sheet tray. Bake another twenty minutes. Do this until all four sides have been baked against the sheet tray.
6. Remove from the oven and let the bread cool completely before cutting.
7. The bread is best toasted. Store in the fridge wrapped in plastic wrap.
Note: recently I baked a loaf on my Big Green Egg. It is a fantastic way to bake this loaf. Much like it might be baked in a shop in Europe using the dying embers of a wood fired oven.
A Life-Changing Loaf of Bread (Redux)
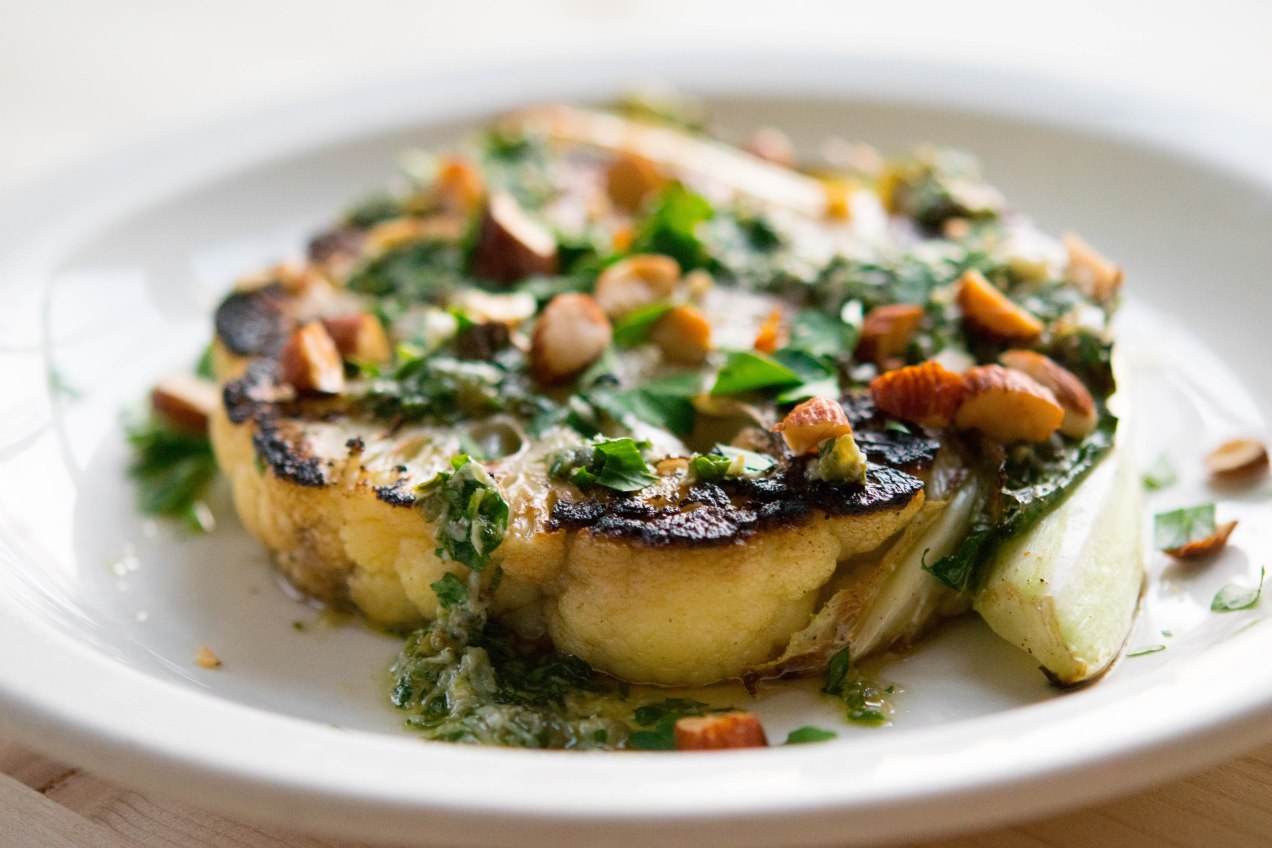
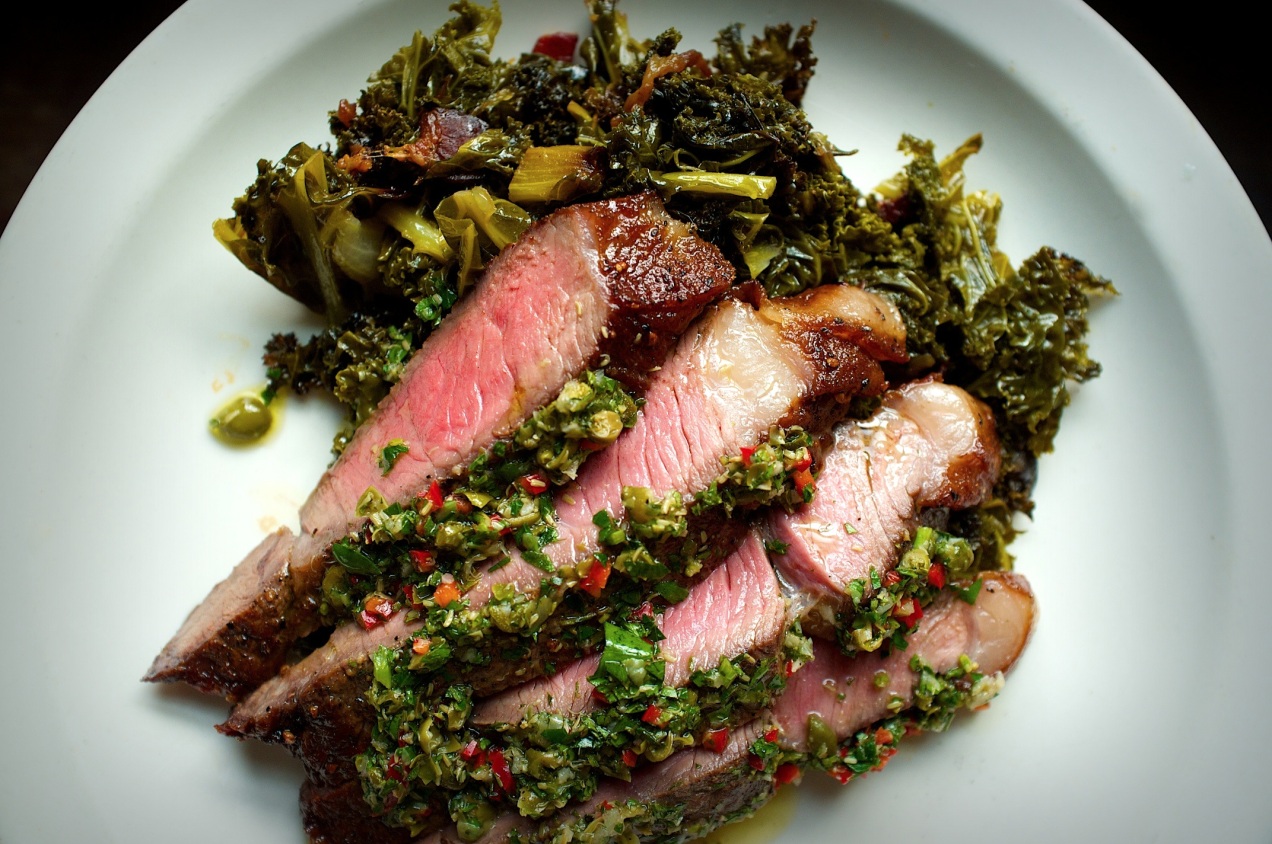
A Real Winner: Seared Cauliflower Steaks with Salsa Verde and Almonds

Some people collect cars, for others it is playing golf, for me, it’s barbecues. I don’t collect them per se but rather I cook with them. Their value isn’t termed by condition but in hours of use. Much like a cast iron skillet I can gauge the worth of a good smoker by the black patina that coats its inside. While many men might spend their weekends under a car, I prefer to smell like hickory rather then gasoline and motor oil. It’s how I get my kicks.
So you can imagine my excitement to I discover I won a Big Green Egg! Yea, I won. I never win anything but Debra Smith at SmithBites pulls my name from a hat of entrants and I win, I never win. Nevertheless, it is like getting the Most Improved trophy in grade school. I sort of treat it like that, it sort of looks like that and I couldn’t be any happier then to be a proud owner of one. Hell, I park it in the garage if that tells you anything. I don’t even put my car in the garage, the garage is for my tractor, and now the grill.
 The whole time I am assembling my grill I think about what I am going to cook first. A steak, a brisket, venison, burgers, pork chops, butt steak, I go through all the possibilities and my head spins in anticipation. The dogs look on with concern for my well being, TrixieB even comes over and gives me a lick on the face and some big sad eyes of worry.
As I said, I don’t collect grills. I have three. One is a smoker, that is all it does, it smokes meat, charcuterie and hams at low temperatures. My other grill I hand made. It is a street food kind of contraption meant to cook fast and furious. It is for meat on a stick, small stuff that cooks through quickly. Both serve their purpose. So maybe I don’t consider my self an aficionado but I do consider myself an expert. It was my station each day at the restaurant. I worked the grill day-in and day-out for seven years. I can cook a steak, a boneless chicken breast and any kind of fish you can imagine but, like professional ball players who sometimes hit a foul ball, I do sometimes miss the mark but rarely, and I mean rarely, do I over cook a steak.
My point being, I am excited to try what many consider to be the Mercedes of grills, the Big Green Egg but I am a little apprehensive having never used one. Don’t think I wasn’t a little more then cautious too, I bought a high end Wolfe stove and it’s a piece of crap, so I know just because something has a name doesn’t mean it is going to work but I have to be on my game also. I am approaching this with a certain err of caution.
But then it hits me. Friends often accuse me of using appliances differently then anyone else, most recently crock pots were entered as evidence into this court of opinion. So I asked myself, “why would I grill a steak?” It took all of a second to answer my own question, “why not sear cauliflower steaks in a pan on the grill?” That was easy enough, decision made.
Here is why I wanted to cook cauliflower steaks. The Big Green Egg people claim a lot of things about their grill. You can cook pizza on it, bread, grill steaks or smoke brisket is what they say. Which I get, it is sort of like a wood burning oven. It is ceramic, it holds heat, and it gets very, very hot but can also hold a low temperature for a long time. It holds a lot of promise. So my thinking is, I want to put a cast iron pan on the heat, see how hot it gets and how well it sears. I know, I know, you can cook with a cast iron skillet on your stove. True, but my stove won’t impart a smokey flavor to whatever I am cooking. And that is it, that is what I want to find out, is what is the smoke flavor of the Big Green Egg going to be like. It is the one character trait I am most interested in. Will it be bitter and heavy or will it be just right. When it comes to vegetables the right amount of smoke goes a long way. To much and you have a very bitter ash tray kind of experience that will keep you from tasting any other part of your meal. And seriously, antacids are no kind of dessert.
I am not going to bore you with blow by blow cooking details other then to say the grill is great. It lights fast, it gets very hot quickly and it imparts a great flavor to whatever you are cooking. My cast iron casserole heated quickly, I actually thought it might get to hot and burn the cauliflower before it became tender on the inside, but it didn’t. It cooked the cauliflower with a perfectly light kiss of smokey flavor. Since then I have roasted chickens to great applause from the family, from me too. A tri-tip roast delicious, pork chops amazing, cauliflower steaks a home run, and the Big Green Egg, a real winner.

Seared Cauliflower Steaks (serves 2)
2 small heads of organic cauliflower
1/3 cup flat leaf parsley, minced
1 small garlic clove, grated on a microplane
1 tablespoon lemon juice
1 anchovy, rinsed
1/4 cup Asiago cheese
extra virgin olive oil
half a cup of salted almonds, chopped
1. Build a charcoal fire for direct heat grilling in your grill. You want it to be very hot. Place a large cast iron skillet right in the middle of the grilling rack. Cover the grill. What happens when you cover the grill is the heat builds, the pan becomes very hot and the lid keeps a little bit of smoke flavor circulating.
2. While the grill is heating make the salsa verde. In the bowl of a mortar and pestle combine the lemon juice, garlic, anchovy, and parsley. Beat it up with the pestle. Add a two finger pinch of salt, a dash of black pepper and a few glugs worth of olive oil. Stir to combine, taste and add more oil it the salsa is to tart. Stir in the cheese.
3. Trim the stalk ends of the cauliflower. Using a good sharp knife cut one steak each out of the center of each head. To do this turn the floret side of the cauliflower down. Hold it firmly and place you knife onto the stalk. Cut through to the florets. Roughly gauge and inch in width and make another cut leaving yourself a nice center cut cauliflower steak. Repeat these steps with the second head of cauliflower. Use the loose outer edges of the cauliflower for another dish.
4. Drizzle the steaks with olive oil and season them with salt. Take them out to the grill. If you have a thermometer on your grill it should read about 600˚ F. Nevertheless when you open the lid the cast iron pan should be beginning to smoke and when you place the cauliflower into the pan it should sizzle. Cook each side until of the steak until it is very deeply caramelized. Remove the steaks from the pan.
5. Drizzle the steaks with the salsa verde, top with almonds, minced parsley and serve.
No Recipe Greek Nachos
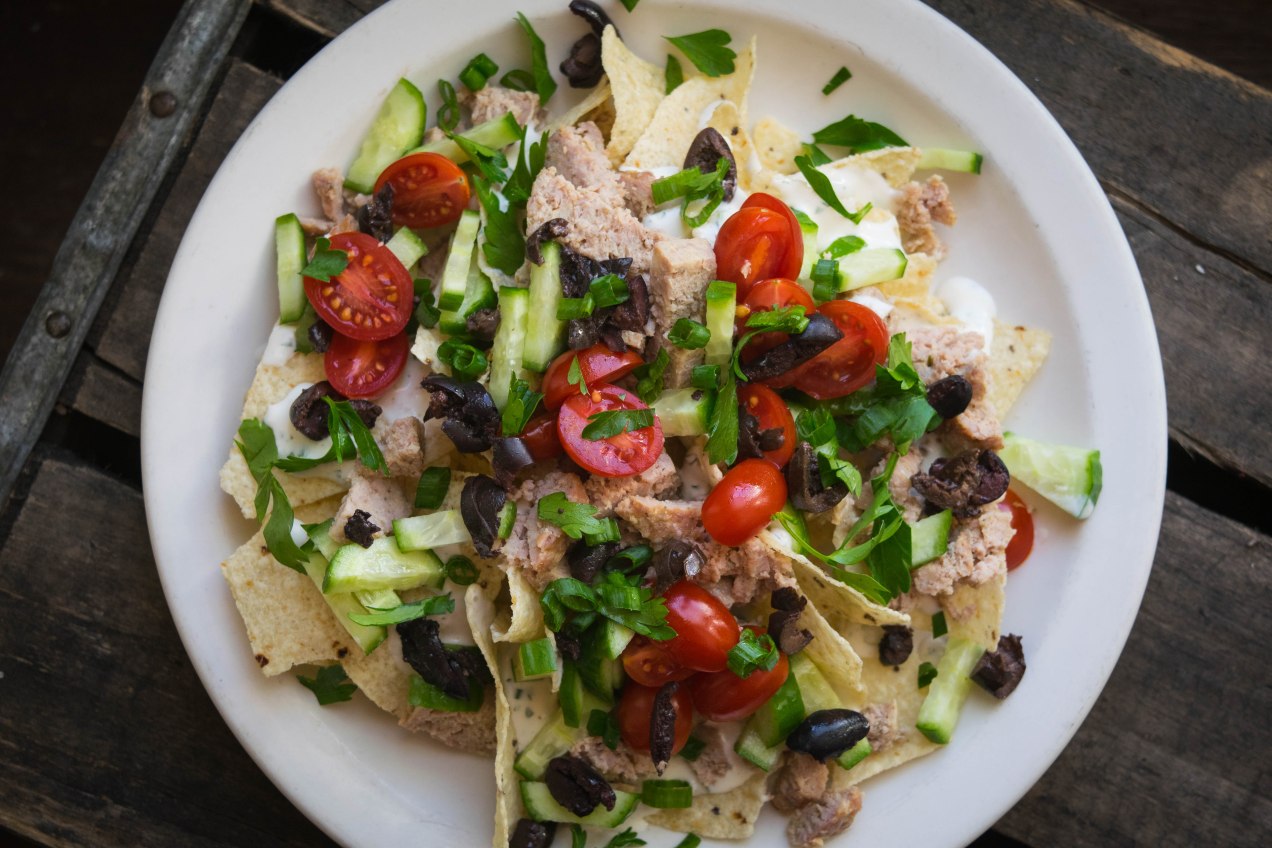
You don’t need a recipe. You can make these from scratch and it will take you less then 10 minutes. Of course that doesn’t include grocery time, I am making the assumption you did a little pre-planning. Although when I made this the other day it came out of leftovers, no planning required. (Don’t want to make the tzatziki, sub in ranch dressing and go for it.)
Pile good quality corn chips onto a plate. If you are making the ranch/tzatziki sauce scoop about 1/2 cup of mayonnaise into a bowl, just eyeball it don’t dirty a measuring cup. Add a splash of buttermilk, milk, or kefir and whisk it to make a smooth dressing. To thick, thin it out with another splash of liquid. Add a half a tablespoon of chopped dill. No dill, use dried oregano just make sure to let it sit and hydrate in the dressing for a few minutes. Again just put it into the palm of your hand, does it look like half a tablespoon? Toss it in, add salt, pepper and a little lemon juice if you want. Stir it again then set it aside until you get the rest of the ingredients together.
Slice some grape tomatoes in half, cut some olives, pit them if you have the fancy kind but pitted California black olives work fine. Chop some cucumbers, I like the baby kind but big ones work too. Any kind of cooked chopped-up ground meat works here. Don’t have any animal protein around, drain a can of chickpeas and rinse them.
Drizzle the chips with the tzatziki, top with everything else, add a bit of crumbled feta, a sprinkle of minced parsley and green onion, if your heart is in it, and serve.
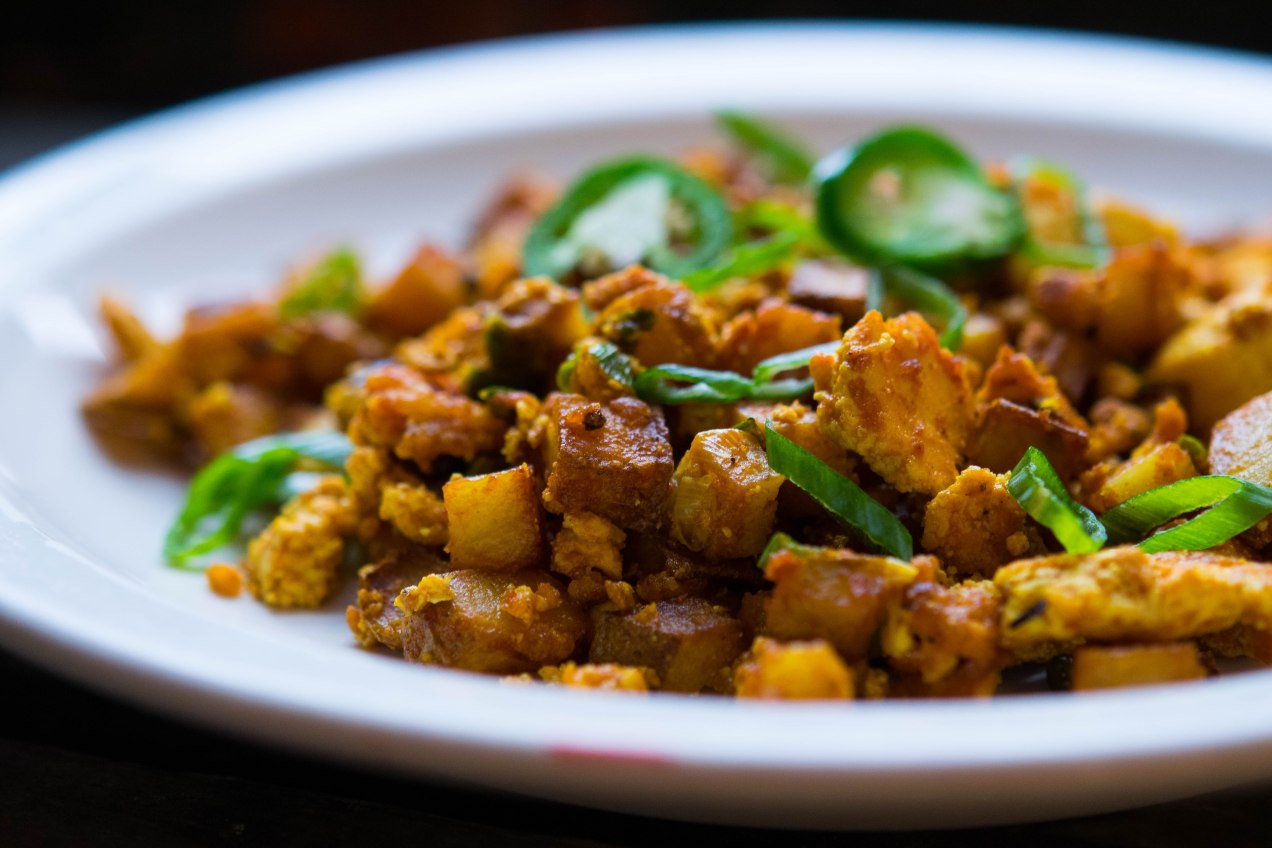
My Favorite Tofu Scramble
It’s not for a lack of eggs. I raise chickens, I have more eggs then I can use most days.
So what drives me to this dish. I especially like sprouted tofu, a lot. It’s not just tofu though. I like the process, the feel of the tofu as I crumble it between my fingers onto a plate, the precision of cutting the potatoes into tiny squares so they cook faster but stay crispy on the outside while remaining creamy in the interior, the smell of the curry powder when I sprinkle it into the hot pan, or the sizzle of the tomato sauce.
I like this dish because it requires a few minutes to make but isn’t complicated to get to the table.
I like it because it is doable on a weekday morning.
I like it because it feels nutritious to eat, as if it is resetting something in my body.
I like it because after eating I am still hungry for the day.
Curried Tofu Scramble (2 servings)
10 ounces sprouted firm tofu, crumbled
1 russet potato, scrubbed and diced into 1/4 inch squares
peanut or grape seed oil
1 green onion, thinly sliced
1 jalapeno, chopped
1 tablespoon curry powder
1/4 cup tomato sauce
kosher salt and fresh ground pepper cilantro, optional
1. Place a 12 inch non-stick skillet over medium high heat. Add enough oil to the pan to generously coat the bottom of the pan. Add the potatoes. Season them with salt and pepper. Gently toss the potatoes in the pan until they are brown on all sides, crispy but still creamy in the center.
2. Add the tofu, jalapeno, and green onion to the pan. Season again with salt and black pepper. Stir to combine the sprinkle the curry powder over the tofu. Stir again being sure to evenly stain all the pieces of tofu with the nice yellow color of the curry. Add the tomato sauce and stir. If need be add a tablespoon or more of water.
3. Once everything is heated through, the right consistency, and seasoned to your liking divide the scramble onto two plates, garnish with cilantro and serve.
Perfect Microwave Broccoli
 Rarely do I use my microwave. I use it to take the chill off my coffee. I heat leftovers for lunch. Whenever a recipe calls for “butter, melted” onto the glass turntable the fat filled Pyrex measuring cup goes. I don’t cook with my microwave in any real culinary sense. I sometimes wonder why I have it, why I allow it to take up precious counter space when I know everything for which I use it can be done just as easily on the stove.
Of course there is also the fear that has been around as long as the microwave, that somehow it poses some sort of health risk. I don’t know if it does or not but if I error on the side of solid scientific research, it would tell me the microwave is harmless. Even so, I will lean on the side of caution and repeat the mantra I continually voice to my children, don’t put your face right up to the microwave door to watch as a cooking pizza pocket swells and shrinks, as if it is coming to life, and please, stand back an arms length.
I don’t believe the microwave has ever lived up to its original space age expectations. Nonetheless I read an article touting the healthy aspects of cooking vegetables in a microwave. Because it basically steams the vegetables, the vegetables retain a large portion of nutrients then if you used other cooking methods. It made sense, and I am buying in, or at least I want to and there are lots of reasons why. Continue reading
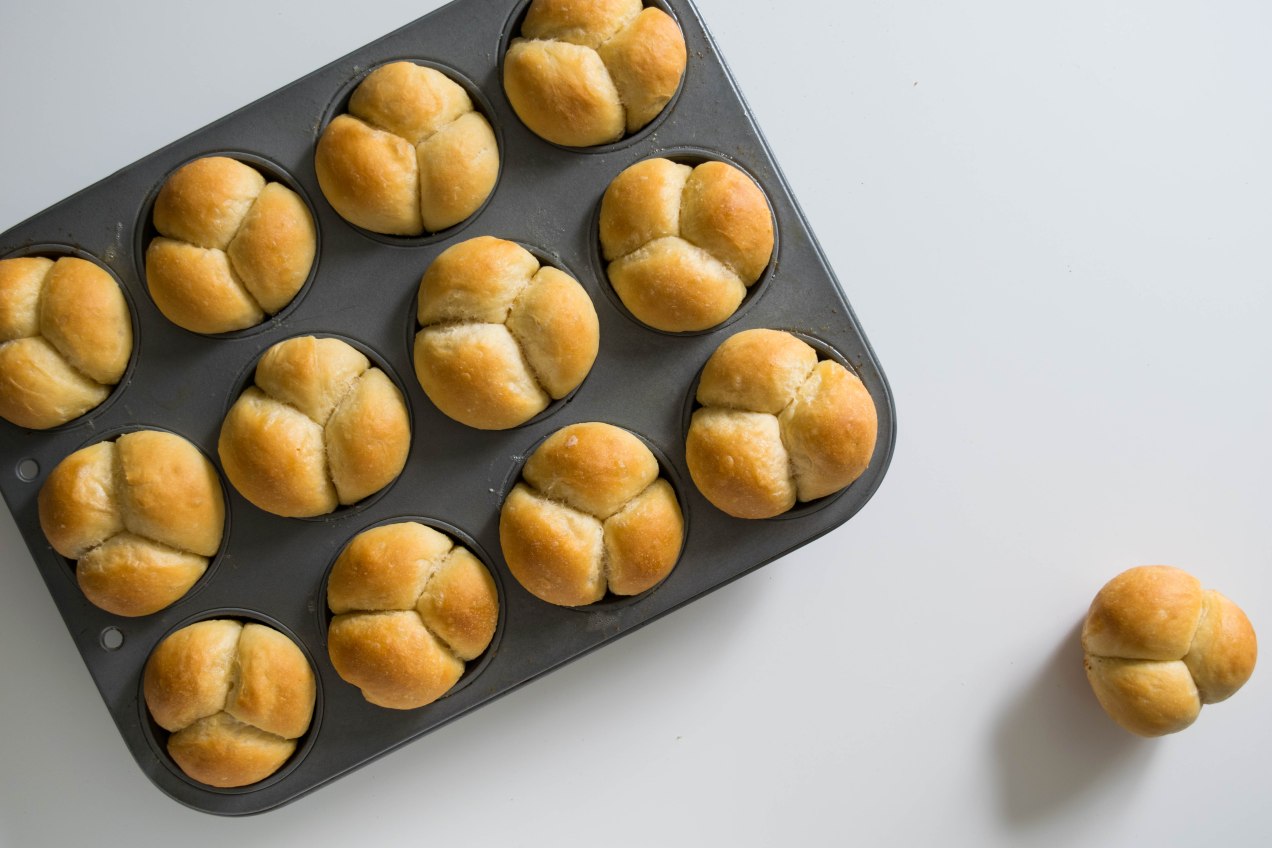
Dinner Rolls and a Bonus Southern White Loaf
I have been, and will continue to be a believer in simple good recipes that follow great technique. I often feel as though complicated directions and hard to find ingredients set us up for disappointment and failure. Don’t get me wrong. I understand the law of diminishing return. That today’s worlds best recipe will be boring tomorrow.
We need to search out new tastes, techniques and flavors but it is also important to return to the classics. For me, I also like to share my childhood favorites with my children. These rolls are a part of me. They connect me to my past, and by sharing them, they connect me to my children. Continue reading
Classic Creamy Coleslaw

My favorite kind of coleslaw is the classic, creamy variety; it comforts me because I grew up eating it at a mom-and-pop catfish bar whose coleslaw was second to none. Their version was made with finely grated cabbage and bright orange ribbons of carrot. It was a bit tart and a little sharp — the way horseradish can be — because the cabbage was freshly grated. It paired perfectly with deep-fried catfish, whose crispy tails tasted of bacon. This is the slaw by which I judge all others. Continue reading
Three Bean Salad, Redux

Now that picnic season is upon us, I get nostalgic over classic summertime fare. There is nothing quite like a family reunion over fried chicken and a potluck dinner, tables threatening to buckle under the weight of all the CorningWare and Pyrex.
Of course, there are the old favorites: green bean casserole, scalloped potatoes, pea salad with bacon and mayonnaise, three bean salad, and most certainly a mustardy potato salad — and, if luck is with me, an old-fashioned custard pie sprinkled with a little nutmeg. I love all these foods — but this year, I want something new. Continue reading
Morels with Asparagus & Five Reason to Eschew Recipes

There was a time when my father and I would have walked the distance up the hill to Gordon’s Rocky Top. We would have crossed the creek, stepping gingerly across the slick rocks like seasoned hopscotch players, hiked to the fork in the path, taken the trail on the left, and then quietly ascended the long, wooded hill. On our way, we would have walked past the pond, and if we were lucky, we might have spooked an owl or happened upon some white tail deer. Continue reading
Spicy Chickpea and Sour Tomato Curry with Pasta
Whenever a simple, delicious dish — like this spicy chickpea curry — is placed next to me at the table, it doesn’t just make me happy; I become protective of it in a selfish, rabid dog sort of way.
This recipe is based on Indian khatte channe, which is grounded on good Indian home cooking — but to be fair, it could also have easily been born out of a 1970’s hippie cafe in which cheap eats and a flair for the exotic were popular. In fact, Moosewood Restaurant and its cookbooks always come to mind when I cook this stew. But no matter where it came from or how it found its way to my table, I can tell you that there is a lot to like about this pasta, from the first forkful of twisted noodles loaded with tangy sauce to the last spoonfuls of creamy chickpeas.
I could start with the fact it is vegan, but that will scare some of you off, just as if I said it was gluten-free. In this case it is both, but the good news is that after you try this dish, it won’t really matter.
What does matter is how easily it comes together and the fact it can easily come from your pantry. When I make this, I head to the pantry with a tray in hand and begin by collecting all my ingredients and equipment.
What stands out during the pantry search-and-seizure is tamarind concentrate. It is a bit of an oddball ingredient, but one I always have on hand. Unlike tamarind paste, which requires soaking and straining, this concentrate dissolves easily in water. It has the consistency of molasses, and it gives this stew its characteristic tang. A popular substitute for tamarind is equal parts lime juice and brown sugar, but this only works when a small amount of tamarind is called for in a recipe, so it probably wouldn’t work here. If you like Pad Thai and ever wanted to cook it at home, tamarind really is an essential ingredient to have on hand.
When it comes to curry powder, I prefer Madras — I like the fragrance of kari leaves — but feel free to use your favorite. For more heat, you can add more cayenne; just be sure you know how hot your curry powder is before you get too crazy.
As always, when it comes to caramelizing onions, I don’t know how long it will take for them to become a deep, dark brown. It could be 15 minutes or 45, and maybe more depending on your pan, the heat, and the sugar content of your onions. I do know, however, that you shouldn’t cheat yourself; color them deeply, as they are essenial to this dish.
Assuming you have done your prep, once the onions are caramelized, this becomes a dump-and-pour procedure followed by a short simmering period just for good measure.


Spicy Chickpea and Sour Tomato Curry with Pasta
Serves 6
Two 14.5-ounce cans of chickpeas, drained
1 to 2 tablespoon tamarind concentrate mixed with 1/2 cup of water (more tamarind will make the dish more sour)
3 tablespoons olive oil
2 cups yellow onion, julienned
1 tablespoon fresh garlic, minced
2 cups tomato sauce
1 tablespoon fresh ginger, peeled and minced
1 teaspoon turmeric
1/4 teaspoon cayenne
2 teaspoons Madras curry powder, or your favorite kind
1 teaspoon cumin seeds, coarsely ground
Kosher salt and freshly ground pepper
Cilantro, green onion, or both
1 pound thin long noodles: wheat or rice or gluten free, use whatever floats you boat
1. Place a 3 1/2-quart heavy-bottomed pot over medium heat. Add 3 tablespoons of oil to the pot and then the onions. Season the onions with salt. Cook the onions, patiently, until they begin to brown and become deeply colored. Stir them often enough that the onions on top brown at the same pace as those on bottom. Don’t do this too fast; you want melted, gooey onions, not seared onions. Take your time; it takes a while.
2. Once the onions are browned to your liking, add the garlic. Once you smell the garlic, add the turmeric, curry powder, cumin, and cayenne pepper. Give it a stir then add the tamarind, tomatoes, chickpeas and ginger. Reduce the heat and let the sauce simmer. Taste the sauce for salt and adjust as necessary.
3. Cook the noodles.
4. Once the noodles are done, drain them, and put them on a platter. Top the noodles with the chickpea stew and top with green onions or cilantro or both. Serve.

A Classic Potato Gratin With No Recipe
Have you ever had a friend who knows no strangers? The kind of genuine person to whom everyone in the room gravitates — someone who doesn’t have to work at meeting new people, because somehow it is coded into their DNA for others to like them?
For me a potato gratin is just such a friend. A friend who hangs out with all the cool entrees too: a mustard crusted beef tenderloin taking a bath in a flavorful sauce or a perfectly roasted chicken with crackly brown skin are its best friends.
But, to its credit, a potato gratin knows enough to complement all the other dishes and, with the exception of a few rules, remains unfussy enough not to need a recipe and somehow is always perfectly put together for any holiday gathering.
How to Make Potato Gratin Without a Recipe
1. Peel your potatoes. For a 10-inch oval gratin pan, I like to use six to eight medium-sized Yukon Gold potatoes — about 2 1/2 pounds. (Don’t worry: If you overdo it, you can snack on leftovers after step 6.)

2. Slice the potatoes an 1/8-inch thick, ideally on a mandoline right into a heavy bottomed pot. Add a few minced cloves of garlic, about a teaspoon of salt, and roughly equal parts of water and milk to cover the potatoes.

3. Bring it to a gentle boil over medium heat and cook the potatoes till just tender but not falling apart, then drain. By cooking the potatoes most of the way through in flavorful liquid, you don’t have to worry about exact quantities of liquid and seasoning later on.

4. While the potatoes are cooling, grate approximately 2 1/2 cups of Gruyère or Comté cheese — they are traditional but expensive. Other cheese in the family would be gouda, fontina, or American Gruyère.

5. Get out an oval gratin, or any casserole, pie pan or dish you choose. Just take note: with a smaller circumference dish you have more creamy interior and less crunchy top and, obviously, the reverse is true for a larger gratin. Place around half the potatoes into the gratin (they don’t need to look pretty, yet). Season with salt and white pepper. Top with half the cheese and drizzle about 1/2 cup of cream over the top.

6. Starting with one slice of potato placed in the middle of the gratin, spiral the potatoes around until you reach the gratin edges. Make it look pretty — it makes a difference.

7. Top with the remaining cheese, then drizzle another 1/2 cup or so of cream over the top and around the edges so it gets to the bottom, too.

8. Bake at 425˚ F until brown and bubbly, about 30 minutes. Don’t overcook the gratin so it dries out. You want a little cream to remain on the bottom. Serve.

Everything but the Hamburger, Special Sauce Included

Sadly, as I sit at the bus stop watching my daughters play, I have to tell myself: summer is so last season.
All summer I have been grilling vegetables for salads. Mostly zucchini and summer squash; I char it deeply and then chop it and toss it with basil, lemon juice, and olive oil, in sort of a grilled chopped salad. It captures all the flavors of early summer one could want. But at some point, either the zucchini or I tire and the dish no longer appears on the table. At least not until next summer, when the annual craving for these flavors peaks again. Continue reading
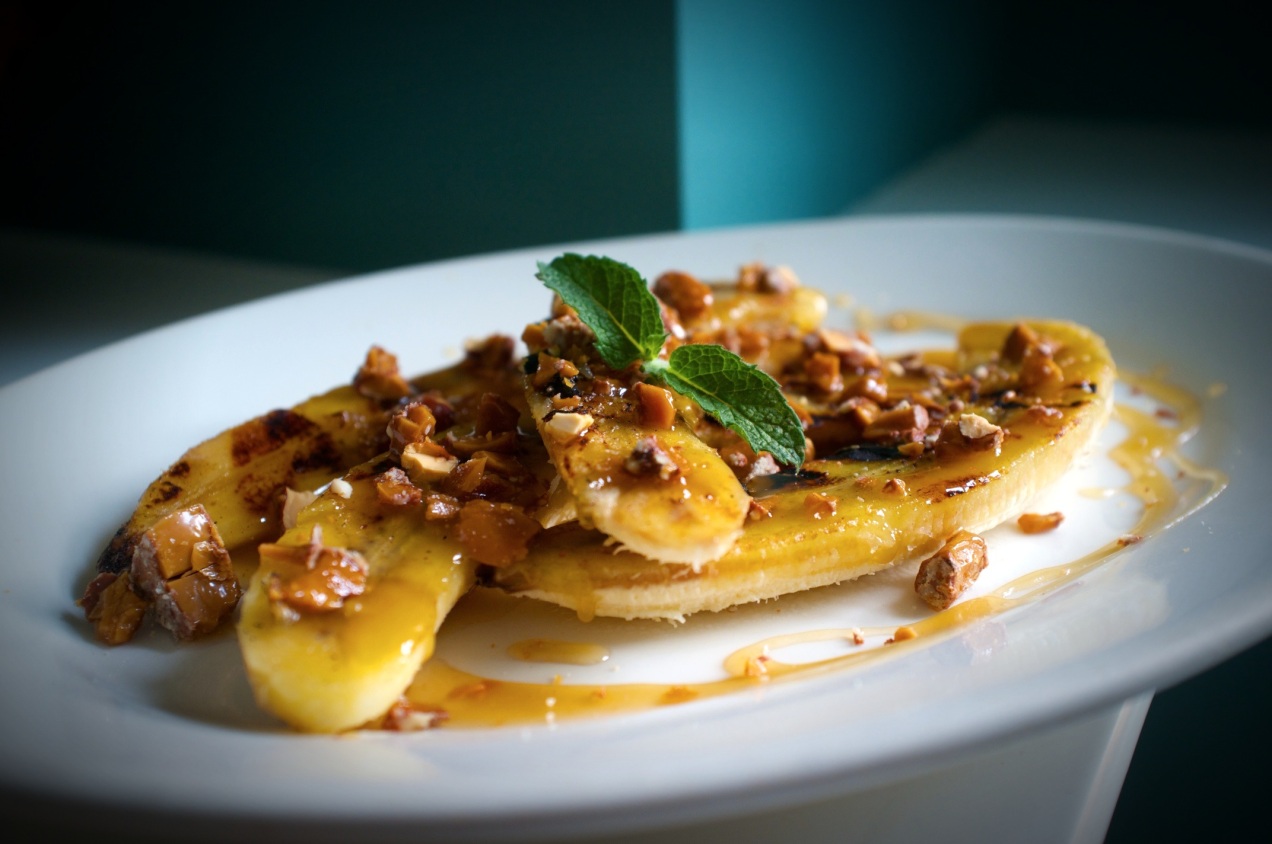
Grilled Bananas with Buttered Maple Sauce and English Toffee

I quit eating bananas years ago because I would buy them and not eat them. They would sit in the fruit bowl idling away, eventually passing through the different stages of ripeness. I would watch, like a gambler calling another’s bluff, knowing that I had until they turned black to do something with them. It was then that I would convince myself I needed to make banana bread. I even froze them for future use and had a stack of them in the freezer, until one day they fell out onto my wife’s toe and broke it.
Continue reading
Using Herbs with Abandon
 If I didn’t already have a list of reasons I need lots of herbs in my life, Italian Salsa Verde (green sauce) alone would be enough to convince me. It’s delicious on almost anything. Take my dinner tonight: salsa verde is outstanding on steak and takes long-cooked kale up a notch. And when I got a little on my baked potato with sour cream, it was no longer a plain old baked potato. It was sublime. Continue reading
Red Onion and Rhubarb Fondue
I know, I know you are thinking cheese and you are right to do so. It is, after all, one of the many things fondue can mean but simply put it means “melted” but fondue is also used in other culinary applications beyond the Swiss national dish.
To fondue something is to sweat it over low heat until it becomes very tender. Vegetables are often used in fondue where they are left on the stove over low heat eventually breaking down into an unctuous mess of jam. It is looser then jam and while I am sure you  could preserve or can fondue I don’t. I usually don’t make a fondue in those quantities. I more or less consider it a quick jam or pickle, and much like a quick pickle it is something I will store in the fridge and use within week or so.
This particular fondue goes well with grilled pork chops, is better then great on beef quesadillas and is wildly good on hotdogs and brats. In other words you will want to have this little gem around for summer grill outs.
Everyday my diet pushes further in a vegetarian/vegan direction. I don’t know if it is because I am older, my tastes changing, or maybe I am I just tired of all the same foods I have spent life eating.
If I really think about it, which I am prone to do, I don’t think I eat this way to be healthy. While health is a byproduct and one I will take, I think it is because I am a lover of food. As one whose tastebuds have been around the block a few times I am always looking for the new and exciting to try. As my tastebuds gain experience it also becomes harder to get excited about food.
It might be connected to my garden too. I have been lucky enough to have a garden of some sort for well over 15 years now. With each passing year I get more excited about the growing season. It gets harder and harder to wait for the first produce. The other thing I know is the diversity of vegetables I grow has increased the diversity of my diet. For whatever reason and it does not matter to me, I have developed a fondness for vegan food.
I make these lentil patties often with my lentil patty tikka masala recipe. Today I cooked the lentils in cashew cream and added lemon juice and thyme.
Cost to make this dinner: under $15.oo
Get the lentil patty tikka masala recipe here.
For the Lentils(serves 4)
1 cup dried Lentil du Puy, rinsed and picked over for stones
1/2 yellow onion, small dice
1 tablespoon fresh grated ginger
1 tablespoon cilantro, minced
2 teaspoons garam masala
1/4 cup flour, I used millet flour
1 egg
3/4 teaspoons kosher salt
1. Place the lentils into a 3 quart pot and cover with water by two or more inches. Add the minced onion. Place the pot over medium heat. Slowly bring the lentils to a boil then reduce the heat to a simmer and cook the lentils until tender adding a pinch or two of salt in the last 10 minutes of cooking. This should take approximately 30 minutes.
2. Drain the lentils. Let them cool but puree them in a food processor while they are still warm. They will be easier to handle when warm.
3. Add the remaining lentil cake ingredients and pulse the cakes a few more times until the rest of the ingredients are combined into the mix. Taste the lentil puree then season the puree with kosher salt and a few grinds of pepper. Taste again and adjust the seasoning.
4. Let the cakes sit for a few minutes to hydrate the flour. Take a tablespoon of the mix and make a ball. Is it really wet or is it too stiff? You want the mix to hold its shape but not be overly stiff otherwise they can be dry when cooked. It should just hold its shape. Add more flour a tablespoon at a time if you need to letting the additional flour hydrate before testing. Divide the lentils into eight balls.
5. Add enough oil to cover the bottom of a heavy bottomed sauté pan by an 1/8 inch. Heat the oil over medium high heat. Test the oil by dropping a pinch of lentil to the pan. It should begin to sizzle right away but not violently sizzle and pop.
6. When the oil is ready take each lentil ball and smash it down gently forming it into 1/2 inch thick cakes and add them to the oil. Let each side brown nicely and then remove them to a tray lined with a brown bag to soak up the oil. Keep the cakes warm, either in a low, 200 degree oven or in a warm place on the stove.
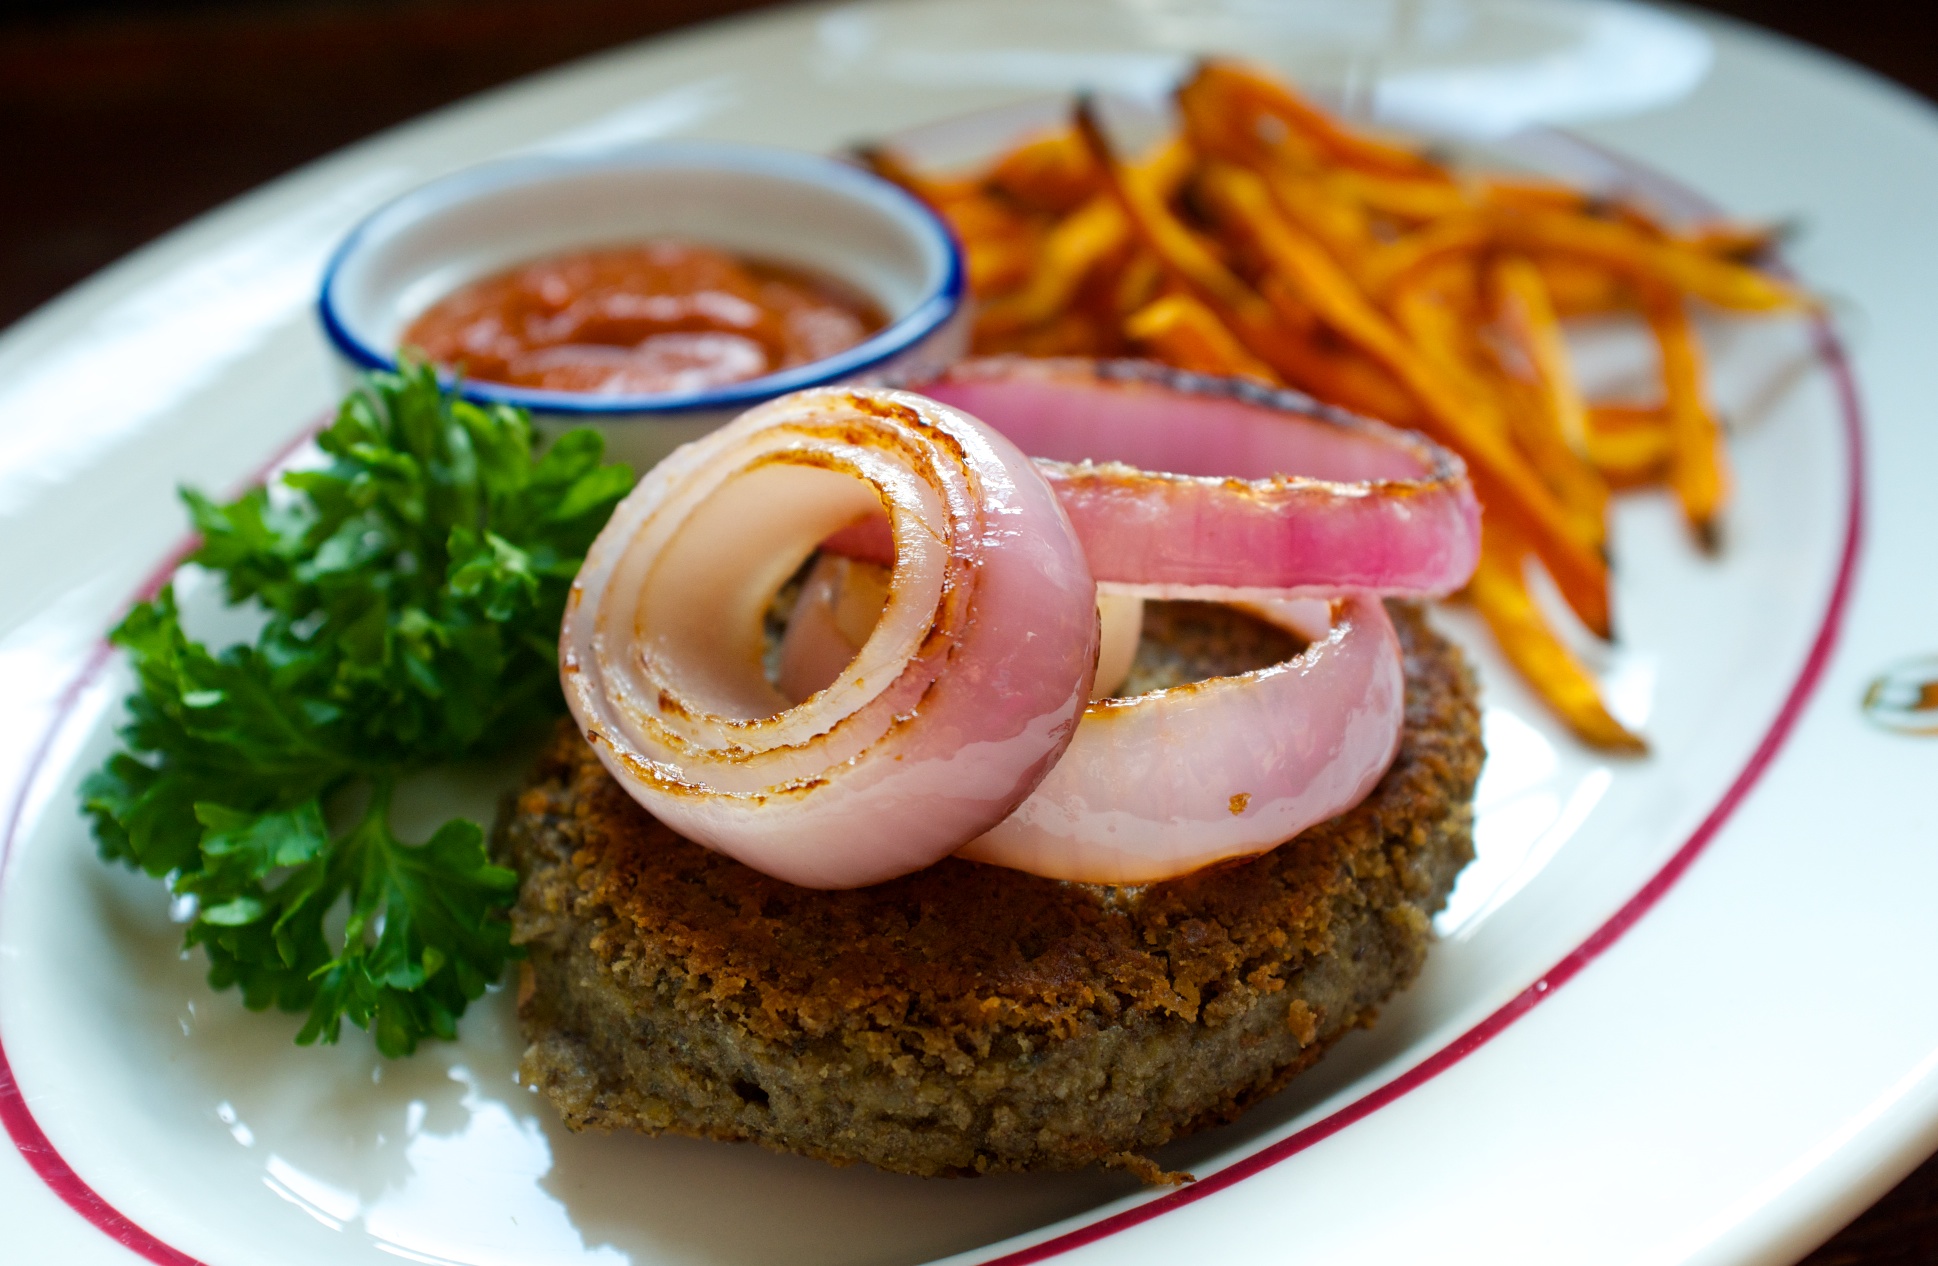
For the onions:
1 large red onion, cut into four 1/2 inch slices the onion wheels left in one piece do not separate into rings
vegetable oil
For the sweet potato fries:
4 large sweet potatoes, peeled and cut into 1/4 to 1/2 inch julienne slices
oil
kosher salt and fresh ground pepper
- Heat the oven to 425˚ F.
- While the oven is heating place a saute pan over medium heat. When the pan is warm add a couple of glugs of oil. Add the slices of onion and saute them until they have browned. Remove from the heat.
- Toss the sweet potatoes with oil. Season them with plenty of salt and pepper and toss them again to mix in the seasoning. Lay the fries out onto a baking rack set over a baking sheet. This will allow the heat to cook the fries from all sides(do this step or you will have limp fries). Bake the fries until they begin to brown and blister, about 20 minutes. Remove one of the largest fries and test it to see if it is tender on the inside. Be careful sweet potatoes burn easily so keep an eye on them. Warm the onions in the oven.
- Top the patties with the onion rings, serve with fries and curry ketchup!
Lentil Cakes, Red Onions and Sweet Potato Fries
The Asparagus Has Not Sprung


The rain is really coming down now.
On the few days it has been nice I have been to the garden looking for the tiniest hints of spring. Maybe thin asparagus tips might be peeking at me through the damp dirt. The tarragon is growing, so is the sorrel and savory. The purple chive blossoms are ready to burst open and there are strong whiffs of lovage. I have already made my beloved lovage cream cheese spread even if it is only beloved by me.
I know I could go to the store and buy asparagus. I know it would taste good. I have already seen countless asparagus recipes tempting me, one for an asparagus tart that looks amazing.
The mustard greens are blooming now, a toad has dug his way up from the mud. Around dinner time he wrestles himself in between clumps of dirt getting himself as close to the earth’s warmth as he can. He needs to protect himself from the night time cold. During the heat of the day a snake is searching the compost pile for mice. Soon…I think to myself…soon you will get to taste the sweetness of the asparagus that only happens when you grow your own. Continue reading
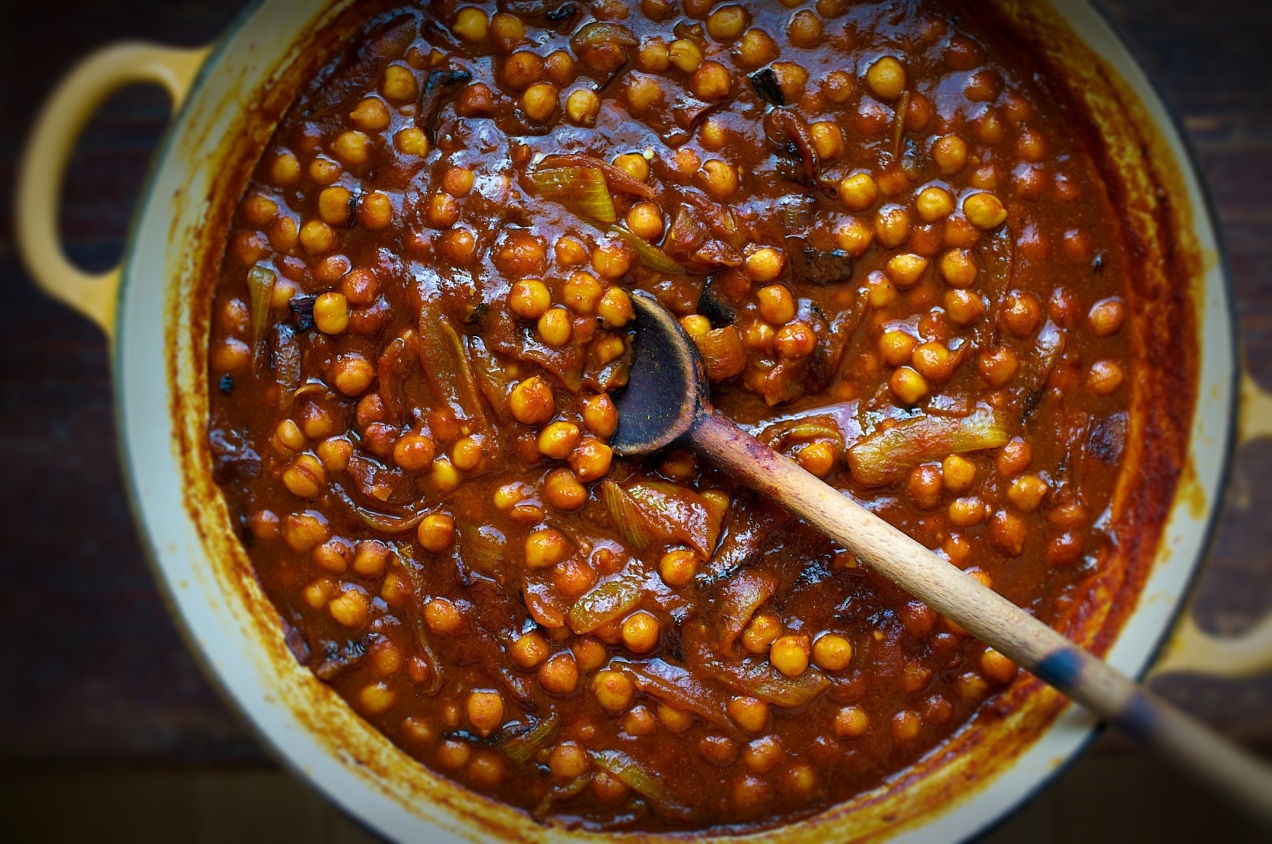
Chickpeas in a Spicy Tomato Gravy
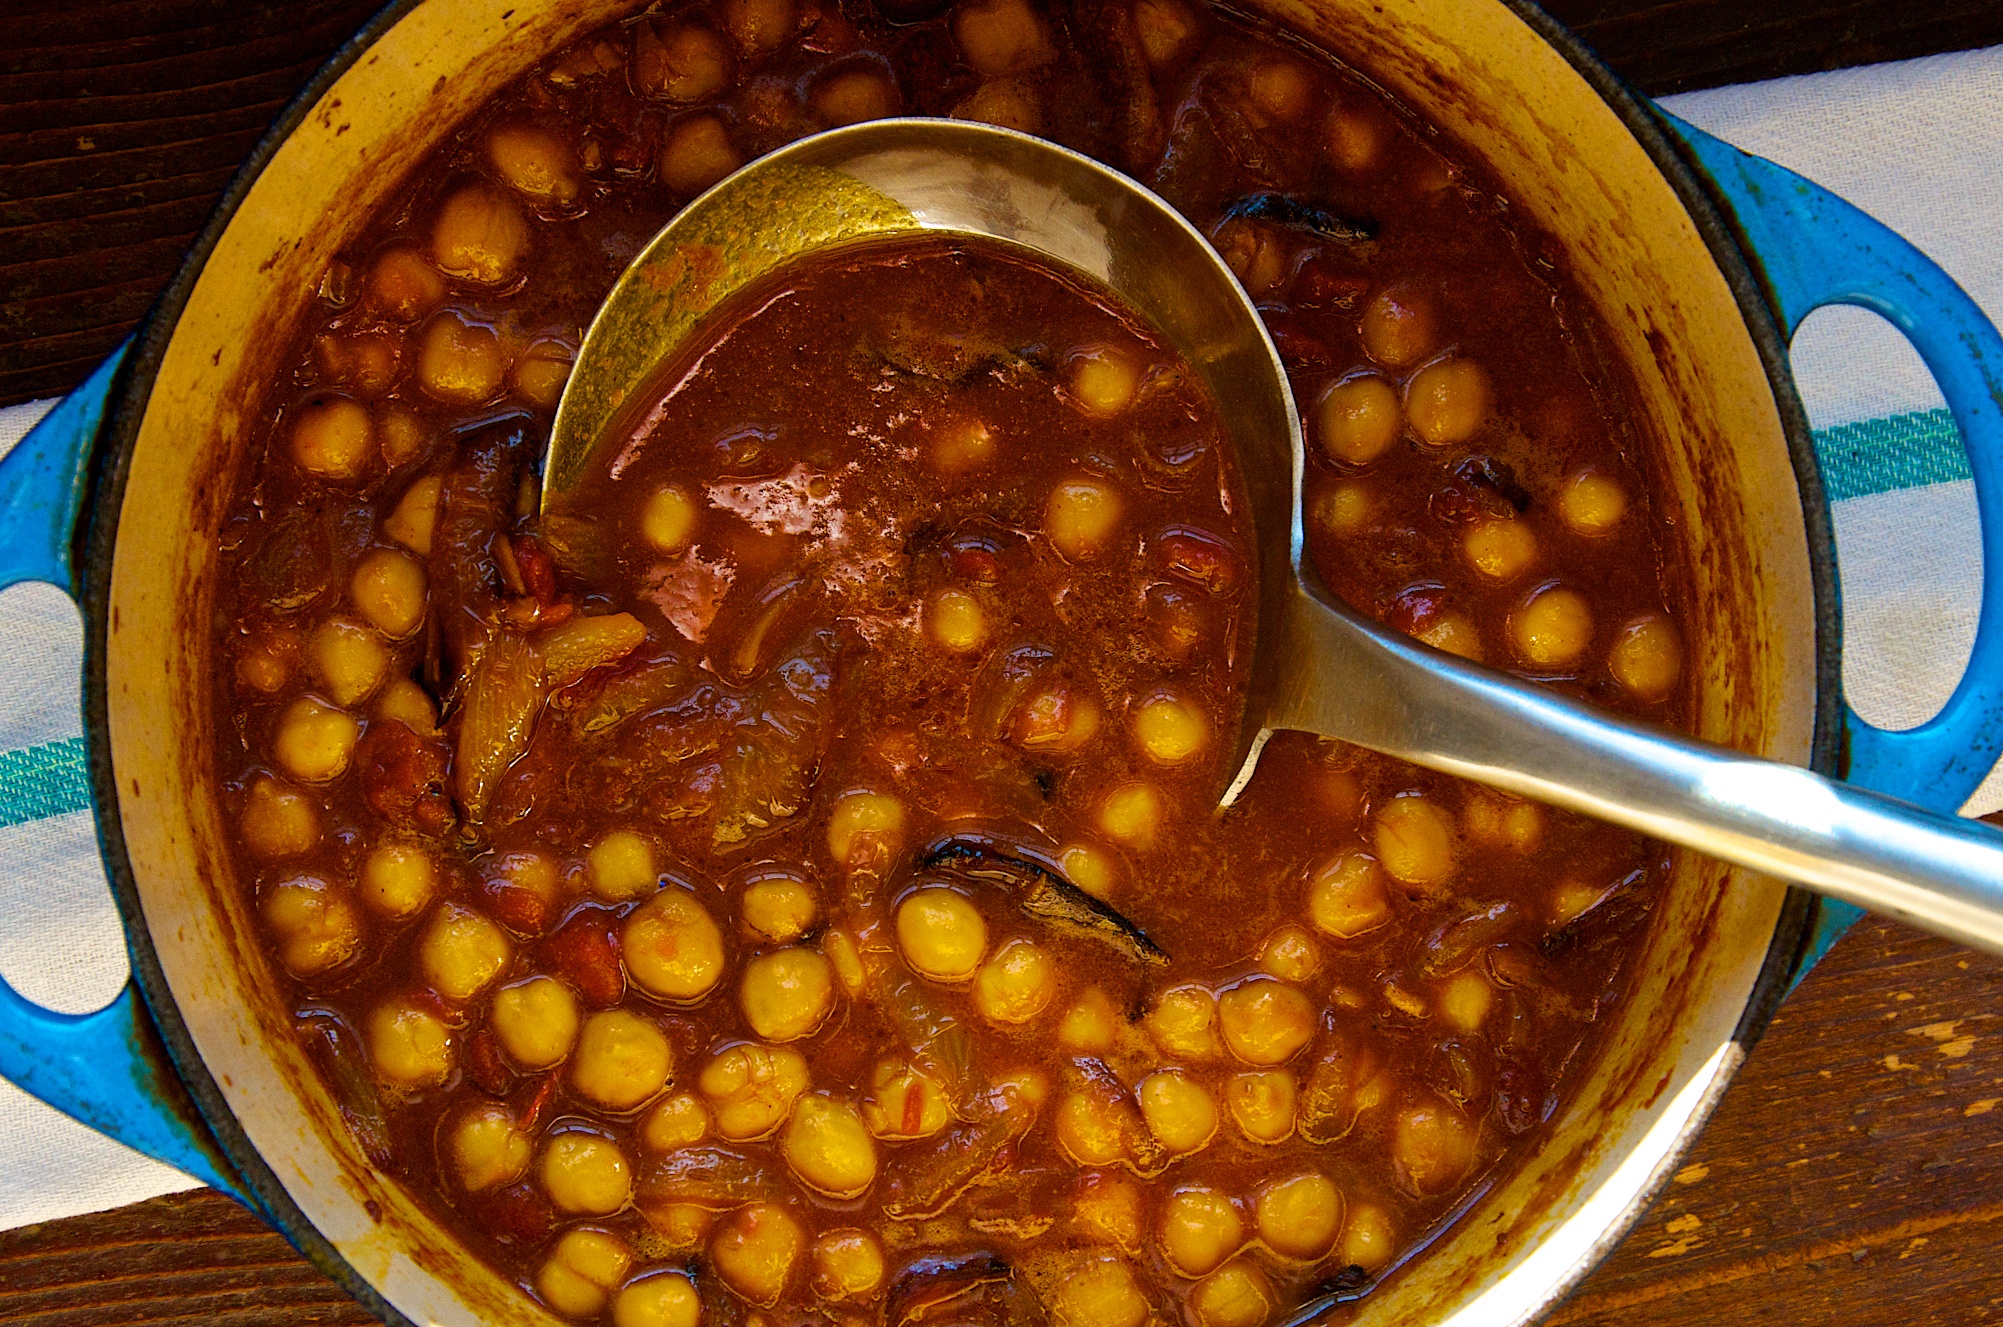
A wonderful blend of deeply caramelized onions, spicy tomato broth and creamy chickpeas. Khatte Channe, as it is know in India, is traditionally served with a flatbread but as it is cooked in this recipe it has lots of sauce so it makes sense to serve it with simple steamed rice and some sort of green vegetable.
I don’t like to use a lot of canned goods but beans are one that I rely on. They are no fuss, no standing over the stove stirring or adding liquid because they are already cooked. In fact I think this dish benefits from canned because the peas stand out by not absorbing all the gravy flavors that long cooking would have infused in them .
There is some extra expense in buying spices for the dish but if you have an ethnic grocery nearby, either Asian or Indian, you should be able to find the ingredients. Buy the smallest amount they sell and if you like the spices and find yourself using them to make other dishes then buy bigger quantities.
The thing I really like about this dish and these kind of bean dishes is even though it is of Indian descent it still feels familiar, I think of it as soul food. It is warm with a hint of spice and very much like bean dishes from Central America and Mexico. The dish is comfortable.
Cost to make this meal:
- three 14oz. cans organic garbanzo beans $1.49 each or $4.47
- 2 large onions .74 cents
- one 14 ounce can crushed tomatoes .99 cents
- at my local Indian grocery an 8 ounce bag costs $3.oo dollars or 2 teaspoons .12 cents
- 1 head of garlic .99 cents 4 cloves about . 50 cents
- fresh ginger 3.99 per pound 2 ounces at .48 cents
- 48 oz vegetable oil $2.99 or 3 tablespoons at .10 cents
- cumin seeds vary in price greatly depending on where you purchase them 1 teaspoon at .25 cents
- my recipe calls for tamarind but substitute a 2 tablespoon of vinegar to give the dish its sourness
Total cost range is from $7.65 to $9.00 and if you are only serving 4 you should have a couple of lunches.
This recipe is adapted from Julie Sahni’s Classic Indian Cooking. If you enjoy Indian food her books are a must for you shelf.
Makes 8 to 10 servings
3 (14.5 oz.) cans chickpeas/garbanzos (drained and liquid reserved)
2 tablespoons tamarind paste mixed with half a cup of water (or substitute 2 tablespoon of vinegar with no water)
3 vegetable oil
2 cups yellow onions, peeled and thinly sliced
2 tablespoons garlic, peeled and minced
1 teaspoon turmeric
1/2 teaspoon cayenne pepper
1 (14.5 ounce) can crushed tomatoes
1 tablespoon fresh ginger, peeled and minced finely
2 teaspoons curry powder
1 teaspoon ground cumin, toasted
kosher salt and fresh ground pepper
1. Place a 3 1/2 quart heavy bottomed pot over medium heat. Add 3 tablespoons of oil to the pot and then the onions. Season the onions with salt. Cook the onions, patiently, until they begin to brown and become deeply colored. Stir them often enough that the onions on top brown at the same pace as those on bottom. Don’t do this to fast you want melted gooey onions not seared. Take your time it takes a while.
2. Once the onions are browned to your liking add the garlic. Once you smell the garlic add the turmeric and cayenne pepper. Give it a stir then add the tamarind, tomatoes and ginger. Reduce the heat and let the tomatoes simmer.
3. Add 1 cup of the reserved bean liquid along with the cumin and curry powder. Bring the liquid back to a boil reduce the heat and add the beans.
4. Cook the rice.
5. By the time you finish the rice the beans will be warmed through and the flavors will have come together nicely. Taste the peas and adjust the seasoning. Serve over the rice.
This time of year potatoes are a shot glass full of sunshine, they are the break-up song I can’t stop listening to, they are my noodle, my rice, and my comfort. They are soothing in the way a pacifier is to a child and they get me through the edgy emotions of late winter.
They are one of those rare ingredients that selflessly put other ingredients on a pedestal. They make butter better and cheese cheesier and we all know potatoes are versatile by the vast number of ingredients you can pair with them.
You can bet come Sunday when I want something comforting for dinner, they will make an appearance at the table. Most of the time they aren’t fancy. Something simple will do. But on occasion they get dressed up and this is one of the many things I like about potatoes: they adapt to any occasion. They can even go solo and be the meal themselves.
 While I am not particular so much about potato dishes I am particular about my potatoes, really particular. But I didn’t become so until I grew them in my garden. Not until then did I understand what fresh, good potatoes were about. I grow fingerlings, purple, Irish cobblers, Kenebec, and Yukon golds. All are unique, and all have peculiarities the cook needs to understand.
Like which potatoes to use for which dishes: the Russet Burbank, for example, is perfect for mashed potatoes because, when cooked, the grains in the potato swell and separate, making for a light and fluffy mash. On the other hand, when you want to make a nice vinegary French herb potato salad, it is nice to have French fingerlings or Russian Bananas because the waxy make-up of the potato keeps them from falling to mush.
I have a film changing bag in which I store my potatoes. It is a relic from, yeah, the days of film but it is light-proof, which makes it great for storing potatoes. And this is where I get picky. I will use potatoes if they are just beginning to sprout but I won’t use them if I see any signs of green. Storing potatoes in complete darkness keeps them from getting green. I know you can cut off the green but I also know different people have different reactions to the glycoalkaloids. This is the chemical in potatoes that causes stomach issues for some and, while the green isn’t the glycoalkaloids, it is a sign they are abundant. So I simply won’t use green potatoes.
I also like to keep the skin on. I think they add so much flavor and extra nutrients, but obviously this recipe-dependent. Because of this, once my potato stash from the garden runs dry I only buy organic potatoes. They have a higher turnover rate because they sprout and turn green while the conventional are sprayed with a sprout suppression spray. I know the organic potatoes are fresh, good potatoes because they just can’t hang out like the conventional.
Click here for the Potato Cake recipe.


Potato Tips:
1. If the pile of 10-pound potato bags at the store looks messy, it’s because I was digging to the bottom to find the bag of potatoes that has absorbed the least amount of sunlight.
2. Smell the potatoes. They should smell like good soil, not mold.
3. Squeeze the potatoes. They should be firm, with no give.
4. When making mashed potatoes, let the potatoes sit in the colander after having been drained and let them steam off any extra moisture. Then add the butter first and mash it in before any of the other ingredients. Let the starch absorb the fat.
5. If you are making potato salad, dress the potatoes while hot. If making a vinaigrette, add the vinegar and herbs first, then the oil.
6. Waxy potatoes like fingerlings or German butterballs make the best roasted potatoes.
7. Duck fat or lard might be the best choice of roasting fat, and will brown the potatoes deeply and create a crispy exterior with a creamy interior.
8. If you want to roast potatoes in butter start off by roasting the potatoes in canola oil, then during the last 15 minutes of roasting time, stir the butter into the hot potatoes and finish roasting them. This will keep the butter from burning.
9. If your potatoes have begun to sprout but aren’t green, bake them till tender. Then let them cool and store them in the fridge to make hash browns or rösti. About five potatoes makes a nice dinner-sized rösti for two. The baked potatoes will last about 5 days in the fridge.
Everyday Potatoes
Celery Root and Potato Gratin


For some it might have been potato or green bean, but for me my gratin affinity began at an early age with macaroni and cheese. You know, the good old-fashioned kind with real cheddar and whole milk thickened with roux or egg yolks. The one that is baked until the correct ratio of crispy, crunchy top to creamy interior is achieved. It taught me early on in life just how fantastic a great food friendship is.
Then, as I came of age, somehow the gratin became any one-dish. It is tuna with the thin crispy onion rings baked on top or Chicken Divan with broccoli, cheddar, and crumbled Ritz crackers providing the crunch. There is the obligatory cottage pie, as done in the Midwest, topped with both cheddar and mozzarella, then browned. For a while, it was a multitude of eggy breakfast casseroles, all, of course, involving more cheddar.
It became neat, rectangular, and predictable. It served twelve. It was a 9×13 casserole world and I was living it.
I was fortunate. I got out. I went to college, I travelled, I ate.
With knowledge and experience came diversity. And we all know diversity makes the world a much better place. So I developed friendships with lasagna, cassoulet, moussaka, and the timballo, to name a few.
Through it all, and even though we didn’t see each other as much, the gratin remained my favorite.
What I realized is the gratin is the kick-ass cousin who went to college too. And when you reconnect at the family reunion you realize you hang with them because they are exciting, interesting, and you can rest assured that there is more depth to them than a spiky haircut and a couple of tattoos. You get each other in that way only family can.
I like the gratin’s quirks. I like its fondness for juxtaposition. I know that, without pretense, Tournedos Rossini can snuggle in next to a celery root gratin as easily as can Irish bangers and, regardless of which side of the tracks it finds itself, the gratin brings comfort to the table, weight to the unbearable lightness of being.
The thing is, the gratin comes by these traits naturally. But I also know that the things that make it stand out — the creamy interior and crunchy top — don’t just happen, that the building of flavors takes effort, and that without a true friend’s presence the gratin’s popularity might wane.
But then that is what true friends do, you know, bring out the best in each other, and relish in each others’ success.
Note: I have been making this recipe for years. It is based on a recipe in the Dean and DeLuca cookbook by David Rosengarten. I have always found it to be a lovely holiday side dish. It goes well with prime rib roasts and roast chicken. It is versatile and can be made ahead to be put into the oven when needed and also is easily doubled.

Serves 6 to 8
2 pounds russet potatoes, peeled and cut into 1/2 inch chunks
2 pounds celery root, peeled and cut into 1/2 inch chunks
Kosher salt and freshly ground white pepper
3/4 cups heavy cream
1 tablespoon garlic, minced
1/4 cup unsalted butter
1/8 teaspoon saffron, crushed
1 1/2 cup gruyere or comte cheese, grated
1. If you plan to cook the gratin right away heat the oven to 400 degrees. Otherwise move on to step two.
2. Place the potatoes and celery root into separate large pots. Cover by two inches with cold water and add a teaspoon of salt to each pot. Bring the pots to a boil over medium heat. Cook the vegetables until tender.
3. Once the vegetables are tender, pour them out into a colander set in the sink. Drain the vegetables and let them sit for a minute or two steam-drying.
4. Rinse out one of the pots and add the cream, garlic, butter, and saffron. Bring the cream to a boil over medium heat. Add a hefty pinch of salt and a few grinds of white pepper. Add 1/2 cup of the cheese. Stir it into the warm liquid till melted.
5. Place the celery root and potatoes into a mixing bowl (or the other blanching pot if it is big enough) and smash the mix with a potato masher. Add a pinch of salt then add the cream and saffron mix. Stir to combine. Taste and adjust the seasoning, adding more salt or pepper if necessary.
6. Use a little softened butter to grease an 8-inch oval gratin (12 inches long). Spread the rustic chunky mash out into the pan. Smooth the top with a spatula, then crosshatch the top with the tines of a fork. Spread the remaining cheese out over the top.
7. Bake until the cheese is browned, about 30 minutes. Let the gratin cool for 5 minutes, then serve.
Farmhouse Whole Wheat
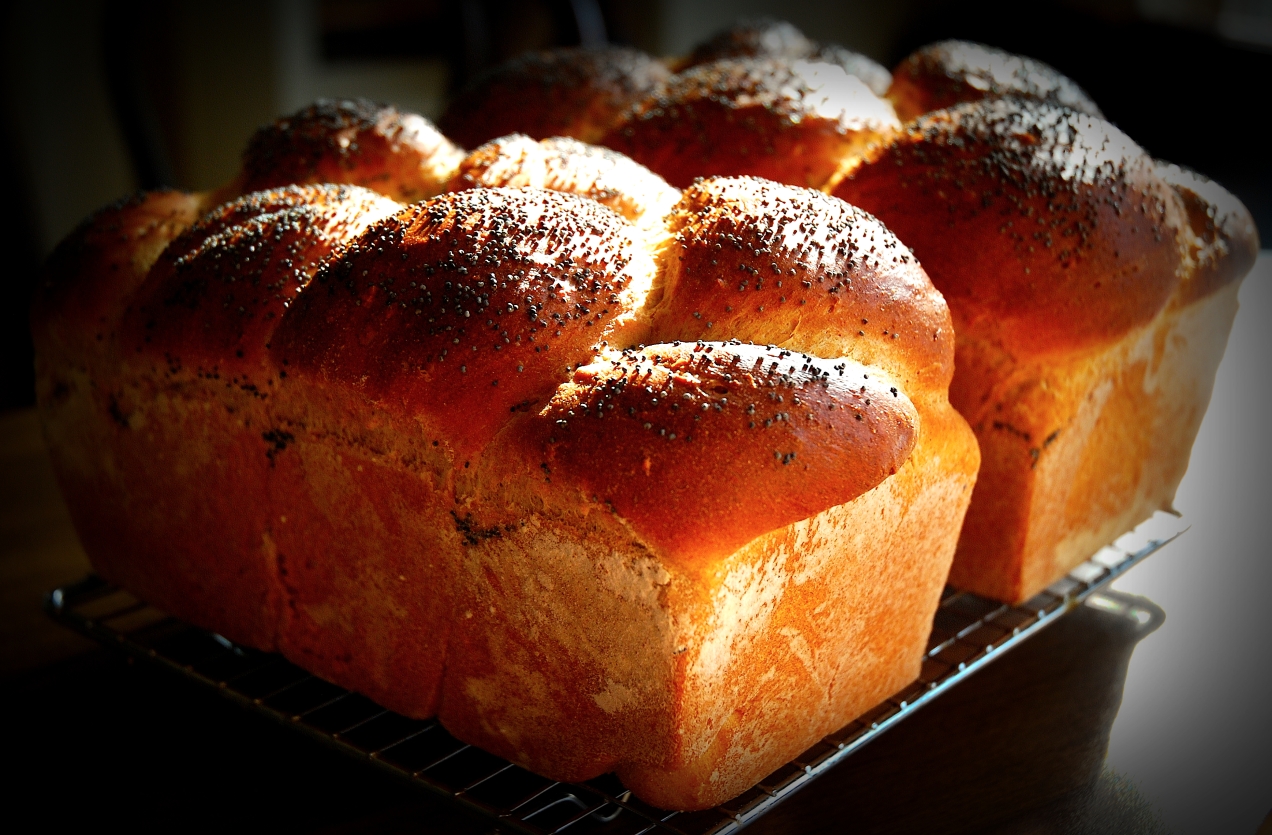
There are so many different kinds of bread. You could make sourdough where you feed a starter flour to grow it and keep it alive, you can retard loaves in the refrigerator overnight, there are paté fermentes, bigas and all kinds of other preferments and sure it is great to have knowledge of all these breads but at the same time it is nice to have a tried and true everyday bread. A bread with some shelf life, a bread that little kids like and one that is good with which to make a variety of sandwiches.
For me this is that loaf. It debunked the idea that my two girls would only eat white bread. They love it. It fits into my notion that I won’t make bread that isn’t at least 75 percent whole wheat. It makes two loaves that will be around just long enough that you won’t need to throw it out because it is old.
Be sure to buy a fine grind whole wheat flour and make sure to buy it at a store with high turnover of its whole wheat. Countless times I have brought a bag home only to open it and it is rancid. Whole wheat flour should smell like a wheat field not rancid oil or some other off smell.
I like to braid this loaf for two reasons. One it looks pretty and two, when I make this loaf on a Sunday it is nice to bake it about two hour before dinner, remove it from the oven to cool a little, then serve it warm and let people tear off a hunk. It will tear at the braids like dinner rolls would. Continue reading
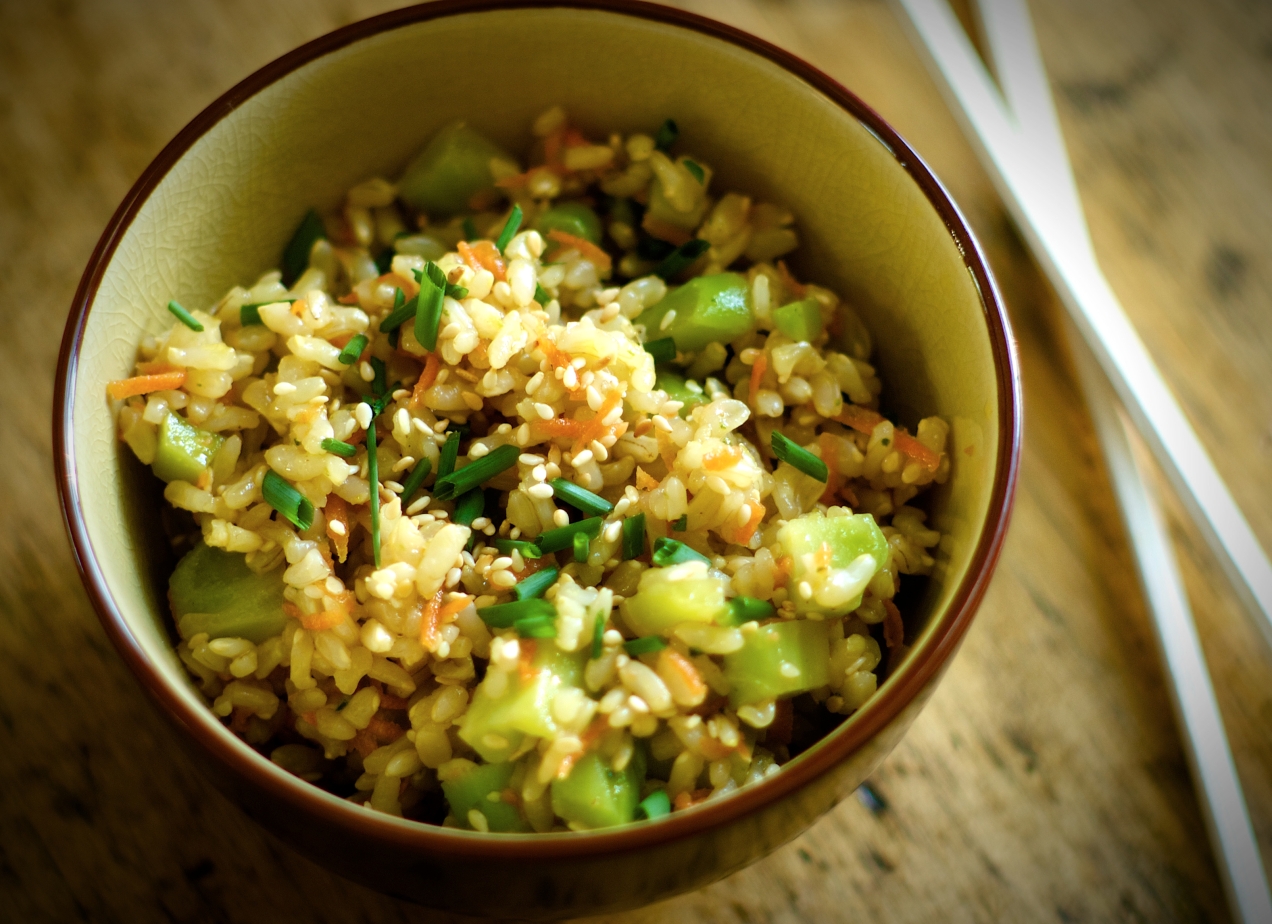
Stems and Seeds

Hippy food has long been a bastion of vegetarian eats for many reasons. Some political, some personal but in all honesty mostly because it is cheap and often utilizes every last morsel sharing some of the same philosophy as head to tail eating, ironic?, well, yes. Never mind the reasons though because that doesn’t mean it doesn’t taste great and utilizing every part means new tastes and textures from veggies you have long grown tired of.
There is nothing better than to take a bite of something and not only have it taste good but when it feels good, or nutritious, as you eat it it is all the better. Having said it time and time again there are certain dishes that hit that button and, man, there is no better eating. This salad hits that button.
So get out your tie dies and put on your birks, crank up the Dead and get in touch with your inner vegetarian, oh, and make extra because the nice thing about this salad is it is no worse for the wear the next day.
The soy ginger vinaigrette in this recipe was adapted from Jean-Georges Vongericthen’s Simple Cuisine. Learn this recipe you because will find yourself using it on everything. It is a genius recipe.
Makes 4 servings
For the vinaigrette:
2 1/2 tablespoons soy sauce
2 tablespoons lemon juice
1 teaspoon ginger, finely minced
1/3 cup canola or unflavored oil
1/3 cup extra virgin olive oil
kosher salt and fresh ground pepper
1 1/2 tablespoons water
Put all the ingredients into a pint mason jar and screw the lid on tightly. Shake the hell out of it. Set the dressing aside.
For the salad:
1 to 1 1/2 cups blanched broccoli stems, 1/4 inch dice
1/2 cup carrots, grated
3 cups cooked brown rice
1/4 cup sesame seeds
1 1/2 tablespoon chives, minced
soy ginger vinaigrette
kosher salt and fresh ground pepper
1. Place all the ingredients, except the dressing in a large bowl and toss to combine. Add 1/3 of a cup of the dressing and combine everything. Taste, adjust the salt and pepper and add more dressing if you like.
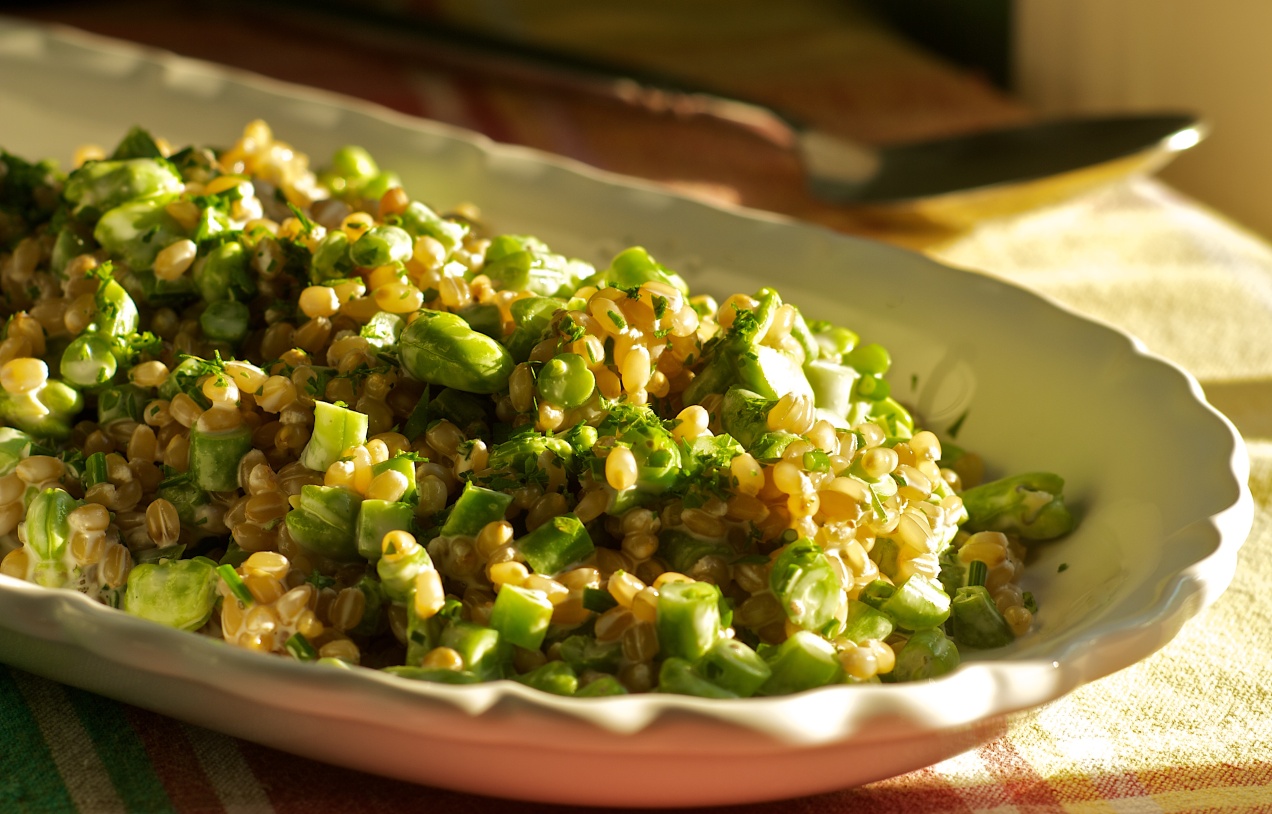
White Wheat Berry Salad with Fresh Beans
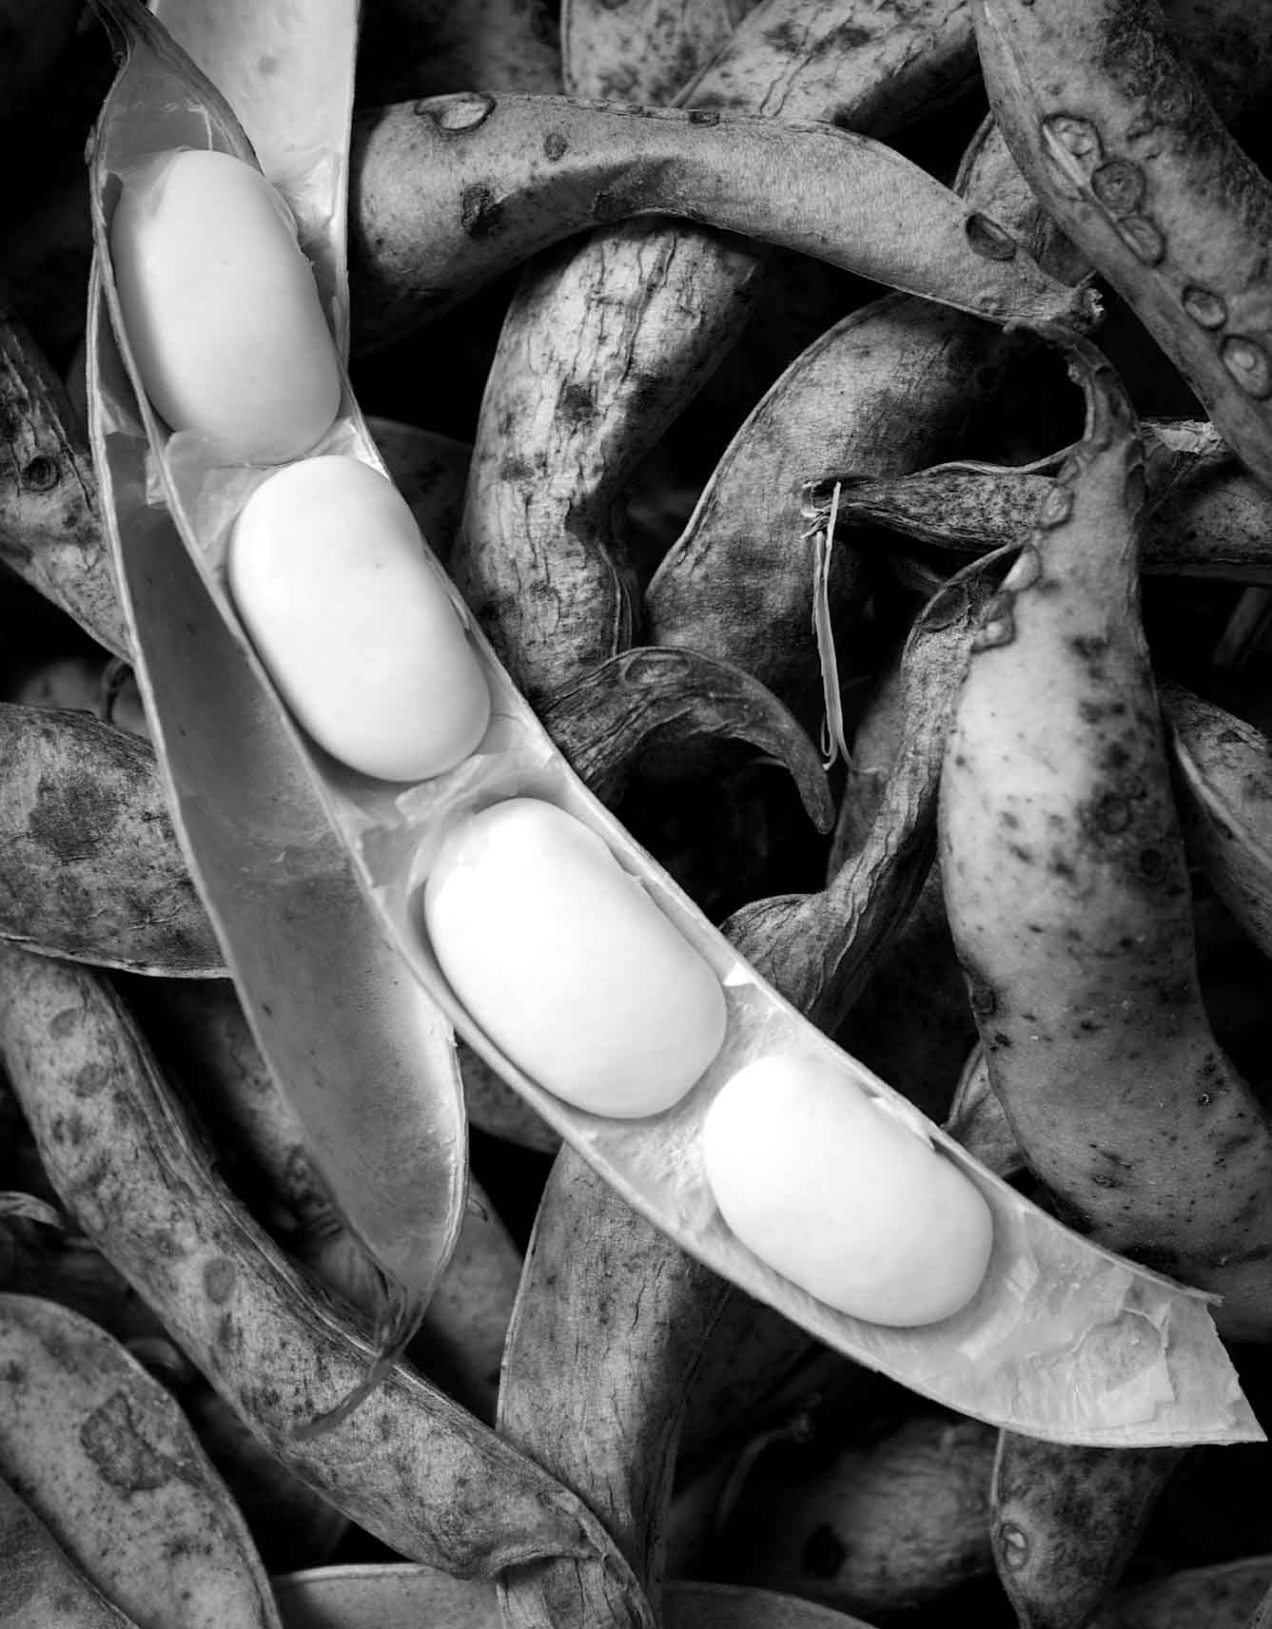
 If you have ever had fresh raw fava beans then you know the wonderful tender pop, the tender chew and the juicy flavor. It goes wonderfully here with the green beans and the dressing.
Wheat berries are another wonderful addition to your repertoire. They add a subtle chew and give the dish a pasta flavor while digesting at a lower glycemic level because they are a whole grain.
This is one of those dishes that is here because it is delicious and, luckily, it just happens to be very good for you too.
Serves 6 as a side dish
1 cup soft white wheat berries, rinsed
3/4 cup green beans, blanched and chopped into 1/4 inch pieces
1 cup fresh fava beans, lima, or edamame, shells and outer skin removed
1 1/2 tablespoons chives, chopped
2 teaspoons fresh thyme, minced
1/4 cup mayonnaise
1/3 cup buttermilk
2 teaspoons lemon juice
kosher salt and fresh ground pepper
1. Place the wheat berries into a large pot and cover them with cold water by two inches. Place the pot over high heat and bring it to a boil. Boil for two minutes then turn off the heat, cover the pot and let it sit for two hours.
2. After two hours add a couple of pinches of salt and then place the pot back over the heat and bring the berries to a boil again. Now reduce the heat to medium and let them simmer until soft, or the texture you want, about 15 minutes.
3. Drain the berries in a colander and let them cool to room temperature.
4. In a large mixing bowl combine the mayo, buttermilk and lemon juice. Season it with salt and pepper then add the thyme and chives. Add the rest of the ingredients and mix to combine. Taste and adjust the seasoning. It is nice if you can let it sit for at least a half hour to let the flavors meld and even overnight is good.
5. Serve
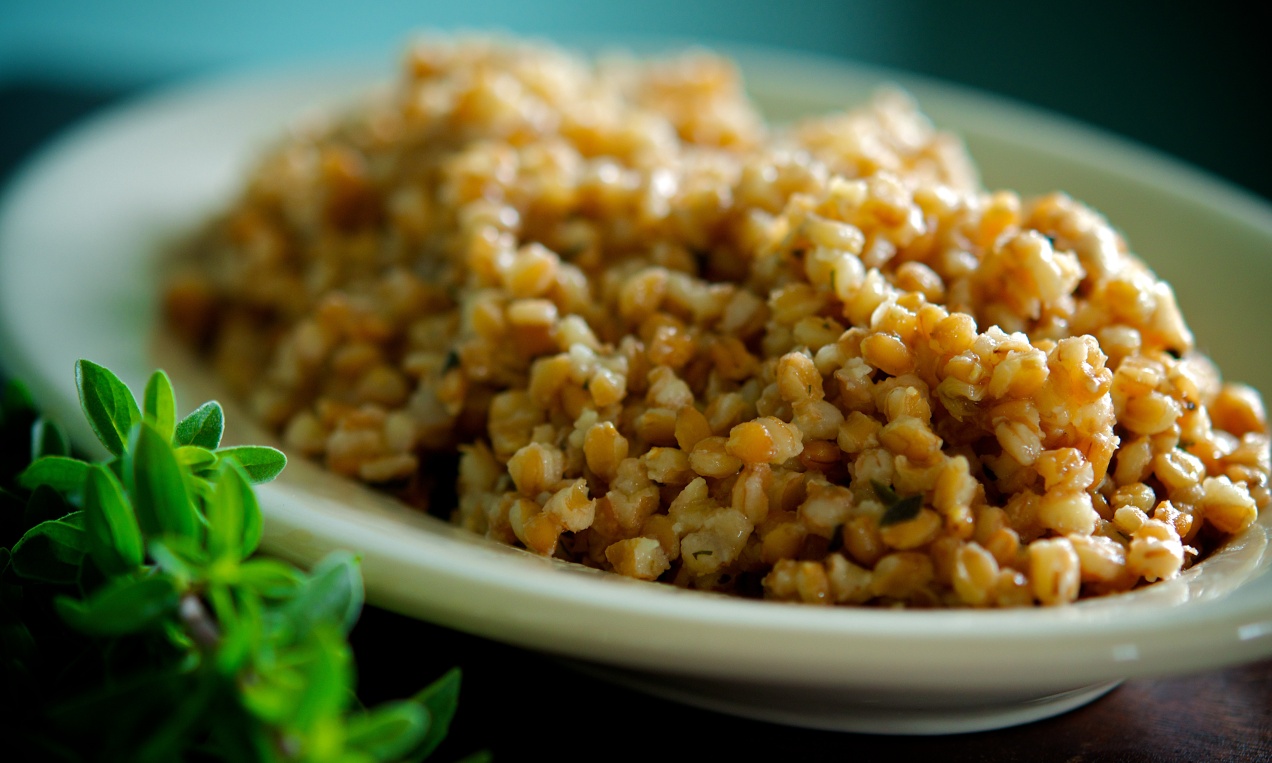
Farro and Roasted Garlic Pilaf
 The term farro can be very confusing. If you look it up you will see no one really wants to pin the tail on the donkey, and as such, all the authors of the articles seem to want to avoid naming a specific grain as farro.
People really want spelt to be farro but I can say spelt is not farro. Spelt is much larger and has a sweeter flavor to me. What I have found is farro can come in different sizes, roasted, and for lack of a better term, par cooked or pearled which means it cooks quicker.
In this recipe I use piccolo farro from Anson Mills. It is easy to cook, is extremely delicious and quite honestly I have become enamored with it as well. I think I can say with all clarity it should be spelled Pharroh because it is the food of gods. It feels nourishing to eat and is such a refreshing change, or I should say replacement, from rice or potatoes.
I always cook extra and use the grain, plain, when baking bread and I plan to save the cooking water next time and use it as well.
Serves 4 to 6
1 cup farro piccola
2 heads of garlic
1 stick unsalted butter
1 tablespoon marjoram
kosher salt
fresh ground pepper
1. Preheat the oven to 325˚F. Slice the heads of garlic across the top at a point where you will remove enough to expose as many cloves as possible but not so much that you loose a lot of the head. Usually I slice off about the top third of the head. Place the heads in a small ovenproof gratin or some other dish. Smear the heads with 1/2 teaspoon of butter and then salt and pepper them. Cover tightly with foil and bake the garlic for one hour. At the end of the hour remove the foil and bake another fifteen minutes to brown up the cloves.
2. Using a strainer rinse the farro under cold water. Place the farro into a 3 quart heavy bottomed sauce pan with a lid. Cover the farro with cold water to cover by two to three inches and add a two finger pinch of salt.
3. Place the pan over high heat and bring it to a boil. Turn off the heat and cover the pan. Let the farro sit in the pan for an hour to two or until the grains have popped.
4. Use a large strainer or colander and drain the farro.
5. Wipe out the pan and put the pan back on the stove over medium low heat. Add the remaining stick of butter. Let it melt gently and then add the drained cooked farro, marjoram and squeeze the roasted garlic into the pot. Stir in the creamy soft garlic smearing it into the farro. Season the pilaf with salt and pepper to taste.
6. Once it is hot, bowl it up, and serve.
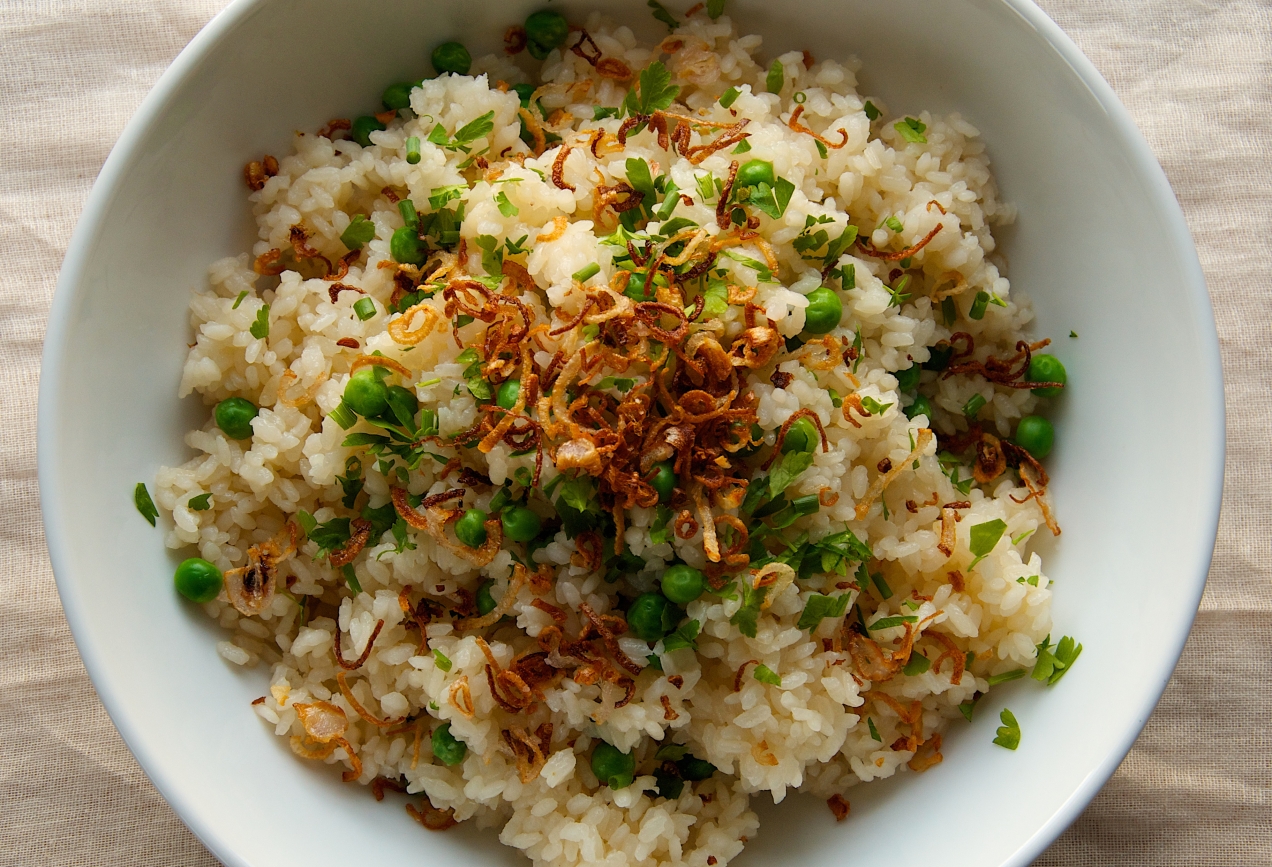
Peas and Rice with Crispy Shallots

I never feel like people like to cook rice unless of course they are from a country or region where it is a staple. I will say it took me a while to get the hang of it. Even after culinary school, because I didn’t cook rice often, it was a struggle. It seemed like it would either be a gooey mess, or dry and not cooked all the way through. Some recipes seemed to work one time and the next they failed.
It wasn’t until I started to look for a rhyme and reason that it started to get better for me. I stopped buying different brands, types and kinds of rice for regular use and narrowed my selection down to two. I use medium grain brown rice from Lundberg farms in California and a kapika short grain white rice from Japan. For other dishes such as risottos or paella I use carnaroli.
For those not familiar with kapika it is a process where by the rice is polished using the grains themselves to remove the outer husk which also allows for greater water absorption. What I like about the kapika process is you do not need to rinse the rice before it is cooked and it has a stickiness to it that allows you to be able to eat it with chopsticks if you choose. Still there is more to kapika then just chopstick usability, there is the chew. It has, for me, the perfect chew it is tender with a spring.
I cook brown rice using a method that is wildly different from how I cook any other rice. I always parboil it in large quantities of lightly salted water, drain it and cool it much like you might pasta. They I use it in applications like fried rice, casseroles and pilafs.
I usually by larger quantities of white rice then brown. I love brown rice but brown rice can go rancid if left sitting around or because of lower turnover in the store, the rice is already old and needs to be used up before it goes south. It has an acrid smell to it when it is old. White rice like white flour has a longer shelf life.
Obviously brown rice is better for you because it is a whole grain but I am certain white rice is more soothing to my stomach.
For this recipe I could simply enjoy sitting at the table and eating it all on its own. I need no other dish alongside it but if it is going to be a side dish roast chicken is a real good choice as is rabbit.
My absolute favorite condiment for this dish is the gelatinous stock (not the chicken fat) that forms on the bottom of the roast chicken pan. If you have it available stir some of it in to the rice after it has cooked but before serving.
Serves 4 to 6
2 cups kapika rice
2 3/4 cup vegetable broth
1 cup peas, fresh or frozen
1/2 cup shallots, sliced into very thin rounds and separated
peanut or safflower oil
2 teaspoons fresh chives, minced
2 teaspoons parsley, minced
1. Place the rice into a 3 1/2 quart enameled Dutch oven with a heavy lid. Add the vegetable stock and a pinch of salt. Bring the broth to a boil over high heat. Immediately turn down the heat to simmer and put the lid onto the pot (I weight the lid with a two pound weight but that is up to you). Set a timer for 20 minutes.
2. While the timer is running place a 2 quart sauce pan over medium high heat. Add a 1/2 inch worth of oil to the pan. Once the oil is to temperature, you can test this by dropping in a shallot ring it should drop to the bottom then come back to the top all in slow motion, add the shallots. It won’t take long for them to brown so don’t leave the stove. Once they are brown remove them from the pan with a metal slotted spoon to a paper towel lined plate and season them with salt and pepper. Set aside.
3. When the rice timer goes of quickly lift the lid and add the peas. Don’t stir them just leave them on top to steam. Cover the pot and set the time for 10 minutes.
4. At the end of ten minutes remove the lid to the pot and with a fork fluff the rice which will also stir in the peas. Bowl up the rice, sprinkle on the herbs and finish it with the shallot garnish. Serve.
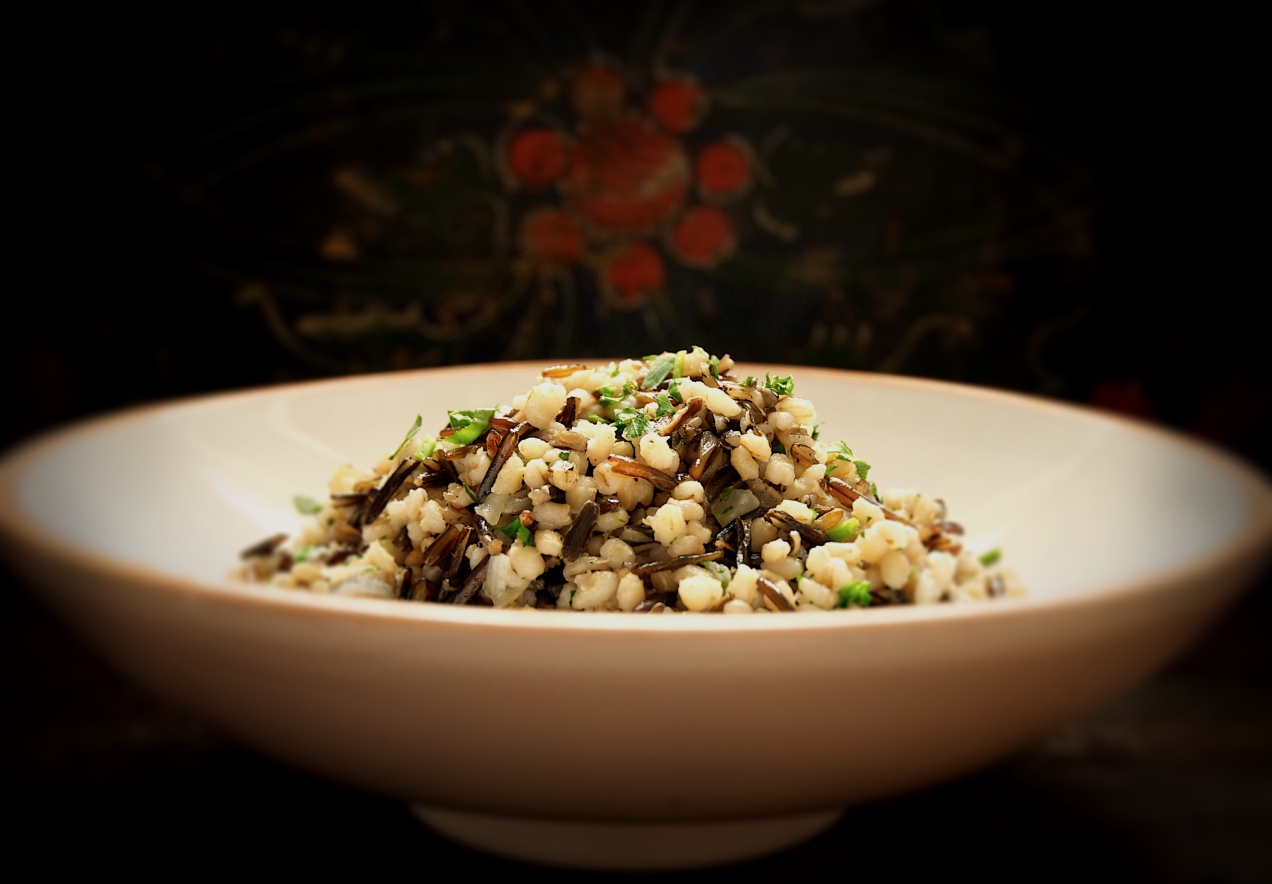
Wild Rice and Barley Pilaf
 This is so good for you you won’t even know it taste really delicious. Seriously good eats and a great side dish for roast birds of any kind and I’ll even throw salmon onto that list.
Yes, I know it uses two sauce pans but, please, neither grain leaves behind a sticky mess. You could almost just wipe the pan with a towel after emptying it of the grains. Don’t get any ideas I said almost.
Makes 6 to 8 servings
3/4 cup wild rice
3/4 cup pearl barley
1/2 cup yellow onion, small dice
1/4 cup flat leaf parsley, minced
3 to 4 tablespoons unsalted butter
kosher salt and fresh ground black pepper
1. Put the grains into two different sauce pans. Add water to cover by 2 inches and add a two finger pinch of salt to both pots.
2. Bring the water to a boil then reduce the heat to a gentle but continuous bubble. Cook both grains until they are tender. The barley should take about 30 minutes and the rice maybe 40. The rice will just begin to open up its pod.
3. Drain both grains. The dish can be done up to a day in advance at this point.
4. Put the larger of the two sauce pans over medium heat and add the butter. Once it has melted add the chopped onion and sweat it until it is tender. Add both grains and season everything with salt and pepper. I like lots of pepper but season to your liking. Heat everything until hot, taste, and if it needs more add more butter or even a dash of water. Stir in the parsley, plate it and serve immediately.

Depression Cookies
Sugar cookies
Yes, I could imagine a cookie just like this being created during the Great Depression. The nutmeg lends itself to the past and makes the cookie feel like something a grandmother would make for her grandchildren on a Sunday afternoon. She might also make it when she notices her grandchildren are a little sad. Whatever the reason they are a cure for depression. They will bring you out of your funk with a heavy dose of the warm and fuzzies.
MAKES 2 DOZEN
1 cup sugar
3/4 teaspoons nutmeg
1 vanilla bean, split and seeds scraped
2 cup all purpose flour
1/2 teaspoon baking powder
1/2 teaspoon Kosher salt; if you sub table salt cut it to 1/4 teaspoon
12 tablespoons unsalted butter
4 tablespoons vegetable shortening
1 tablespoon honey, something with citrus notes is good
1 large egg
1/2 cup sugar for rolling the cookies
1. Make sure you have an oven rack placed dead in the middle of your oven. Preheat the oven to 375 degrees. In a mixing bowl combine the flour, baking powder and salt. Stir it with the measuring spoon to mix.
2. Place the sugar, nutmeg and vanilla seeds into the bowl of a mixer and mix for two minutes to distibute. Turn off the mixer and add the butter and shortening. I use cold, when I squeeze it it just gives, butter because I personally think it creams better. You do not want this to look granular and you don’t want the fat to break out and look similar to cottage cheese either. It should look like ice cream just scooped from the container. Start out on low speed and when the butter starts to cream gradually increase the speed to medium and cream for about 2 minutes total.
3. Scrape down the sides with a spatula. Add the egg and mix to combine. Add the honey and mix briefly.
4. Adding the flour in thirds, to keep it from flying out of the mixing bowl, mix at low speed and mix until all is incorporated. Scrape down the sides of the bowl if necessary.
5. Place the remaining half cup of sugar into a seperate bowl. Line two 12 x 17 baking sheet pans with parchment paper.
6. Using a tablespoon or a number 40 scoop, scoop out some dough. Using your hands roll it into a ball and then roll it around in the sugar until coated. Place it onto the baking sheet. Repeat until you have 12 cookies on the tray. Using a fork, flatten the cookies to about a 1/2 inch thickness.
7. Place tray into the oven and set the timer for 10 minutes. While they are cooking roll and coat the remaining twelve cookies. When the timer goes off check the cookies. They should be browning at the edges but still light in the middle. If they’re not, leave them in the oven for another few minutes. Remove them and let them cool for 3-5 minutes before changing them to a cooling rack to finish cooling. Place the other tray of cookies into the oven and repeat this step.

Pot Roasted Collards and Purple Hull Pea Fritters with Spicy Buttermilk Gravy
Pot Roasted Collard Greens and Purple Hull Pea Fritters
The one thing that stays the same around my kitchen, has been a continuous thread, is collard greens.
Collard recipes have been prepared in many incarnations but eventually I rendered them all down the most basic of recipes. I like collards in every fashion imaginable, and while I can spoon potlikker right out of the pot and onto a slab of buttered cornbread, making me perfectly happy, I have grown to like my greens best when they are pot roasted. I used to render bacon, butter or pancetta into the pot first, the fatty crispy strips of cured pork to be fought over at dinner. Then there came a time when I needed to make the greens vegan. I started using peanut oil and ever since it has become a fast favorite which is strange since we are big pork eaters.
What happens to greens when they are pot roasted is the natural sugars break out and much like caramelizing onions you start to build flavors that just don’t exist when collards have been boiled. I liken the building of flavors to a fine cigar, great coffee or a complex wine.
As the thick and leathery fall collards, greens which have taken a frost or two, cook down a toothsome quality develops that is very satisfying to eat. You also get these rogue bits that didn’t get as much oil as they should and they become crispy and blistered which contributes a nice contrast. A sure sign that you have roasted your greens right is the smear of brown juice that paints the bottom of the pot when you stir.
We eat greens cooked like this as part of three dinners each week, at least, and in general Amy and I will fight over the leftovers at breakfast time.
Seves 4
For the fritters:
16 oz. field peas, cooked, either black eyed or you favorite type I used purple hull, two 14 oz. cans, drained works too
1 cup carrots, grated
1/4 cup rice flour, or all purpose flour
2 teaspoons shallots, minced
2 teaspoons garlic, minced
1 1/2 teaspoons dried thyme
kosher salt
fresh ground pepper
For the collards:
8 to 10 cups collards, cut into 1 inch stirps, rinsed multiple times to get rid of sand and dirt
peanut oil
kosher salt
fresh ground black pepper
For the buttermilk gravy:
1 1/2 cups live culture buttermilk
1 teaspoon creole seasoning
1/2 teaspoon dried thyme
1 1/2 teaspoon shallot, peeled and minced
1 teaspoon garlic, peeled and minced
1.Heat the oven to 325˚ F. Combine all the gravy ingredients in a small bowl and mix to combine. Set aside to let the flavors build.
2. Place a 6 quart enameled Dutch oven with a lid over medium high heat. Add some peanut oil to the pot being generous with the peanut oil and making sure you coat the bottom of the pan plus a touch more. Add half the greens and season them with a two finger sprinkle of salt and a few grinds of pepper. Turn the green giving them a hot oil bath. You want the leaves to be coated, not greasy though. Add the rest of the greens. Season them with salt and pepper too. Turn them into the first batch of greens being sure they get an oil coat as well. Put the lid on the pot, slide it into the oven and roast the collards for 1 hour and 15 minutes making sure to stir the pot at the half way point.
3. Place the cooked peas into the bowl of a food processor. Pulse to grind the peas. When it becomes mealy add the rest of the fritter ingredients and pulse until smooth, moist and will hold together. The key here is to adjust the moisture content. If it is too wet add rice flour a tablespoon at a time letting the mix rest a bit so the flour can hydrate and thicken the fritter mix. If it is too dry add water by the tablespoon and do the same. My way to test patties of all types is to make a patty and then throw it against the side of the mixing bowl. If it flattens and holds its shape I am happy.
4. Once your consistency is right make 8 equal sized patties. Place a nonstick pan over medium heat, add oil and fry the fritters until they are brown on both sides. Remove them from the pan to a brown bag lined tray. Drain the excess grease. Serve while hot.

Dexas Turbo Fan Salad Spinner-Dryers
Dexas Greens Spinner
I had an email arrive in my box a couple of weeks back from a company by the name of Dexas. I have never done a sponsored post but in this case I decided to. I don’t know why, maybe it is just time but instead of me reviewing a product I thought I would just post the email I sent back to Dexas with my likes and concerns for the product.
But time passes and Jeff who sent me the original email, who is very nice and good people usually don’t stay at bad companies, sends me another email just checking in or code for, nudge nudge is the post getting close to being done. Me being me, his second letter sits in my inbox for some time. I finally get around to actually photographing the spinner but by now I have used it a lot more. After I did my initial testing I had some clear ideas, even sent Jeff a letter with my concerns but now I have become comfortable with the spinner and I have changed my mind on several issues. First here is my letter to Jeff (take note, I removed a portion of the letter about a cutting board, not because it was bad or a bad product but because they didn’t ask me to test it but sent it along for my thoughts. It is a great product too.)
Hi Jeff,
Thanks for the follow-up. I did receive the spinner and the cutting board. It came at the perfect time since all my fall greens from the garden are just getting really good.
I have put the salad spinner to the test and really like a lot of things about it, the gearing in the top and the fan are fantastic, really fantastic, and the offset and size of the handle is perfect. It is much like a honey extractor I have and feels just as solid. It does a great job of cleaning and drying greens of all types.
The spinner really is a nice product but I would be remiss in my testing if I didn’t mention a couple of things. I really like the way the water runs out the open bottom but one of the things I really like about other salad spinners is the ability to store greens in the fridge right in the spinner. This may seem trivial but for some reason I have found spinners as a storage unit really helps to extend the shelf life of salad and greens. Are there any plans to make the spinner available with an optional, I’ll say, drip bowl? I also mention this because I sometimes have a sink full of dishes when I get to the point in my prep that I want to clean greens I have to clean the sink out. Don’t get me wrong you have a great product and these are just a few of my thoughts.
Anyway, I like the quality and durability of your products and I will look for them in stores around our area. I still plan to write a post for my blog and will do so soon. Thanks so much.
Tom
So what did I change my mind about. Well, after using it and getting used to storing the greens in a plastic bag instead of the spinner I realized how much fridge space spinners of all kinds actually use. Now the fridge is far less crowded, a definite plus.
In all seriousness this thing is built like a tank and works great!.
In the market for a good quality spinner? Get yourself one here Sur la Table or here Dexas.com

Texas Caviar
The first time I had Texas caviar I was in Santa Fe. There I think they called it Cowgirl Caviar but that might have been the name of the restaurant. I remember lots of pictures of cowgirls. Maybe the name of the restaurant was called Cowgirl Hall of Fame. That seems more right to me.
Anyway. Texas Caviar was made famous by Helen Corbitt the food director in the 1950’s for Neiman Marcus in Dallas. Many recipes call for Italian dressing. No. Do not do it. I am sorry but bottled dressings suck. Period. This is supposed to be fresh and vibrant and everything added is meant to highlight the creamy texture of the legumes, not hide it.
Serves 6 to 8
2 ea. 15 oz cans black eyed peas, drained and rinsed
2 tablespoons red onion, minced
2 tablespoons celery, minced
1/3 cup cilantro, minced
1 tablespoon green onions, minced
1 garlic clove, minced finely
1/3 cup red wine vinegar
1/8 cup extra virgin olive oil
1/8 cup neutral flavored oil, i.e., canola, grape seed
1 to 2 dried cayennes or chile tepins cut into thin strips with scissors
kosher salt and fresh ground black pepper
corn chips
1. Combine all the ingredients into a bowl and mix to combine. Season with salt and lots of black pepper. Taste and adjust the seasoning as necessary. This gets better as it sits, 24 hours is optimal, but will also gain more Scoville heat units so keep that in mind when you decide the amount of red pepper you want to use.

Bona Fide Black Skillet Cornbread
The only thing that might make this cornbread more Southern is using white cornmeal instead of yellow. Most certainly the cornbread debate has set off more feuds than history has recorded. Should it contain sugar or not is usually the big question but why should you have to make a choice. That is not to say this is one of those recipes that is going to combine the best of both worlds because it is not. You shouldn’t mix cornbreads just like you shouldn’t mix liquor. Flat out, it is always a bad idea. You should have two great cornbread recipes, one Northern sweet version and one Southern.
With that in mind you can pretty much bet when the words black skillet come before the word cornbread it is going to be Southern. The title here holds true to that theory. Actually most recipes, such as this one, vary only slightly in ingredients but usually find a fork in the road when they reach the part of the recipe that reads “technique”.
I use stoneground corn flour because, one, it tastes great and two I like the quality of the crumb in the final product. Some people use cornmeal and let sit overnight in what is called a soaker, meaning the liquid and the meal are mixed and allowed to rest overnight and then you add the soda and baking powder before baking. Kind of defeats the purpose of quick bread which is what cornbread really is. With that in mind, what seems to work well is to let the corn flour soak for twenty minutes while the pan is in the oven heating.
Heating the pan is paramount to getting the full cornbread experience. Without heating it you will never get the crisp crust that tastes like a cross between deep fried catfish tails and bacon. What you have never eaten the crispy tails off of deep fat fried catfish? Why lucky you, you still have some living to do.
To be completely stubborn if you can’t bring yourself to use either bacon grease or butter you should probably make some other bread because, really, you will be missing the point. If you sub out the bacon grease for real butter cut down the pan warming time to twelve minutes or the butter will burn.
Makes 8 to 10 servings
4 tablespoons bacon grease
2 cups stone ground yellow corn flour
1 teaspoon sea salt or 1 1/2 teaspoons kosher salt
1/2 teaspoon baking powder
1/2 teaspoon baking soda
1 large egg
2 cups buttermilk
1. Preheat the oven to 425 degrees. Place the bacon grease in a 10 inch cast iron pan.
2. Mix the corn flour, baking soda, baking powder and salt in a mixing bowl.
3. Beat egg and add it to the buttermilk and then add the liquid to the dry ingredients and mix quickly to combine the batter.
4. Place the cast iron pan into the oven and set a time for twenty minutes.
5. Using a dry towel or oven mit remove the pan from the oven and set it on a heat proof surface. Mix the batter with one or two quick spins and gently scrap it into the pan. You may need to use the whisk to pat it down and around so it reaches the edges of the pan. Grind some fresh ground pepper over the top.
6. Place the bread into the oven for 20 minutes or until it just starts to brown. Remove from the oven and cover it with a towel for 5 minutes. Slice and serve with lots of butter.
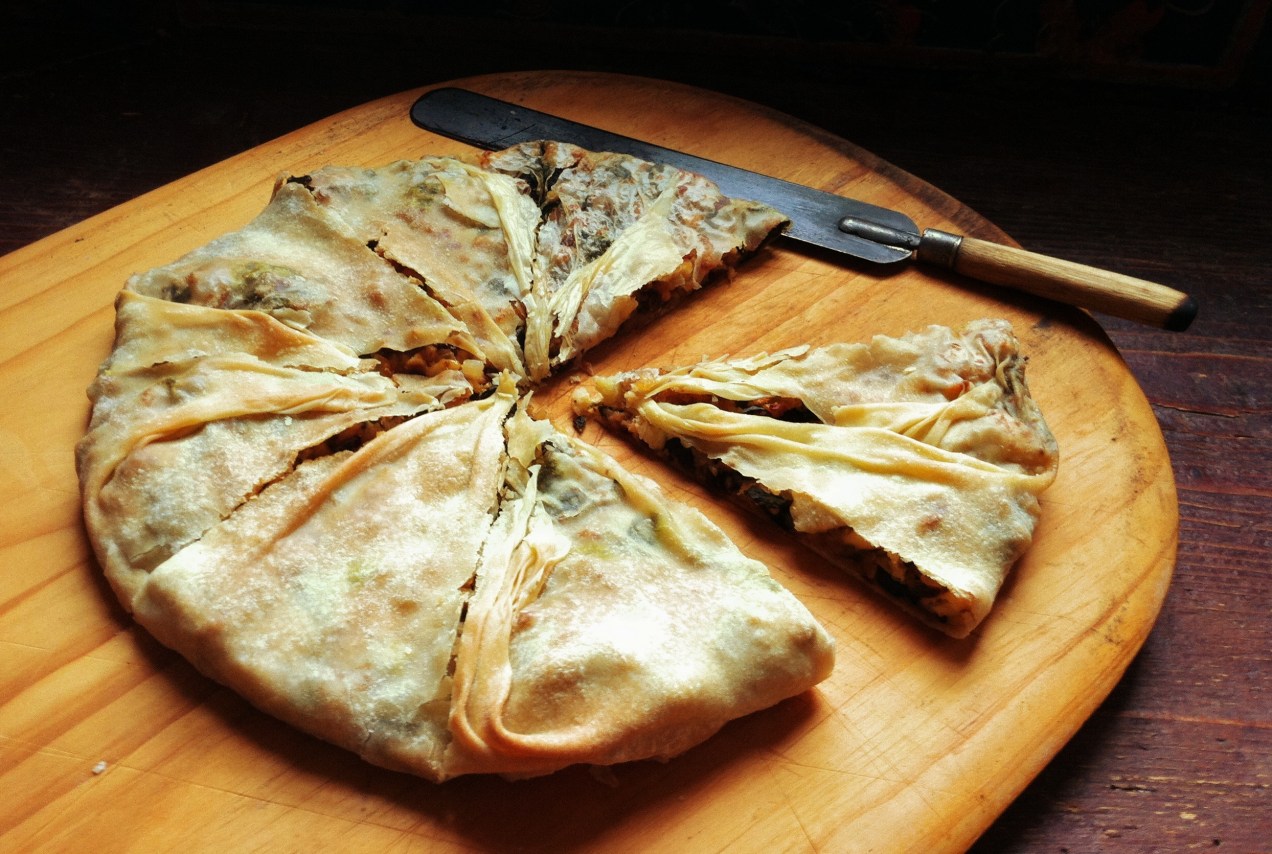
Spinach and Feta Pie
Spinach and Feta Pie
Most people, it seems, remember the first time they ate spinach pie. Chances are you were at an ethnic restaurant, maybe on your first food adventure to a Greek establishment, feeling continental and worldly. Maybe you where in college and eating at the local hippie restaurant where they also introduced you to North African Peanut Stew with Tofu, bags of tamari pepitas and herbal tea.
The joint smelled of clove cigarettes, Turkish coffee and sweat. Hank Williams and Lefty Frizzell tunes rained down from the speakers above and mingled with the smell of patchouli making you think it was the birth of cool. There are newspapers hanging on bamboo racks, a clothesline drying out today’s laundry, for anyone to pick up and read. People played checkers and chess and snacked on millet muffins.
It was a health food restaurant without a non-smoking section. In the kitchen Moosewood cookbooks lined the shelf above the stove. The food was vegetarian except on Sunday morning when all of campus lined up for a killer breakfast that included sausage and bacon. Sunday being the only day the restaurant actually made money.
Just sitting in the pine high-backs with a good cup of your daily grind and a used but unopened copy of The Sheltering Sky, lying face up on the table, made you feel smart. Lots of broody wannabes wrapped in black with their berets mimicking Kerouac, but really, all of them a breed of Caulfield. Each with tattered composition notebooks lying open to the first page waiting for that initial first stroke of the pen.
It was an ocean of intellectual doldrums, bitter hopes and angst filled dreams. Everyone who came here was looking for more than a good meal. They had either lost the wind in their sails or were looking for an intellectual soul mate with which to share their troubled waters, if not their sheets.
And, yet, you came back. Somehow at this place in time, the angst ridden shirt feels comfortable, it fits and you fit or maybe the spinach pie, really, was just that good.
Serves 4 as part of a larger meal
For the strudel dough:
1 1/4 cup all purpose flour dough
1 tablespoon plus 2 teaspoons safflower oil
5 to 7 tablespoons cold water
♣
For the filling:
2 tablespoons olive oil
2 cups yellow onion, small dice
1 1/2 tablespoons garlic, minced
two 1 x 4 inch pieces of orange zist
1 teaspoon finely grated orange zest
10 oz. baby spinach, washed
1 cup fresh bread crumbs
1/2 cup crumbled feta cheese
1/2 to 1 teaspoon red pepper flakes
2 tablespoons currants
kosher salt and fresh ground black pepper
1. Place the flour, safflower oil and water into the bowl of a mixer and using the paddle attachment mix the ingredients until they become well combined and elastic.
2. Turn the dough out and need it till it is satiny smooth. Wrap in plastic wrap and let it rest for 1 hour. You can make the dough up to a day in advance and store it, wrapped, in the fridge. Just be sure to let it come to room temperature before shaping the dough.
3. Place a large saute pan over medium high heat and add the olive oil. Add the orange zest strips and let them bubble away for a few minutes. Remove the strips.
4. Add the onions and cook them until they just start to turn golden at the edges. Season them lightly with salt and pepper, remember feta is salty. Add the garlic and chili flakes and stir until fragrant.
5. Add the spinach and turn it with tongs in the pan to coat it with oil and to wilt it. Once it is mostly wilted turn it out into a clean kitchen towel that is set in a colander. Pull the edges of the towel together then place your tongs around the towel, like a hair pin, and use the tongs to twist the towel into a ball around the spinach and squeeze out the moisture.
6. Place the pan back over the heat and add a more olive oil. Add the bread crumbs and brown them. Add the grated zest and the cooked spinach to the pan and mix to combine. Remove from the heat and cool. Once cool add the feta and currants. Taste and adjust the seasoning as necessary.
7. Preheat the oven to 375 ˚F.
8. A large 18 x 24 wood cutting board works great for this but the corner of a counter or table will do as well. Cover the cutting board with a large, non terry cloth, towel or apron. Dust it with flour.
9. Flatten the dough into an 8 inch disk and dust it with flour. Work it out with you hands into a larger disk. 12 to 14 inches round. Now, hook an edge of the dough onto a corner of the board. Using the backs of your hands, tucked under the dough, start stretching and pulling, gently, the underside of the side of the dough towards the empty corners of the board. If you get a whole just pinch the dough back together and continue. You can stretch the thicker edges from time to time with your hands. Keep stretching from the underside of the dough with the backs of you hands until the dough is transparant and eggshell thin and is 18 x 18 inches.
10. Sprinkle the dough with a little bit of olive oil and using a pastry brush gently and lightly coat the dough with the oil.
11. Lift the dough into a 12 inch non-stick saute pan leaving the edges of the dough to hang over the sides. Trim off the thick edges of the dough with scissors.
13. Place the filling ingredients into the center of the dough. Grab the edges of the dough and bring then to the center of the pan. Pinch the center and twist the dough. Pinch of the dough ball in the center.
14. Bake in the preheated oven for 45 minutes or until brown and crusty. Remove from the oven and let the pie rest for 20 minutes. Cut into wedges and serve.

Smokin’ Black-eyed Sandwich
This is a perfect example of vegetarian food that stands on its own. Not much different than falafel which has stood its ground for years. Your could in fact replace the mayonnaise with a yogurt sauce of your liking. Something with tomato and cucumber would draw down the heat nicely. It would go well with grilled pitas too so if you wanted to you could take the whole meal and easily give it a Middle Eastern flare. When it is a sandwich like the above I really like it with crunchy shoestring fries and I have even been known to stack the fries right between the bread with the fritter for a nice crunch.
Serves 6
2 each 14 oz. cans black eyed peas, drained
1/2 to 2/3 cup rice flour
1/2 onion minced
2 cloves of garlic, chopped
3/4 teaspoon dried thyme
1/2 teaspoon cayenne pepper
kosher salt and fresh ground pepper
2 carrots, peeled and grated, about 1 cup
lettuce, shaved
vegetable oil
bread, buns or pitas
mayonnaise or you choice of condiment
1. Place the drained peas, 1/2 cup rice flour, onion, garlic, thyme, cayenne and a 1/2 teaspoon of kosher salt and some fresh ground pepper into the bowl of a food processor. I like the mix to maintain some chunkiness but it is important for it to be fairly smooth so it holds together. Add up to 1/3 cup more rice flour as needed. So process until smooth but it doesn’t by any means need to be perfectly smooth. Add the carrots and mix, not process, them in thoroughly with a spatula. I like to let this sit for at least an hour so the rice flour has time to hydrate and thicken the mix so it stays together better. You could even cover it and refrigerate overnight. If it seems loose before you are getting ready to cook it add more rice flour.
2. Heat a large non-stick skillet over medium high heat. Add the oil and let it get hot. Form the mix into 6 balls and then shape them into patties. Fry then until crispy on both sides. Build you sandwiches and serve.
Smokin’ Black-eyed Sandwich

Lacinato Kale and Ricotta Tart
This tart is perfect for breakfast, lunch or dinner and, maybe, all three. Lacinato is also known as Cavelo Nero or dinosaur kale. It is becoming ever more popular not only for its great taste but for its presumed health benefits too. While this has many healthy components they are just a nice side note to the decadence of this wonderful tart.
The crust for this tart uses the idea of a shortbread crust to keep it tender while using whole wheat pastry and buckwheat flours. I like to serve the tart with a fruit salad of grapefruit supremes, toasted crushed hazelnuts and mint.
SERVES 6 TO 8
For the crust::
1 cup whole wheat pastry flour
1/4 cup buckwheat flour
1/4 cup parmesan cheese, grated
1/2 cup unsalted butter, softened
two finger pinch of salt
For the filling:
1 bunch Cavolo nero, chopped, rinsed and dried, 8 loose cups worth
1 cup yellow onion, peeled, small dice
2 teaspoons fresh garlic, minced
3 anchovy filets, minced (obviously omit if you want it to be meatless)
1 1/4 cup whole milk ricotta
3 large eggs
1/2 cup parmesan cheese, grated
1 tablespoon olive oil
1 tablespoon unsalted butter
1/4 cup water
kosher salt and fresh ground pepper
1. Heat the oven to 350 degrees.
2. Place the whole wheat pastry flour, buckwheat, parmesan, butter and salt into a large mixing bowl and stir it with a wooden spoon until it looks like a combination of cous cous and cornmeal. You may need to rub some of the bigger pieces between you hands to break up the butter.
3. Dump the crumbs into an 8 inch tart pan. Starting at the edges press the crumbs into the flutes. Use you index finger as a back stop by placing it at the top of the flute and pushing the flour up to it. Pack the crust tightly and evenly. Once you have finished the crust bake it in the oven for 20 minutes. Remove it from the oven.
4. While the crust is baking heat the olive oil and butter over medium heat in a 12 inch saute pan. Add the onions, anchovies and garlic. Season them with a little salt and fresh ground pepper. Saute them gently without coloring and until they are soft. You may need to adjust the heat and you will want to stir them to keep them from coloring.
5. Once the onions are soft add the Cavolo nero and toss and stir it to coat it with oil. Season again with a little salt and fresh ground pepper. Add the water and cover the pan. Let the Cavolo nero steam until tender but still vibrant in color, about 8 minutes over medium heat.
6. In a large mixing bowl combine the ricotta, parmesan and the eggs. Add a 1/2 teaspoon of salt and a few grinds of pepper and stir to combine.
7. Once the Cavolo nero is tender taste it and adjust the seasoning as necessary. Make sure all the water has simmered away from the Cavolo nero, you don’t want it to be to wet. Let it cool for a couple of minutes and then add it to the ricotta and stir it well to combine.
8. Carefully spoon the filling into the tart and smooth and level it out. Place the tart into the oven and bake it for 50 to 60 minutes or until set and nicely browned.
9. When the top has browned remove the tart from the oven and let it cool to room temperature before cutting. Serve at room temperature.
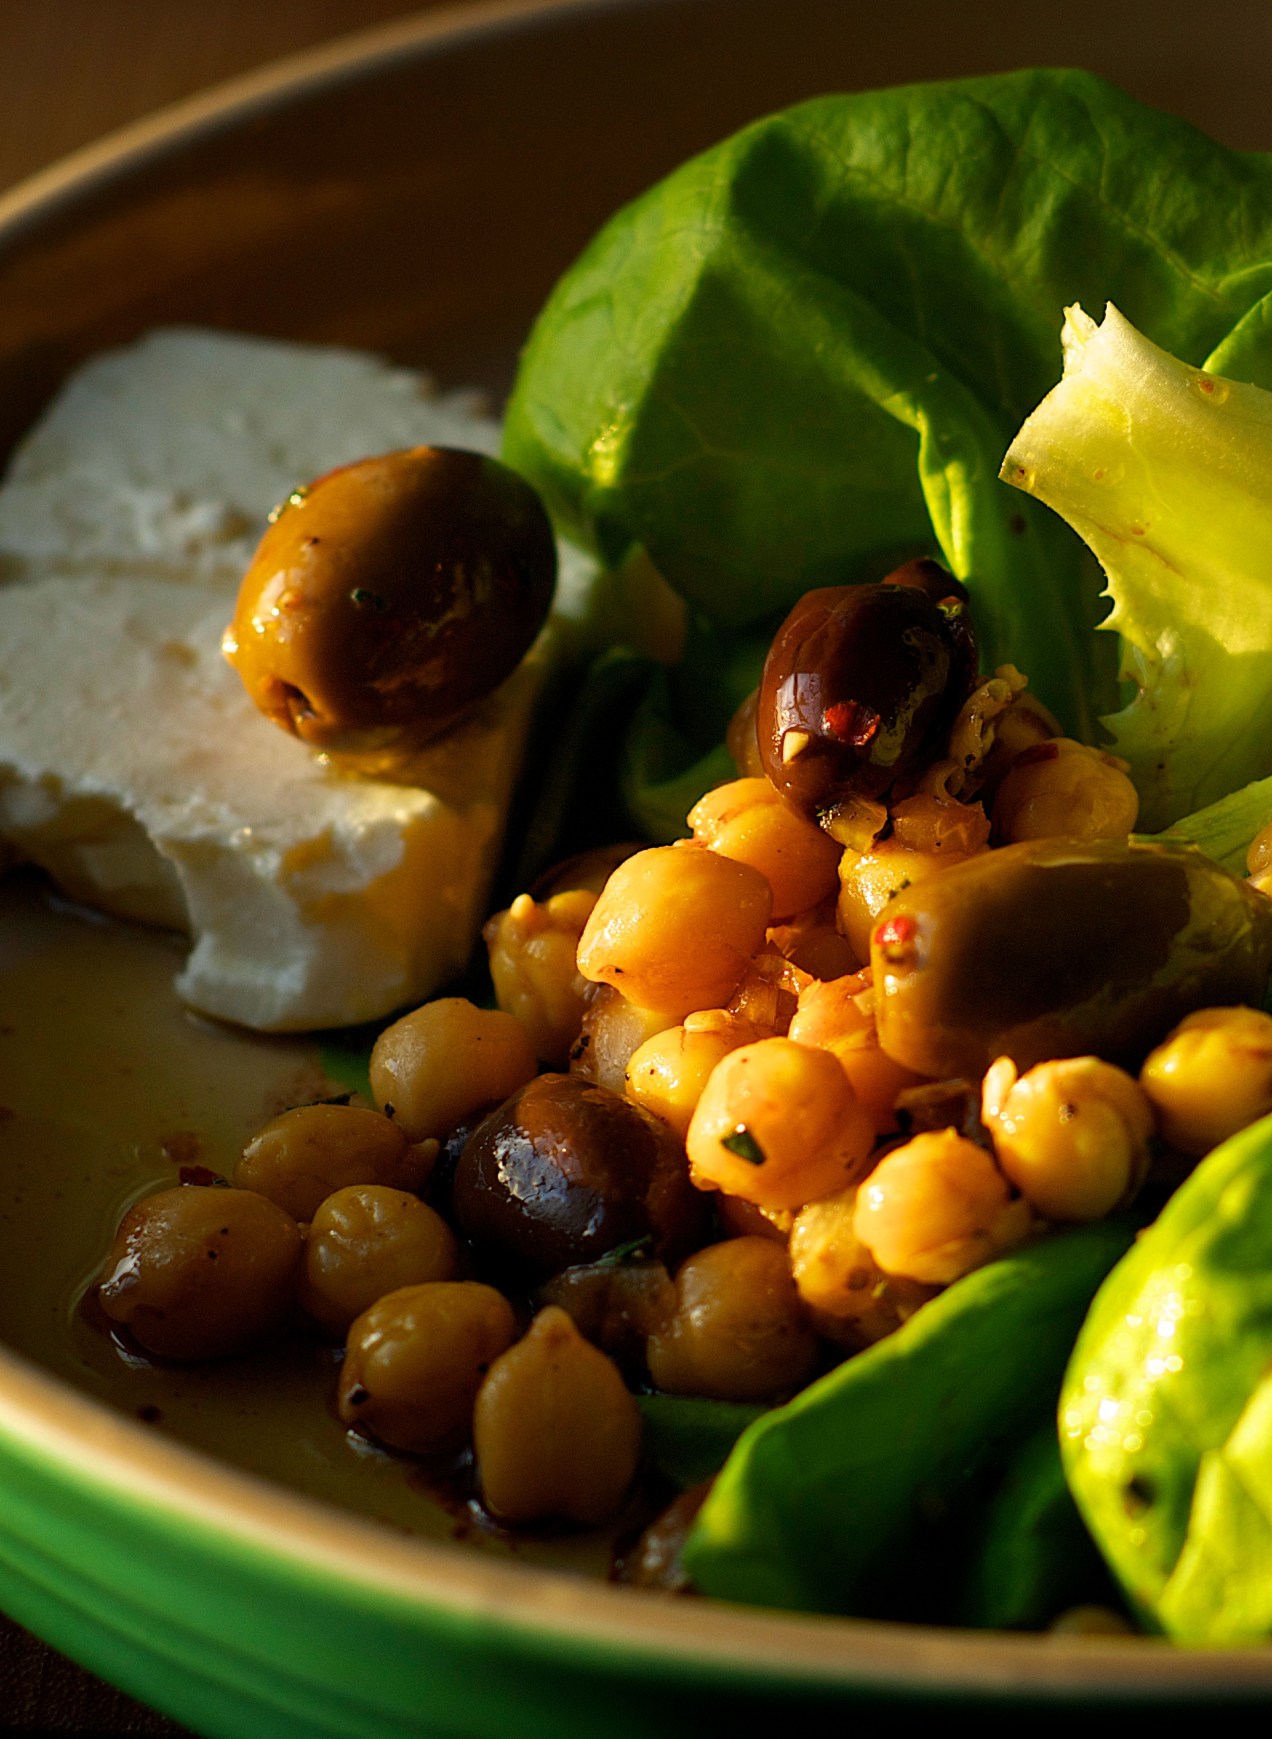
Olive Salad Taverna

Olive Salad Taverna
While having never been to Greece this seems as though it would be something that you might eat at a small taverna on the Mediterranean Sea. It is sort of an “a la grecque” dish which if done right is always good to have on hand and usually are even better the second day or, at the very least, after a couple hour marinade. I think this would be good followed by some sort of Mediterranean fish dish. If you want to make this a very filling salad add some feta and a couple of pitas and you will have a meal.
SERVES 4
1 cup mixed olives
1 cup garbanzos, cooked, or rinsed canned
2 teaspoons preserved lemon, finely minced
2 teaspoons shallot, finely minced
1 garlic clove, finely minced
1 teaspoon fresh savory or thyme, minced, Richard Olney used savory with olives and I think it works really well
1/2 teaspoon chile flakes
2 tablespoons red wine vinegar
1 teaspoon pomegranate molasses
1/4 cup extra virgin olive oil
kosher salt and fresh ground black pepper
1 head butter leaf lettuce
hunks of feta and pita, optional
1. In a mixing bowl combine everything up to the olive oil. Mix everything to combine. Season it with black pepper and then add the olive oil. Stir to coat and then let the salad rest for at least 1 hour and you can even refrigerate it over night.
2. Before serving rinse the butter leaf and then using a salad spinner dry the lettuce. Place two or three leaves on each plate. Stir the salad to redistribute everything. Taste and if it needs salt add some. Divide the garbanzo/olive mixture evenly between the plates. Using a spoon drizzle some of the juice over the greens. Serve.

Gumbo Z’herbes with Yeasted Corn Biscuit Dumplings

Gumbo Z’herbes
If you know me you know I love greens. I go to them for comfort, for quick meals and just about any reason, now that I think about it, I am not even sure I need a reason.
There was a day not all that long ago when I would always add some sort of smoked pork or, at the very least, smoked turkey legs to the greens. At some point we started to eat less meat and started to enjoy vegetables for being vegetables. Since those days of long ago I have added the pork back to my greens on occasion and each time I do I always say to myself, “well, that was a mistake.” For me, I have found I like greens for greens and the pork just overpowers them.
Even so there are dishes were not adding the requisite pork is damn near criminal and it might be in some states south of the Ohio River. I thought not adding tasso ham to my Gumbo Z’herbes might be one such crime but then I got to thinking about it and I came to understand, for the most part, it is the herbs used to cure the tasso that I like.
I am sure you see where this is going.
The biscuits dumplings aren’t traditional but the gooey bottoms and crunchy tops sure are a plus in my mind.
Note: the yeast used in the biscuits is really more for the yeasty flavor then it is to make them rise. While I am sure it helps them rise it is not the reason they rise the baking soda is. So don’t omit the soda because there is yeast in the recipe. Also, not only are these really good as dumplings but they are just as good when baked as biscuits.
Serve 4 to 6
For the gumbo:
peanut oil
1 1/2 cups yellow onion, peeled trimmed and cut into a small dice
3/4 cup green pepper, membranes and seeds removed, cut int a small dice
3/4 cup celery, cut into a small dice
3 tablespoons, garlic, minced
1/4 teaspoon cayanne
1/2 teaspoon marjoram
1/2 teaspoon allspice
1/2 teaspoon fresh ground white pepper
7 cups vegetable broth
1 teaspoon gumbo file
8 cups mixed greens, collards, turnip, or kale, rinsed at least three times and chopped into thin ribbons
kosher salt
For the biscuits:
1 cup buttermilk, room temperature
2 teaspoons active dry yeast
1 teaspoon sugar
1 1/2 cups all-purpose flour
1 cup corn flour, not cornmeal
1 teaspoon baking soda
1 teaspoon salt
1/2 cup unsalted butter, cold and cubed
extra flour for dusting
1. Place a 3 1/2 quart cast iron Dutch oven over medium heat. Add enough oil to the pot to just cover the bottom. Add the onion, peppers and celery. Season them with salt and pepper and stir them to keep them from browning but let them become soft.
2. Add the garlic, cayenne, marjoram, allspice and white pepper. Stir until everything becomes fragrant with out letting the garlic brown. Add the vegetable stock and bring it to a boil.
3. Add the greens by the handful until each addition is wilted and you can add more to the pot. Do this till all 8 cups have been added.
4. Bring the gumbo back to a boil then reduce the heat to a simmer. Simmer uncovered for 1 hour. At the end of the hour add the gumbo file and stir it into the broth. The greens will be tender and gooey.
5. Heat the oven to 425˚ F. While the oven is heating combine the yeast and buttermilk and let the yeast dissolve.
6. In the bowl of a stand mixer fitted with a paddle attachment, or by hand using a heavy duty wooden spoon, combine the flour, cornmeal, sugar, baking soda, and salt with the butter. Mix the flour with the butter until it has the appearance of coarse cornmeal. Add the buttermilk and process until the biscuit dough is just combined.
7. You can use a small ice cream scoop, make sure you don’t sink the biscuits into the liquid, and make a drop biscuit topping by gingerly and gently plopping the dough right out of the scoop and into the gumbo or you can turn the dough out onto a lightly floured surface roll it, cut it into rounds, and then lay these on top of the gumbo.
8. Either way be careful not to sink the dumplings. Place the pot into the oven and bake the whole thing, uncovered, for 20 minutes or until the biscuits have browned nicely.
6. Serve

The Poor Wretches Pasta

Street walkers pasta and now poor wretches pasta. Leave it to the Italians to come up with an interesting name for their local eats. This is Sicilian by birth. The pine nuts and currants aren’t traditional but I like what they bring to this dish.
Eggplants are abundant at the moment. You could take the time to make eggplant parm, moussaka or some other multi-step dish or you could keep it simple and make this. It is simple but that doesn’t mean it isn’t flavorful. I have made it twice already and probably will make it again. I am not doing so because I have eggplants, and lots of them, but because I like it that much.
Makes 4 to 6 servings
good quality olive oil
2 or 3 eggplant, depending on size, peeled and cubed into 1 inch pieces, about 5 cups
2 cups tomato sauce
2 teaspoons red pepper flakes
3 tablespoons currants
2 tablespoons pine nuts
1/2 cup fresh bread crumbs
16 oz. penne pasta
kosher salt and fresh ground pepper
1. Add 1 1/2 tablespoons of olive oil to a small saute pan. Once it is hot add the bread crumbs and pine nuts. Season them with salt and pepper and cook them until they are browned. Add the currants and toss a few times. Empty the pan into a small bowl and let the topping cool.
2. About one hour before you start cooking put the eggplant cubes into a colander. Season the cubes with a fair amount of salt and either place the colander in the sink to drain or in a large bowl.
3. Place a large pot of generously salted water over high heat.
4. While the water is coming to a boil place a 14 inch saute pan over high heat and add 1/3 cup of olive oil. Once it is shimmering but not smoking add the eggplant. It might splatter a little if there is a lot of water clinging to the pieces so be careful. Brown the eggplant.
5. Add the red pepper flakes, a little more oil if the pan looks dry, and then the tomato sauce. Reduce the heat and simmer the sauce.
6. Add the pasta to the big pot of boiling water and cook the pasta according to the cooking time listed on the box. Once they are done, add a 1/2 to 1 cup of the starchy pasta cooking liquid to the sauce depending on how reduced it has become.
7. Strain the noodles and add them to the sauce. Toss to combine and coat the noodles. Pour the pan out into a large bowl and top with the bread-crumb-currant-pine-nut topping and serve.
These cakes have become a standard in our rotation. Not always as Indian cuisine but as other styles too. The Lentil du Puy base is a really good foil for all kinds of flavors and the texture of the meal is toothsome which is also very satisfying. I would imagine the possibilities to be endless and I will let you know if we make any discoveries that deem reporting back to you.
Serves 4
For the Lentil Cakes:
1 cup dried Lentil du Puy, rinsed and picked over for stones
1/2 yellow onion, small dice
1 tablespoon fresh grated ginger
1 tablespoon cilantro, minced
2 teaspoons garam masala
1/4 cup flour, I used millet flour
1 egg
3/4 teaspoons kosher salt
For the Sauce:
1/2 yellow onion small dice
1 cup tomato sauce
1/2 cup cream
1/2 cup plain yougurt
pinch cinnamon
pinch tumeric
2 teaspoons cilantro
canola oil
1. Place the lentils into a 3 quart pot and cover with water by two or more inches. Add the minced onion. Place the pot over medium heat. Slowly bring the lentils to a boil then reduce the heat to a simmer and cook the lentils until tender adding a pinch or two of salt in the last 10 minutes of cooking. This should take approximately 30 minutes.
2. Drain the lentils. Let them cool but puree them in a food processor while they are still warm. They will be easier to handle when warm.
3. Add the remaining lentil cake ingredients and pulse the cakes a few more times until the rest of the ingredients are combined into the mix. Taste the lentil puree then season the puree with kosher salt and a few grinds of pepper. Taste again and adjust the seasoning.
4. Let the cakes sit for a few minutes to hydrate the flour. Take a tablespoon of the mix and make a ball. Is it really wet or is it too stiff? You want the mix to hold its shape but not be overly stiff otherwise they can be dry when cooked. It should just hold its shape. Add more flour a tablespoon at a time if you need to letting the additional flour hydrate before testing. Divide the lentils into eight balls.
5. Add enough oil to cover the bottom of a heavy bottomed sauté pan by an 1/8 inch. Heat the oil over medium high heat. Test the oil by dropping a pinch of lentil to the pan. It should begin to sizzle right away but not violently sizzle and pop.
6. When the oil is ready take each lentil ball and smash it down gently forming it into 1/2 inch thick cakes and add them to the oil. Let each side brown nicely and then remove them to a tray lined with a brown bag to soak up the oil. Keep the cakes warm, either in a low, 200 degree oven or in a warm place on the stove.
7. Drain the oil from the pan, place it back on the heat and then add the remaining diced onion. Sauté until tender then add the rest of the sauce ingredients. Stir to combine, bring to a boil then reduce the heat. Let it simmer for ten minutes to come together. You can puree the sauce to make it smooth or leave the onion chunky making the sauce rustic.
Serve with rice.
Lentil Cakes Tikka Masala

Glazed Carrots with Lettuce

I am not sure when my fascination with carrots began but it wasn’t as a kid. I really don’t think I thought much about carrots until I started growing them in my garden. I think the fact that a good carrot in the middle of winter taste so good and feels so completely nourishing while you are eating them it makes them hard to pass up.
This recipe uses classic technique, yet, is really simple. I find this recipe to be old school Flemish/Belgian and borderline Dutch. The first time I made it years ago I had my doubts about the lettuce addition but they quickly dissolved into bliss. As always the best and freshest produce you can lay you hands on is always going to make the best food.
SERVES 4
16 carrots with tops, you can tell how fresh the carrots are by the tops, not more than 3/4 inch diameter, peeled and timmed with 1 inch of top left on
1 teaspoon sugar
scant 1/2 teaspoons salt
1 1/2 teaspoon white wine vinegar
1 bay leaf
1 sprig of fresh thyme
3 tablespoons unsalted butter
a few grinds of white pepper
water
1/2 dozen bibb lettuce leaves, larger ones torn in half
- Place everything, except the lettuce, into a 12 inch heavy bottom saute pan. Add about 1 cup of cold water to the pan or just enough to reach an 1/8 inch from the tops of the carrots.
- Place the pan over high heat and bring to a boil. The idea here is to have the water all but evaporate at the same time the carrots finish cooking leaving you with a rich and delicious glaze to coat and be poured over the dish. If the water seems to be evaporating before the carrots are close to being done you can add a little more. At the same time if the carrots seem to be getting to done remove them from the pan. Reduce the glaze and then at the end add the carrots back to warm them and to cook the lettuce.
- The whole idea here is to have a tender carrot that is not mushy or one that when you cut it is so hard it shoots across the table. It is timing and you can always use a toothpick to test the fattest part of the carrot. It should yield with a some pressure pressure. As the water gets close to being gone add the lettuce. Let the lettuce wilt and get soft. You want it to be vibrant green but tender like cooked spinach. Taste and adjust the seasoning. Plate, drizzle the glaze over the veggies and serve.
