I often wonder what makes a recipe so good it goes viral. I am sure it’s lots of factors. Sometimes it’s the recipe itself, other times it is what the author expresses in words through their post, and sometimes it is simply because the author is very famous. This recipe, originally posted on the blog My New Roots, has shown up on lots of other sites and was even a Genius Recipe on Food 52, and rightly so.  At the very least it has gone viral in my circles.

There are lots of things to like about this bread, like stacking it with thinly sliced crisp cucumbers, topped with oily mackerel, shallots, and parsley like in the picture above.  I also like it with thick cut bacon and peas shoots, or simply toasted and topped with butter and lingonberry jam.  It is delicious bread.  I even bake it on my Big Green Egg to give it a more authentic, and Danish, baked-in-the-dying-embers of a wood fired oven flavor.

My only problem is if I make the loaf of bread following the original recipe it comes up short. I heard the same words of disappointment from others who tried it too. The bread can be fussy, difficult to cut, crumbles, and becomes dry.  Many I know have given up making it.

DSC_0426

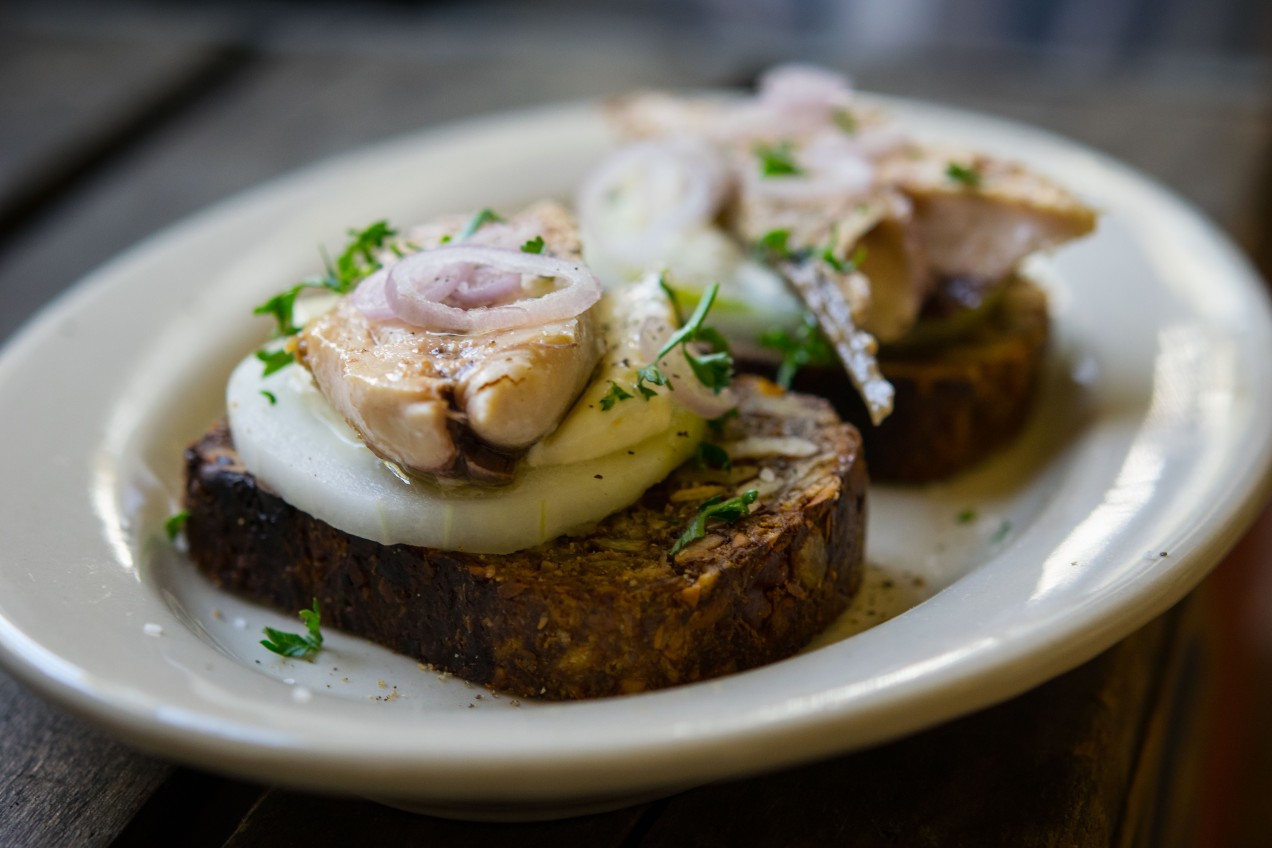
One of my favorite ways to top this bread is with thin slices of cucmber, mackeral, parsley, and shallot.

I am sure the loaf bakes up perfect and to the satisfaction of many people every time. It doesn’t for me, but I understand when it comes to cooking and baking there are so many variables that to place fault elsewhere is simply not taking responsibility for ones own abilities. After all, it is up to the cook to get what they want from a recipe.  It is why you need to know how to cook rather then simply follow directions.  Just like different musicians playing the same piece of sheet music. The song sounds very different depending on the players abilities.  It is only because there are so many things about this loaf of bread I like that I stuck with it, experimented with it, until I got the loaf of bread I wanted, until I heard the song I wanted to hear.

I didn’t change much, although I used pumpkin seeds instead of sunflower and ground psyllium instead of seeds and I ground a portion of the oats and pumpkin seeds to create a finer crumb in the end product.  And while I use coconut oil in some recipes I didn’t use it here nor did I use maple syrup but instead brown rice syrup was substituted.   For me all these small touches made for a more manageable loaf in the end.

The fact is, made from the original recipe this loaf of bread is delicious, the taste is very satisfying, nutty, feels good to eat, and it is nourishing.  I simply made adjustments which gave me the product  I wanted to eat.  Rest assured though,  for those on a restricted diet, and those that aren’t, this seed bread is an important find.  It’s worth practicing to get it right.

_TJH0960

Seed bread packed into a pate mold and waiting to be wrapped up for a rest before baking. Notice the parchment handles.

Seed Bread

This recipe creates a less delicate loaf.

Seed and Grain Bread (adapted from My New Roots)

1 cup unsalted pumpkin seeds (1/2 cup coarsely ground)
1/2 cup golden flax meal, ground
1/2 cup walnuts
1 1/2 cups rolled oats ( I generally grind 1/2 cup coarsely in a coffee grinder )
2 tablespoons chia seeds
3 tablespoons powdered psyllium
1 teaspoon kosher salt
1 tablespoons brown rice syrup or whatever syrup you have and want to use
3 tablespoons spectrum vegetable shortening (it’s palm oil and non-hydrogentated) or unsalted butter
1 1/2 cups hot water

1. Combine all the ingredients in a bowl. Using your hands work the mass until the shortening or butter and the other ingredients are evenly distributed.
2. Line a pate mold, or small loaf pan, with parchment. To remove air bubbles, literally, pack the dough into a 3 x 4 x 10 pate mold. Wrap the whole thing in plastic wrap and let it sit for 1 to 2 hours.
3, Heat the oven to 350˚F. Remove the plastic wrap, place the loaf pan onto a baking sheet and bake the bread for 25 minutes.
4. At the end of the baking time remove the tray from the oven and using excess parchment paper as handle lift the loaf from the pan. Place the loaf, with the parchment still under it, back onto the sheet tray and bake the bread for another 20 minutes.
5. When the timer sounds, roll the loaf so that a new side is flush with the sheet tray. Bake another twenty minutes. Do this until all four sides have been baked against the sheet tray.
6. Remove from the oven and let the bread cool completely before cutting.
7. The bread is best toasted. Store in the fridge wrapped in plastic wrap.

Note: recently I baked a loaf on my Big Green Egg. It is a fantastic way to bake this loaf. Much like it might be baked in a shop in Europe using the dying embers of a wood fired oven.

Advertisement
Bread, dog-eared, Gluten-free, Grains/Legumes, Medium Time, Moderate, Sandwiches, Vegetarian

A Life-Changing Loaf of Bread (Redux)

Image
Bread, Dinner, Grains and Legumes, Thanksgiving, Vegetarian

Dinner Rolls and a Bonus Southern White Loaf

I have been, and will continue to be a believer in simple good recipes that follow great technique.  I often feel as though complicated directions and hard to find ingredients set us up for disappointment and failure. Don’t get me wrong.  I understand the law of diminishing return.  That today’s worlds best recipe will be boring tomorrow.

We need to search out new tastes, techniques and flavors but it is also important to return to the classics.  For me, I also like to share my childhood favorites with my children.  These rolls are a part of me.  They connect me to my past, and by sharing them, they connect me to my children. Continue reading

Standard
dessert, Fruit, Pie

Honest Peach Pie

I always thought my friend Steven was lying when he told me that over the course of a few years he sold enough of his handmade old timey-looking leather fly swatters at the Indiana State Fair to pay for his log cabin and farm, until I myself moved to the country. Turns out he is a way smarter man than I because when you live on a farm, at some point during the summer, and especially if you have animals, flies are going to invade the house. It is inevitable and it is just a part of country life.

Like any man, I am always looking for the best tool for the job, and at day’s end I usually come back to the one I started with, because only after trying them all do I realize I had the right one to begin with. This is how I have come to understand that the fly swatter is an important time-honored, tried and true tool. One of those that works as well today as it did hundreds of years ago and is so simple even children like to use it.

So a couple of months back, when my KitchenAid stand mixer went down for the count it was like breaking a fly swatter, as far as I was concerned. But lo and behold, I was in the throes of Paul Bertolli’s Cooking by Hand, which I took as a sign. I just had to wonder what would happen if I didn’t run out and replace it immediately, but instead went without and cooked like I did when I first started.

You see, a KitchenAid is like having a bottle of bourbon hidden in the cupboard. I mean really, as long as the bourbon is there you aren’t going to stop drinking, just like if you have a KitchenAid you won’t not use it. But is a mixer better, was my question, than, say, your tried and true, time-honored hands?

A decision was made: I had the shakes, I would go cold turkey and I would cook by hand. Do it the old way. The  “on the fly” theory, I would call it. Now don’t get me wrong — I am no blast from the past wannabe. I like my technology, my cell phones, computers, my gas stove and car — although the car is black. Nevertheless, I am not about to grow a beard sans mustache and ask you to call me Graber. (Full disclosure: I will, on the other hand, sometimes wear overalls because I am the anti-ass. Yes, when you are the anti-ass, overalls and outdoor labor make sense because when you have no butt you can never pull a belt tight enough to keep your pants from ending up around your ankles when working, and while I know overalls are not the best look — although I think they are making a comeback on Etsy right next to the Hobo Wedding — they are practical.)

So, as I was saying, I had always heard rumor that making doughs, breads and pastas by hand made them more tender, gave them a better rise in the oven or a more satiny feel in the mouth. I just needed to know.

I dove in head first and started out with a couple of yeast breads. One was a very dense whole grain bread and the other was my whole wheat farmhouse loaf. What I noticed right off was the difference in feel.  The whole grain at the end of kneading felt like the wet green block of floral foam that you stick flowers into. You know how when it gets damp and you push on it, it gives a little but seems crunchy and sandy on your hand? The farmhouse loaf is somewhat of a sticky dough and what happened there, how I have come to know the right hydration, is you get barnacle hands. Sounds funny, but these little pieces of dough should sparsely spot your hands and, well, look like tiny barnacles. The wetter the dough, the more barnacles.

I quickly moved on to crusts and the resulting pies have been great. They are more tender, have a better crumb and they aren’t any more difficult to make, although you do need practice to get the feel of it.

The biggest benefit to cooking by hand though is the girls and I aren’t standing there looking at a paddle attachment go round and round, but instead we are getting our hands dirty and learning about different flours and dough. The elasticity, the hydration and all the other technical stuff which, once you know how a dough should feel, allows you to become more confident and more efficient in the kitchen and build an intimacy with your doughs that allows you to make adjustments by intuition.

While I have procured another stand mixer and will use it (probably not for crusts), the one thing I learned that was probably most important and something you will want to remember and just might be the best kitchen tip I can give is: people keep their best liquor hidden in the cupboard and sometimes, maybe that’s where the KitchenAid belongs too.

This slideshow requires JavaScript.

 Tips for Making a Pie Crust by Hand

1. Never add all the water to the dough that a recipe calls for. Always stop short and, as you work the dough, you will know pretty quickly if it needs more.

2. Use a bowl that is three times bigger than you think you need to keep the flour from shooting over the sides.

3. Don’t over-knead the dough. There should be a quarter cup or so of crumbles that fall onto and around the crust when you dump it out of the bowl onto the counter. Knead the dough a little more to incorporate them and stop. It doesn’t have to be one homogenous and smooth mass. While the dough rests it will continue to hydrate and when you roll it out the rolling pin will bring it together.

4. Rotating the dough 45 degrees between each use of the rolling pin is key to ending up with a round crust.

5. Always place your rolling pin in the middle of the dough round and roll away from yourself, then put it back in the middle and roll/pull the pin towards you.

For the crust:

1 1/2 cup whole wheat flour

1 1/2 cup all purpose flour

1 teaspoon kosher salt

1/2 cup lard

1/2 cup unsalted butter, cubed and chilled

1/2 cup ice cold water

1. Sift the flour into a bowl and add the salt. Place the butter and lard into the bowl. Start by squeezing the flour into the butter and lard and then as things start to blend pick up clumps of flour between your hands and rub your hands together like you are trying to warm them up. Do this until the flour looks like course cornmeal. It is ok if there are some larger pieces of butter still in the mix.

2. Add the water and using your hands knead the dough right in the bowl until it comes together. Remove the dough from the bowl to a counter top and knead it two or three times. Divide the dough in half, pat it into two rounds then wrap in plastic wrap and put it in the fridge 30 minutes or more. If you let it sit in the fridge for two hours or more make sure you pull it out and let it warm up a little before trying to roll it.

3. To roll the crust first dust your counter top with some flour. I then dip one of the dough pieces into the flour bin itself and give it a shake. Place the dough on the counter top and starting in the middle of the dough roll with your rolling pin away from you then put the pin back in the middle and roll, backwards, towards yourself. Now turn the dough 45 degrees so it is oblong and horizontal. Roll with your pin, again, starting in the middle. Continue this process until the crust is 10 to 12 inches in diameter and about an 1/8 to 1/4 inch thick. Using the rolling pin for support roll the dough lightly around the pin, like a carpet, and place it into a 9 inch pie pan. Roll out the remaining piece of dough.

For the Filling and to Finish

6 to 8 peaches depending on their size, firm but ripe, look for free stone peaches, meaning the pit comes out easy. I used Indiana red havens which are semi-free and if they are

1/2 cup sugar

2 tablespoons cornstarch

juice of half a lemon

1/4 teaspoon ground cinnamon

1/4 teaspoon ground nutmeg

1 egg white mixed with 2 teaspoons of water

sugar for dusting

1. Heat the oven to 400˚ Fahrenheit.

2. Bring a large pot of water to a boil and blanch the peaches for 10 to 20 seconds. Remove them to a bowl. Leave the water on because as you are peeling the peaches you may find a peach that needs to be blanched a little longer. Slip the peaches from their skins, halve them, pit them and then slice each half into 3 pieces.

3. Place the peaches into a large bowl. Mix the sugar with the cornstarch. This will help to prevent the cornstarch from clumping. Combine the peaches with the sugar/cornstarch mix, cinnamon, lemon juice and nutmeg. Using your hands gently turn the peaches to distribute the sugar and spices. Remove the peaches and put them into the crust lined pie pan. Pour the juice over the top until it comes 3/4 of the way to the top. You may have more juice than you need. If you have less, don’t worry — it is fine.

4. Roll out the top crust and either cut it into strips for a lattice top or use it whole. Either way brush the edge of the bottom crust with egg white to help attach the top crust. Trim the excess crust. Crimp the crust. Brush the top crust with egg wash and dust with sugar. Place the pie on a sheet tray with edges just in case it bubbles over and because it will be much easier to get in and out of the oven.

5. Bake the pie for 20 minutes at 400 ˚F then turn the heat to 350˚ F and bake another 40 to 50 minutes or until the juices are bubbling and the crust browned. Remove and let cool. Slice and serve cold or warm, with cream or ice cream or just skip and go naked.

Standard
Cookies, Desserts, Snacks/Appetizers, Vegetarian

Depression Cookies

Sugar cookies

Yes, I could imagine a cookie just like this being created during the Great Depression.  The nutmeg lends itself to the past and makes the cookie feel like something a grandmother would make for her grandchildren on a Sunday afternoon.  She might also make it when she notices her grandchildren are a little sad.  Whatever the reason they are a cure for depression.  They will bring you out of your funk with a heavy dose of the warm and fuzzies.

MAKES 2 DOZEN

1 cup sugar

3/4 teaspoons nutmeg

1 vanilla bean, split and seeds scraped

2 cup all purpose flour

1/2 teaspoon baking powder

1/2 teaspoon Kosher salt; if you sub table salt cut it to 1/4 teaspoon

12 tablespoons unsalted butter

4 tablespoons vegetable shortening

1 tablespoon honey, something with citrus notes is good

1 large egg

1/2 cup sugar for rolling the cookies

1. Make sure you have an oven rack placed dead in the middle of your oven. Preheat the oven to 375 degrees. In a mixing bowl combine the flour, baking powder and salt. Stir it with the measuring spoon to mix.

2. Place the sugar, nutmeg and vanilla seeds into the bowl of a mixer and mix for two minutes to distibute. Turn off the mixer and add the butter and shortening. I use cold, when I squeeze it it just gives, butter because I personally think it creams better. You do not want this to look granular and you don’t want the fat to break out and look similar to cottage cheese either. It should look like ice cream just scooped from the container. Start out on low speed and when the butter starts to cream gradually increase the speed to medium and cream for about 2 minutes total.

3. Scrape down the sides with a spatula. Add the egg and mix to combine. Add the honey and mix briefly.

4. Adding the flour in thirds, to keep it from flying out of the mixing bowl, mix at low speed and mix until all is incorporated. Scrape down the sides of the bowl if necessary.

5. Place the remaining half cup of sugar into a seperate bowl. Line two 12 x 17 baking sheet pans with parchment paper.

6. Using a tablespoon or a number 40 scoop, scoop out some dough. Using your hands roll it into a ball and then roll it around in the sugar until coated. Place it onto the baking sheet. Repeat until you have 12 cookies on the tray. Using a fork, flatten the cookies to about a 1/2 inch thickness.

7. Place tray into the oven and set the timer for 10 minutes. While they are cooking roll and coat the remaining twelve cookies. When the timer goes off check the cookies. They should be browning at the edges but still light in the middle. If they’re not, leave them in the oven for another few minutes. Remove them and let them cool for 3-5 minutes before changing them to a cooling rack to finish cooling. Place the other tray of cookies into the oven and repeat this step.

Standard
Bread, Grains/Legumes, Vegetarian

Bona Fide Black Skillet Cornbread

The only thing that might make this cornbread more Southern is using white cornmeal instead of yellow. Most certainly the cornbread debate has set off more feuds than history has recorded. Should it contain sugar or not is usually the big question but why should you have to make a choice. That is not to say this is one of those recipes that is going to combine the best of both worlds because it is not. You shouldn’t mix cornbreads just like you shouldn’t mix liquor. Flat out, it is always a bad idea. You should have two great cornbread recipes, one Northern sweet version and one Southern.

With that in mind you can pretty much bet when the words black skillet come before the word cornbread it is going to be Southern. The title here holds true to that theory. Actually most recipes, such as this one, vary only slightly in ingredients but usually find a fork in the road when they reach the part of the recipe that reads  “technique”.

I use stoneground corn flour because, one, it tastes great and two I like the quality of the crumb in the final product. Some people use cornmeal and let sit overnight in what is called a soaker, meaning the liquid and the meal are mixed and allowed to rest overnight and then you add the soda and baking powder before baking. Kind of defeats the purpose of quick bread which is what cornbread really is. With that in mind, what seems to work well is to let the corn flour soak for twenty minutes while the pan is in the oven heating.

Heating the pan is paramount to getting the full cornbread experience.  Without heating it you will never get the crisp crust that tastes like a cross between deep fried catfish tails and bacon.  What you have never eaten the crispy tails off of deep fat fried catfish?  Why lucky you, you still have some living to do.

To be completely stubborn if you can’t bring yourself to use either  bacon grease or butter you should probably make some other bread because, really, you will be missing the point.  If you sub out the bacon grease for real butter cut down the pan warming time to twelve minutes or the butter will burn.

Makes 8 to 10 servings

4 tablespoons bacon grease

2 cups stone ground yellow corn flour

1 teaspoon sea salt or 1 1/2 teaspoons kosher salt

1/2 teaspoon baking powder

1/2 teaspoon baking soda

1 large egg

2 cups buttermilk

1. Preheat the oven to 425 degrees. Place the bacon grease in a 10 inch cast iron pan.

2. Mix the corn flour, baking soda, baking powder and salt in a mixing bowl.

3. Beat egg and add it to the buttermilk and then add the liquid to the dry ingredients and mix quickly to combine the batter.

4. Place the cast iron pan into the oven and set a time for twenty minutes.

5. Using a dry towel or oven mit remove the pan from the oven and set it on a heat proof surface. Mix the batter with one or two quick spins and gently scrap it into the pan. You may need to use the whisk to pat it down and around so it reaches the edges of the pan. Grind some fresh ground pepper over the top.

6. Place the bread into the oven for 20 minutes or until it just starts to brown. Remove from the oven and cover it with a towel for 5 minutes. Slice and serve with lots of butter.

Standard
Desserts/Sweets, dog-eared, Holiday

Persimmon Chocolate Muffins

These are a favorite of mine.  Chocolate and persimmon go together with buckwheat in the best way possible.   This recipe is adapted from one in the book Good to the Grain by Kim Boyce which is a really good guide to teaching how to incorporate whole grains into your baked goods.

Makes 12 muffins

1 pound persimmon pulp

6 tablespoons unsalted butter

1/2 cup light brown sugar

2 eggs

1/2 cup buttermilk or plain yogurt

1 cup buckwheat flour

1 1/2 cup all purpose flour

1/4 cup + 2 tablespoons coco powder

2 teaspoons baking powder

1 teaspoon kosher salt

1/2 teaspoon baking soda

4 ounces of bittersweet chocolate chips or chop 4 ounces with a knife

1. Preheat the oven to 350 degrees. Grease muffin liners and put them in the tins.

2. In the bowl of a mixer cream the butter with the light brown sugar. Add the eggs and mix. Scrape down the sides as necessary. Now add the buttermilk and persimmon pulp.

3. Mix until combined. Scrap down the sides.

4. Combine the flours, baking powder and soda along with the coco powder and the salt in a bowl, stir it to mix. Add it to the wet ingredients and mix until just combined. Scrap down the sides.

5. Mix and add the chocolate chips. Mix until combined. Fill the muffin liners until 2/3 full.

6. Bake in a preheated 350˚ F oven for 35 minutes.

Standard