
I have cooked with whole grains for a long time. My fascination began, simply enough, with bulgur wheat used to make tabouleh. It was a gateway to all sorts of other grains; winter wheat, soft summer wheat, oat groats, farro, you get the idea. There are lots of grains readily available that a few short years ago were very difficult to locate. A good earthy health food store went a long way to rectifying the shortage but now about every food store carries some sort of whole grain. Continue reading
Category Archives: Grains/Legumes
I don’t get the allure of risotto. Years ago at culinary school, every student revered the dish except me, and slowly I’ve come to hate it. It’s overrated.
I’ve practiced making it at home with the guidance of some of the best cookbook authors of the day. I stand at the stove as instructed, stirring, hot broth on the back burner, and all of the ingredients at hand. Inevitably after the required 19 minutes of stirring, ladling, and coddling as instructed, I have a pot of hot, goopy rice, but I am never impressed.
I never get tired of cooking, but eventually I did tire of making risotto.
I had given up ordering risotto in restaurants long ago for the same reasons I quit making it at home. But on a chance, just like the dollar I dropped into a slot and pulled the arm as I walked by, I ordered it. I took the gamble and it too payed off, just like the $1600 slot earlier in the day.
I don’t eat at restaurants often. Not because I don’t enjoy them – because I do – it’s more that my wife, Amy, and I splurge when we go out to eat. A few times a year we spend lots of money at a few restaurants. A weekend in Napa or New York City is perfect for this. This time we headed to Las Vegas where there are lots of great restaurants tucked within a confined space. We made plans to hit several famous chef’s restaurants. It’s what we do when we go to Vegas. Others gamble, we eat.
On a whim, we decided to go into Le Cirque, the off shoot of the famous New York City restaurant. Le Cirque is whimsical. It ’s dinner under the big top, draping curtains hanging from the ceiling like a technicolor circus tent, highlighting a huge chandelier centered in a huge circular room. No corner table. Gaudy at best but it pairs perfectly with Cirque Du Soleil playing one ring over.
As I glanced at the veritable circus around us, the ringmaster balanced hot plates on his arm and delivered them to our table. The risotto dish set in front of me was the most exquisite rice dish ever. Tender rice but with a spring to it. The acidity of the white wine, added and burned off au sec, is a perfect match for the Parmesan and the starchy rice. Brothy, but not too much so. Fine dinning at its best. It is out of place in Vegas: to simple, not garish enough. Still, that rice dish will hold a place at the front of my mind for the rest of the weekend and follow me around for a long time to come.
I arrived back home with renewed determination. I had to figure out how to make risotto like that. It’s like a three-ring circus in my kitchen: ingredients spread all around while I’m stirring and ladling and stirring and measuring and stirring some more. Another carefully measured attempt ends yet again with disappointment. How could it not? I can make a perfect pot of rice, but I can’t make risotto. No amount of hope can fix that.
I did my best to just move on. There are so many wonderful foods in this world; there is no point in getting hung up on any one failure. It’s not like anyone notices a gaping risotto hole in my cooking repertoire. And what if they did? It’s only risotto.
But I do. I notice. And for me it is an empty pan smoking over high heat. Cooking is what I do. Making food the best that I possibly can is what drives me. Once my palate has experienced something new and exciting there are no lengths to which I won’t go in order to replicate that experience.
And so I head back to the stove with another recipe for Risotto Milanese, seeking yet again that illusive pairing of a creamy texture and toothsome rice. I carefully ladle in the broth, stirring and stirring and seeking to master the ultimate balancing act.
Perfect Risotto Milanese (serves 4)
2 tsp. unsalted butter
1/2 cup yellow onion, finely diced
1/4 cup dry white wine
1 cup arborio rice
1/4 tsp kosher salt
2 3/4 cup homemade or sodium free chicken broth
1/2 tsp saffron
2 TBS. unsalted butter, cold
1/2 cup Parmegiano-Reggiano cheese, grated
1 TBS. chives, minced
- Place a 4-quart pressure cooker over medium high heat. Add the butter, and when it begins to bubble, add the onions. Sauté until the onions begin to soften.
- Add the dry white wine and bring it to a boil. Reduce the wine by half and add the rice and stir to coat. Add salt, chicken stock, and saffron, and bring the liquid to a boil.
- Lock the lid into place and bring the pressure to high. Once the pot is to pressure start a timer set for 7 minutes. Remove the pot from the heat and use the cold water release method to drop the pressure. Remove the lid.
- Stir in the chilled butter followed with the Parmesan. If the risotto is stiff, add more broth 1 TBS. at a time until you reach the desired consistency. Divide the rice into 4 bowls, garnish a little more cheese and chives. Serve immediately.
Searching for the Perfect Risotto
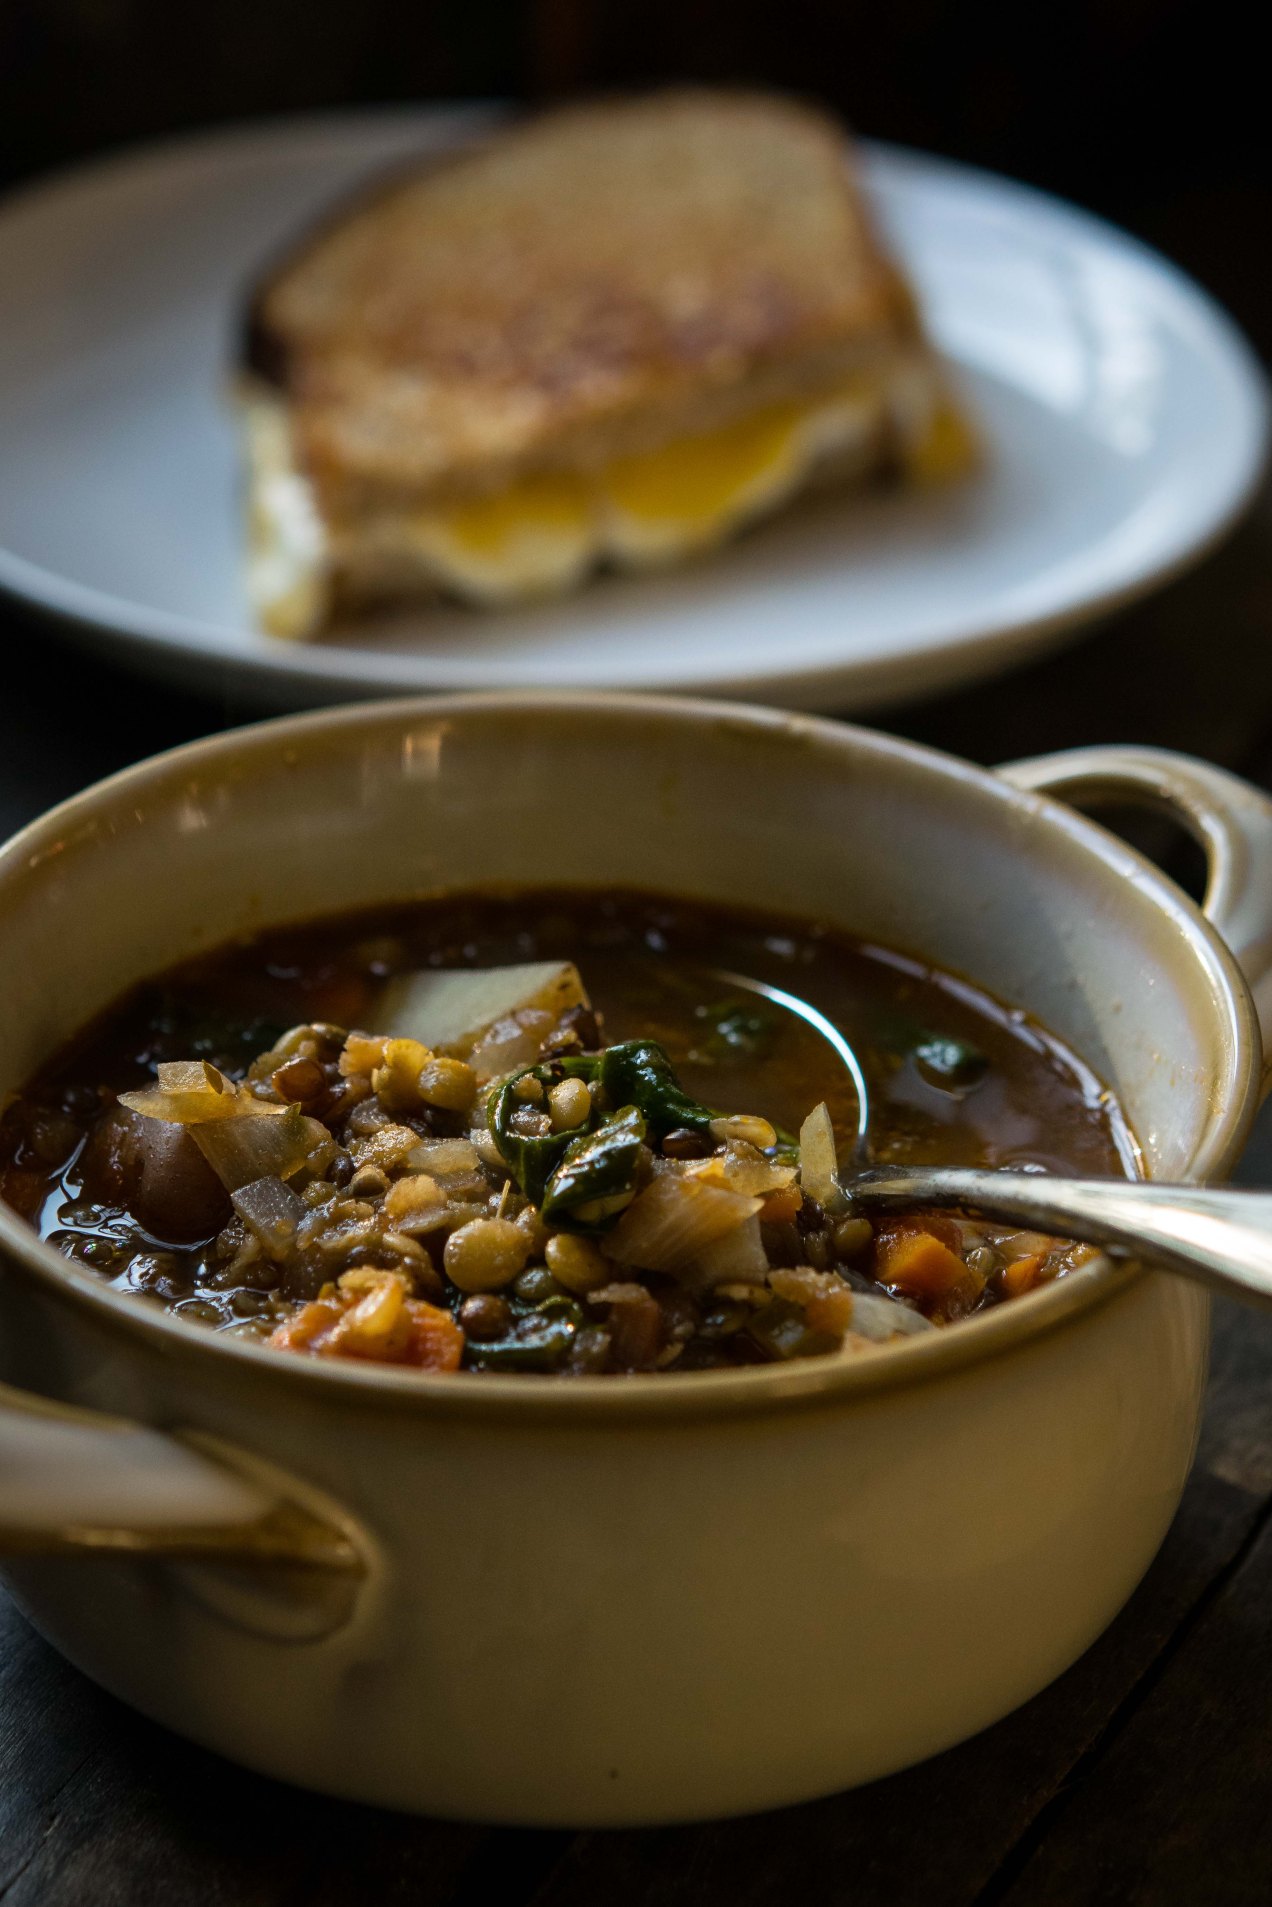
A Delicious Lentil Soup With A Dirty Little Secret
What you need to know about lentil soup is everyone has their “simple” version. Knowing this, it reminds me how easy it is to get a nutritious hot bowl of soup to the table. It also tells me that it must taste really good if there is a reason to keep publishing simple lentil soup recipes, and we do keep publishing them and it does taste good.
The hardest part of making this soup is cutting the vegetables, which with the exception of the potatoes, can be done up to two days in advance as long as the vegetables are stored in an airtight container in the refrigerator. The recipe calls for four types of lentils but the truth of the matter is, I had just a small portion of different kinds of lentils I needed to use up. It so happens that the different textures and subtle flavor differences in the legumes was a welcome addition but if you don’t have but one kind of lentil in the house the soup is still really good.
And here is the secret, soups depend on good broth but sometimes the broth isn’t strong enough. Without a good broth soups come off as watery and bland and no amount of salt is going to change this. This fact, and this fact alone, is enough of a reason to keep bouillon cubes in the pantry, or some sort of stock base, that can be used more as a seasoning then as an actual broth. The idea is to taste the soup after it has cooked and if it comes off as a little flat you add a quarter teaspoon or more of stock base or break off a small piece of bouillon cube to kick up the flavor. Add the base to the pot, let the it dissolve, stir, and taste again. Keep adding a small piece if needed until the soup is delicious. Get the picture? It works, makes the soup more exciting, even if it is a dirty little secret.

©Tom Hirschfeld 2016 All Rights Reserved
4 Lentil Soup (makes 6 servings)
2 tablespoons extra-virgin olive oil
1 medium yellow onion, peeled, small dice
3 carrots, peeled and cut into thin rounds
1 large celery stalk, small dice
3 medium yellow potatoes, cubed
1 cup lentils, a mix of beluga, du pays, yellow, and red
3 garlic cloves, minced
2 tsp. fresh rosemary, minced
1 tsp. dried oregano
2 tsp. fresh thyme
1 cup crushed tomatoes
salt
pepper
vegan sodium free bouillon cube
5 cups homemade vegetable stock or no-sodium vegetable stock
2 handfuls baby spinach
1.Place a 3 1/2 quart (3.5l) enameled Dutch oven over medium heat and add olive oil. Once the oil is warm add onions, carrot, celery, and garlic.
2. Season with 1/2 teaspoon kosher salt. Stir, and sauté the vegetables until they are soft, about 3 minutes
3. Add oregano, thyme, and rosemary. Stir again and add potatoes and lentils. Stir. Add tomatoes, broth, and bouillon cube. Season with a pinch of salt and fresh ground pepper.
4. Bring the broth to a boil, reduce the heat to a simmer and cover. Cook for 20 to 25 minutes, or until the lentils are tender.
5. Remove the lid, taste the soup, and add any seasoning necessary. Add 2 big handfuls of fresh spinach and stir it into the soup. Once the spinach is wilted, ladle up bowls of soup and serve.
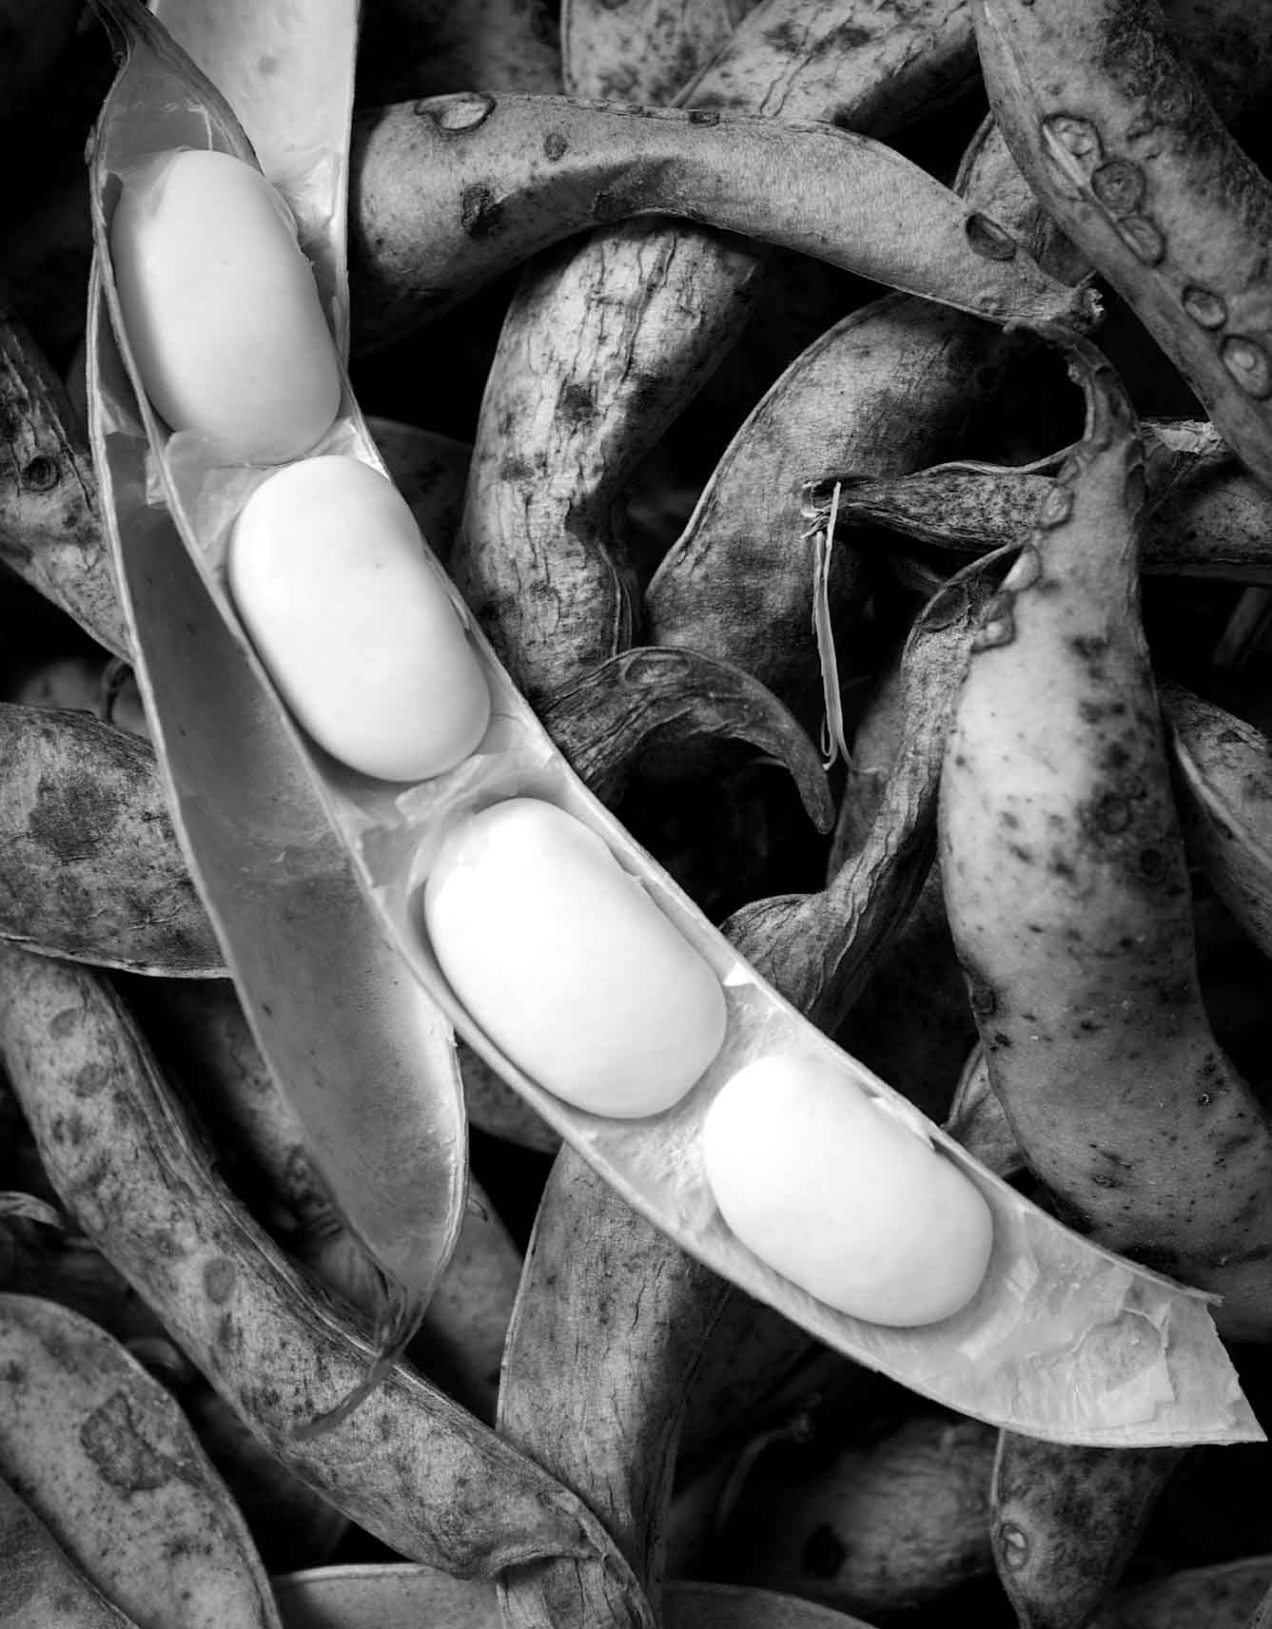
A Simple Pot Of Beans (And Tips For Pressure Cooking Them)

©Tom Hirschfeld 2016 all rights reserved
Just about anything can be cooked in a pressure cooker. It does lots of things well. Stews, roasts, soups and one pots all come to the table hot and delicious. Even so, what really keeps the pressure cooker on the stove top is the basics. A pressure cooker cooks beans, grains, rice, and stocks effortlessly and it cooks them perfect every time. A pressure cooker is a natural in the kitchen. Not only that, as everybody knows, the pressure cooker saves time and when it comes to cooking beans it saves lots of time.
Bean Myths
We live in a world of bean myths. A world where bits of anecdotal information is passed from one generation of cooks to another. Dried beans carry suitcases full of informational baggage around with each and every pound. But what is truth and what is fiction and how should it all be sorted out?
Dried beans
There are a lot of choices when it comes to the kinds of beans you choose to cook. There are all the traditional beans -‑ black, pinto, garbanzo, navy, and kidney but there are also limitless kinds of heirloom beans with fancy names like Tiger Eye, Eye of the Goat, and Snowcap. There are even more.
When combined with a grain, more often then not rice, beans make a complete protein. This makes beans one of the least expensive healthy foods to put onto the stove. Combine them with a few spices and herbs and it becomes a flavorful dish the whole family will love.
To buy the best beans frequent a grocery that has a high turnover of dried beans. The newer the bean the better it cooks. Beans that have been around for a long time might not ever soften no matter how long you cook them. It pays to pay a little extra for good quality beans.
There are other legumes too. Split peas, lentils, and field peas cook up just as wonderfully in a pressure cooker as any of their cousins mentioned above. These legumes don’t need any kind of soak either, they can go right into the pot and cook in no time at all.
To Soak or Not to Soak?
This is a personal question. It is up to the cook whether or not to soak the beans overnight. In pressure cooker you do not need to soak the beans but there may be reasons why you want to.
One reason would be how are the beans going to be used. If they are to be pureed soaking isn’t necessary but if they are to be left whole a pressure cooker often splits beans leaving them cracked. If this is important then soak the beans.
Under pressure dried beans are cooked in minutes. Not something that can happen when they are cooked traditionally. The question becomes one of digestibility. If the beans are soaked a good deal of the gas causing chemical, phytic acid, is leached out into the soaking water which is discarded and fresh water is then added for cooking. If gastrointestinal issues are a factor presoaking is mandatory.
So while you can eliminate the soaking water when pressure cooking here is another reason it might not be a good idea. Almost any presoaked bean cooks in 10 to 14 minutes in a pressure cooker. That is what is amazing. Cooked delicious beans in such a short amount of time!
A Quick Soak
If you should forget to soak you beans you can still get a pot of beans to the table with a quick soak. Simply put the amount of beans you want to cook into the pressure cooker and for every 1 cup of beans add 4 cups of water. Bring the water to a boil and lock on the pressure cooker lid. Bring to pressure and set a timer for 2 minutes. When the timer sound turn off the heat and let the beans sit for 20 minutes or until the pressure has released. Drain the soaking liquid and proceed.
Salt
There is an old wives tale about salt and beans. It says that salting beans extends their cooking time and makes the beans tough. It does not. Salting beans is paramount to great tasting beans. It is best to salt them during the soak time. About 2 teaspoons of salt per 4 cups of water is sufficient.
Foaming
Foaming is always a concern when using a pressure cooker. Foam carries particulate which can lodge and clog the pressure valves. It is best to add a tablespoon of oil or fat to the cooking liquid. This will help to prevent foaming. It is also best to use a natural or cold water release beans for the same reasons.
When To Add Acids
Tomato sauce and vinegars are often added to beans for flavor. The acids in these products can cause the beans to toughen and take longer to cook. It all depends on how much you add. A can of tomato sauce is going to affect the cooking time, a tablespoon probably not. Nevertheless, it is always best to add any of these products toward the end of the cooking time.
Baking Soda
There is no good reason to add baking soda to beans.
A Simple Pot Of Beans
2 cups pinto beans, rinsed and picked over for debris soaked in 8 cups of salted water for 4 hours to overnight
1 small yellow onion, peeled, small dice (about 3/4 cup)
3 garlic cloves, minced (about 1 TB.)
1 tsp. kosher salt
1 bay leaf
[1/2] tsp. fresh ground black pepper
- Drain the beans into a colander and strain. Rinse the beans.
- Place the beans into a 6 quart (5.51l) or larger pressure cooker. Add enough water to cover the beans by about 1-inch (2.5cm) about 5 or 6 cups.
- Add onion, cloves, garlic, salt, bay leaf, and pepper to the pot. Bring the water to a boil over medium high heat (traditional)/high(electric).
- Lock on the lid, bring the pressure to level 2(traditional)/high (electric). Set a timer for 10 to 12 minutes.
- After the time sounds either perform a natural or quick release. Serve or cool and refrigerate beans until needed.
I often wonder what makes a recipe so good it goes viral. I am sure it’s lots of factors. Sometimes it’s the recipe itself, other times it is what the author expresses in words through their post, and sometimes it is simply because the author is very famous. This recipe, originally posted on the blog My New Roots, has shown up on lots of other sites and was even a Genius Recipe on Food 52, and rightly so. At the very least it has gone viral in my circles.
There are lots of things to like about this bread, like stacking it with thinly sliced crisp cucumbers, topped with oily mackerel, shallots, and parsley like in the picture above. I also like it with thick cut bacon and peas shoots, or simply toasted and topped with butter and lingonberry jam. It is delicious bread. I even bake it on my Big Green Egg to give it a more authentic, and Danish, baked-in-the-dying-embers of a wood fired oven flavor.
My only problem is if I make the loaf of bread following the original recipe it comes up short. I heard the same words of disappointment from others who tried it too. The bread can be fussy, difficult to cut, crumbles, and becomes dry. Many I know have given up making it.
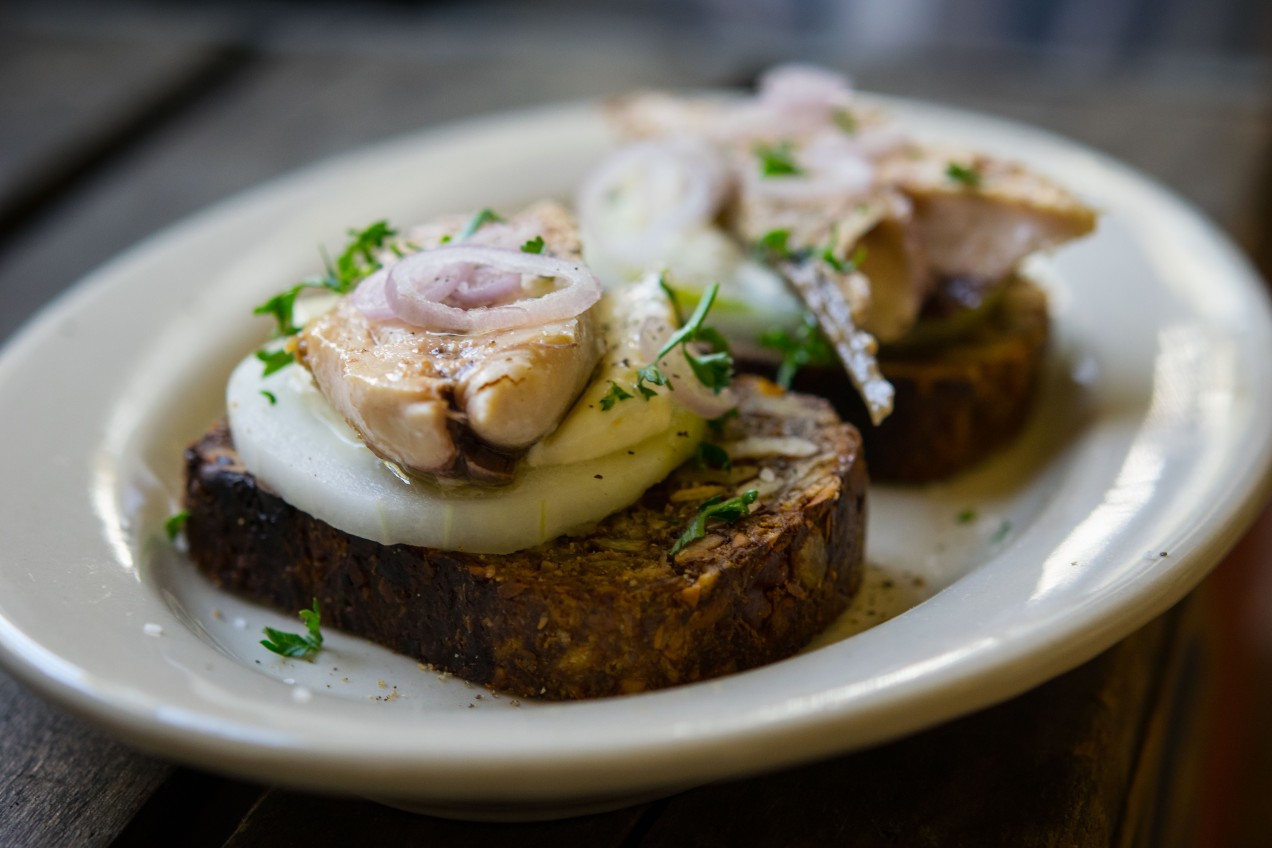
One of my favorite ways to top this bread is with thin slices of cucmber, mackeral, parsley, and shallot.
I am sure the loaf bakes up perfect and to the satisfaction of many people every time. It doesn’t for me, but I understand when it comes to cooking and baking there are so many variables that to place fault elsewhere is simply not taking responsibility for ones own abilities. After all, it is up to the cook to get what they want from a recipe. It is why you need to know how to cook rather then simply follow directions. Just like different musicians playing the same piece of sheet music. The song sounds very different depending on the players abilities. It is only because there are so many things about this loaf of bread I like that I stuck with it, experimented with it, until I got the loaf of bread I wanted, until I heard the song I wanted to hear.
I didn’t change much, although I used pumpkin seeds instead of sunflower and ground psyllium instead of seeds and I ground a portion of the oats and pumpkin seeds to create a finer crumb in the end product. And while I use coconut oil in some recipes I didn’t use it here nor did I use maple syrup but instead brown rice syrup was substituted. For me all these small touches made for a more manageable loaf in the end.
The fact is, made from the original recipe this loaf of bread is delicious, the taste is very satisfying, nutty, feels good to eat, and it is nourishing. I simply made adjustments which gave me the product I wanted to eat. Rest assured though, for those on a restricted diet, and those that aren’t, this seed bread is an important find. It’s worth practicing to get it right.

Seed bread packed into a pate mold and waiting to be wrapped up for a rest before baking. Notice the parchment handles.

This recipe creates a less delicate loaf.
Seed and Grain Bread (adapted from My New Roots)
1 cup unsalted pumpkin seeds (1/2 cup coarsely ground)
1/2 cup golden flax meal, ground
1/2 cup walnuts
1 1/2 cups rolled oats ( I generally grind 1/2 cup coarsely in a coffee grinder )
2 tablespoons chia seeds
3 tablespoons powdered psyllium
1 teaspoon kosher salt
1 tablespoons brown rice syrup or whatever syrup you have and want to use
3 tablespoons spectrum vegetable shortening (it’s palm oil and non-hydrogentated) or unsalted butter
1 1/2 cups hot water
1. Combine all the ingredients in a bowl. Using your hands work the mass until the shortening or butter and the other ingredients are evenly distributed.
2. Line a pate mold, or small loaf pan, with parchment. To remove air bubbles, literally, pack the dough into a 3 x 4 x 10 pate mold. Wrap the whole thing in plastic wrap and let it sit for 1 to 2 hours.
3, Heat the oven to 350˚F. Remove the plastic wrap, place the loaf pan onto a baking sheet and bake the bread for 25 minutes.
4. At the end of the baking time remove the tray from the oven and using excess parchment paper as handle lift the loaf from the pan. Place the loaf, with the parchment still under it, back onto the sheet tray and bake the bread for another 20 minutes.
5. When the timer sounds, roll the loaf so that a new side is flush with the sheet tray. Bake another twenty minutes. Do this until all four sides have been baked against the sheet tray.
6. Remove from the oven and let the bread cool completely before cutting.
7. The bread is best toasted. Store in the fridge wrapped in plastic wrap.
Note: recently I baked a loaf on my Big Green Egg. It is a fantastic way to bake this loaf. Much like it might be baked in a shop in Europe using the dying embers of a wood fired oven.
A Life-Changing Loaf of Bread (Redux)
Three Bean Salad, Redux

Now that picnic season is upon us, I get nostalgic over classic summertime fare. There is nothing quite like a family reunion over fried chicken and a potluck dinner, tables threatening to buckle under the weight of all the CorningWare and Pyrex.
Of course, there are the old favorites: green bean casserole, scalloped potatoes, pea salad with bacon and mayonnaise, three bean salad, and most certainly a mustardy potato salad — and, if luck is with me, an old-fashioned custard pie sprinkled with a little nutmeg. I love all these foods — but this year, I want something new. Continue reading

If my extended family’s eating habits are an indication as to what the preferred meat was on my grandparents and great grandparents farm then it is obvious to me I come from a long line of pork eaters. It’s not as if this matters or that I need some sort of familial approval for my love of the beast because I don’t. I claim it as my heritage after all but I’ll just say it anyway for clarity, I…love…pork.
I love pork for its possibilities, its versatility, and most importantly, it’s flavor. From snout to hocks or bacon to ham there are more uses for the pig then any other animal I know and one of my favorite uses is as a seasoning. My definition and what I mean by seasoning is not simply tossing a couple of strips of bacon in with the green beans and calling it a day. No, the pork isn’t there for a cameo but instead has an important supporting role, one in which it could be nominated for an award.
Don’t get me wrong I enjoy a good pork dinner, something like Edna Lewis’s Boiled Pork (think Pot eu Feu) really floats my boat but as I try to reduce the amount of animal protein I consume I often look to the example of Italian ragus or Asian dishes where animal protein, quite literally, plays second fiddle to the grains or noodles on the platter. The pork is there to enhance and flavor the dish. Sure this is done for economy, just like adding bread or oats to meatloaf, and who doesn’t like save a few bucks or at the very least feed more mouths for the same price. Not only that but if you buy less quantity then you can afford better quality, at least this has always been my way of thinking.
When it comes to pork quality matters. If you buy pork that is enhanced with sodium triphosphate, a common practice at big box stores, it won’t caramelize very well and honestly the pork tastes bland. It is done to help the meat retain moisture but they add it because the producers have made pork to lean. If you buy pork with a little higher fat content you don’t need the moisture retainer. Not only that but when pork is raised in a more sustainable fashion it just taste better. It taste better because of what the animals eat. It is about the animals diet after all. I am all about how my food taste and if sustainability happens to be a byproduct then, wonderful. I mean when I bite into good pork it immediately transports me to my grandparents farm, sitting outside under a shade tree eating a farm dinner on a beautiful summer’s eve and it reminds me exactly how pork is supposed to taste.
Over the years I have had different fascinations with different types of cured pork. I mean the list of possibilities is big, you have bacon, ham, Tasso, Serrano, prosciutto, pancetta, guanciale all on top of any number of sausages. All used as seasonings and all just a few of the options that can confront you. The wonderful thing is there are many books that will teach you how to cure many of these products at home (Michael Ruhlman’s Charcuterie comes to mind) and many of the processes are surprisingly simple. In fact no special equipment is required other then a good sharp knife(which I don’t consider special equipment).


Polenta with Peas and Sausage (serves 6)
one recipe of Carlo Middione’s Polenta Facile
10 ounces pork tenderloin, sirloin or loin
4 to 5 ounces pancetta
2 teaspoons red wine vinegar
a scrape or two of whole nutmeg
a handful of parsley leaves
3 cloves garlic
2 tablespoons tomato paste
1 teaspoon dried thyme
1/2 teaspoon dried rosemary
1 bay leaf
kosher salt
fresh ground pepper
1 garlic clove, minced
1/2 cup carrots, small dice
1/2 cup onion, small dice
1/2 cup white wine
2 cups pork stock or chicken stock
1 1/2 cups fresh peas or frozen
chopped chives and parsley
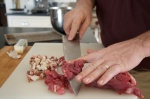
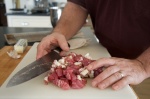
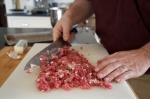
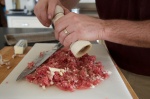
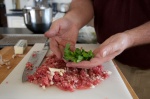
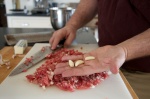
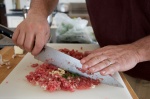
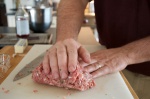
1. Lay your pork out onto a large cutting board. Cut the pork and pancetta into thin strips then into cubes. Spread the pork out so it is flat instead of in one big pile. It’s ok if it isn’t in one single layer you just don’t want a big pile. Place the palm of you hand, as shown in the picture, across the blade of the knife making sure to keep your fingers up and you hand flat. This will keep you from cutting your hand if the knife slips. So fingers up! What you are doing is creating a hinge of sorts because you want to keep the tip of the knife on the board and in doing so it lets you apply more cutting force. Run the knife through the pork several times and until you have minced it to a coarse mince.
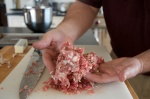
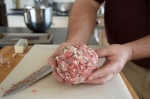
2. Add the garlic cloves, parsley, a teaspoon of salt, a few grinds of pepper and the nutmeg. Mince the seasonings into the pork until you have a fine mince. Add the red wine vinegar and knead it into the sausage. Ball up the sausage, put it in a bowl and let it get funky in the fridge for an hour or two.
3. Start the polenta. I let my polenta cook for almost three hours. I was using an heirloom corn I grew last year called Henry Moore. It took a long time to cook but it was creamy beyond my wildest expectations. So take your time with the polenta, cook any bitterness out of it and let it do its thing.
4. When the polenta is close to being finished start the sauce by placing a large 12 inch saute pan over medium high heat. When it is hot add a glug or two of oil to coat the bottom of the pan. Brown the sausage. Once the sausage is brown remove it to a plate. Be careful not to burn the fond on the bottom of the pan. Add the onions and carrots and cook them gently until they just begin to wilt.
5. Add the tomato paste, dried thyme, rosemary, garlic and bay leaf. Stir until fragrant then add the white wine. Let the wine burn off the alcohol and then add the stock. Season and taste. Bring it to a boil and reduce it by half. Taste again and adjust the seasoning.
6. Add the sausage and peas. Heat until the peas are warmed through. Taste and adjust the seasoning. Add a tablespoon of chopped chives and parsley. Stir.
7. Spread the polenta on a platter, top with the peas and sausage, and serve.
Seasoning with Pork: Polenta with Peas and Pork Sausage
Chicken, Sausage and Red Pepper Paella
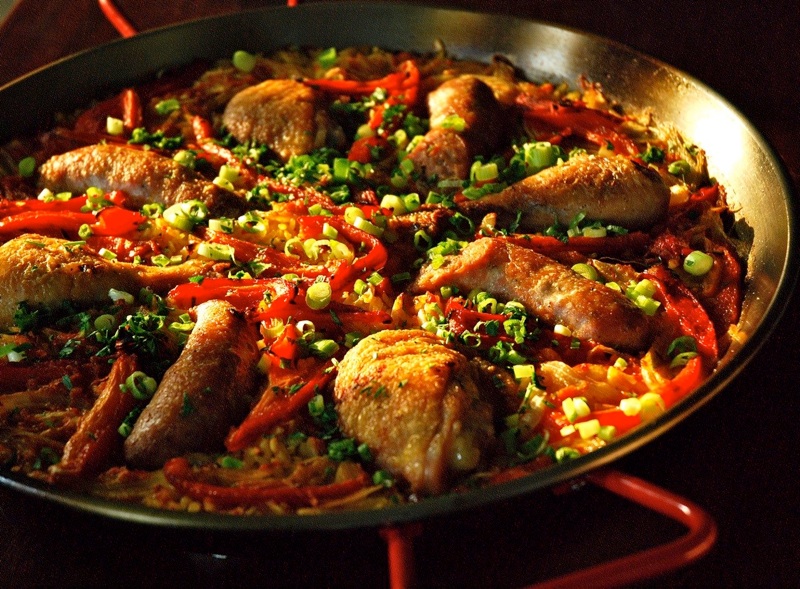 Paella to me is the ultimate one pot meal. It also is the time of year where I am not ready for a stew but want something more substantial than the usual summer fare. Paella is a great answer. Although paella is considered Spanish I think this one is more Mediterranean. I use Italian sausages but fresh chorizo would be good, the important part is that the sausage isn’t dry cured or it would just be drier in this case. I also use arborio rice, but you could use the Spanish version of this as well.
SERVES 4-6
2 bell peppers
1/4 cup extra virgin olive oil
2 chicken legs, seasoned with salt and pepper
2 Italian sausages
2 chicken thighs, seasoned with salt and pepper
1 onion, julienned
1 fennel bulb, tops trimmed, core removed and sliced very thinly
1/4 cup garlic, peeled and thinly sliced
2 bay leaves
3 1/2 cups warm water
pinch of saffron, crumbled
3 Roma tomatoes, cut in half from top to bottom, and grated, large whole of a box grater, leaving the skin behind
1/4 cup dry white wine
2 cups arborio rice
1 1/2 teaspoon aleppo pepper
1 tablespoon flat leaf parsley, minced
2 tablespoons green onions, sliced into thin rings
kosher salt and fresh ground pepper
- Sometime during the day or when ever you have time, turn a gas burner to high. If you don’t have a gas burner turn your oven to broil and place a rack at the highest level you can. Char the peppers, top, bottom and all on sides. The idea is to char or blacken the skin without cooking the pepper through.
- Place the peppers into a container with a lid. Set aside for at least 20 minutes. Crumble the saffron into the warm water.
- If you roasted them properly the skins will easily peel right off with out running them under water.
- Peel, seed and core the peppers and then julienne them into thick strips.
- Preheat the oven to 400 degrees. Place a 16 inch paella pan or a 14 inch saute pan over medium high heat. Add the olive oil and once it is hot add the chicken, skin side down, and then the sausages. Brown them thoroughly and then remove them to a plate. You do not want them to cook all the way through. They will finish cooking in the oven so you just want to brown them.
- Turn the heat to medium and add the onion and fennel. Season them with healthy pinch of salt and pepper. Cook until they start to soften. Add the garlic, aleppo pepper and bay leaves, once fragrant add the white wine and grated tomatoes and cook for a minute or two letting the alcohol burn off. Add the saffron water and rice. Season again with a healthy pinch salt and pepper. Gently shake the pan to level out the rice. Place the chicken into the pan and arrange the red peppers around the chicken.
- Bring to a boil, place the pan into the oven and set the timer for 15 minutes. Cut the sausages in half. Once the timer goes off add the sausages and place the pan back into the oven. Set the timer for 10 minutes.
- Once the timer goes off remove the pan from the oven and place a clean towel over the top. Let the dish rest for five minutes, remove the towel and garnish with parsley and green onions, then serve.
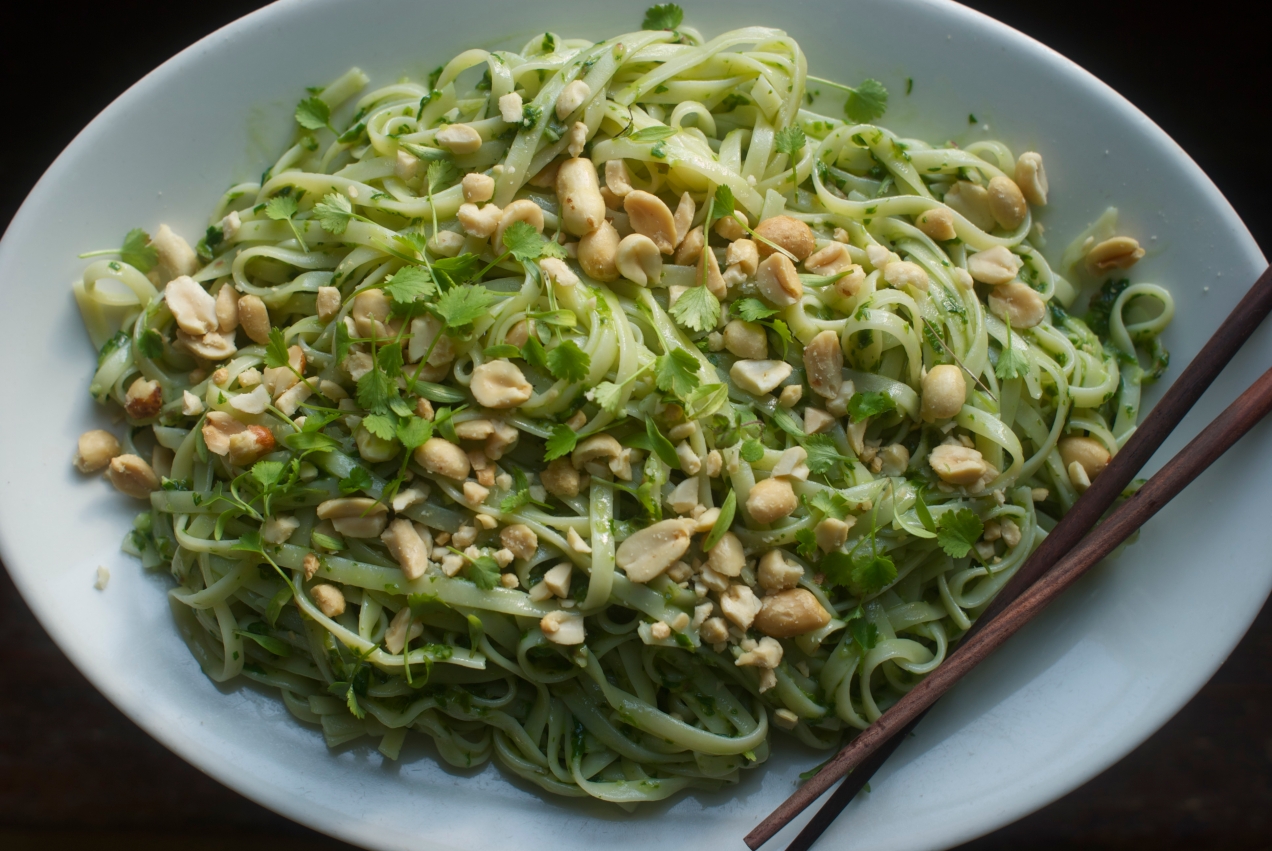
Thai Pesto with Brown Rice Noodles

This dish has a history that is connected to two other dishes. The two dishes were last summer favorites and they were a pesto recipe from Saveur magazine, Trofie al Pesto, that called for green beans and potatoes. It is, and still is, by far my favorite Italian pesto dish. The second dish comes from Momofuku, a favorite cookbook, and it is a recipe called Scallion Noodles.
What both dishes do is chop or process the pesto ingredients fine enough that when tossed with hot noodles they cook. One of the things I don’t like about most pesto dishes is the raw garlic taste that you carry with you the rest of the meal and maybe even the rest of the day. These two recipes have solved that problem.
The pesto created here carries on with the finely chopped tradition but is also packed with a little more unami by its use of the traditional Thai flavors of fish sauce and lime.
If you want to round out this meal a steamer tray full of potstickers and a Thai style salad would definitely do the trick. Continue reading
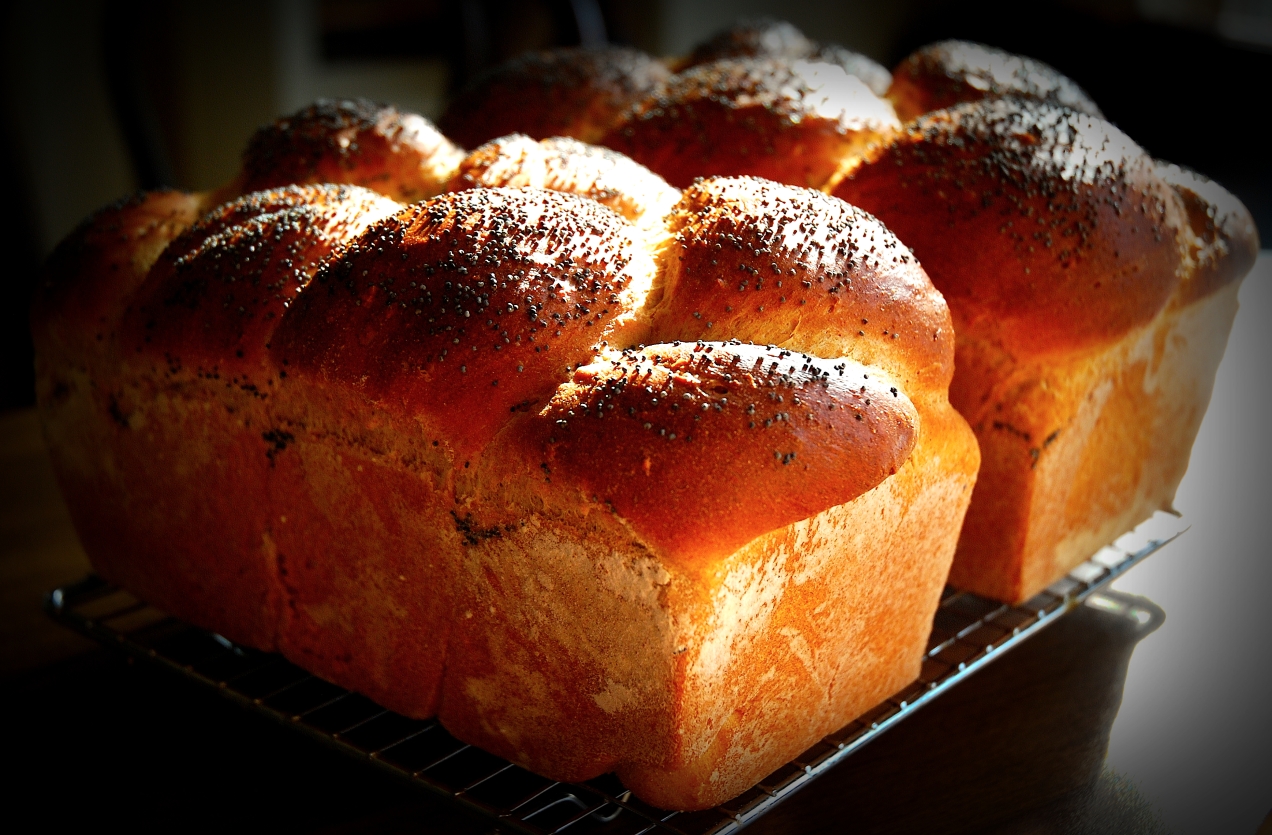
Farmhouse Whole Wheat
There are so many different kinds of bread. You could make sourdough where you feed a starter flour to grow it and keep it alive, you can retard loaves in the refrigerator overnight, there are paté fermentes, bigas and all kinds of other preferments and sure it is great to have knowledge of all these breads but at the same time it is nice to have a tried and true everyday bread. A bread with some shelf life, a bread that little kids like and one that is good with which to make a variety of sandwiches.
For me this is that loaf. It debunked the idea that my two girls would only eat white bread. They love it. It fits into my notion that I won’t make bread that isn’t at least 75 percent whole wheat. It makes two loaves that will be around just long enough that you won’t need to throw it out because it is old.
Be sure to buy a fine grind whole wheat flour and make sure to buy it at a store with high turnover of its whole wheat. Countless times I have brought a bag home only to open it and it is rancid. Whole wheat flour should smell like a wheat field not rancid oil or some other off smell.
I like to braid this loaf for two reasons. One it looks pretty and two, when I make this loaf on a Sunday it is nice to bake it about two hour before dinner, remove it from the oven to cool a little, then serve it warm and let people tear off a hunk. It will tear at the braids like dinner rolls would. Continue reading
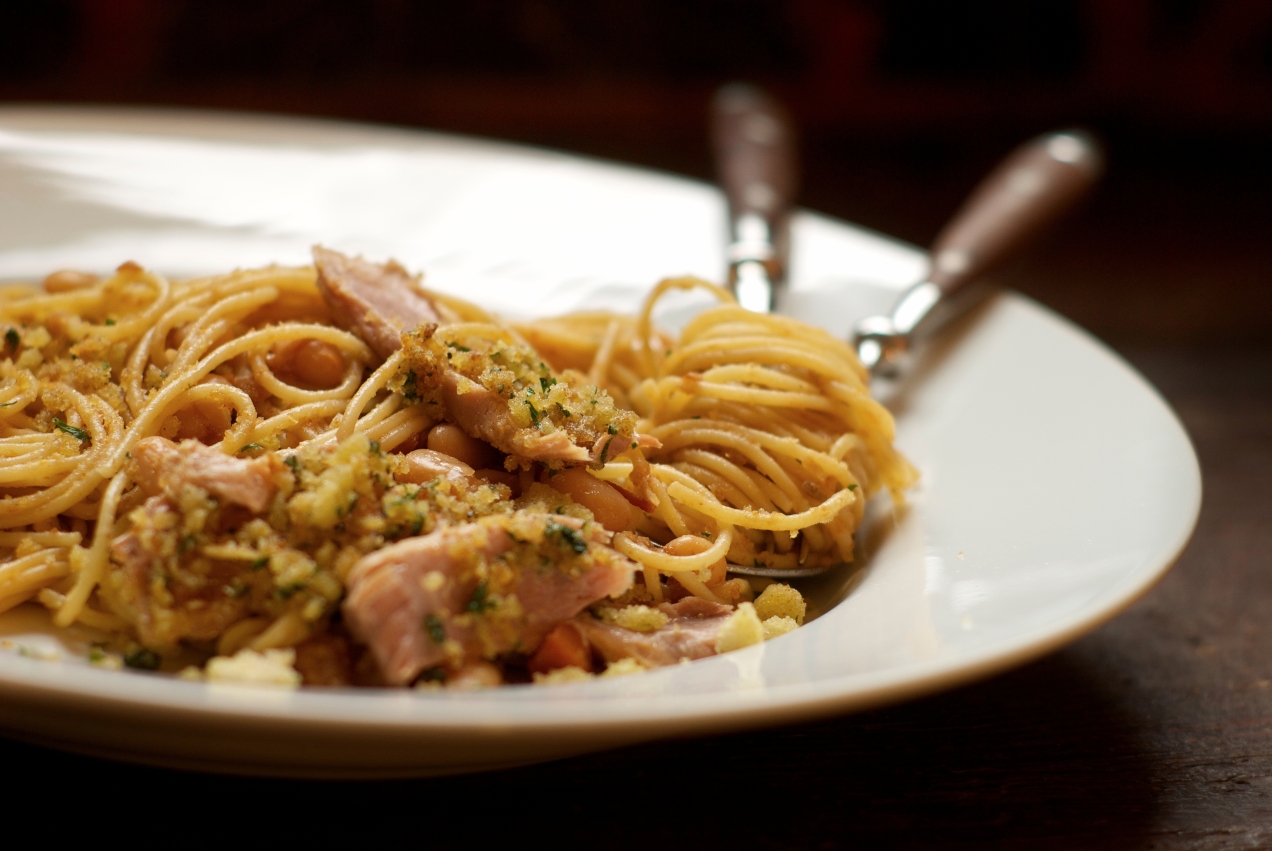
Tuna with White Beans and Spaghetti
White beans and tuna have always been combined in salads and pasta and have long been purveyor’s of pantry dinners in Italy. I have taken up the habit of pantry pasta myself and while I don’t keep many canned goods I do keep tomato sauce, tuna in olive oil, dried beans and pasta on hand.
The cheese rind is imperative here. It is to the broth what bones are to stock. Besides you know it makes you mad to have to pay for this usually unusable part. So here is your opportunity. I Always try to have at least one cheese rind on hand and just store it in the fridge amongst the other cheeses.
This is not a skillet pasta but a long simmering sauce because it takes some time to build the flavors in the beans. As with all beans everyone has their own method to their bean madness. I have tried many and the one I use yields a tender beans with tooth. That is not to say it is crunchy or undercooked but what it means is it holds its shape while being tenders. I want to know I am eating a bean when I bite into one.
I also don’t make home made pasta for this dish because this is one time were store bought spaghetti noodles are the right choice.
I served this with a green side vegetable and after the pasta served a salad, as the Italians would.
Serves 6 to 8
2 heads of garlic, the top 1/4 inch of which has been sliced off
1/2 pound white beans
4 whole cloves of garlic, peeled and trimmed
10 sun dried tomatoes (dried, not in olive oil)
water
1/2 cup yellow onion, small dice
1/4 cup carrot, small dice
1/4 cup celery, small dice
1 1/2 teaspoons fennel seed, ground
1/4 to 1/2 teaspoon red pepper flakes
2 bay leaves
1/2 cup strained tomatoes or tomato sauce
1 each 2 x 2 inch parmesan cheese rind
olive oil
kosher salt and fresh ground pepper
1/3 cup bread crumbs, toasted in olive oil then seasoned with salt and pepper then mixed
with 1 tablespoon of minced parsley
12 oz. tuna in olive oil
1 pound spaghetti, cooked according to the instructions on the box
- Preheat the oven to 300˚F. Place the heads of garlic in a small ovenproof dish and drizzle each with olive oil then season them with salt and pepper.
- Cover the dish with foil and bake the garlic for 1 hour. At the end of the hour make sure they have taken on alight tobacco color and are tender. Cook them another 15 minutes if you need to. Once they are done remove them from the oven and set them aside.
- Place the beans, garlic cloves and the sun dried tomatoes into a sauce pan and cover by at least 2 inches of water. Place the pan over high heat and bring it to a boil and let it boil for 2 minutes. Cover and remove the pan from the heat and let it sit covered for two hours or longer.
- At the end of two hours drain the beans. Rinse out the pot. Remove the sun dried tomatoes and chop them. Place the pot over medium heat and add a good 2 tablespoons of olive oil. When it is hot add the onion, carrots and celery and let them saute until they begin to become tender. Add the fennel, bay leaves and red pepper and saute until fragrant. Add the beans, sun dried tomatoes and garlic back into the pot. Cover the beans with water by 1 inch. Add the tomato sauce and cheese rind.
- Bring the pot to a boil then reduce the heat so the liquid is at a lazy bubble. Season them with pepper. Stir occasionally to keep anything from sticking to the bottom of the pot.
- Near the end of the cooking season the beans with salt to taste and take the roasted garlic and squeeze out the garlic paste then add the paste to the beans. Stir it all in and taste. Adjust the seasoning.
- When the beans are tender cook the pasta. Once the pasta is done drain it and immediately toss the pasta with some of the oil from the tuna. Toss the beans and pasta together.
- Put the pasta into a serving bowl, top with tuna crumbles and then the bread crumbs. Serve immediately.
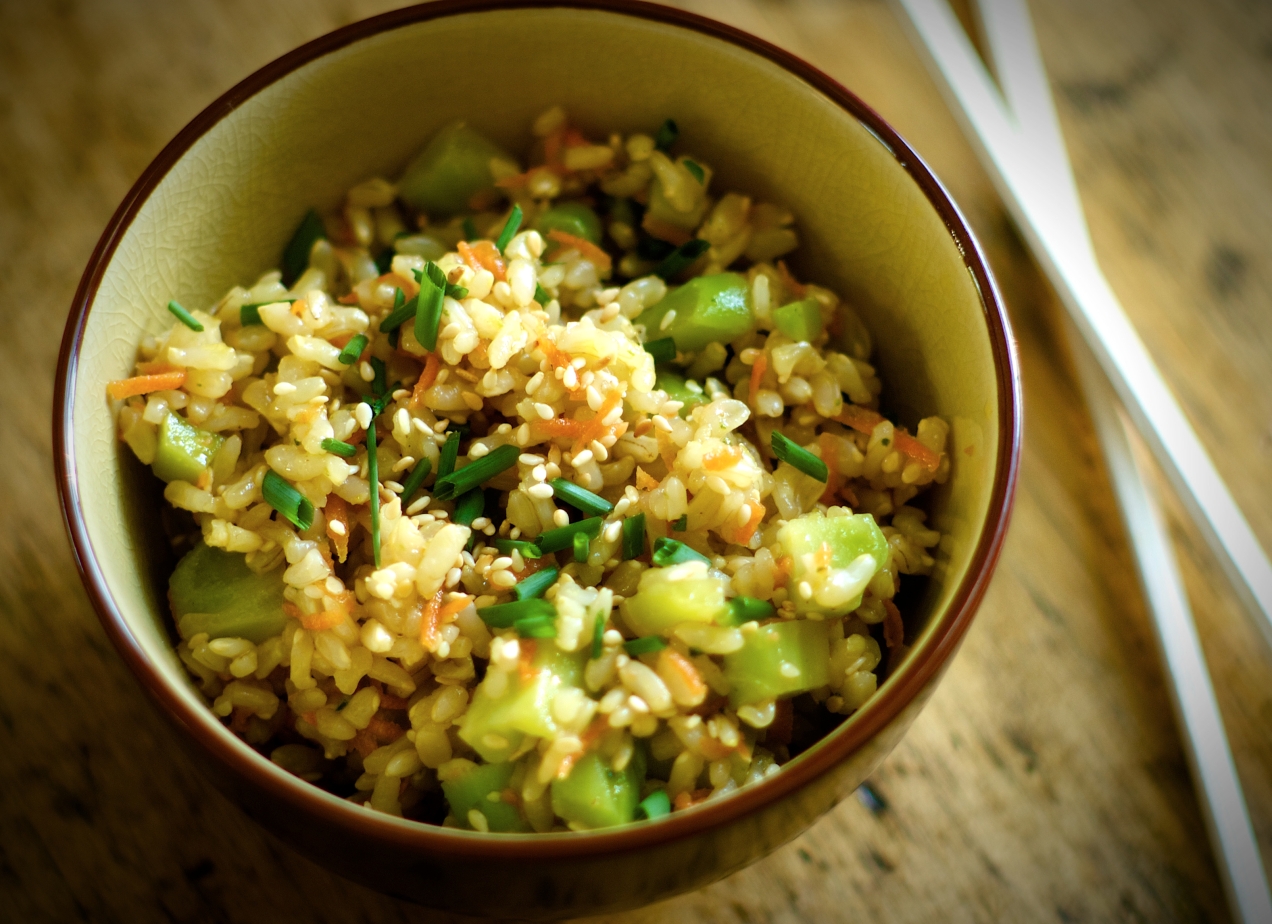
Stems and Seeds

Hippy food has long been a bastion of vegetarian eats for many reasons. Some political, some personal but in all honesty mostly because it is cheap and often utilizes every last morsel sharing some of the same philosophy as head to tail eating, ironic?, well, yes. Never mind the reasons though because that doesn’t mean it doesn’t taste great and utilizing every part means new tastes and textures from veggies you have long grown tired of.
There is nothing better than to take a bite of something and not only have it taste good but when it feels good, or nutritious, as you eat it it is all the better. Having said it time and time again there are certain dishes that hit that button and, man, there is no better eating. This salad hits that button.
So get out your tie dies and put on your birks, crank up the Dead and get in touch with your inner vegetarian, oh, and make extra because the nice thing about this salad is it is no worse for the wear the next day.
The soy ginger vinaigrette in this recipe was adapted from Jean-Georges Vongericthen’s Simple Cuisine. Learn this recipe you because will find yourself using it on everything. It is a genius recipe.
Makes 4 servings
For the vinaigrette:
2 1/2 tablespoons soy sauce
2 tablespoons lemon juice
1 teaspoon ginger, finely minced
1/3 cup canola or unflavored oil
1/3 cup extra virgin olive oil
kosher salt and fresh ground pepper
1 1/2 tablespoons water
Put all the ingredients into a pint mason jar and screw the lid on tightly. Shake the hell out of it. Set the dressing aside.
For the salad:
1 to 1 1/2 cups blanched broccoli stems, 1/4 inch dice
1/2 cup carrots, grated
3 cups cooked brown rice
1/4 cup sesame seeds
1 1/2 tablespoon chives, minced
soy ginger vinaigrette
kosher salt and fresh ground pepper
1. Place all the ingredients, except the dressing in a large bowl and toss to combine. Add 1/3 of a cup of the dressing and combine everything. Taste, adjust the salt and pepper and add more dressing if you like.
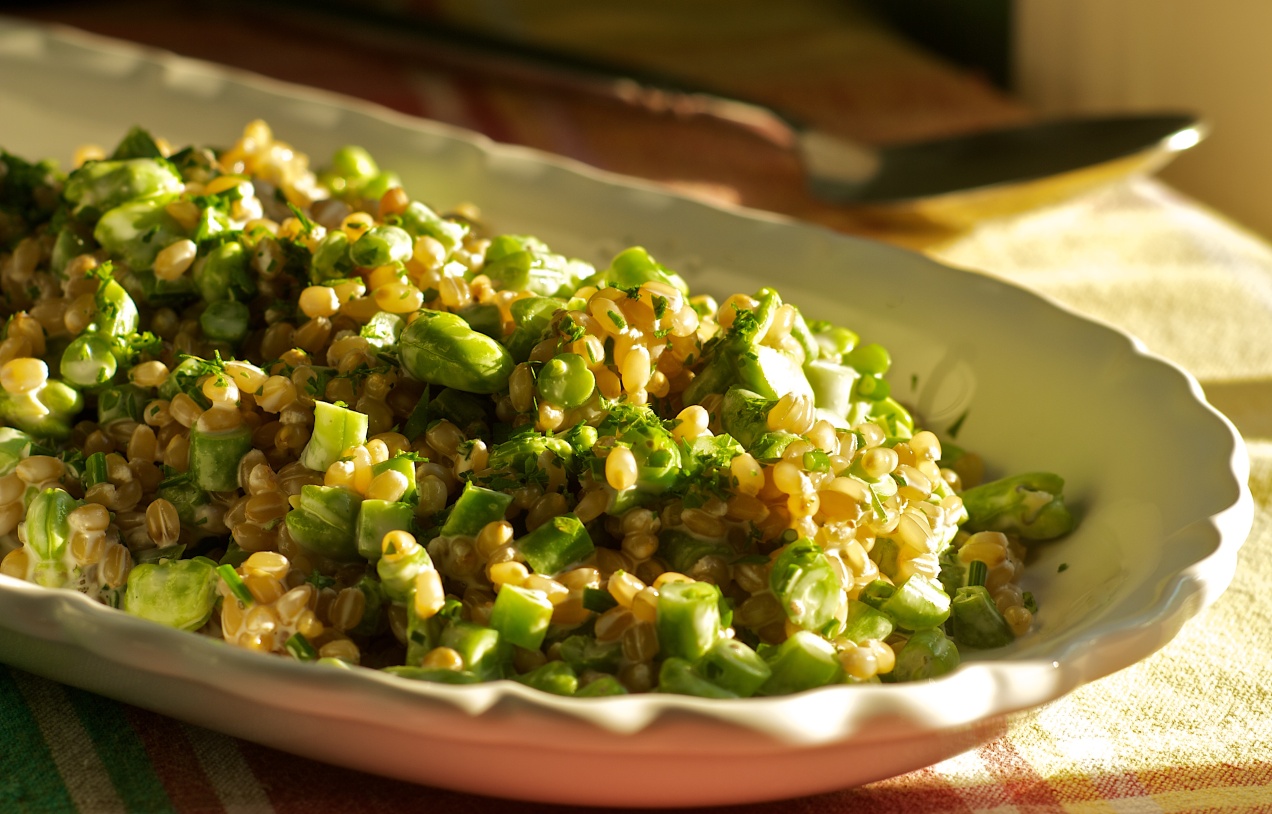
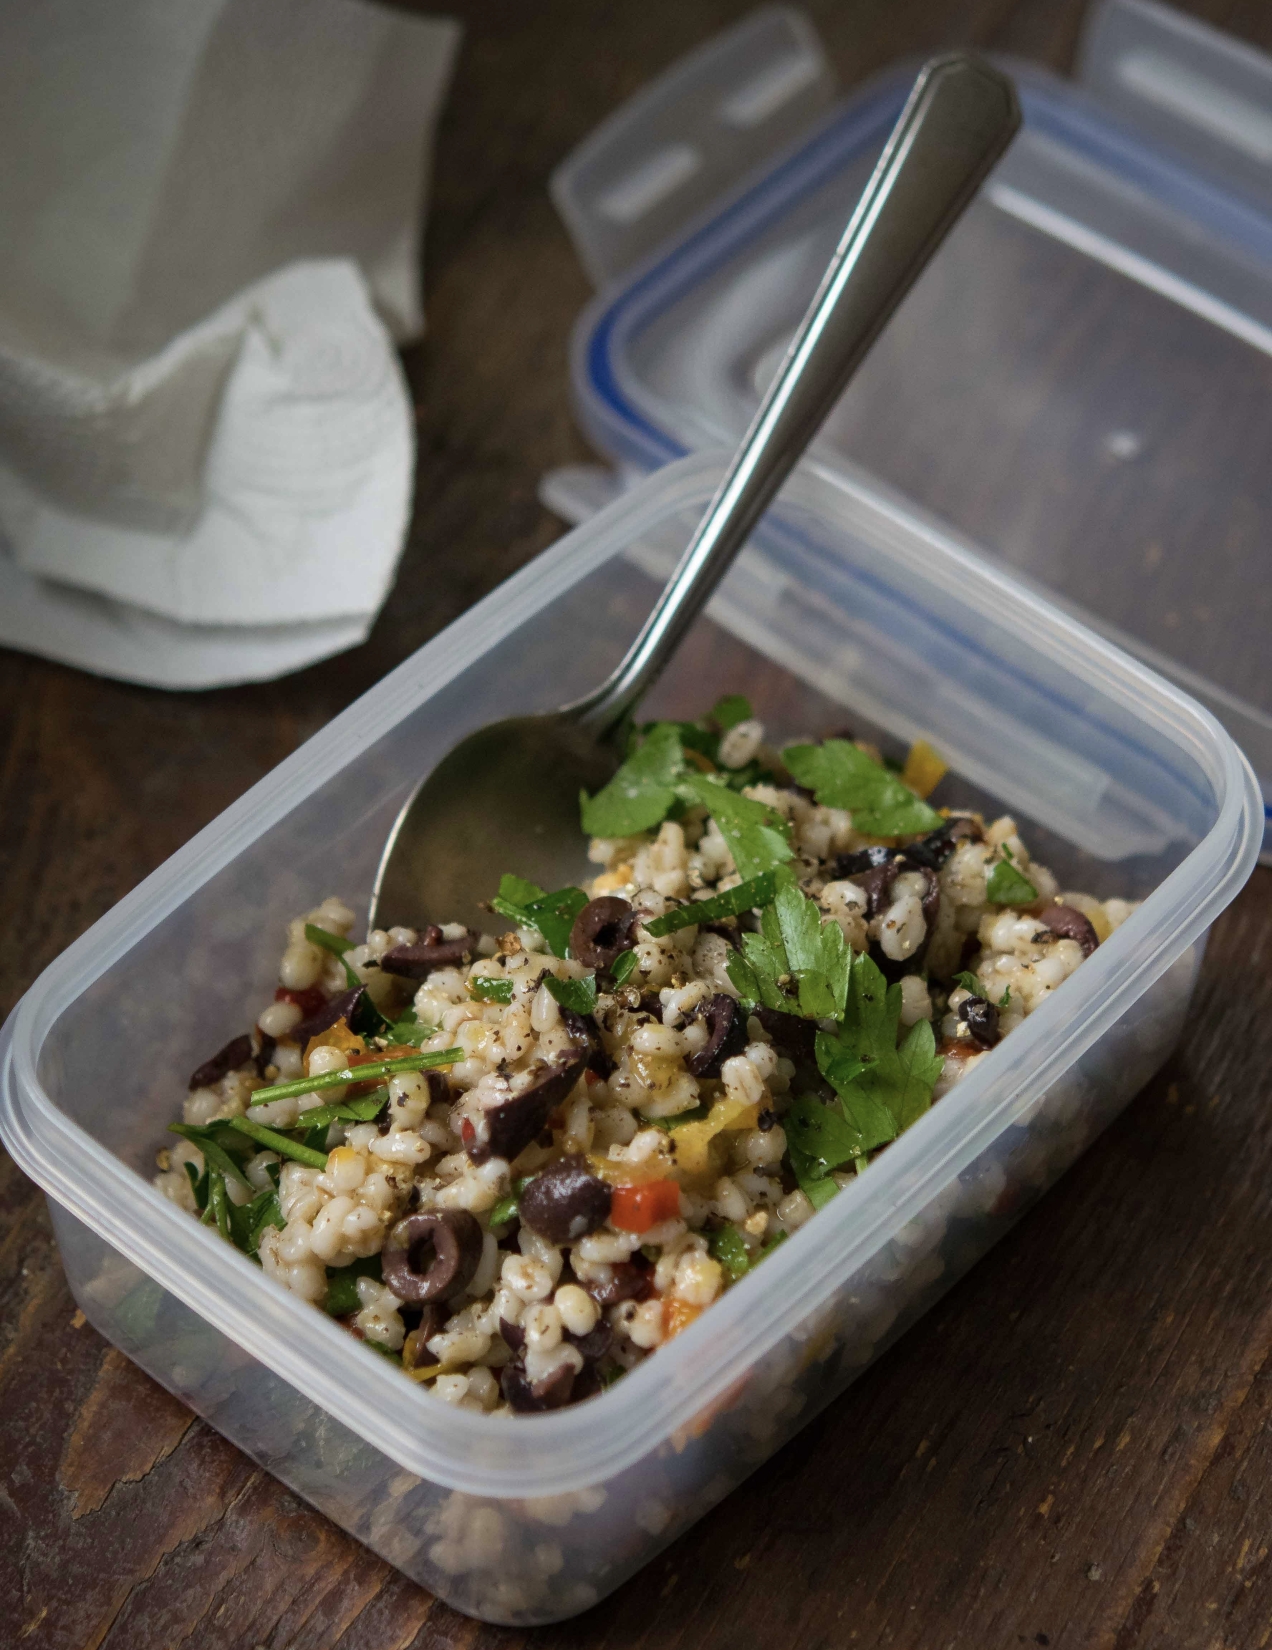
White Wheat Berry Salad with Fresh Beans
 If you have ever had fresh raw fava beans then you know the wonderful tender pop, the tender chew and the juicy flavor. It goes wonderfully here with the green beans and the dressing.
Wheat berries are another wonderful addition to your repertoire. They add a subtle chew and give the dish a pasta flavor while digesting at a lower glycemic level because they are a whole grain.
This is one of those dishes that is here because it is delicious and, luckily, it just happens to be very good for you too.
Serves 6 as a side dish
1 cup soft white wheat berries, rinsed
3/4 cup green beans, blanched and chopped into 1/4 inch pieces
1 cup fresh fava beans, lima, or edamame, shells and outer skin removed
1 1/2 tablespoons chives, chopped
2 teaspoons fresh thyme, minced
1/4 cup mayonnaise
1/3 cup buttermilk
2 teaspoons lemon juice
kosher salt and fresh ground pepper
1. Place the wheat berries into a large pot and cover them with cold water by two inches. Place the pot over high heat and bring it to a boil. Boil for two minutes then turn off the heat, cover the pot and let it sit for two hours.
2. After two hours add a couple of pinches of salt and then place the pot back over the heat and bring the berries to a boil again. Now reduce the heat to medium and let them simmer until soft, or the texture you want, about 15 minutes.
3. Drain the berries in a colander and let them cool to room temperature.
4. In a large mixing bowl combine the mayo, buttermilk and lemon juice. Season it with salt and pepper then add the thyme and chives. Add the rest of the ingredients and mix to combine. Taste and adjust the seasoning. It is nice if you can let it sit for at least a half hour to let the flavors meld and even overnight is good.
5. Serve
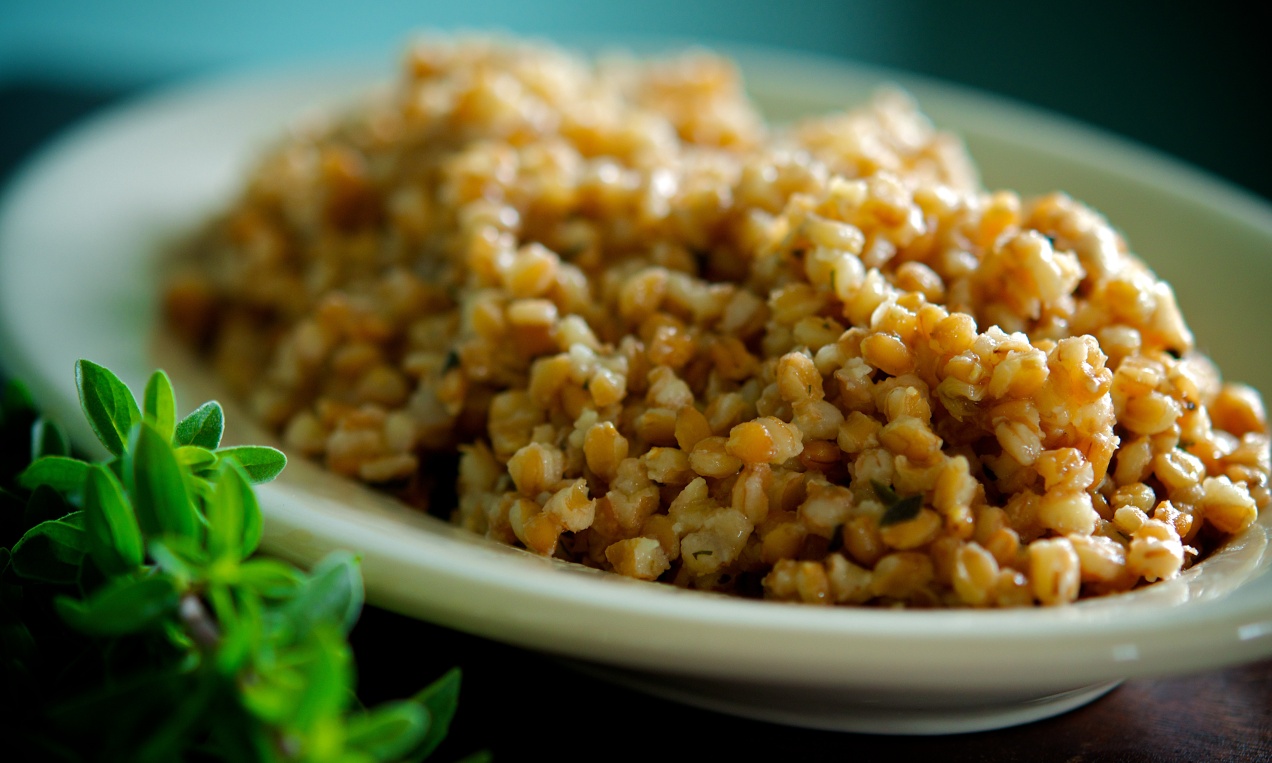
Farro and Roasted Garlic Pilaf
 The term farro can be very confusing. If you look it up you will see no one really wants to pin the tail on the donkey, and as such, all the authors of the articles seem to want to avoid naming a specific grain as farro.
People really want spelt to be farro but I can say spelt is not farro. Spelt is much larger and has a sweeter flavor to me. What I have found is farro can come in different sizes, roasted, and for lack of a better term, par cooked or pearled which means it cooks quicker.
In this recipe I use piccolo farro from Anson Mills. It is easy to cook, is extremely delicious and quite honestly I have become enamored with it as well. I think I can say with all clarity it should be spelled Pharroh because it is the food of gods. It feels nourishing to eat and is such a refreshing change, or I should say replacement, from rice or potatoes.
I always cook extra and use the grain, plain, when baking bread and I plan to save the cooking water next time and use it as well.
Serves 4 to 6
1 cup farro piccola
2 heads of garlic
1 stick unsalted butter
1 tablespoon marjoram
kosher salt
fresh ground pepper
1. Preheat the oven to 325˚F. Slice the heads of garlic across the top at a point where you will remove enough to expose as many cloves as possible but not so much that you loose a lot of the head. Usually I slice off about the top third of the head. Place the heads in a small ovenproof gratin or some other dish. Smear the heads with 1/2 teaspoon of butter and then salt and pepper them. Cover tightly with foil and bake the garlic for one hour. At the end of the hour remove the foil and bake another fifteen minutes to brown up the cloves.
2. Using a strainer rinse the farro under cold water. Place the farro into a 3 quart heavy bottomed sauce pan with a lid. Cover the farro with cold water to cover by two to three inches and add a two finger pinch of salt.
3. Place the pan over high heat and bring it to a boil. Turn off the heat and cover the pan. Let the farro sit in the pan for an hour to two or until the grains have popped.
4. Use a large strainer or colander and drain the farro.
5. Wipe out the pan and put the pan back on the stove over medium low heat. Add the remaining stick of butter. Let it melt gently and then add the drained cooked farro, marjoram and squeeze the roasted garlic into the pot. Stir in the creamy soft garlic smearing it into the farro. Season the pilaf with salt and pepper to taste.
6. Once it is hot, bowl it up, and serve.
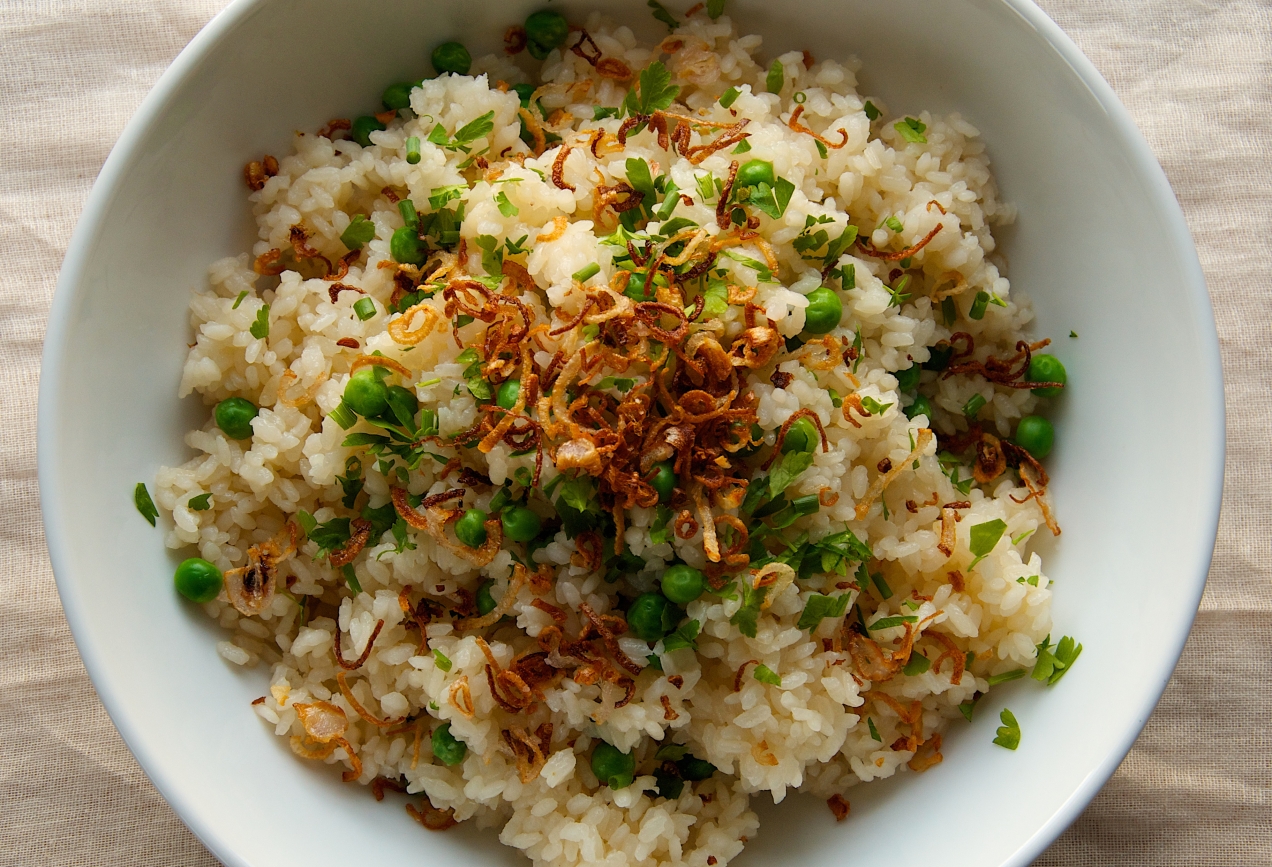
Peas and Rice with Crispy Shallots

I never feel like people like to cook rice unless of course they are from a country or region where it is a staple. I will say it took me a while to get the hang of it. Even after culinary school, because I didn’t cook rice often, it was a struggle. It seemed like it would either be a gooey mess, or dry and not cooked all the way through. Some recipes seemed to work one time and the next they failed.
It wasn’t until I started to look for a rhyme and reason that it started to get better for me. I stopped buying different brands, types and kinds of rice for regular use and narrowed my selection down to two. I use medium grain brown rice from Lundberg farms in California and a kapika short grain white rice from Japan. For other dishes such as risottos or paella I use carnaroli.
For those not familiar with kapika it is a process where by the rice is polished using the grains themselves to remove the outer husk which also allows for greater water absorption. What I like about the kapika process is you do not need to rinse the rice before it is cooked and it has a stickiness to it that allows you to be able to eat it with chopsticks if you choose. Still there is more to kapika then just chopstick usability, there is the chew. It has, for me, the perfect chew it is tender with a spring.
I cook brown rice using a method that is wildly different from how I cook any other rice. I always parboil it in large quantities of lightly salted water, drain it and cool it much like you might pasta. They I use it in applications like fried rice, casseroles and pilafs.
I usually by larger quantities of white rice then brown. I love brown rice but brown rice can go rancid if left sitting around or because of lower turnover in the store, the rice is already old and needs to be used up before it goes south. It has an acrid smell to it when it is old. White rice like white flour has a longer shelf life.
Obviously brown rice is better for you because it is a whole grain but I am certain white rice is more soothing to my stomach.
For this recipe I could simply enjoy sitting at the table and eating it all on its own. I need no other dish alongside it but if it is going to be a side dish roast chicken is a real good choice as is rabbit.
My absolute favorite condiment for this dish is the gelatinous stock (not the chicken fat) that forms on the bottom of the roast chicken pan. If you have it available stir some of it in to the rice after it has cooked but before serving.
Serves 4 to 6
2 cups kapika rice
2 3/4 cup vegetable broth
1 cup peas, fresh or frozen
1/2 cup shallots, sliced into very thin rounds and separated
peanut or safflower oil
2 teaspoons fresh chives, minced
2 teaspoons parsley, minced
1. Place the rice into a 3 1/2 quart enameled Dutch oven with a heavy lid. Add the vegetable stock and a pinch of salt. Bring the broth to a boil over high heat. Immediately turn down the heat to simmer and put the lid onto the pot (I weight the lid with a two pound weight but that is up to you). Set a timer for 20 minutes.
2. While the timer is running place a 2 quart sauce pan over medium high heat. Add a 1/2 inch worth of oil to the pan. Once the oil is to temperature, you can test this by dropping in a shallot ring it should drop to the bottom then come back to the top all in slow motion, add the shallots. It won’t take long for them to brown so don’t leave the stove. Once they are brown remove them from the pan with a metal slotted spoon to a paper towel lined plate and season them with salt and pepper. Set aside.
3. When the rice timer goes of quickly lift the lid and add the peas. Don’t stir them just leave them on top to steam. Cover the pot and set the time for 10 minutes.
4. At the end of ten minutes remove the lid to the pot and with a fork fluff the rice which will also stir in the peas. Bowl up the rice, sprinkle on the herbs and finish it with the shallot garnish. Serve.
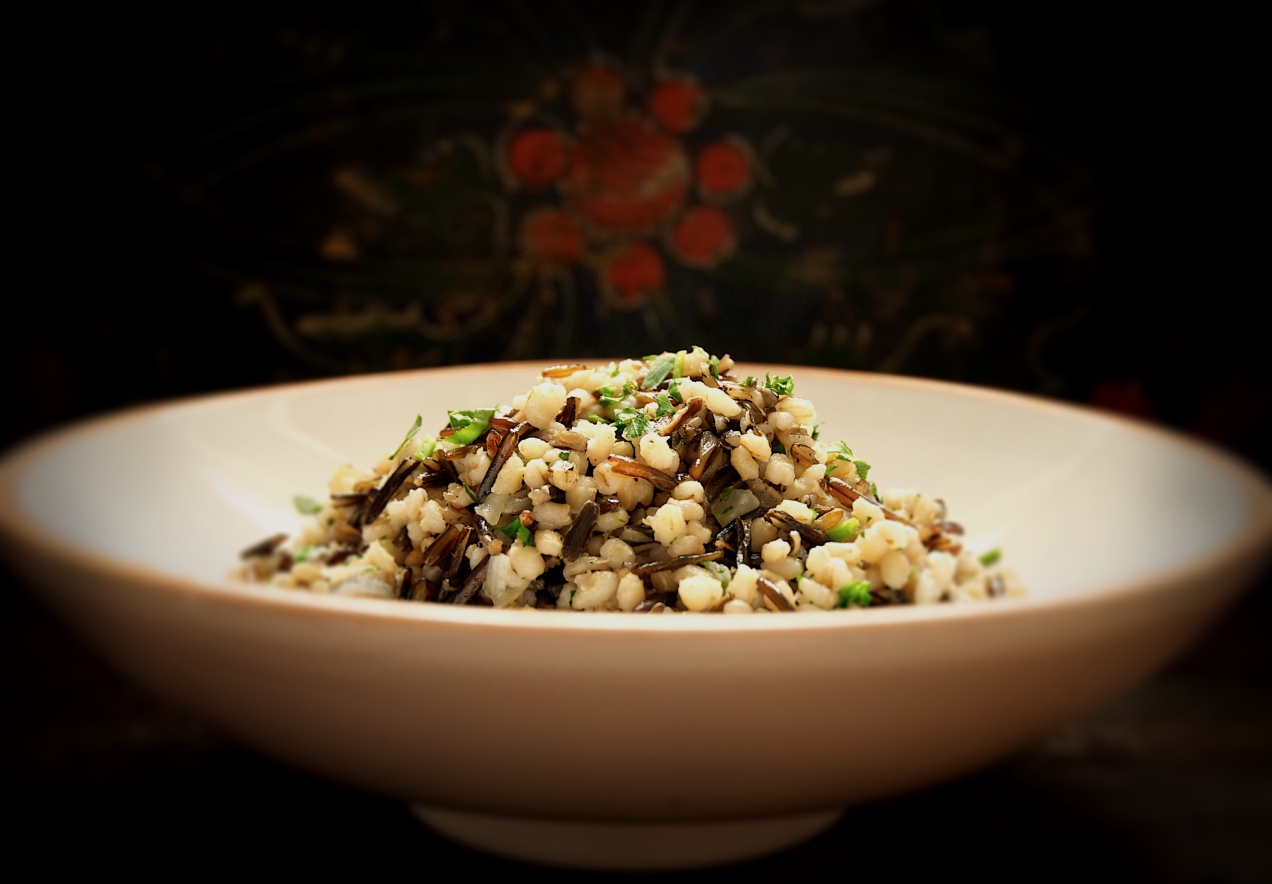
Wild Rice and Barley Pilaf
 This is so good for you you won’t even know it taste really delicious. Seriously good eats and a great side dish for roast birds of any kind and I’ll even throw salmon onto that list.
Yes, I know it uses two sauce pans but, please, neither grain leaves behind a sticky mess. You could almost just wipe the pan with a towel after emptying it of the grains. Don’t get any ideas I said almost.
Makes 6 to 8 servings
3/4 cup wild rice
3/4 cup pearl barley
1/2 cup yellow onion, small dice
1/4 cup flat leaf parsley, minced
3 to 4 tablespoons unsalted butter
kosher salt and fresh ground black pepper
1. Put the grains into two different sauce pans. Add water to cover by 2 inches and add a two finger pinch of salt to both pots.
2. Bring the water to a boil then reduce the heat to a gentle but continuous bubble. Cook both grains until they are tender. The barley should take about 30 minutes and the rice maybe 40. The rice will just begin to open up its pod.
3. Drain both grains. The dish can be done up to a day in advance at this point.
4. Put the larger of the two sauce pans over medium heat and add the butter. Once it has melted add the chopped onion and sweat it until it is tender. Add both grains and season everything with salt and pepper. I like lots of pepper but season to your liking. Heat everything until hot, taste, and if it needs more add more butter or even a dash of water. Stir in the parsley, plate it and serve immediately.

Pot Roasted Collards and Purple Hull Pea Fritters with Spicy Buttermilk Gravy
Pot Roasted Collard Greens and Purple Hull Pea Fritters
The one thing that stays the same around my kitchen, has been a continuous thread, is collard greens.
Collard recipes have been prepared in many incarnations but eventually I rendered them all down the most basic of recipes. I like collards in every fashion imaginable, and while I can spoon potlikker right out of the pot and onto a slab of buttered cornbread, making me perfectly happy, I have grown to like my greens best when they are pot roasted. I used to render bacon, butter or pancetta into the pot first, the fatty crispy strips of cured pork to be fought over at dinner. Then there came a time when I needed to make the greens vegan. I started using peanut oil and ever since it has become a fast favorite which is strange since we are big pork eaters.
What happens to greens when they are pot roasted is the natural sugars break out and much like caramelizing onions you start to build flavors that just don’t exist when collards have been boiled. I liken the building of flavors to a fine cigar, great coffee or a complex wine.
As the thick and leathery fall collards, greens which have taken a frost or two, cook down a toothsome quality develops that is very satisfying to eat. You also get these rogue bits that didn’t get as much oil as they should and they become crispy and blistered which contributes a nice contrast. A sure sign that you have roasted your greens right is the smear of brown juice that paints the bottom of the pot when you stir.
We eat greens cooked like this as part of three dinners each week, at least, and in general Amy and I will fight over the leftovers at breakfast time.
Seves 4
For the fritters:
16 oz. field peas, cooked, either black eyed or you favorite type I used purple hull, two 14 oz. cans, drained works too
1 cup carrots, grated
1/4 cup rice flour, or all purpose flour
2 teaspoons shallots, minced
2 teaspoons garlic, minced
1 1/2 teaspoons dried thyme
kosher salt
fresh ground pepper
For the collards:
8 to 10 cups collards, cut into 1 inch stirps, rinsed multiple times to get rid of sand and dirt
peanut oil
kosher salt
fresh ground black pepper
For the buttermilk gravy:
1 1/2 cups live culture buttermilk
1 teaspoon creole seasoning
1/2 teaspoon dried thyme
1 1/2 teaspoon shallot, peeled and minced
1 teaspoon garlic, peeled and minced
1.Heat the oven to 325˚ F. Combine all the gravy ingredients in a small bowl and mix to combine. Set aside to let the flavors build.
2. Place a 6 quart enameled Dutch oven with a lid over medium high heat. Add some peanut oil to the pot being generous with the peanut oil and making sure you coat the bottom of the pan plus a touch more. Add half the greens and season them with a two finger sprinkle of salt and a few grinds of pepper. Turn the green giving them a hot oil bath. You want the leaves to be coated, not greasy though. Add the rest of the greens. Season them with salt and pepper too. Turn them into the first batch of greens being sure they get an oil coat as well. Put the lid on the pot, slide it into the oven and roast the collards for 1 hour and 15 minutes making sure to stir the pot at the half way point.
3. Place the cooked peas into the bowl of a food processor. Pulse to grind the peas. When it becomes mealy add the rest of the fritter ingredients and pulse until smooth, moist and will hold together. The key here is to adjust the moisture content. If it is too wet add rice flour a tablespoon at a time letting the mix rest a bit so the flour can hydrate and thicken the fritter mix. If it is too dry add water by the tablespoon and do the same. My way to test patties of all types is to make a patty and then throw it against the side of the mixing bowl. If it flattens and holds its shape I am happy.
4. Once your consistency is right make 8 equal sized patties. Place a nonstick pan over medium heat, add oil and fry the fritters until they are brown on both sides. Remove them from the pan to a brown bag lined tray. Drain the excess grease. Serve while hot.

Texas Caviar
The first time I had Texas caviar I was in Santa Fe. There I think they called it Cowgirl Caviar but that might have been the name of the restaurant. I remember lots of pictures of cowgirls. Maybe the name of the restaurant was called Cowgirl Hall of Fame. That seems more right to me.
Anyway. Texas Caviar was made famous by Helen Corbitt the food director in the 1950’s for Neiman Marcus in Dallas. Many recipes call for Italian dressing. No. Do not do it. I am sorry but bottled dressings suck. Period. This is supposed to be fresh and vibrant and everything added is meant to highlight the creamy texture of the legumes, not hide it.
Serves 6 to 8
2 ea. 15 oz cans black eyed peas, drained and rinsed
2 tablespoons red onion, minced
2 tablespoons celery, minced
1/3 cup cilantro, minced
1 tablespoon green onions, minced
1 garlic clove, minced finely
1/3 cup red wine vinegar
1/8 cup extra virgin olive oil
1/8 cup neutral flavored oil, i.e., canola, grape seed
1 to 2 dried cayennes or chile tepins cut into thin strips with scissors
kosher salt and fresh ground black pepper
corn chips
1. Combine all the ingredients into a bowl and mix to combine. Season with salt and lots of black pepper. Taste and adjust the seasoning as necessary. This gets better as it sits, 24 hours is optimal, but will also gain more Scoville heat units so keep that in mind when you decide the amount of red pepper you want to use.

Bona Fide Black Skillet Cornbread
The only thing that might make this cornbread more Southern is using white cornmeal instead of yellow. Most certainly the cornbread debate has set off more feuds than history has recorded. Should it contain sugar or not is usually the big question but why should you have to make a choice. That is not to say this is one of those recipes that is going to combine the best of both worlds because it is not. You shouldn’t mix cornbreads just like you shouldn’t mix liquor. Flat out, it is always a bad idea. You should have two great cornbread recipes, one Northern sweet version and one Southern.
With that in mind you can pretty much bet when the words black skillet come before the word cornbread it is going to be Southern. The title here holds true to that theory. Actually most recipes, such as this one, vary only slightly in ingredients but usually find a fork in the road when they reach the part of the recipe that reads “technique”.
I use stoneground corn flour because, one, it tastes great and two I like the quality of the crumb in the final product. Some people use cornmeal and let sit overnight in what is called a soaker, meaning the liquid and the meal are mixed and allowed to rest overnight and then you add the soda and baking powder before baking. Kind of defeats the purpose of quick bread which is what cornbread really is. With that in mind, what seems to work well is to let the corn flour soak for twenty minutes while the pan is in the oven heating.
Heating the pan is paramount to getting the full cornbread experience. Without heating it you will never get the crisp crust that tastes like a cross between deep fried catfish tails and bacon. What you have never eaten the crispy tails off of deep fat fried catfish? Why lucky you, you still have some living to do.
To be completely stubborn if you can’t bring yourself to use either bacon grease or butter you should probably make some other bread because, really, you will be missing the point. If you sub out the bacon grease for real butter cut down the pan warming time to twelve minutes or the butter will burn.
Makes 8 to 10 servings
4 tablespoons bacon grease
2 cups stone ground yellow corn flour
1 teaspoon sea salt or 1 1/2 teaspoons kosher salt
1/2 teaspoon baking powder
1/2 teaspoon baking soda
1 large egg
2 cups buttermilk
1. Preheat the oven to 425 degrees. Place the bacon grease in a 10 inch cast iron pan.
2. Mix the corn flour, baking soda, baking powder and salt in a mixing bowl.
3. Beat egg and add it to the buttermilk and then add the liquid to the dry ingredients and mix quickly to combine the batter.
4. Place the cast iron pan into the oven and set a time for twenty minutes.
5. Using a dry towel or oven mit remove the pan from the oven and set it on a heat proof surface. Mix the batter with one or two quick spins and gently scrap it into the pan. You may need to use the whisk to pat it down and around so it reaches the edges of the pan. Grind some fresh ground pepper over the top.
6. Place the bread into the oven for 20 minutes or until it just starts to brown. Remove from the oven and cover it with a towel for 5 minutes. Slice and serve with lots of butter.

Okra and Sweet Corn Purloo
It is the time of year, at least for me, where I have remnants–odds and ends–coming from the garden. A few rebellious plants refusing to be defeated by a light frost are still putting forth small amounts of tender vegetables. The real fall plants, broccoli, cauliflower and Brussel sprouts haven’t yet committed to blooming. In my garden basket I have Silver Queen sweet corn, okra, and a few green peppers.
I make purloo, a simple but very satisfying one-pot of vegetables, rice and some sort of meat (meant more as a seasoning then an entree.)
Purloo is a dish of economy. It is a dish of diversity. It is a dish that tells many a family history simply by ingredients the cook chooses to use. It is of Low Country origin. Most likely a slave dish. It is meant to serve many and it is meant to be comforting. It is.
Serves 6
3/4 cup onion, small dice
1/3 cup green pepper, seeded and small dice
1/3 cup celery, small dice
1 teaspoon garlic, minced
1 teaspoon dried thyme
1/4 teaspoon dried marjoram
1/2 teaspoon dried basil
2 cups okra, cut lengthwise or into stars
1 cup sweet corn, such as silver queen
2 cups smoked turkey thighs, skin removed, chopped (or ham)
1 cup short grain white rice
2 cups vegetable or chicken broth
kosher salt
fresh ground black pepper
1. Heat the oven to 400˚ F. Place a heavy bottomed 3 quart pot over medium heat. Add enough oil to the pot to barely coat the bottom.
2. Once the oil is hot add the onion, pepper, and celery. Season with a pinch of salt and a grind of pepper. Cook, stirring often, until the vegetables are soft but not brown.
3. Add the thyme, basil, marjoram and garlic. Saute, being careful not to brown the garlic, until they become fragrant. Add the okra, corn and turkey. Season the purloo again with salt and fresh ground pepper. Taste and adjust any seasoning necessary.
4. If the pan seems dry add a little more oil. Then add the rice and stir it around to coat the grains with the oil. Add the broth.
5. Grab the pot by the handle and give it a sharp shake so everything evens out and is distributed evenly. Bring the broth to a boil.
6. Turn off the heat, cover the pot with a lid and slide the whole thing into the oven. Immediately turn the heat to 325˚ F.
7. Set a timer for 35 minutes. At the end of thirty five minutes remove the pot from the oven, remove the lid and using a tasting spoon check the rice to see if it is done.
8. If it is not done, cover the pot and return it to the oven for 10 more minutes.
9. If the rice is tender, serve.

Smokin’ Black-eyed Sandwich
This is a perfect example of vegetarian food that stands on its own. Not much different than falafel which has stood its ground for years. Your could in fact replace the mayonnaise with a yogurt sauce of your liking. Something with tomato and cucumber would draw down the heat nicely. It would go well with grilled pitas too so if you wanted to you could take the whole meal and easily give it a Middle Eastern flare. When it is a sandwich like the above I really like it with crunchy shoestring fries and I have even been known to stack the fries right between the bread with the fritter for a nice crunch.
Serves 6
2 each 14 oz. cans black eyed peas, drained
1/2 to 2/3 cup rice flour
1/2 onion minced
2 cloves of garlic, chopped
3/4 teaspoon dried thyme
1/2 teaspoon cayenne pepper
kosher salt and fresh ground pepper
2 carrots, peeled and grated, about 1 cup
lettuce, shaved
vegetable oil
bread, buns or pitas
mayonnaise or you choice of condiment
1. Place the drained peas, 1/2 cup rice flour, onion, garlic, thyme, cayenne and a 1/2 teaspoon of kosher salt and some fresh ground pepper into the bowl of a food processor. I like the mix to maintain some chunkiness but it is important for it to be fairly smooth so it holds together. Add up to 1/3 cup more rice flour as needed. So process until smooth but it doesn’t by any means need to be perfectly smooth. Add the carrots and mix, not process, them in thoroughly with a spatula. I like to let this sit for at least an hour so the rice flour has time to hydrate and thicken the mix so it stays together better. You could even cover it and refrigerate overnight. If it seems loose before you are getting ready to cook it add more rice flour.
2. Heat a large non-stick skillet over medium high heat. Add the oil and let it get hot. Form the mix into 6 balls and then shape them into patties. Fry then until crispy on both sides. Build you sandwiches and serve.
Smokin’ Black-eyed Sandwich

The Poor Wretches Pasta

Street walkers pasta and now poor wretches pasta. Leave it to the Italians to come up with an interesting name for their local eats. This is Sicilian by birth. The pine nuts and currants aren’t traditional but I like what they bring to this dish.
Eggplants are abundant at the moment. You could take the time to make eggplant parm, moussaka or some other multi-step dish or you could keep it simple and make this. It is simple but that doesn’t mean it isn’t flavorful. I have made it twice already and probably will make it again. I am not doing so because I have eggplants, and lots of them, but because I like it that much.
Makes 4 to 6 servings
good quality olive oil
2 or 3 eggplant, depending on size, peeled and cubed into 1 inch pieces, about 5 cups
2 cups tomato sauce
2 teaspoons red pepper flakes
3 tablespoons currants
2 tablespoons pine nuts
1/2 cup fresh bread crumbs
16 oz. penne pasta
kosher salt and fresh ground pepper
1. Add 1 1/2 tablespoons of olive oil to a small saute pan. Once it is hot add the bread crumbs and pine nuts. Season them with salt and pepper and cook them until they are browned. Add the currants and toss a few times. Empty the pan into a small bowl and let the topping cool.
2. About one hour before you start cooking put the eggplant cubes into a colander. Season the cubes with a fair amount of salt and either place the colander in the sink to drain or in a large bowl.
3. Place a large pot of generously salted water over high heat.
4. While the water is coming to a boil place a 14 inch saute pan over high heat and add 1/3 cup of olive oil. Once it is shimmering but not smoking add the eggplant. It might splatter a little if there is a lot of water clinging to the pieces so be careful. Brown the eggplant.
5. Add the red pepper flakes, a little more oil if the pan looks dry, and then the tomato sauce. Reduce the heat and simmer the sauce.
6. Add the pasta to the big pot of boiling water and cook the pasta according to the cooking time listed on the box. Once they are done, add a 1/2 to 1 cup of the starchy pasta cooking liquid to the sauce depending on how reduced it has become.
7. Strain the noodles and add them to the sauce. Toss to combine and coat the noodles. Pour the pan out into a large bowl and top with the bread-crumb-currant-pine-nut topping and serve.
These cakes have become a standard in our rotation. Not always as Indian cuisine but as other styles too. The Lentil du Puy base is a really good foil for all kinds of flavors and the texture of the meal is toothsome which is also very satisfying. I would imagine the possibilities to be endless and I will let you know if we make any discoveries that deem reporting back to you.
Serves 4
For the Lentil Cakes:
1 cup dried Lentil du Puy, rinsed and picked over for stones
1/2 yellow onion, small dice
1 tablespoon fresh grated ginger
1 tablespoon cilantro, minced
2 teaspoons garam masala
1/4 cup flour, I used millet flour
1 egg
3/4 teaspoons kosher salt
For the Sauce:
1/2 yellow onion small dice
1 cup tomato sauce
1/2 cup cream
1/2 cup plain yougurt
pinch cinnamon
pinch tumeric
2 teaspoons cilantro
canola oil
1. Place the lentils into a 3 quart pot and cover with water by two or more inches. Add the minced onion. Place the pot over medium heat. Slowly bring the lentils to a boil then reduce the heat to a simmer and cook the lentils until tender adding a pinch or two of salt in the last 10 minutes of cooking. This should take approximately 30 minutes.
2. Drain the lentils. Let them cool but puree them in a food processor while they are still warm. They will be easier to handle when warm.
3. Add the remaining lentil cake ingredients and pulse the cakes a few more times until the rest of the ingredients are combined into the mix. Taste the lentil puree then season the puree with kosher salt and a few grinds of pepper. Taste again and adjust the seasoning.
4. Let the cakes sit for a few minutes to hydrate the flour. Take a tablespoon of the mix and make a ball. Is it really wet or is it too stiff? You want the mix to hold its shape but not be overly stiff otherwise they can be dry when cooked. It should just hold its shape. Add more flour a tablespoon at a time if you need to letting the additional flour hydrate before testing. Divide the lentils into eight balls.
5. Add enough oil to cover the bottom of a heavy bottomed sauté pan by an 1/8 inch. Heat the oil over medium high heat. Test the oil by dropping a pinch of lentil to the pan. It should begin to sizzle right away but not violently sizzle and pop.
6. When the oil is ready take each lentil ball and smash it down gently forming it into 1/2 inch thick cakes and add them to the oil. Let each side brown nicely and then remove them to a tray lined with a brown bag to soak up the oil. Keep the cakes warm, either in a low, 200 degree oven or in a warm place on the stove.
7. Drain the oil from the pan, place it back on the heat and then add the remaining diced onion. Sauté until tender then add the rest of the sauce ingredients. Stir to combine, bring to a boil then reduce the heat. Let it simmer for ten minutes to come together. You can puree the sauce to make it smooth or leave the onion chunky making the sauce rustic.
Serve with rice.
Lentil Cakes Tikka Masala
Mother’s Grits and Debris

I snuggled in behind the wheel of what became known as the Starship Enterprise, it was no longer a minivan fit for a family vacation. Instead it morphed into a party pod for a convoy of misfits headed to Mardi Gras. I was old enough to know better but I never let that stop me.
Fortunately, we only lost one car and one person both of which later turned up in Florida. I guess they just needed a change of venue, besides the important thing is we all managed to stay out of jail.
I could smell the chicory coffee wafting out the front door and blowing down Tchoupitoulas. It drew me in like a voodoo king casting a love spell and deposited me at Mother’s front door. The sign about the world’s best baked ham didn’t even register as I walked past it and sat down near a window hoping the low morning sun would cast some clarity onto the crumpled two day old newspaper I was trying to read. I thought the sunlight might help me focus but it didn’t and in the end I had to leave that to the coffee.
The bite of the chicory brought me around long enough to order another cup and a bowl of Grits and Debris, which was really all I could afford. What the coffee couldn’t do, breakfast did. I didn’t realize how bad I needed food. It was one of those occasions when you realize booze and nicotine isn’t a sustainable diet. My breakfast was nourishing from the first bite to the last.
I only ate at Mother’s this one time but I revisit often on mornings when what is needed is a little something more.
Debris: the parts, bits and crumbs of roast beef that fall onto the carving board while you are slicing the meat.…..Find the recipe here
Fugly Lentils and Drunken Pig

This is a love story. One with big hands, fat spoons and where ladles are measured in busty bra sizes. It harkens back to the days when hand hewn tables were made of whole trees and crusty loaves of bread were the size of clouds. One where wine was quaffed, not sipped and swirled, and bellicose laughter could be heard around the dinner table not TV. There were no food temples of hallowed and silent reverence just hunger and many mouths to be fed. While not pretty the lowly lentil has done this job for centuries and so has the pig.
When they finally met it was love at first sight. The kind of love where you see no faults. It is big love where your very nature is to do everything in your power to make the other shine because they are the only light you see. There are no dainty little pieces that sit comfortably on soup spoons never to threaten silk shirts with a trip to the dry cleaners. These are knife, fork, spoon and some crusty bread to sop up any tears of joy left on the plate kind of eats. The Armagnac you ask, well, sometimes the lentils just like to feel a little slutty.
SERVES 4 TO 6
For the drunken pig:
3 or 4 meaty fresh pork hocks, unsmoked and about 4 inches long. The closer to the ham end the better. Really, make sure they are meaty it is where the pork for the dish is coming from
10 ounces unsmoked slab bacon, in one piece
1 leek, trimmed cut in half lengthwise
1 onion quartered
1 carrot, peeled and cut into chunks
2 celery stalks, rinsed and cut into chunks
1 head of garlic, halved
2 thyme sprigs
2 bay leaves
2 teaspoons whole black pepper corns
pinch of ground cloves
3 parsley sprigs
2 cups dry white wine
1 cinnamon stick 3 inches long
For the fugly lentils:
Meat from the hocks and the bacon
strained stock from above
2 onions, trimmed peeled and cut into quarters
8 carrots, decent sized, peeled and cut into 1 1/2 inch lengths
14 cloves of garlic, peeled, trust me later you will think this isn’t near enough
2 bay leaves
1 tablespoon rosemary, minced
1 tablespoon tomato paste
1/2 cup tomato sauce
1 teaspoon thyme, minced
1 1/4 cup Lentils du Puy
kosher salt and fresh ground pepper
1 tablespoon armagnac
1 tablespoon red wine vinegar
1 tablespoon extra virgin olive oil
1 teaspoon garlic, very finely minced
1 tablespoon flat leaf parsley minced
1.To make the stock turn the oven to 325 degrees. Place all the stock ingredients into a large enameled cast iron pot with a lid. Make sure it is going to fit comfortably. Add water to cover. Bring to a boil on the stove top and skim any foam that rises.
2. Cover the pot with a lid and place it in the oven. Take a 2 hour and 45 minute break to do what ever you want. I generally play with the kids at this point or run errands or whatever.
3. Make sure the hocks are pull apart tender. If not cook them a little longer. When they are done pull the hocks and bacon and set them on a tray. Strain and drain the stock into a clean bowl, degrease and reserve the broth. Clean out the pot and put it back on the stove over medium high heat.
4. Add a few glugs of olive oil and then toss in the carrots and the onions. Sear them until they begin to take on color.
5. Add the garlic, rosemary, thyme, tomato sauce, 3 cups of stock and the tomato paste.
6. Season the broth with black pepper and add the lentils. Bring the pot to a boil and then reduce the heat to a simmer and cover. Simmer them for 40 minutes checking to make sure they aren’t boiling or that the lentils haven’t drank all the broth and adding broth if necessary. Lentil like all beans vary in cooking times depending on age, moisture content etc so times may vary. You want these to be tender but not mush so you will need to give them a taste.
7. Meanwhile make the seasoning sauce. Combine the minced garlic, parsley and red wine vinegar and season it with salt and pepper. Stir in the olive oil.
8. At the end of 40 minutes check to make sure the lentils are tender. If not simmer them another fifteen minutes or so. Stir in the armagnac and add the reserved pork that you picked from the bones and add it to the lentils. Cut the bacon into equal portions and add it too. Season the pot with salt and black pepper and taste. Cover and warm the pork through. Serve with the sauce on the side.
