Beef, Beef/Veal, Easy, Gluten-free, Grill, Grilling, Sandwiches

Building a Better Burger

If you think about it, a hamburger is nothing more than a sausage without a casing. Once you accept this notion, you open yourself up to endless burger possibilities! I mean really, there are as many burger recipes as there are cooks. Everyone has their own little tweaks and a go-to recipe.

With that being said, I am not going to sit here and try to convince you this is a recipe for the best hamburger in the world — even though it is — because someone will undoubtedly draw a line in the sand, slap me with gloves in hand, and challenge me to a duel. It’s inevitable. Continue reading

Standard
Brunch, Chicken and Poultry, Chicken/Poultry, Dinner, dog-eared, Gluten-free, Main Dishes, Medium Time, Moderate

The Art of Honest Fried Chicken (A Lifestyle Choice)

Frying chicken, at its best, is a state of mind formed much in the same way as the quiet back beats of a porch-sitting session with a dear friend. It has a rhythm. It is good company on a sunny summer afternoon. It is pointless to rush. Futile, even. Besides, the comfort of a good friend comes from the effortlessness of meaningful conversation and is further heightened by the knowledge you have nothing you would rather do. Continue reading

Standard
Beef, Gluten-free, Grill, Grilling, Kitchen Tips, Recipes

Grilling: Tips, Skirt Steak and more…

Skirt Steak with Greek Salsa

I use a pair of kitchen tongs and quickly flip a steak, pull back to let my hand cool for a split second before diving in again behind the safety of the tongs to flip another. The hair on my forearm recoils from the heat. Even with a long pair of kitchen tongs I can’t bear the sting of the glowing coals like I used too.

I have lost my commercial kitchen hands. The hands that could take the heat without flinching, the same hands that could grab thermonuclear plates, or could move steaks around on a grill without ever noticing the heat. The heat abused hands that were once this line cooks badge of honor.

The wind shifts, a wisp of white smoke blows back. My eyes catch a little before I can turn and shut them. The smoke underneath my eyelids stings and my eyes begin to water. Continue reading

Standard
Dinner, Gluten-free, Grains/Legumes, Main Dishes, Pork

Polenta with Peas and Pork Sausage

If my extended family’s eating habits are an indication as to what the preferred meat was on my grandparents and great grandparents farm then it is obvious to me I come from a long line of pork eaters. It’s not as if this matters or that I need some sort of familial approval for my love of the beast because I don’t.  I claim it as my heritage after all but I’ll just say it anyway for clarity, I…love…pork.

I love pork for its possibilities, its versatility, and most importantly, it’s flavor. From snout to hocks or bacon to ham there are more uses for the pig then any other animal I know and one of my favorite uses is as a seasoning.  My definition and what I mean by seasoning is not simply tossing a couple of strips of bacon in with the green beans and  calling it a day.  No, the pork isn’t there for a cameo but instead has an important supporting role, one in which it could be nominated for an award.

Don’t get me wrong I enjoy a good pork dinner, something like Edna Lewis’s Boiled Pork (think Pot eu Feu) really floats my boat but as I try to reduce the amount of animal protein I consume I often look to the example of Italian ragus or Asian dishes where animal protein, quite literally, plays second fiddle to the grains or noodles on the platter. The pork is there to enhance and flavor the dish. Sure this is done for economy, just like adding bread or oats to meatloaf, and who doesn’t like save a few bucks or at the very least feed more mouths for the same price. Not only that but if you buy less quantity then you can afford better quality, at least this has always been my way of thinking.

When it comes to pork quality matters. If you buy pork that is enhanced with sodium triphosphate, a common practice at big box stores, it won’t caramelize very well and honestly the pork tastes bland. It is done to help the meat retain moisture but they add it because the producers have made pork to lean. If you buy pork with a little higher fat content you don’t need the moisture retainer. Not only that but when pork is raised in a more sustainable fashion it just taste better. It taste better because of what the animals eat.  It is about the animals diet after all. I am all about how my food taste and if sustainability happens to be a byproduct then, wonderful. I mean when I bite into good pork it immediately transports me to my grandparents farm, sitting outside under a shade tree eating a farm dinner on a beautiful summer’s eve and it reminds me exactly how pork is supposed to taste.

Over the years I have had different fascinations with different types of cured pork. I mean the list of possibilities is big, you have bacon, ham, Tasso, Serrano, prosciutto, pancetta, guanciale all on top of any number of sausages. All used as seasonings and all just a few of the options that can confront you. The wonderful thing is there are many books that will teach you how to cure many of these products at home (Michael Ruhlman’s Charcuterie comes to mind) and many of the processes are surprisingly simple. In fact no special equipment is required other then a good sharp knife(which I don’t consider special equipment).

Polenta with Peas and Sausage (serves 6)

one recipe of Carlo Middione’s Polenta Facile

10 ounces pork tenderloin, sirloin or loin

4 to 5 ounces pancetta

2 teaspoons red wine vinegar

a scrape or two of whole nutmeg

a handful of  parsley leaves

3 cloves garlic

2 tablespoons tomato paste

1 teaspoon dried thyme

1/2 teaspoon dried rosemary

1 bay leaf

kosher salt

fresh ground pepper

1 garlic clove, minced

1/2 cup carrots, small dice

1/2 cup onion, small dice

1/2 cup white wine

2 cups pork stock or chicken stock

1 1/2 cups fresh peas or frozen

chopped chives and parsley

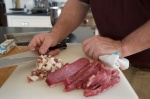
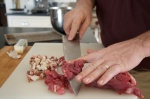
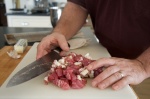
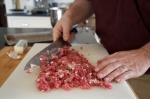
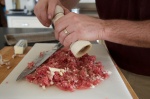
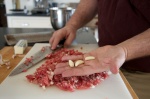
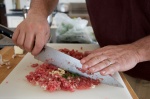
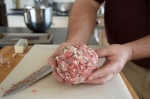
1. Lay your pork out onto a large cutting board. Cut the pork and pancetta into thin strips then into cubes. Spread the pork out so it is flat instead of in one big pile. It’s ok if it isn’t in one single layer you just don’t want a big pile. Place the palm of you hand, as shown in the picture, across the blade of the knife making sure to keep your fingers up and you hand flat. This will keep you from cutting your hand if the knife slips. So fingers up! What you are doing is creating a hinge of sorts because you want to keep the tip of the knife on the board and in doing so it lets you apply more cutting force. Run the knife through the pork several times and until you have minced it to a coarse mince.

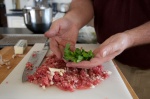
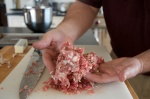
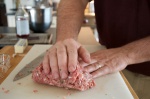
2. Add the garlic cloves, parsley, a teaspoon of salt, a few grinds of pepper and the nutmeg. Mince the seasonings into the pork until you have a fine mince. Add the red wine vinegar and knead it into the sausage. Ball up the sausage, put it in a bowl and let it get funky in the fridge for an hour or two.

3. Start the polenta. I let my polenta cook for almost three hours. I was using an heirloom corn I grew last year called Henry Moore. It took a long time to cook but it was creamy beyond my wildest expectations. So take your time with the polenta, cook any bitterness out of it and let it do its thing.

4. When the polenta is close to being finished start the sauce by placing a large 12 inch saute pan over medium high heat. When it is hot add a glug or two of oil to coat the bottom of the pan. Brown the sausage. Once the sausage is brown remove it to a plate. Be careful not to burn the fond on the bottom of the pan. Add the onions and carrots and cook them gently until they just begin to wilt.

5. Add the tomato paste, dried thyme, rosemary, garlic and bay leaf. Stir until fragrant then add the white wine. Let the wine burn off the alcohol and then add the stock. Season and taste. Bring it to a boil and reduce it by half. Taste again and adjust the seasoning.

6. Add the sausage and peas. Heat until the peas are warmed through. Taste and adjust the seasoning. Add a tablespoon of chopped chives and parsley. Stir.

7. Spread the polenta on a platter, top with the peas and sausage, and serve.

Seasoning with Pork: Polenta with Peas and Pork Sausage

Aside
Gluten-free, Grains/Legumes, Main Dishes, Meatless Monday, Vegetarian

Pot Roasted Collards and Purple Hull Pea Fritters with Spicy Buttermilk Gravy

Pot Roasted Collard Greens and Purple Hull Pea Fritters

The one thing that stays the same around my kitchen, has been a continuous thread,  is collard greens.

Collard recipes have been prepared in many incarnations but eventually I rendered them all down the most basic of recipes.  I like collards in every fashion imaginable,  and while I can spoon potlikker right out of the pot and onto a slab of buttered cornbread, making me perfectly happy,  I have grown to like my greens best when they are pot roasted.  I used to render bacon, butter or pancetta into the pot first, the fatty crispy strips of cured pork to be fought over at dinner.   Then there came a time when I needed to make the greens vegan. I started using peanut oil and ever since it has become a fast favorite which is strange since we are big pork eaters.

What happens to greens when they are pot roasted is the natural sugars break out and much like caramelizing onions you start to build flavors that just don’t exist when collards have been boiled.  I liken the building of flavors to a fine cigar, great coffee or a complex wine.

As the thick and leathery fall collards,  greens which have taken a frost or two, cook down a toothsome quality develops that is very satisfying to eat.  You also get these rogue bits that didn’t get as much oil as they should and they become crispy and blistered which contributes a nice contrast.  A sure sign that you have roasted your greens right is the smear of brown juice that paints the bottom of the pot when you stir.

We eat greens cooked like this as part of three dinners each week, at least,  and in general Amy and I will fight over the leftovers at breakfast time.

Seves 4

For the fritters:

16 oz. field peas, cooked, either black eyed or you favorite type I used purple hull, two 14 oz. cans, drained  works too

1 cup carrots, grated

1/4 cup rice flour, or all purpose flour

2 teaspoons shallots, minced

2 teaspoons garlic, minced

1 1/2 teaspoons dried thyme

kosher salt

fresh ground pepper

For the collards:

8 to 10 cups collards, cut into 1 inch stirps, rinsed multiple times to get rid of sand and dirt

peanut oil

kosher salt

fresh ground black pepper

For the buttermilk gravy:

1 1/2 cups live culture buttermilk

1 teaspoon creole seasoning

1/2 teaspoon dried thyme

1 1/2 teaspoon shallot, peeled and minced

1 teaspoon garlic, peeled and minced

1.Heat the oven to 325˚ F. Combine all the gravy ingredients in a small bowl and mix to combine.  Set aside to let the flavors build.

2. Place a 6 quart enameled Dutch oven with a lid over medium high heat.  Add some peanut oil to the pot being generous with the peanut oil and making sure you coat the bottom of the pan plus a touch more.  Add half the greens and season them with a two finger sprinkle of salt and a few grinds of pepper.  Turn the green giving them a hot oil bath.  You want the leaves to be coated, not greasy though.  Add the rest of the greens.  Season them with salt and pepper too.  Turn them into the first batch of greens being sure they get an oil coat as well.  Put the lid on the pot, slide it into the oven and roast the collards for 1 hour and 15 minutes making sure to stir the pot at the half way point.

3. Place the cooked peas into the bowl of a food processor.  Pulse to grind the peas.  When it becomes mealy add the rest of the fritter ingredients and pulse until smooth, moist and will hold together.  The key here is to adjust the moisture content.  If it is too wet add rice flour a tablespoon at a time letting the mix rest a bit so the flour can hydrate and thicken the fritter mix.  If it is too dry add water by the tablespoon and do the same.  My way to test patties of all types is to make a patty and then throw it against the side of the mixing bowl.  If it flattens and holds its shape I am happy.

4. Once your consistency is right make 8 equal sized patties.  Place a nonstick pan over medium heat, add oil and fry the fritters until they are brown on both sides. Remove them from the pan to a brown bag lined tray.   Drain the excess grease.  Serve while hot.

Standard
Grilling, Main Dishes, Pork

Pork Ribs in Adobo

Pork Ribs in Adobo

In looking for a new rib recipe for the grill,  Pork in Adobo kept coming across the radar. Knowing that Filipino food is considered, by some, to be the soul food of the Pacific it became interesting.

Looking at the ingredients it was apparent, or seemed so, that this was a dish influenced by an outside culture. Just as Spam is a huge part of Hawaiian culture this looked to have some of the earmark influences of the American military. Upon a little research though you will learn that this method, adobo or to stew in vinegar, is indigenous to the Philippines.

Many of the recipes for this dish all look very similar. It is one of those dishes that doesn’t sway much from the original except for little tweaks by the individual cooks who want to alter the flavor to their liking, just as was done here.

While the ribs take time to complete the time is mostly spent unattended. It really is a simple dish that comes together easily.  You can make you next cook-out amazingly simple as can be if you do this in advance.

Thai sticky rice and wok seared bok choy with oyster sauce are great with these ribs. If you want to be adventurous try replacing the ribs in this dish with fresh pork belly.

Serves 6

2 pork spare rib racks

1 1/2 cups unfiltered apple cider vinegar

4 tablespoons soy sauce

1 tablespoon kosher salt

5 bay leaves

1 tablespoon whole black peppercorns

20 garlic cloves, smashed and peeled

1. Place all the ingredients in a non reactive pan, large ziploc or, as I did, in a food saver vacuum bag. If you use a large pan you will need to turn the ribs every now and again making sure the ribs get a good even soak. If you get most of the air out of the ziploc you won’t need to flip the ribs but you get the idea, they need to be marinated evenly.  Place the ribs in the fridge, covered if you use the pan, and let them marinate over night.

2. The next day remove the ribs from the fridge and if you are using a pan to marinate you are ready to go. Heat he oven to 225˚F.  If you used the plastic bags remove the ribs, saving the marinade and put the ribs in a large casserole and pour the marinade over them. Cook the ribs, covered,  for 2 1/2 to 3 hours. They should be tender but not falling off the bone. Remove them from the oven and let them cool. You can refrigerate them, covered, until needed. The recipe can be done up to a day in advance at this point.

3. Heat you grill for direct heat grilling. If you are ready to serve the ribs remove them from the marinade. Strain the marinade into a small sauce pan.  Place the pan over medium heat.  Bring to a boil and let the marinade reduce by half.

4. Brush off any peppercorns stuck to the ribs and any bay leaves as well. Brush the ribs with some of the marinade and continue to brush with the marinade throughout the grilling. Be sure to save a good amount of the marinade to use as a dipping sauce too. Grill the ribs until seared, crispy, lightly charred and hot, remember they are already cooked so grilling won’t take long.  Cut the ribs into rib-lets and serve.

Standard