
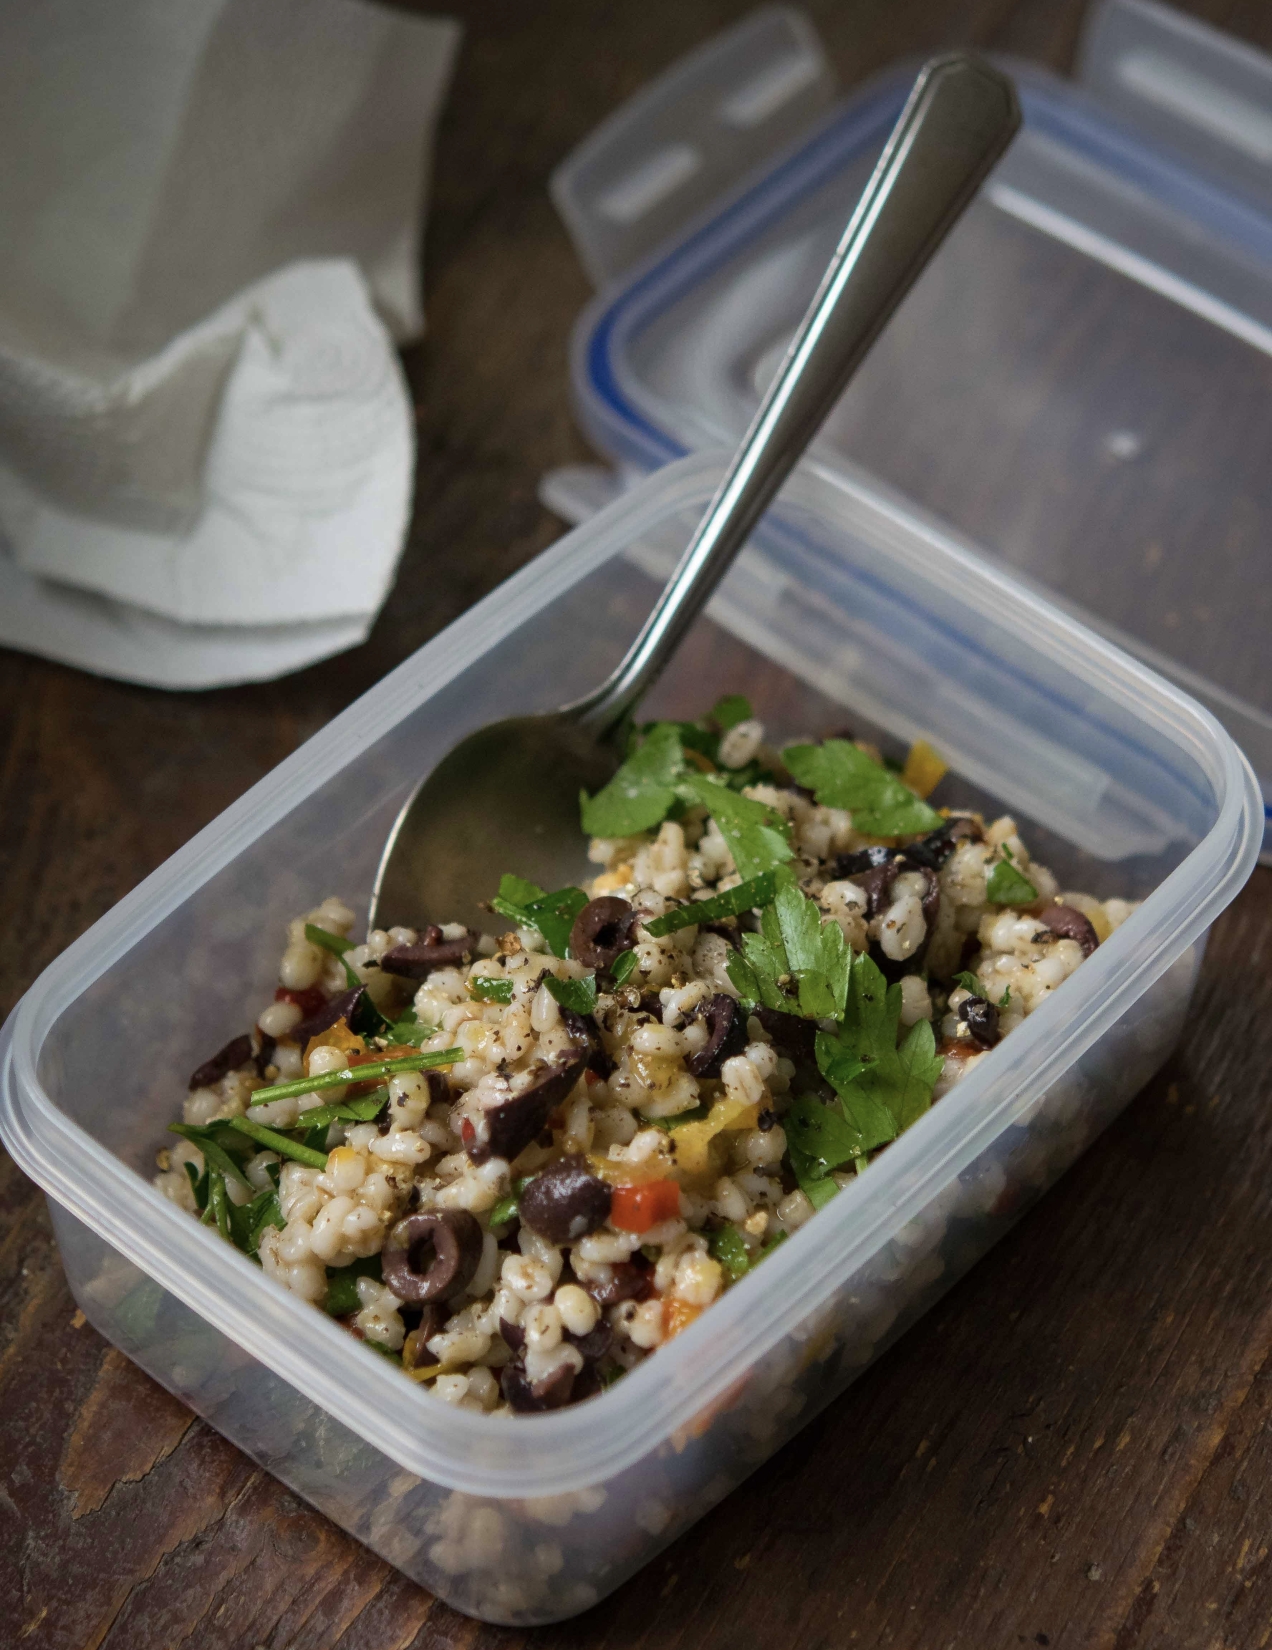
I have cooked with whole grains for a long time. My fascination began, simply enough, with bulgur wheat used to make tabouleh. It was a gateway to all sorts of other grains; winter wheat, soft summer wheat, oat groats, farro, you get the idea. There are lots of grains readily available that a few short years ago were very difficult to locate. A good earthy health food store went a long way to rectifying the shortage but now about every food store carries some sort of whole grain. Continue reading
Tag Archives: Olive oil
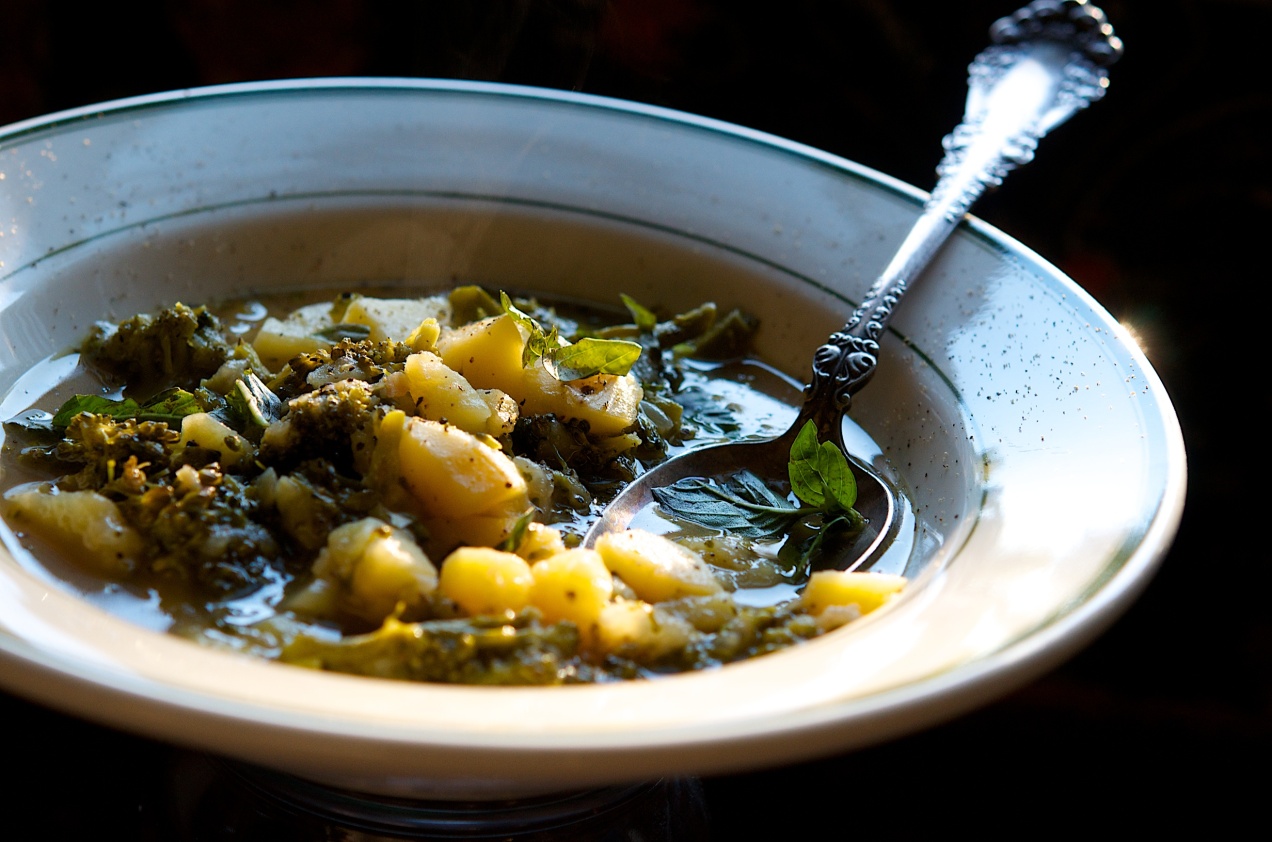
Marcella’s Broccoli and Potato Soup
Each year I look forward to making this recipe with the first broccoli from the fall garden. I’ll make it several times from mid-autumn to early winter. It requires but a few humble ingredients which, when combined in the soup pot, are as satisfying as knowing you have an uncommitted hundred dollar bill in your pocket.
As with many soups of few ingredients, it requires attention to detail, your best technique, as well as quality ingredients. But if you are anything like me, you find as much enjoyment in the process as the reward.

The process for me starts with chicken stock made from scratch. I use old hens from my flock each year to make my stock, but any bones would work great. From the carcasses I make a very richly flavored stock which I preserve by canning. I use the homemade canned stock for many soups throughout the cold months. I urge you, if you don’t already, to learn how to make good stock even if you don’t preserve it by canning.
The next step for me is in my garden. I walk the rows of heirloom broccoli looking for tight, almost purple in color, florets. I give them a delicate squeeze for firmness and if they make the grade I get out my pocket knife and cut the stalks. It doesn’t stop there: there are the firm, yellow-fleshed potatoes and the pungent basil leaves stripped from thick, late-summer stalks.
All the ingredients are laid out on the counter top. I have an urge to stick close to Marcella’s original recipe, I want her book close at hand and set it next to the cutting board. Even though I have made this recipe from memory I want to make it as Marcella has it written. I like to do this occasionally, to refresh my memory and taste.
I clean the vegetables. With the exception of the potatoes, I cut everything and collect up the ingredients setting them neatly on a sheet tray. Then I move them close to the soup pot so they are at hand.
I came late to Marcella’s books in my cooking, even then it took time for her to grow on me. She was a champion of home cooking and I was more interested in preparing fancy and complicated restaurant food. I never met her; even so I often call her Marcella as if I knew her. I bet lots of people do this.
We did have a conversation once through social media. She called me out on a picture of a branzino, a Mediterranean sea bass. I had this fancy picture, a great photograph of the fish on a bed of greens with prosciutto and I posted it. I received lots of positive comments and likes. Then later that Saturday night Marcella asked me, “What are you doing to this poor fish?”
She may as well have rolled up a wet kitchen towel and snapped me on the ass. She called me out. What proceeded from the sting was a weekend-long exchange of messages, me going to the grocery to get another branzino and her teaching me how to simply poach the fish in aromatics and serve it with a simple aioli. Her recipe was by far the better.
What was important wasn’t that she taught me how to cook a branzino, or that she shared a recipe with me, but that she reeled me in. In one fell swoop she made me realize the importance of simple home cooking, that making restaurant food at home is silly, often wasteful and that great home cooking isn’t about chasing trends and being a foodie but more importantly how to cook wholesome good food for your family.
It might have taken culinary school to make me a chef but in a single Saturday night Marcella turned me into a home cook.

Freshly dug potatoes.

Caramelizing onions

Fresh from the garden broccoli florets.

Broccoli and potato soup
Marcella’s Broccoli and Potato Soup (adapted from Marcella Cucina)
Makes 6 servings
3 tablespoons unsalted butter, divided
1/4 cup extra virgin olive oil
2 cups yellow onion, julienned
Kosher salt and freshly ground black pepper
3 garlic cloves, peeled and minced (about 1 tablespoon)
2 cups Yukon Gold potatoes, peeled, medium dice
2 1/2 cups broccoli florets, no stems
3 1/2 cups stock, chicken or vegetable
6 smallish fresh basil leaves, torn
1/2 cup Parmesan, grated
- In a 3 1/2-quart heavy-bottomed pot, combine the olive oil and half the butter. Place the pot over medium heat. Once the butter begins to melt, add the onions. Season them with a pinch of salt and freshly ground black pepper.
- Saute the onions until they become golden. Don’t rush this step and adjust the heat as necessary to keep them from browning too fast. Add the garlic and cook until fragrant.
- Add the potatoes. Stir them to coat with oil and let them sizzle away for a minute or two. Add the broccoli and do the same as you did with the potatoes. Add the stock.
- Bring the stock to a boil. Taste the broth and adjust the seasoning. Go easy on the salt though because the Parmesan has lots and will act as seasoning as well.
- Simmer the soup until the broccoli and potatoes are tender. The broccoli is not going to remain vibrant green, but if it is good broccoli it won’t be olive drab either.
- Once the potatoes have cooked through, add the parmesan, the remaining butter, and the basil. Stir to combine and serve with more black pepper.
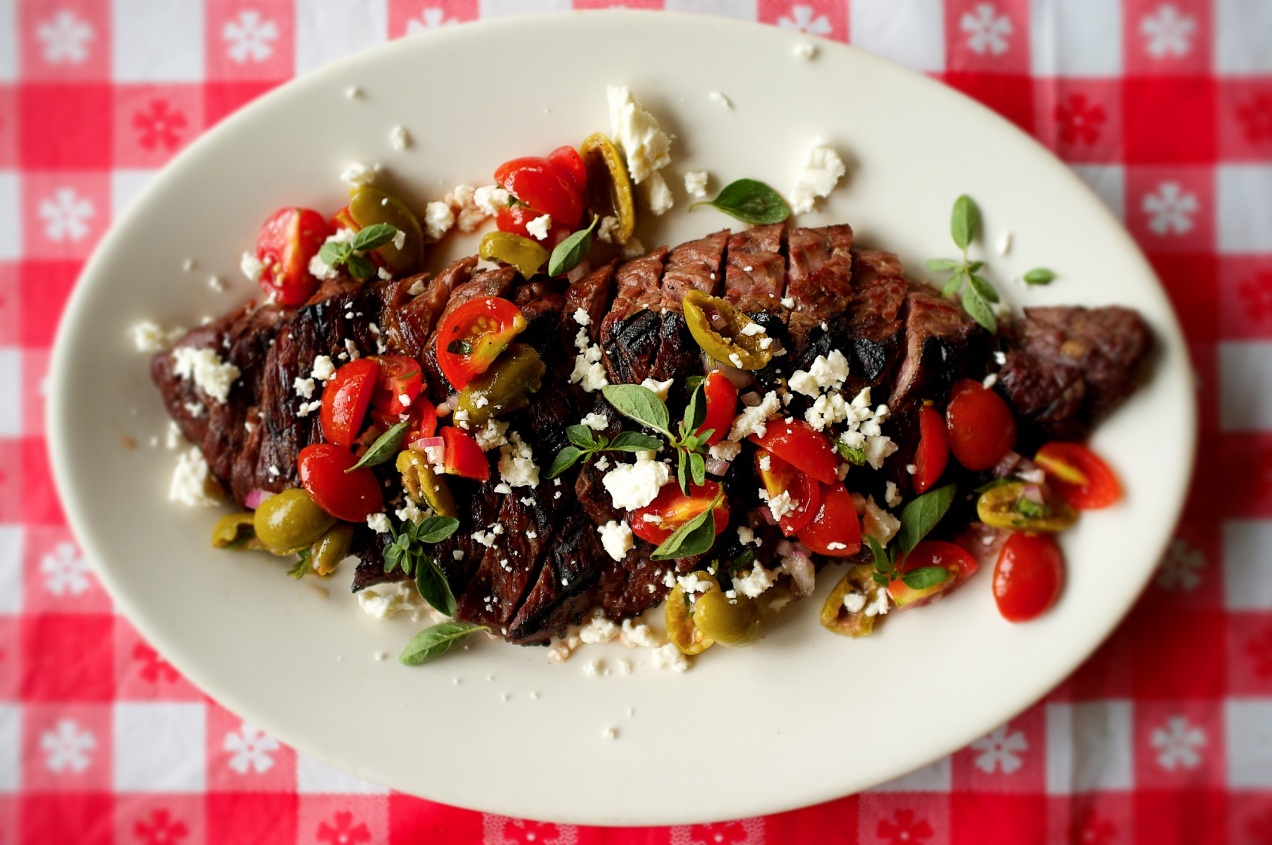
Everything but the Hamburger, Special Sauce Included

Sadly, as I sit at the bus stop watching my daughters play, I have to tell myself: summer is so last season.
All summer I have been grilling vegetables for salads. Mostly zucchini and summer squash; I char it deeply and then chop it and toss it with basil, lemon juice, and olive oil, in sort of a grilled chopped salad. It captures all the flavors of early summer one could want. But at some point, either the zucchini or I tire and the dish no longer appears on the table. At least not until next summer, when the annual craving for these flavors peaks again. Continue reading
Grilling: Tips, Skirt Steak and more…

I use a pair of kitchen tongs and quickly flip a steak, pull back to let my hand cool for a split second before diving in again behind the safety of the tongs to flip another. The hair on my forearm recoils from the heat. Even with a long pair of kitchen tongs I can’t bear the sting of the glowing coals like I used too.
I have lost my commercial kitchen hands. The hands that could take the heat without flinching, the same hands that could grab thermonuclear plates, or could move steaks around on a grill without ever noticing the heat. The heat abused hands that were once this line cooks badge of honor.
The wind shifts, a wisp of white smoke blows back. My eyes catch a little before I can turn and shut them. The smoke underneath my eyelids stings and my eyes begin to water. Continue reading
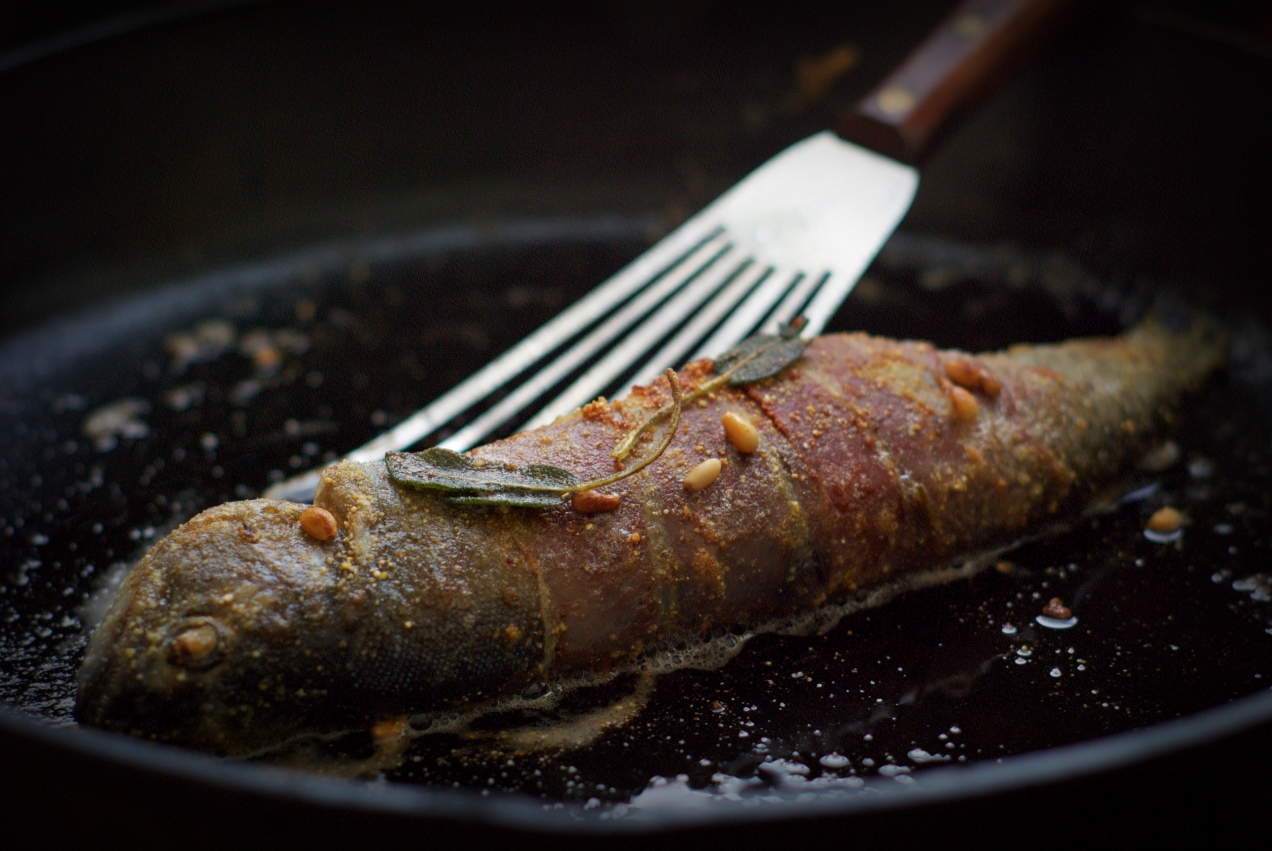
Pan Fried Trout with Prosciutto, Crispy Sage and Pine Nuts
There is something special about trout that goes beyond just eating. They are one of only fish that have a whole culture built around them. They are a freshwater game fish, they are skittish and will jump at their own shadow. They only thrive in cold water and need lots of oxygen provided by a stiff current. When they feed they feed only on what is abundant at the moment. Wild trout make for difficult prey.
In the high altitude lakes of the Grand Tetons you are likely to catch cutthroats the size of your hand while watching the sunrise in, hands down, one of the most beautiful places in the world. When you get back to camp you cook them up for breakfast with pancakes and eggs.
On the other hand you might spend the afternoon in the Catskills on the banks of the Beaverkill reading Hemingway or Fitzgerald. Legendary fisherman like Lee Wulff and Lefty Kreh coming to mind as you are thinking about the evening fish and having high hopes for a Green Drake hatch. You might even doze off for an hour.
Then just as the evening hours begin you pull on your waders and out into the rushing stream you go. It doesn’t seem like hard work from the shore but standing in rushing water up to your midsection takes effort. You wrestle the current to get to the spot you want. You look down at the water to see if there are any bugs floating by that might give you an indication of what the fish are eating tonight. You light a cigar and smile.
You see the transparent wings of a pale evening dun float by. You reach into your fly box and pull out a number 20. The fly you saw go by didn’t seem any bigger. You tie the fly to the tippet. You drop the fly into the water and strip out some line.
You draw back the rod in a gentle sweep and the fly draws past your ear and then you rocket it forward aiming upstream of an eddie that lies just behind a big rock. You watch as the fly floats downstream, you gather excess line, and as it passes the eddie you hope you hear and see a strike as a rainbow trout breaks the surface grabbing your fly. If you had a good night and matched the hatch you will be in camp cooking up a couple of nice rainbows for supper but only after a nice Scotch.
Serves 2
2 trout, boneless 12 to 16 oz.
4 pieces prosciutto, thinly sliced
a handful of sage leaves
1/4 cup grape seed oil
1 tablespoon of butter
1/4 cup pine nuts
kosher salt and fresh ground white pepper
cornmeal for dredging
1. Season the inside of the trout with salt and pepper. Carefully lay out two pieces of prosciutto letting the long side overlap by 1/4 inch. Lay a trout across the short sides of the prosciutto and wrap it in the prosciutto.
2. Heat a 14 inch skillet over medium high heat. Dredge the trout in cornmeal and shake off any excess. Add the oil to the pan. Sprinkle in the half of the sage leaves and let them deep fry. when they have crisped remove them from the pan.
3. Gently lay the trout into the pan, reduce the heat to medium and cook until the pancetta is crisp and caramelized, about 5 minutes. Gently turn the fish cooking the other side. It will take about ten minutes total for the fish to cook through so be patient and adjust the heat as necessary.
4. When the fish are done remove them to their plates. Drain the oil and put the pan back on the heat. Add the butter, the pine nuts and the remaining sage leaves. When the nuts have toasted spoon some of the pine nut sage butter over the top of the fish. Serve
Chicken, Sausage and Red Pepper Paella
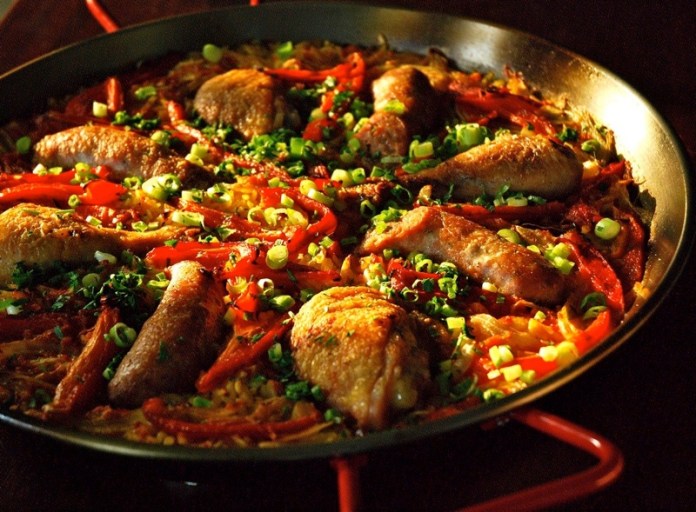 Paella to me is the ultimate one pot meal. It also is the time of year where I am not ready for a stew but want something more substantial than the usual summer fare. Paella is a great answer. Although paella is considered Spanish I think this one is more Mediterranean. I use Italian sausages but fresh chorizo would be good, the important part is that the sausage isn’t dry cured or it would just be drier in this case. I also use arborio rice, but you could use the Spanish version of this as well.
SERVES 4-6
2 bell peppers
1/4 cup extra virgin olive oil
2 chicken legs, seasoned with salt and pepper
2 Italian sausages
2 chicken thighs, seasoned with salt and pepper
1 onion, julienned
1 fennel bulb, tops trimmed, core removed and sliced very thinly
1/4 cup garlic, peeled and thinly sliced
2 bay leaves
3 1/2 cups warm water
pinch of saffron, crumbled
3 Roma tomatoes, cut in half from top to bottom, and grated, large whole of a box grater, leaving the skin behind
1/4 cup dry white wine
2 cups arborio rice
1 1/2 teaspoon aleppo pepper
1 tablespoon flat leaf parsley, minced
2 tablespoons green onions, sliced into thin rings
kosher salt and fresh ground pepper
- Sometime during the day or when ever you have time, turn a gas burner to high. If you don’t have a gas burner turn your oven to broil and place a rack at the highest level you can. Char the peppers, top, bottom and all on sides. The idea is to char or blacken the skin without cooking the pepper through.
- Place the peppers into a container with a lid. Set aside for at least 20 minutes. Crumble the saffron into the warm water.
- If you roasted them properly the skins will easily peel right off with out running them under water.
- Peel, seed and core the peppers and then julienne them into thick strips.
- Preheat the oven to 400 degrees. Place a 16 inch paella pan or a 14 inch saute pan over medium high heat. Add the olive oil and once it is hot add the chicken, skin side down, and then the sausages. Brown them thoroughly and then remove them to a plate. You do not want them to cook all the way through. They will finish cooking in the oven so you just want to brown them.
- Turn the heat to medium and add the onion and fennel. Season them with healthy pinch of salt and pepper. Cook until they start to soften. Add the garlic, aleppo pepper and bay leaves, once fragrant add the white wine and grated tomatoes and cook for a minute or two letting the alcohol burn off. Add the saffron water and rice. Season again with a healthy pinch salt and pepper. Gently shake the pan to level out the rice. Place the chicken into the pan and arrange the red peppers around the chicken.
- Bring to a boil, place the pan into the oven and set the timer for 15 minutes. Cut the sausages in half. Once the timer goes off add the sausages and place the pan back into the oven. Set the timer for 10 minutes.
- Once the timer goes off remove the pan from the oven and place a clean towel over the top. Let the dish rest for five minutes, remove the towel and garnish with parsley and green onions, then serve.
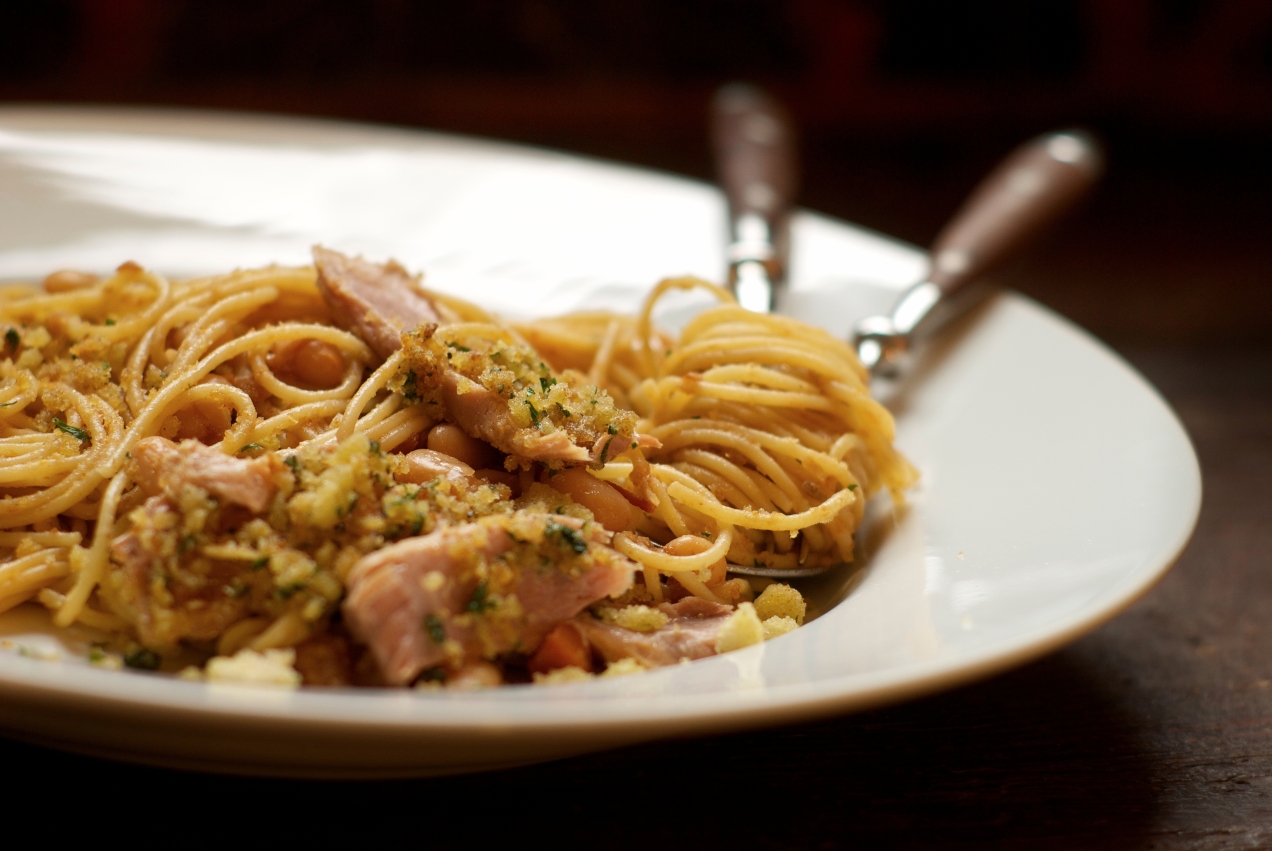
Tuna with White Beans and Spaghetti
White beans and tuna have always been combined in salads and pasta and have long been purveyor’s of pantry dinners in Italy. I have taken up the habit of pantry pasta myself and while I don’t keep many canned goods I do keep tomato sauce, tuna in olive oil, dried beans and pasta on hand.
The cheese rind is imperative here. It is to the broth what bones are to stock. Besides you know it makes you mad to have to pay for this usually unusable part. So here is your opportunity. I Always try to have at least one cheese rind on hand and just store it in the fridge amongst the other cheeses.
This is not a skillet pasta but a long simmering sauce because it takes some time to build the flavors in the beans. As with all beans everyone has their own method to their bean madness. I have tried many and the one I use yields a tender beans with tooth. That is not to say it is crunchy or undercooked but what it means is it holds its shape while being tenders. I want to know I am eating a bean when I bite into one.
I also don’t make home made pasta for this dish because this is one time were store bought spaghetti noodles are the right choice.
I served this with a green side vegetable and after the pasta served a salad, as the Italians would.
Serves 6 to 8
2 heads of garlic, the top 1/4 inch of which has been sliced off
1/2 pound white beans
4 whole cloves of garlic, peeled and trimmed
10 sun dried tomatoes (dried, not in olive oil)
water
1/2 cup yellow onion, small dice
1/4 cup carrot, small dice
1/4 cup celery, small dice
1 1/2 teaspoons fennel seed, ground
1/4 to 1/2 teaspoon red pepper flakes
2 bay leaves
1/2 cup strained tomatoes or tomato sauce
1 each 2 x 2 inch parmesan cheese rind
olive oil
kosher salt and fresh ground pepper
1/3 cup bread crumbs, toasted in olive oil then seasoned with salt and pepper then mixed
with 1 tablespoon of minced parsley
12 oz. tuna in olive oil
1 pound spaghetti, cooked according to the instructions on the box
- Preheat the oven to 300˚F. Place the heads of garlic in a small ovenproof dish and drizzle each with olive oil then season them with salt and pepper.
- Cover the dish with foil and bake the garlic for 1 hour. At the end of the hour make sure they have taken on alight tobacco color and are tender. Cook them another 15 minutes if you need to. Once they are done remove them from the oven and set them aside.
- Place the beans, garlic cloves and the sun dried tomatoes into a sauce pan and cover by at least 2 inches of water. Place the pan over high heat and bring it to a boil and let it boil for 2 minutes. Cover and remove the pan from the heat and let it sit covered for two hours or longer.
- At the end of two hours drain the beans. Rinse out the pot. Remove the sun dried tomatoes and chop them. Place the pot over medium heat and add a good 2 tablespoons of olive oil. When it is hot add the onion, carrots and celery and let them saute until they begin to become tender. Add the fennel, bay leaves and red pepper and saute until fragrant. Add the beans, sun dried tomatoes and garlic back into the pot. Cover the beans with water by 1 inch. Add the tomato sauce and cheese rind.
- Bring the pot to a boil then reduce the heat so the liquid is at a lazy bubble. Season them with pepper. Stir occasionally to keep anything from sticking to the bottom of the pot.
- Near the end of the cooking season the beans with salt to taste and take the roasted garlic and squeeze out the garlic paste then add the paste to the beans. Stir it all in and taste. Adjust the seasoning.
- When the beans are tender cook the pasta. Once the pasta is done drain it and immediately toss the pasta with some of the oil from the tuna. Toss the beans and pasta together.
- Put the pasta into a serving bowl, top with tuna crumbles and then the bread crumbs. Serve immediately.
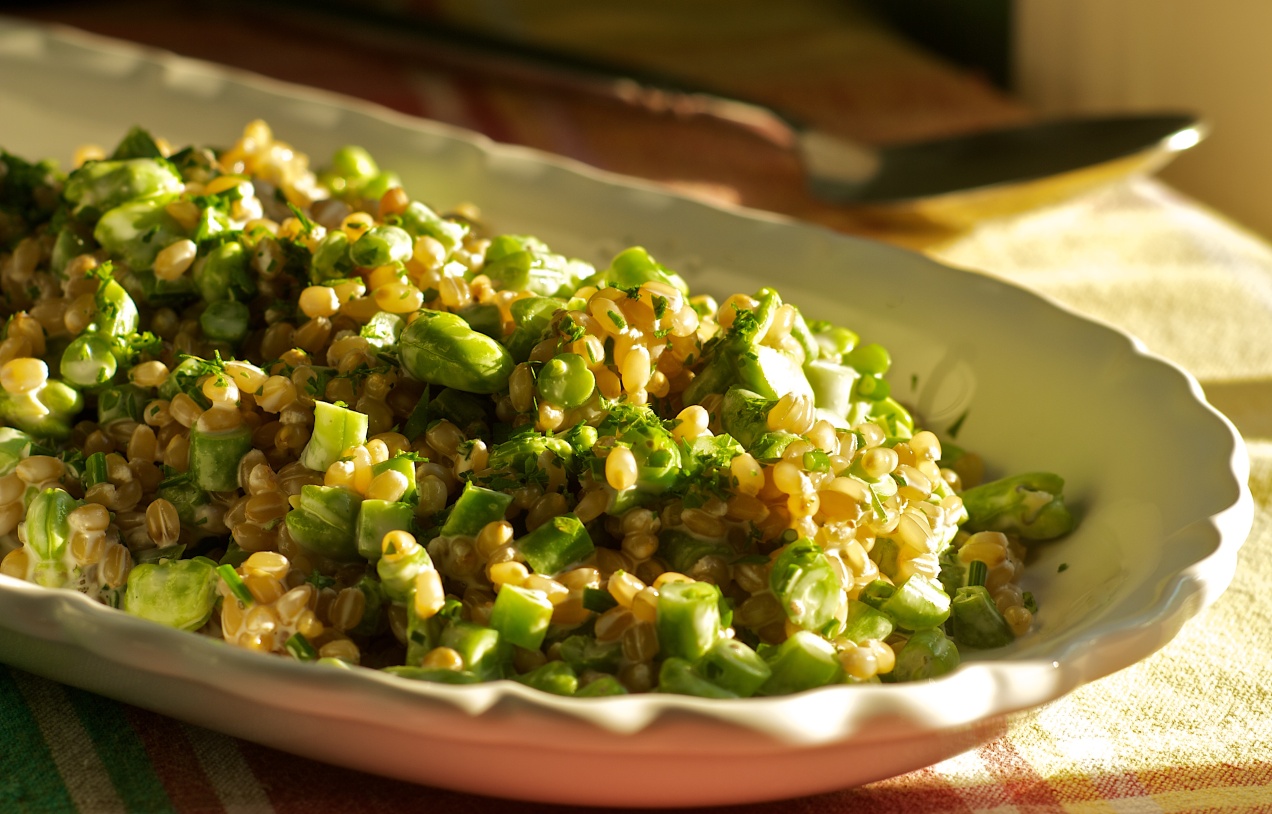
White Wheat Berry Salad with Fresh Beans
 If you have ever had fresh raw fava beans then you know the wonderful tender pop, the tender chew and the juicy flavor. It goes wonderfully here with the green beans and the dressing.
Wheat berries are another wonderful addition to your repertoire. They add a subtle chew and give the dish a pasta flavor while digesting at a lower glycemic level because they are a whole grain.
This is one of those dishes that is here because it is delicious and, luckily, it just happens to be very good for you too.
Serves 6 as a side dish
1 cup soft white wheat berries, rinsed
3/4 cup green beans, blanched and chopped into 1/4 inch pieces
1 cup fresh fava beans, lima, or edamame, shells and outer skin removed
1 1/2 tablespoons chives, chopped
2 teaspoons fresh thyme, minced
1/4 cup mayonnaise
1/3 cup buttermilk
2 teaspoons lemon juice
kosher salt and fresh ground pepper
1. Place the wheat berries into a large pot and cover them with cold water by two inches. Place the pot over high heat and bring it to a boil. Boil for two minutes then turn off the heat, cover the pot and let it sit for two hours.
2. After two hours add a couple of pinches of salt and then place the pot back over the heat and bring the berries to a boil again. Now reduce the heat to medium and let them simmer until soft, or the texture you want, about 15 minutes.
3. Drain the berries in a colander and let them cool to room temperature.
4. In a large mixing bowl combine the mayo, buttermilk and lemon juice. Season it with salt and pepper then add the thyme and chives. Add the rest of the ingredients and mix to combine. Taste and adjust the seasoning. It is nice if you can let it sit for at least a half hour to let the flavors meld and even overnight is good.
5. Serve
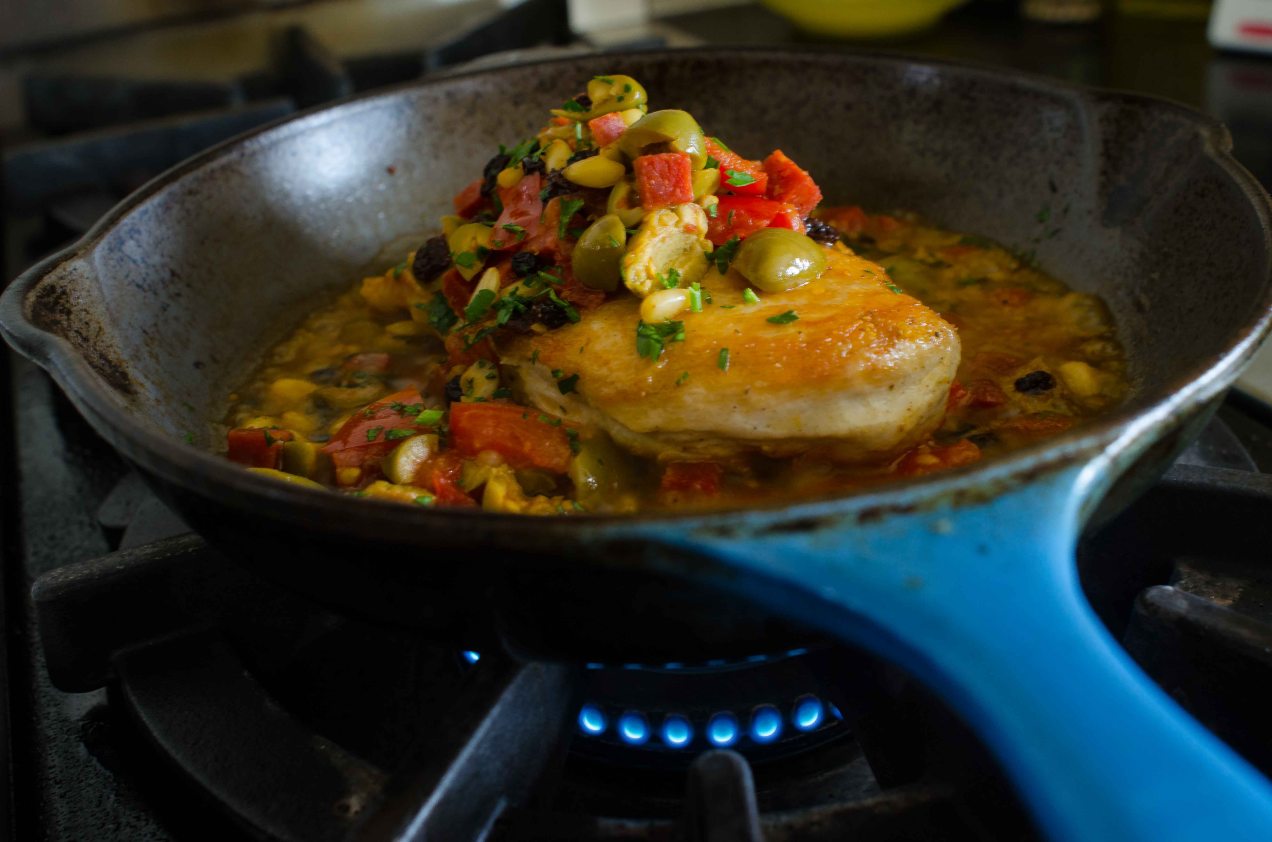
Sautéed Chicken with Pepperoni and Olives
I can tell you, with great certainty, how good a restaurant is going to be by the temperature of their plates. If I get a stone cold plate with hot food chances are the dinner will be average. If I get a cold salad on a warm plate just out of the dish machine, again, I know the rest of my dinner has more of a chance being bad then good. It tells me whether or not the kitchen cares.
When I worked in commercial kitchens it was a bone of contention with me and those who worked for me. Your plates needed to be hot for hot food and cold for cold food, period.
There was a time at home, back before we had kids, when I would always warm our plates in the oven. Probably sounds completely retentive, for all I know it might be, but I have never really given a rats butt what others think. I did it because my wife and I enjoyed being at the table together, taking our time eating, and having some quality conversation. Hots plates keeping your food warm is a nice touch.
We had this for dinner the other day, I warmed the plates.
Serves 2
olive oil
2 each 6 ounce boneless skinless chicken breast
1/4 cup pepperoni, 1/4 inch dice
1/4 cup Picholine olives, pitted and halved
1/4 cup tomato, diced
1/2 cup dry white wine
1 tablespoon pine nuts
1 tablespoon currants
2 teaspoons flat leaf parsley, minced
kosher salt and fresh ground pepper
1. Season the chicken on both sides with salt.
2. Place a heavy bottomed sauté pan over medium high heat. When the pan is hot but not smoking add enough oil to coat the bottom of the pan. Gently lay the chicken breast, what would be skin side down, into the pan being careful not to splash hot oil.
3. Brown the chicken on both sides. Adjust the heat as necessary to keep the oil from burning. Once both sides have caramelized remove them to a plate or pan and let them rest. Pour out any excess grease.
4. Meanwhile put the pan back on the heat and add the pepperoni, olives and tomato. Stir and toss it around until fragrant then add the white wine to deglaze the pan. Using a wooden spoon scrape up any brown bits from the bottom of the pan. Once the wine has reduced by half add the pine nuts and currants.
5. Give everything a stir and then place the breast back into the pan. If the liquid in the pan seems at all dry add a 1/4 cup of water. Braise the breast until they are cooked through which shouldn’t be long if you browned them well. Taste and adjust the seasoning, add the parsley and stir to combine.
6. Place the chicken breast onto warm plates skin side up, top with the sauce, serve immediately.

Hachis Parmentier

Hachis Parmentier
One of the things I like best about the French dish Hachis Pamentier is the looseness of the recipe. Unlike Shepard’s Pie which connotates lamb as the central ingredient Hachis Parmentier quite often simply lists chopped meat and then leaves it to your discretion. So anything on hand, usually cooked, usually leftovers which is generally combined with Sauce Lyonnaise.. Then add potatoes, again, mashed, leftover bakers or boiled, pretty much anything you can crush with a fork.
In my book anything Lyonnaise is good and more likely great. The reality, though, of most classic French sauces is, who has demi-glace on hand and who is going to make it for this dish? Not many home cooks do, nor should they. So if you take the base ingredients of the sauce minus the demi-glace you have a vinegar based dressing. In other words something to cut into the richness of the meat and potatoes and a simple balsamic dressing does this just fine.
The reason I chose salmon for this version is it doesn’t need to be cooked before hand. You can put it right into the ring molds raw to be cooked in the oven. Salmon has enough natural collagen that it will bind on its own, no mayonnaise, no egg, no nothing.
What I have tried to do here, and I think with great success, is make a family style dish into something worthy of a fancy sit down dinner and even the main course to a dinner party. You can make the individual servings ahead of time (hint: my ring molds are water chestnut cans with both ends removed, cheap and simple) by putting the molds onto a parchment lined sheet tray, then layering them with the ingredients, covering them and storing them in the fridge.
On the other hand, you needn’t invite anyone for dinner to make this dish it is just as delicious for two as ten and if you want family style just chuck the whole ring mold idea and use a large gratin.
Serves 4
1 pound salmon, skin removed and cubed into 1/4 inch chunks
1/2 cup celery, finely minced
1 teaspoon capers, minced
1/2 teaspoon lemon zest, finely zested
1 teaspoon dill, minced
1 teaspoon chives, minced
1/2 cup comte or Gruyère cheese, grated
3 potatoes, sliced into 1/8 inch or thinner rounds
1 cup milk
1 teaspoon garlic, minced
water
kosher salt and fresh ground pepper
a handful of arugula leaves, rinsed and dried
1/2 teaspoon Dijon
1 teaspoon balsamic vinegar
1 1/2 tablespoons olive oil
1. Place the potatoes, garlic and milk into a medium size pot. Add enough water to cover the potatoes by an inch. Add a teaspoon of salt and a few grinds of pepper. Place the pot over medium heat and slowly bring it to a boil. Cook the potatoes until just tender, being especially careful not to cook them to mush but if you do don’t get you undies in a bundle they will still cook and taste the same. Drain the potatoes.
2. If you plan to cook the dish now heat the oven to 375˚ F.
3. Place the salmon, celery, capers, lemon zest, dill and chives into a mixing bowl. Add 3/4 teaspoon of salt and some fresh ground white pepper and mix the salmon being sure to incorporate all the ingredients and evenly distribute them throughout.
4. Place a piece of parchment paper onto a sheet tray. Place four ring molds onto the tray. Lightly butter the interior walls of the molds and then divide the salmon mixture into four equal portions and pat firmly/gently it into the molds.
5. Taste a potato testing for salt content. Take the potato slices and fan them into the top of each mold making two to three layers. If the potatoes were salty enough when you tasted them then don’t season them anymore but if the need it season each layer with a pinch of salt and pepper. Top with a little cheese and a spritz of olive oil. Bake in the heated oven for 25 to 30 minutes.
6. While the salmon is baking combine the mustard and balsamic adding a pinch of salt and a grind or two of pepper. Then add the oil and mix to combine.
7. When the salmon is done remove it from the oven. Using a spatula and a dry towel remove each mold to a plate placing it in the center. Using a paring knife run it around the edges to loosen the salmon. Gently hold down on the potatoes with a spoon as you lift the mold.
8. Toss the arugula with the dressing and top each hachis parmentier with a bit of greens. Serve with a crisp fruity white wine.

Smoked Herring Salad

Smoked Herring Salad
Why do so many people fear canned fish? I don’t mean tuna, it doesn’t even count. Was there some massive food poisoning event in the United States back in 1908 or something and the canned fish market never recovered or do we just have a lot of closet canned fish eaters in this country.
Canned fish is brilliant, don’t laugh, I am being totally serious. It is really tasty, it harmlessly sits in your pantry ready to be used and is as tasty as the day it was packed.
Maybe people don’t know how to use it or maybe when they were little their parents always told them they wouldn’t like it and so they never have. My guess is most people who say they don’t like it have never tried it or it has been served to them right out of the can bathed in some sort of funky sauce.
No, what I am talking about is fish packed in oil, be it, mackerel, herring or sardines, smoked and not smoked. The omega-3 dense bait fish, well not mackerel it is higher up the chain then the other two, but fish oil rich nonetheless.
It’s as if you have to go to Eastern Europe, Nordic countries or Russia for your recipes and I am good with that. These countries now what to do when it comes to canned fish. I trust them.
This recipe is of Dutch descent. Being the herring eaters they are you can count on them for good recipes.
Serves 4
1 1/2 tablespoons mayonnaise
1 teaspoon Dusseldorf mustard or Dijon
1 teaspoon whole grain mustard
1/2 teaspoon red wine vinegar
1 tin smoked herring or mackerel
2/3 cup celery, chopped
1 cup yukon gold potatoes, boiled and cubed
6 cornichons, chopped
2 to 3 beets, roasted, peeled and cubed
2 hard boiled eggs, shelled
a handful of peas, fresh or frozen
2 teaspoons chives, chopped
2 shallots, peeled and sliced into thin rounds
salt and fresh ground black pepper
1. Combine the mayonnaise, mustards and vinegar in a large mixing bowl. Whisk to combine.
2. Add the celery, potato, cornichons, peas and herring. Smash the eggs into chunks and add them to the bowl. Stir to combine. The herring will break up into small pieces with some hunks much like if you were making tuna salad. If you want big hunks of herring then garnish the salad with it.
3. Divide among 4 plates and garnish with the beets and shallot rings. Garnishing with the beets keeps the salad from turning pink.
4. Serve

Pot Roasted Collards and Purple Hull Pea Fritters with Spicy Buttermilk Gravy

Pot Roasted Collard Greens and Purple Hull Pea Fritters
The one thing that stays the same around my kitchen, has been a continuous thread, is collard greens.
Collard recipes have been prepared in many incarnations but eventually I rendered them all down the most basic of recipes. I like collards in every fashion imaginable, and while I can spoon potlikker right out of the pot and onto a slab of buttered cornbread, making me perfectly happy, I have grown to like my greens best when they are pot roasted. I used to render bacon, butter or pancetta into the pot first, the fatty crispy strips of cured pork to be fought over at dinner. Then there came a time when I needed to make the greens vegan. I started using peanut oil and ever since it has become a fast favorite which is strange since we are big pork eaters.
What happens to greens when they are pot roasted is the natural sugars break out and much like caramelizing onions you start to build flavors that just don’t exist when collards have been boiled. I liken the building of flavors to a fine cigar, great coffee or a complex wine.
As the thick and leathery fall collards, greens which have taken a frost or two, cook down a toothsome quality develops that is very satisfying to eat. You also get these rogue bits that didn’t get as much oil as they should and they become crispy and blistered which contributes a nice contrast. A sure sign that you have roasted your greens right is the smear of brown juice that paints the bottom of the pot when you stir.
We eat greens cooked like this as part of three dinners each week, at least, and in general Amy and I will fight over the leftovers at breakfast time.
Seves 4
For the fritters:
16 oz. field peas, cooked, either black eyed or you favorite type I used purple hull, two 14 oz. cans, drained works too
1 cup carrots, grated
1/4 cup rice flour, or all purpose flour
2 teaspoons shallots, minced
2 teaspoons garlic, minced
1 1/2 teaspoons dried thyme
kosher salt
fresh ground pepper
For the collards:
8 to 10 cups collards, cut into 1 inch stirps, rinsed multiple times to get rid of sand and dirt
peanut oil
kosher salt
fresh ground black pepper
For the buttermilk gravy:
1 1/2 cups live culture buttermilk
1 teaspoon creole seasoning
1/2 teaspoon dried thyme
1 1/2 teaspoon shallot, peeled and minced
1 teaspoon garlic, peeled and minced
1.Heat the oven to 325˚ F. Combine all the gravy ingredients in a small bowl and mix to combine. Set aside to let the flavors build.
2. Place a 6 quart enameled Dutch oven with a lid over medium high heat. Add some peanut oil to the pot being generous with the peanut oil and making sure you coat the bottom of the pan plus a touch more. Add half the greens and season them with a two finger sprinkle of salt and a few grinds of pepper. Turn the green giving them a hot oil bath. You want the leaves to be coated, not greasy though. Add the rest of the greens. Season them with salt and pepper too. Turn them into the first batch of greens being sure they get an oil coat as well. Put the lid on the pot, slide it into the oven and roast the collards for 1 hour and 15 minutes making sure to stir the pot at the half way point.
3. Place the cooked peas into the bowl of a food processor. Pulse to grind the peas. When it becomes mealy add the rest of the fritter ingredients and pulse until smooth, moist and will hold together. The key here is to adjust the moisture content. If it is too wet add rice flour a tablespoon at a time letting the mix rest a bit so the flour can hydrate and thicken the fritter mix. If it is too dry add water by the tablespoon and do the same. My way to test patties of all types is to make a patty and then throw it against the side of the mixing bowl. If it flattens and holds its shape I am happy.
4. Once your consistency is right make 8 equal sized patties. Place a nonstick pan over medium heat, add oil and fry the fritters until they are brown on both sides. Remove them from the pan to a brown bag lined tray. Drain the excess grease. Serve while hot.
Grilled Sirloin, Cold Weather Greens and Buttermilk Parmesan Dressing

Sirloin Steak with Cold Weather Greens
I consider steak and salad greens to be my go to, quick Friday or Saturday night meal. If we don’t get home till late it is still something substantial, not overly filling, but very satisfying.
While I like all kinds of salad greens these are quite possibly my favorite. They are peppery and a little bitter but they are toned down by the buttermilk parmesan dressing, steak juices and the steak itself.
Rarely do we serve any other sides with this dinner and have been known to polish off an entire one and a half pound sirloin with a huge platter of greens.
Serves 2
1 1/2 lb. top sirloin steak
1 head of radicchio
2 Belgian endives
1 bunch of watercress or upland cress
For the dressing:
3/4 cup mayonnaise
1/3 cup 2% non-homogenized buttermilk
1/2 to 3/4 cup good quality parmesan, microplaned
1 to 2 teaspoons fresh lemon juice
2 teaspoon or more of fresh ground black pepper
kosher salt
1. Season the steak with salt. Set it on a baking rack and set it on a sheet tray with sides. Place it in the fridge for at least 2 hours and up to 8.
2. In a large mixing bowl add all the salad dressing ingredients and mix to combine. Taste and add salt, more cheese or pepper as necessary. Set aside to let the flavors meld. The dressing should be made about the time you season the steak and can be made up to a day in advance.
3. Heat you grill to high for direct heat grilling. Rinse the greens and spin them dry in a salad spinner then place them in a large bowl.
4. Season the steak with pepper. Grill the steak to one temperature below your desired doneness and then remove the steak and let it rest on a tray for 15 minutes.
5. Re-warm the steak on the grill. Toss the greens with the dressing, coating the greens well, and place them on a platter. Pour all the accumulated juices from the steak pan onto the salad. Remove the steak from the grill and slice it thinly and place it right on top of the greens. Serve immediately.
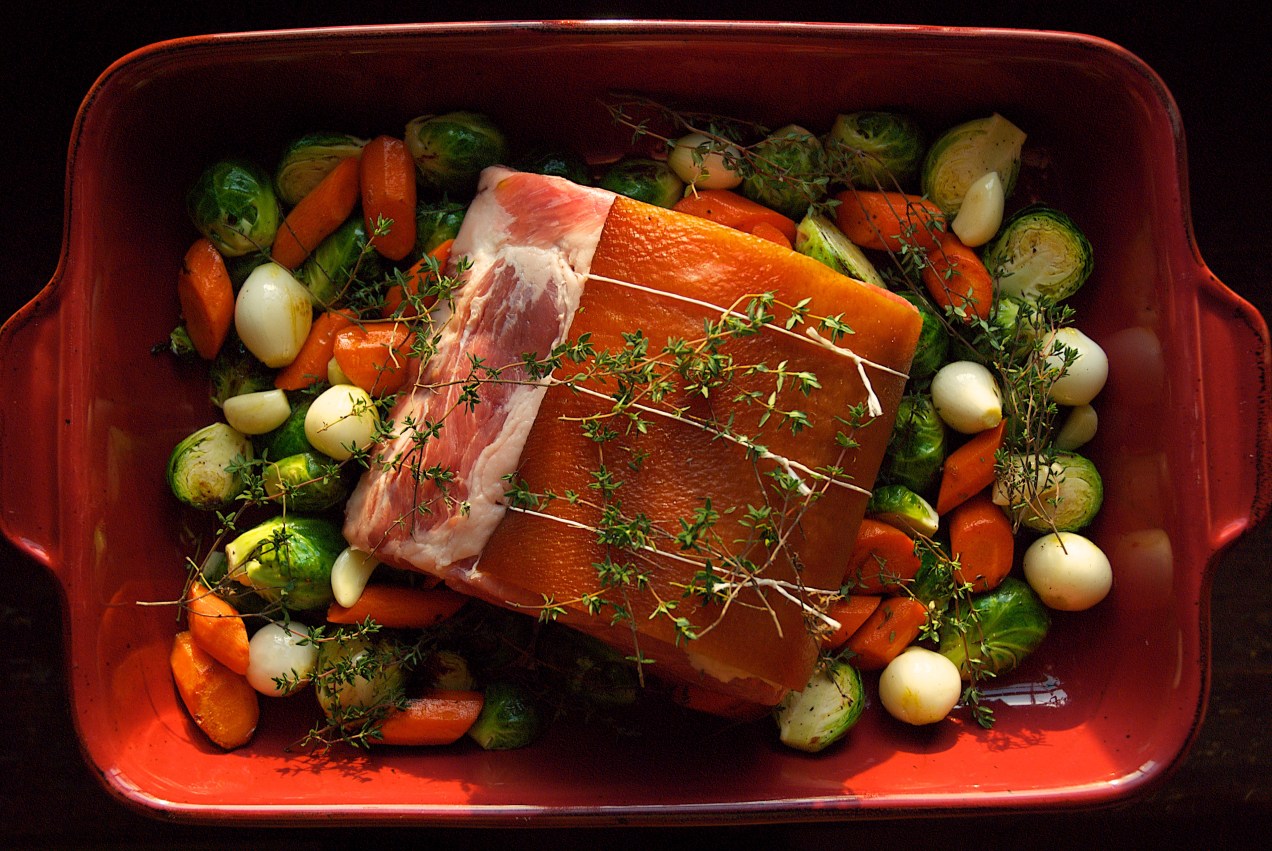
Barded Pork Rib Roast with Fall Vegetables

A pork rib roast with fall vegetables ready to go into the oven.
One perfectly good reason to buy whole slab or make your own bacon is you get the smokey rind. The pork rind is perfect for keeping a roast juicy and adds tons of great flavor, and besides, when the smokey hammy fat oozes down on the vegetables, oh my…
Wrapping a roast in fat is called barding. It is so simple and so delicious. It is a technique of days gone buy in America but I often see it done in ethnic markets and in different countries around Europe. If you live in Indianapolis Klemm’s carries the smoked rinds but you might want to call first to make sure they haven’t sold out.
If Brussel sprouts offend you, which I just don’t get, feel absolutely free to substitute other long cooking green vegetable. Parsnips, potatoes, celery root, and the list goes on, would be good too.
Serves 4
1 four rib, bone-in center cut pork loin roast
1 piece of smoked pork rind, often found at German butcher shops
4 to 5 carrots, peeled and cut into 1 inch chunks
1 lb. Brussel sprouts, trimmed and cut in half
8 to 10 pearl onions, peeled, or small onions cut into wedges
8 to 12 garlic cloves, trimmed and peeled.
a handful of thyme sprigs
kosher salt and fresh ground pepper
grape seed oil
Preheat the oven to 350 degrees.
1. Season the roast with salt and pepper. Place the bacon rind onto the meat side of the the roast and tie it into place with kitchen twine.
2. Heat a 12 inch skillet over high heat and add the grape seed oil. Add the Brussel sprouts and carrots without crowding them. You may need to do this in batches. Season them with salt and pepper. Brown them well then place them into a large casserole.
3. Brown the onions in the same pan and any remaining sprouts or carrots.
4. Place the remaining seared veggies and garlic into the same casserole and set the roast on top. Strew the thyme branches across the top of both the vegetables and the roast.
5. Place the casserole into the oven and set a timer for 30 minutes. Stir the veggies around turning them to coat them in the drippings.
6. Set the timer for another 30 minutes and stir the veggies again.
7. Go another 30 minutes but this time check to see how the roast is coming along by either the squeeze test or with an instant read thermometer. It should read 150-155 degrees.
8. If it is not done stir the vegetables and check it again after 15 minutes.
9. Once the roast is done cut it into 4 chops and serve along side the veggies.
The delicate flavor of white fleshed fish, for me, is best when cooked simply. In fact the most important thing is seasoning the fish properly and making sure not to overcook it, which is a good reason to salt it an hour before you want to eat and why it makes sense to finish cooking or re-warming the fish in the oven.
This dish is a great recipe for entertaining because you can brown the fish without cooking it completely and then when you are ready, you can finish it up in minutes in the oven. I also find it is a great dish for date night at home or a special occasion dinner for two, such as an anniversary.
Finally, the fish you use is up to you. I love Dover sole but it is hard to find, you are going to have to skin it, and then bone it too. Flounder is an excellent alternative as is halibut.
Serves 2
1 large whole Dover Sole, skinned, or other flat fish
5 fresh basil leaves
1 sprig of thyme or savory
extra virgin olive oil, plus more for cooking the fish
3 baby multi colored carrots
1 or 2 zucchini depending on their size
1 garlic clove, peeled and crushed
kosher salt and fresh ground white pepper
1. Heat the oven to 350˚ F. Salt and pepper the fish on both sides.
2. Place the herbs into a mortar. Using the pestle grind and bruise the herbs into a coarse paste. Add a pinch of salt and a grind of fresh ground pepper. Add 2 tablespoons of extra virgin olive oil and mix to combine. Set the oil aside.
3. Heat the olive oil in a skillet(non-stick if you are more comfortable with it) large enough to hold the fish easily and comfortably. When the oil is very hot but not smoking add the fish. Brown the fish on both sides it doesn’t matter if it is cooked through or not, then remove it to an oven proof tray.
4. Clean out the skillet and place it back onto the stove. Slide the fish, and two oven proof plates, into the oven to finish cooking or warming it. Add a glug or two of oil to the saute pan, add the crushed clove of garlic then add and sear the zucchini. Season it with salt and pepper then turn it and do the same to the other side.
5. Plate the fish, put the zucchini on the plate attractively and using a mandolin or by slicing the carrots thin, garnish with the carrots. Drizzle some herb oil over the fish filets.
6. Serve.
Dover Sole with Herb Oil and Zucchini

Texas Caviar
The first time I had Texas caviar I was in Santa Fe. There I think they called it Cowgirl Caviar but that might have been the name of the restaurant. I remember lots of pictures of cowgirls. Maybe the name of the restaurant was called Cowgirl Hall of Fame. That seems more right to me.
Anyway. Texas Caviar was made famous by Helen Corbitt the food director in the 1950’s for Neiman Marcus in Dallas. Many recipes call for Italian dressing. No. Do not do it. I am sorry but bottled dressings suck. Period. This is supposed to be fresh and vibrant and everything added is meant to highlight the creamy texture of the legumes, not hide it.
Serves 6 to 8
2 ea. 15 oz cans black eyed peas, drained and rinsed
2 tablespoons red onion, minced
2 tablespoons celery, minced
1/3 cup cilantro, minced
1 tablespoon green onions, minced
1 garlic clove, minced finely
1/3 cup red wine vinegar
1/8 cup extra virgin olive oil
1/8 cup neutral flavored oil, i.e., canola, grape seed
1 to 2 dried cayennes or chile tepins cut into thin strips with scissors
kosher salt and fresh ground black pepper
corn chips
1. Combine all the ingredients into a bowl and mix to combine. Season with salt and lots of black pepper. Taste and adjust the seasoning as necessary. This gets better as it sits, 24 hours is optimal, but will also gain more Scoville heat units so keep that in mind when you decide the amount of red pepper you want to use.
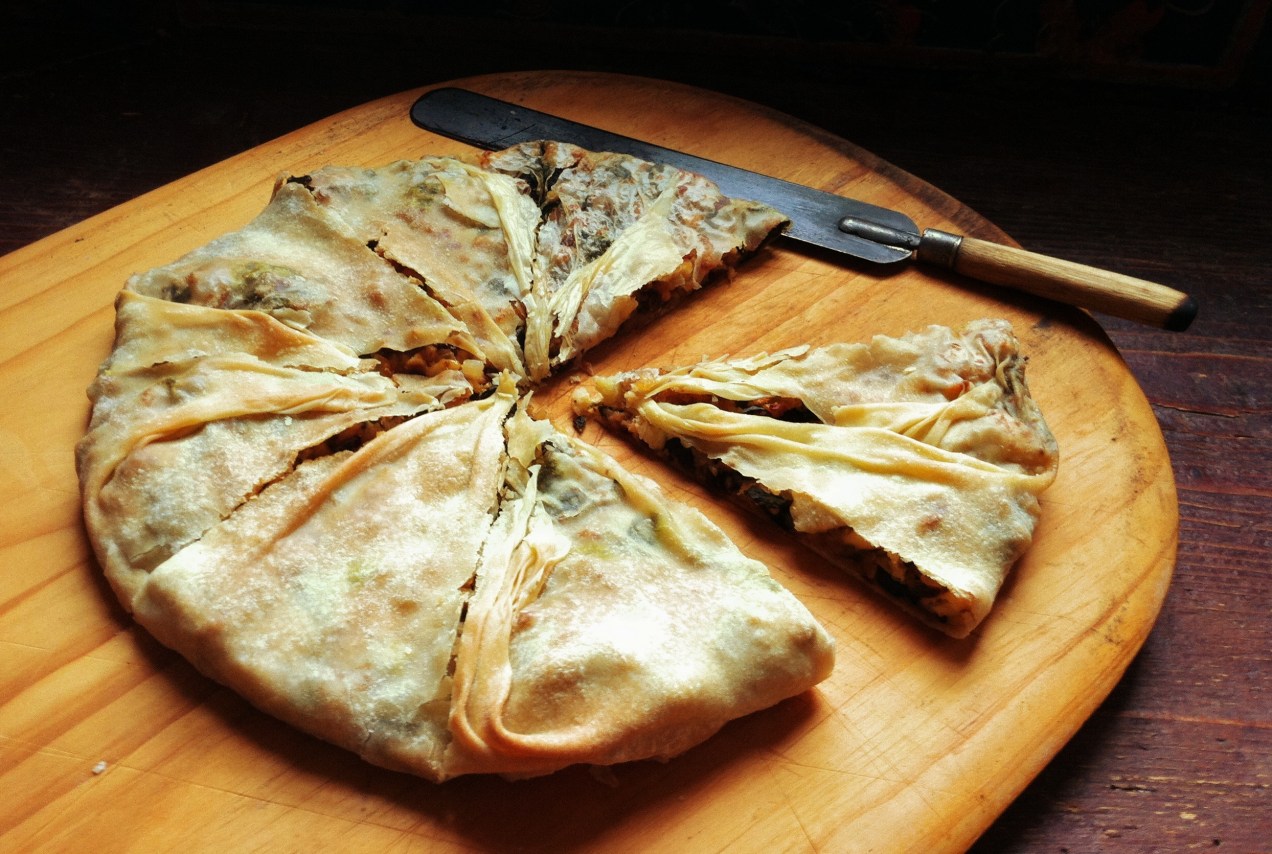
Spinach and Feta Pie
Spinach and Feta Pie
Most people, it seems, remember the first time they ate spinach pie. Chances are you were at an ethnic restaurant, maybe on your first food adventure to a Greek establishment, feeling continental and worldly. Maybe you where in college and eating at the local hippie restaurant where they also introduced you to North African Peanut Stew with Tofu, bags of tamari pepitas and herbal tea.
The joint smelled of clove cigarettes, Turkish coffee and sweat. Hank Williams and Lefty Frizzell tunes rained down from the speakers above and mingled with the smell of patchouli making you think it was the birth of cool. There are newspapers hanging on bamboo racks, a clothesline drying out today’s laundry, for anyone to pick up and read. People played checkers and chess and snacked on millet muffins.
It was a health food restaurant without a non-smoking section. In the kitchen Moosewood cookbooks lined the shelf above the stove. The food was vegetarian except on Sunday morning when all of campus lined up for a killer breakfast that included sausage and bacon. Sunday being the only day the restaurant actually made money.
Just sitting in the pine high-backs with a good cup of your daily grind and a used but unopened copy of The Sheltering Sky, lying face up on the table, made you feel smart. Lots of broody wannabes wrapped in black with their berets mimicking Kerouac, but really, all of them a breed of Caulfield. Each with tattered composition notebooks lying open to the first page waiting for that initial first stroke of the pen.
It was an ocean of intellectual doldrums, bitter hopes and angst filled dreams. Everyone who came here was looking for more than a good meal. They had either lost the wind in their sails or were looking for an intellectual soul mate with which to share their troubled waters, if not their sheets.
And, yet, you came back. Somehow at this place in time, the angst ridden shirt feels comfortable, it fits and you fit or maybe the spinach pie, really, was just that good.
Serves 4 as part of a larger meal
For the strudel dough:
1 1/4 cup all purpose flour dough
1 tablespoon plus 2 teaspoons safflower oil
5 to 7 tablespoons cold water
♣
For the filling:
2 tablespoons olive oil
2 cups yellow onion, small dice
1 1/2 tablespoons garlic, minced
two 1 x 4 inch pieces of orange zist
1 teaspoon finely grated orange zest
10 oz. baby spinach, washed
1 cup fresh bread crumbs
1/2 cup crumbled feta cheese
1/2 to 1 teaspoon red pepper flakes
2 tablespoons currants
kosher salt and fresh ground black pepper
1. Place the flour, safflower oil and water into the bowl of a mixer and using the paddle attachment mix the ingredients until they become well combined and elastic.
2. Turn the dough out and need it till it is satiny smooth. Wrap in plastic wrap and let it rest for 1 hour. You can make the dough up to a day in advance and store it, wrapped, in the fridge. Just be sure to let it come to room temperature before shaping the dough.
3. Place a large saute pan over medium high heat and add the olive oil. Add the orange zest strips and let them bubble away for a few minutes. Remove the strips.
4. Add the onions and cook them until they just start to turn golden at the edges. Season them lightly with salt and pepper, remember feta is salty. Add the garlic and chili flakes and stir until fragrant.
5. Add the spinach and turn it with tongs in the pan to coat it with oil and to wilt it. Once it is mostly wilted turn it out into a clean kitchen towel that is set in a colander. Pull the edges of the towel together then place your tongs around the towel, like a hair pin, and use the tongs to twist the towel into a ball around the spinach and squeeze out the moisture.
6. Place the pan back over the heat and add a more olive oil. Add the bread crumbs and brown them. Add the grated zest and the cooked spinach to the pan and mix to combine. Remove from the heat and cool. Once cool add the feta and currants. Taste and adjust the seasoning as necessary.
7. Preheat the oven to 375 ˚F.
8. A large 18 x 24 wood cutting board works great for this but the corner of a counter or table will do as well. Cover the cutting board with a large, non terry cloth, towel or apron. Dust it with flour.
9. Flatten the dough into an 8 inch disk and dust it with flour. Work it out with you hands into a larger disk. 12 to 14 inches round. Now, hook an edge of the dough onto a corner of the board. Using the backs of your hands, tucked under the dough, start stretching and pulling, gently, the underside of the side of the dough towards the empty corners of the board. If you get a whole just pinch the dough back together and continue. You can stretch the thicker edges from time to time with your hands. Keep stretching from the underside of the dough with the backs of you hands until the dough is transparant and eggshell thin and is 18 x 18 inches.
10. Sprinkle the dough with a little bit of olive oil and using a pastry brush gently and lightly coat the dough with the oil.
11. Lift the dough into a 12 inch non-stick saute pan leaving the edges of the dough to hang over the sides. Trim off the thick edges of the dough with scissors.
13. Place the filling ingredients into the center of the dough. Grab the edges of the dough and bring then to the center of the pan. Pinch the center and twist the dough. Pinch of the dough ball in the center.
14. Bake in the preheated oven for 45 minutes or until brown and crusty. Remove from the oven and let the pie rest for 20 minutes. Cut into wedges and serve.
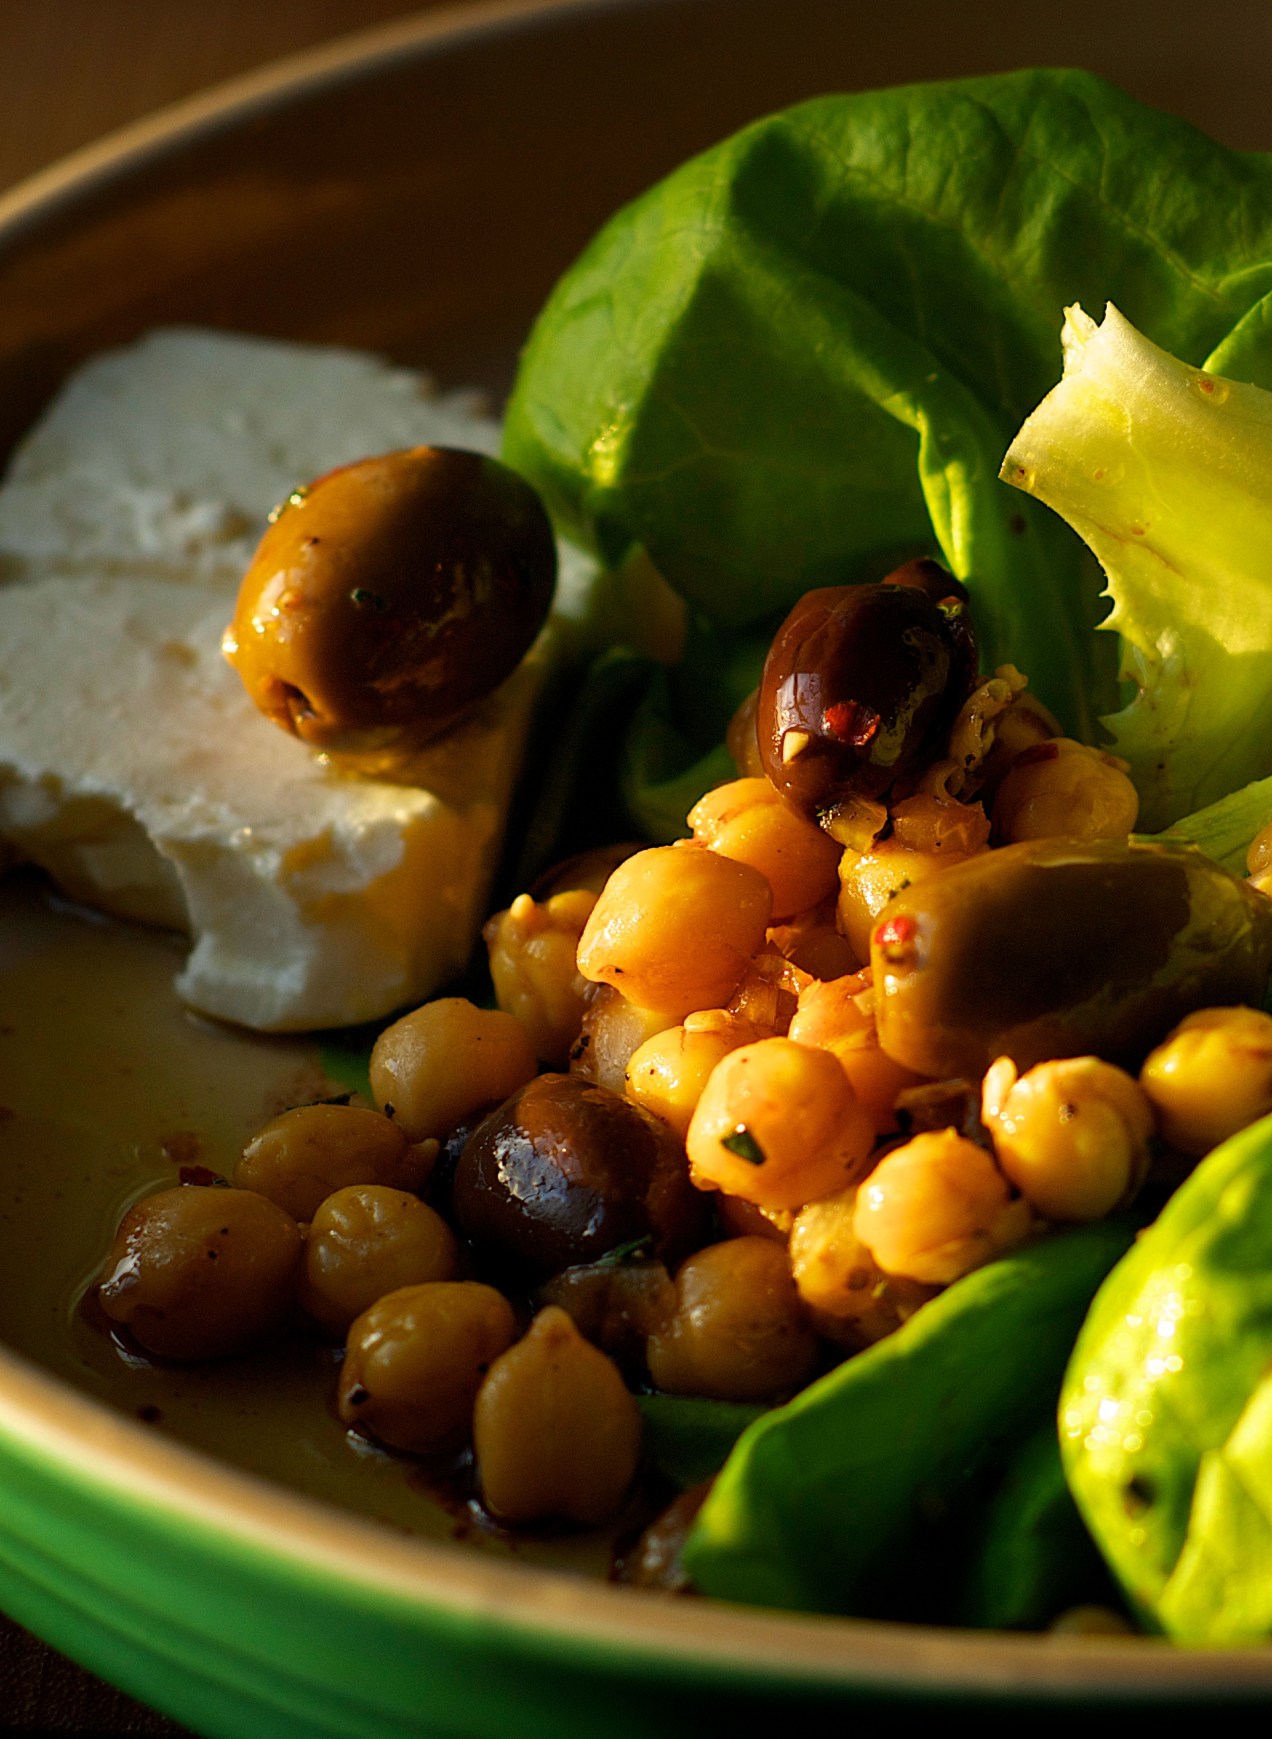
Olive Salad Taverna

Olive Salad Taverna
While having never been to Greece this seems as though it would be something that you might eat at a small taverna on the Mediterranean Sea. It is sort of an “a la grecque” dish which if done right is always good to have on hand and usually are even better the second day or, at the very least, after a couple hour marinade. I think this would be good followed by some sort of Mediterranean fish dish. If you want to make this a very filling salad add some feta and a couple of pitas and you will have a meal.
SERVES 4
1 cup mixed olives
1 cup garbanzos, cooked, or rinsed canned
2 teaspoons preserved lemon, finely minced
2 teaspoons shallot, finely minced
1 garlic clove, finely minced
1 teaspoon fresh savory or thyme, minced, Richard Olney used savory with olives and I think it works really well
1/2 teaspoon chile flakes
2 tablespoons red wine vinegar
1 teaspoon pomegranate molasses
1/4 cup extra virgin olive oil
kosher salt and fresh ground black pepper
1 head butter leaf lettuce
hunks of feta and pita, optional
1. In a mixing bowl combine everything up to the olive oil. Mix everything to combine. Season it with black pepper and then add the olive oil. Stir to coat and then let the salad rest for at least 1 hour and you can even refrigerate it over night.
2. Before serving rinse the butter leaf and then using a salad spinner dry the lettuce. Place two or three leaves on each plate. Stir the salad to redistribute everything. Taste and if it needs salt add some. Divide the garbanzo/olive mixture evenly between the plates. Using a spoon drizzle some of the juice over the greens. Serve.

Chicken, Basil, and Tomato Sausage with Cavatelli
Chicken and Basil Sausage with Cavatelli
 The sausages used in this dish come from the book Charcuterie by Michael Ruhlman and Brian Polcyn and is a book I highly recommend if you want to make sausage and any charcuterie in general. Pictured at left are trays of home made ricotta cavatelli.
♨
Serves 6
Chicken Basil and Tomato Sausage with Cavatelli
6 sausages, Italian sausages would be great too
olive oil
3 onions, peeled, halved and julienned
9 large garlic cloves, peeled and chopped, about a 1/2 cup
36 ounces strained tomatoes or sauce
1 tablespoon double concentrated tomato paste
kosher salt and fresh ground pepper
1/4 cup cream
a handful of fresh basil
1 1/2 lbs of fresh cavatelli or dried gemelli pasta
lots of grating cheese of your choice, parmesan, romano etc.
1. Place a 4 quart pot over medium high heat and add good glugs of olive oil, a little more than just coating the bottom of the pan. When it is hot add the sausage and sear it until is is deeply browned but take care not to over heat it and split the sausage casings. Remove the sausage to a platter.
2. Add the onions to the pot, season them with salt and pepper, and let them cook until they become tender then add the garlic. Cook the garlic until it becomes fragrant and then add the tomato sauce.
3. Bring the sauce to a boil and then reduce it to a simmer. You will want to stir it occasionally so it doesn’t stick to the bottom and burn. You want the sauce to reduce slowly and the sugars in the tomatoes to break out and concentrate. Season the sauce with salt and pepper and taste. Let the sauce simmer for 1 1/2 to 2 hours. What I call mato gum will form on the sides of the pan and the sauce will be thick. Add the cream to the sauce, stir and raise the heat a little to get the sauce good and hot. Be careful with the sauce though it will burn easily at this point because of the concentrated sugars. You can either add the sausage back to the sauce or you can finish cooking them in a 400 degree oven.
4. Bring a large pot of salted water to a boil and cook the pasta according to the instructions. When it is done, strain it and put it into a large bowl and toss it with the tomato sauce. Plate it, dress it with the basil, sausages, cheese and serve.
Cheese Lasagne
 While this technically is vegetarian I don’t think I would call it that. Vegetarian leads me to think there are some vegetables involved. I will call it meatless though.
This lasagna takes me straight back to my childhood. It reminds me of everything I loved about baked pasta growing up and guess what, it is a favorite of my kids too.
It really comes together easy since you use the no boil pasta sheets. I like to make the sauce but if you have a favorite great quality variety in a jar that you want to use, well, just go for it. You could easily make this in advance and cover it and keep it in the fridge for a day. You can go straight from fridge to oven just add another 15 to 20 minutes to the initial bake time.
Serves 6 to 8
extra virgin olive oil
1 onion, peeled and chopped
3 cloves garlic, minced
2 teaspoons pomegranate molasses
one 28oz. box pomi strained tomatoes
one 28oz. box pomi chopped tomatoes
1/4 teaspoons fennel seed, ground
2 teaspoons oregano
2 tablespoons flat leaf parsley, minced
2 tablespoons tomato paste
1 pound no boil whole wheat lasagna noodles
12 ounces low moisture mozzarella , grated
12 ounces fresh mozzarella, sliced into eight rounds
1 pound cottage cheese, drained in a strainer
2 eggs
1 cup parmesan cheese, grated
kosher salt and fresh ground pepper
1. Place a 3 1/2 quart heavy bottomed sauce pan over medium heat. Add enough oil to coat the bottom of the pan liberally. Add the onions and season them with a healthy pinch of salt and fresh ground pepper.
2. Sweat the onions until they are soft. Add the garlic and once it is fragrant add the pomegranate molasses, tomatoes, fennel, oregano, parsley and tomato paste. Season with salt and pepper. Bring to a boil then reduce the heat to a simmer.
3. Occasionally stir the sauce to keep it from sticking. Taste the sauce and if you think you need to add a teaspoon of sugar.
4. While the sauce is cooking combine the cottage cheese, eggs and parmesan in a mixing bowl. Season it with pepper and a little salt. Usually parmesan is salty so it shouldn’t need to much. Combine everything well and set aside or refrigerate.
5. Cook the tomato sauce until it has reduced down and has thickened. Taste and adjust the seasoning.
6. If you choose to cook the lasagna now preheat the oven to 375˚ F. If you want to wait to cook it finish up the remaining steps and assemble the final product, cover and store it in the fridge.
7. Drizzle some lines of extra virgin olive oil into a 9 x 13 casserole. Take a spoon and spoon about a half cup of tomato sauce on top of it and spread it around to make a thin coating on the bottom of the pan.
8. Lay out a layer of dried noodles across the bottom of the pan. Spoon some sauce over the dried noodles. This layer should be heavy. Spread it with the back of the spoon to even it up. Sprinkle half the grated mozzarella over the sauce then lay on another layer of noodles.
9. Another coat of tomato sauce on top of the noodles then spread the cottage cheese over the middle layer. Lay out the last layer of noodles and put down a thin coat of sauce, more then a coat of paint, then top with grated mozzarella and finish with the fresh mozzarella rounds.
10. Cover the casserole tightly with foil. Slide it into the oven and bake it for an 45 minutes. Remove the top, turn the heat to 450˚ F and bake another 20 minutes or until the cheese has browned.
11. Remove the lasagna from the oven and let it rest for 10 minutes. This is really important. It lets everything meld real nicely, the noodles absorb juices and it just makes lasagna better. Cut into portions and serve.
Oven Roasted Plum Tomatoes in Olive Oil
 I make these tomatoes often, mostly at the end of garden season, and have done so ever since I opened the cover of the French Laundry cookbook and found Chef Thomas Keller’s recipe. You can use a recipe other than Keller’s recipe but at least do as Keller does and make sure you season the tomatoes with salt and pepper before roasting them and make sure you cook them over a long period of time in a low heat oven.
I say this for a simple reason. If they aren’t seasoned before you cook them they just aren’t very good and why go to the trouble if they aren’t going to be good, you won’t eat them and they will just sit in the fridge taking up space. Season them agressively and you will be happy.
One thing to make note of. I don’t peel the tomatoes until I use them. The skin, I think, holds them together while in the jar but is really easy to peel off before you use them.
If you try them on a thin crust homemade pizza some Friday night don’t blame me when pizza is never again the same.
 Recipe adapted from The French Laundry Cookbook
Makes 1 quart
30 to 36 Roma or San Marzano tomatoes, perfectly ripe, stemmed and halved
kosher or sea salt
fresh ground black pepper
a handful of fresh savory or thyme sprigs
extra virgin olive oil
1. Heat the oven to 275˚F.
2. Spread to tomato halves out onto a half sheet tray lined with foil. Season the tomatoes evenly with salt and fresh ground pepper. Spread the savory or thyme out over the tomatoes. Place the sheet tray into the oven.
3. Bake the tomatoes for 3 hours or until they have shrunk but still tender. It may take longer then three hours depending on how juicy the tomatoes are to begin with.
4. Remove the tomatoes from the oven and let them cool.
5. Once they have cooled pack them into a 1 quart jar, or a smaller jar if need be, and then use a spatula to get all the oil, accumulated juices and herbs off the tray and into the jar. Top the jar off with olive oil to cover.
6. Store in the fridge but remember pull them out about an hour before you need them so the oil warms and you can easily remove the tomatoes without breaking them.

Baked Rigatoni with Currants and Pine Nuts

Baked Rigatoni with Currants and Pine Nuts
The most beautiful San Marzano tomatoes have been coming out, by the bushel, of the garden. I have been canning sauce, making paste and oven dried tomatoes like it is my civic duty to waste not one tomato. I am loving it.
I can’t wait to open a jar of sauce in the middle of winter. One that has a sprig of basil hidden in the middle of the red liquid like a secret ingredient. I lift the lid with a bottle opener and it lets out the familiar gasp of home canned goods. The smell of last summer’s sunshine rises upward to my nose.
I hoard the stuff. I don’t want to use it now but rather save it for later. Then I realize how stupid this is. So I use the left over sauce, the extra that wouldn’t fill a jar and make this dish. It is very American-Sicilian in my mind but what do I know. Well, I know it’s good.
Note: I use a box brand in the recipe but by all means if you have a great home canned tomato sauce use it.
Makes a 9 x 13 casserole
1 pound rigatoni, cooked and cooled according to the directions on the box
3 tablespoons olive oil
2 onions, small dice about 2 cups
2 tablespoons garlic, minced
1 tablespoon balsamic vinegar
1 teaspoon pomegranate molasses
2 each 28 oz. box Pomi brand chopped tomatoes
1 pound cottage cheese, drained
2 tablespoons flat leaf parsley, minced
1/3 cup currants
1/4 cup pinenuts
1/2 cup pecorino romano
2 cups or more, mozzarella, grated
1. Heat a 3 1/2 quart heavy bottomed pot over medium heat. Add the olive oil and onions and let them sweat until they are soft and become golden around the edges.
2. Add the garlic and when it becomes fragrant add the balsamic and pomegranate syrup. Season with salt and pepper and let the liquid reduce some and then add the chopped tomatoes.
Reduce the sauce to a simmer and let the tomato become thick. It will take about an hour or so. Add the currents to the sauce about 15 minutes before you have finished cooking the sauce so the begin to soften and release some of their flavor.
3. Combine the cooked rigatoni with the cottage cheese, parsley and pecorino cheeses. I usually do this right in the pasta cooking pot after I have drained all the water from the pasta.
4. Now add the tomato sauce and mix to combine.
5. Using a little olive oil oil a 9 x 13 casserole and then pour the noodles into the dish. Top with the mozzarella and bake in a preheated 375˚ F oven for 35 to 40 minutes or until the cheese is browned nicely. About 10 minutes before it is done sprinkle the pine nuts across the top so they brown up nicely. Don’t do this any earlier or the nuts will burn.
6. Let the casserole rest for 5 to 10 minutes and then serve.
