Beef, Dinner, dog-eared, Easy, Main Dishes, Pasta or Noodles

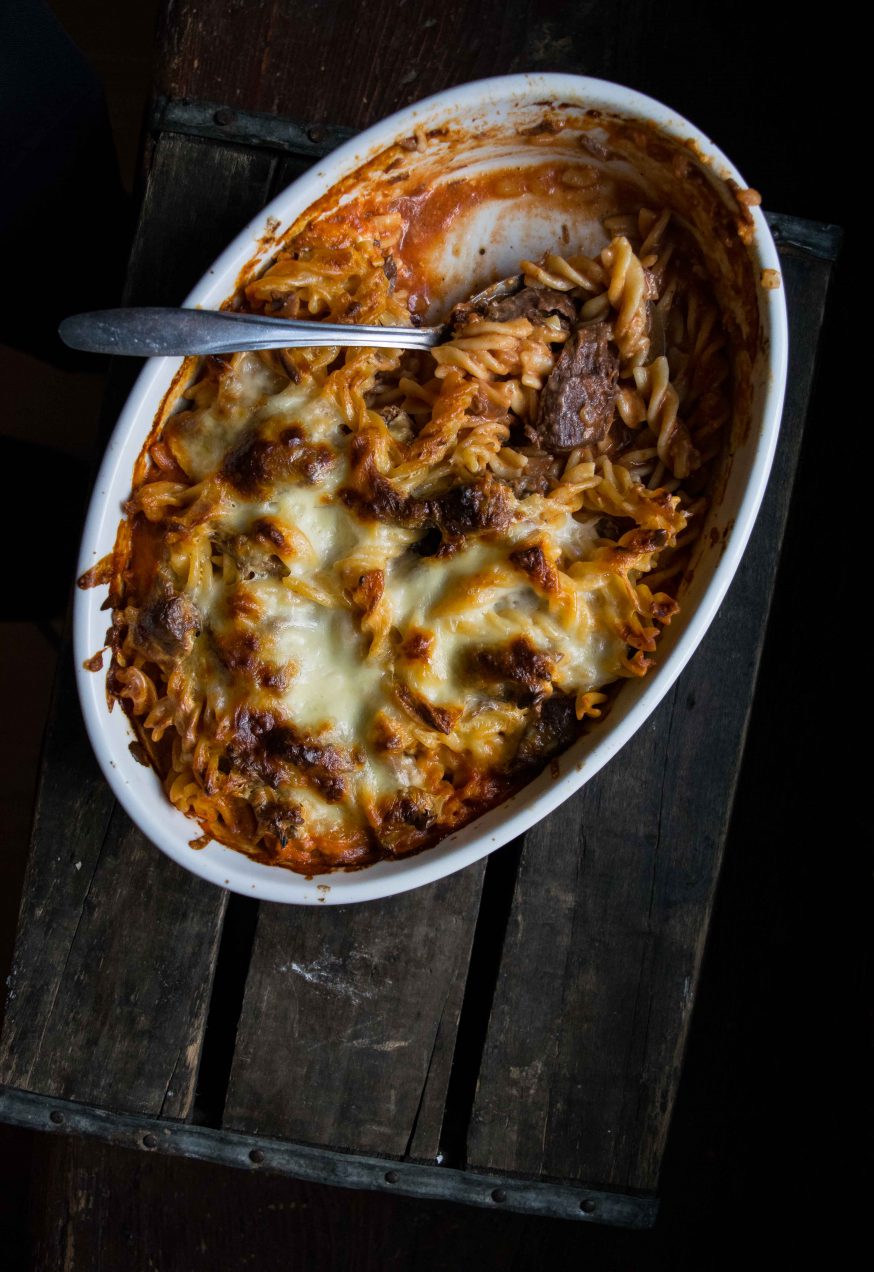
RECIPE CARD: 3 Cheese Beef & Noodles + How To Get The Most Out Of Prep Day

I have always said, “if I am going to cook one chicken, I might as well cook two.”  It’s not really any more work.  I have come to believe the same about pot roast, pork roast, and just about anything that is braised, smoked or roasted.
Continue reading

Standard
Eggs/Dairy, Sandwiches, summer, Vegetarian

Pimento Cheese Sandwiches

Is it the heat in August, or the midday cicadas—grinding, grinding, grinding—that reminds me of the time of year?  The horizon, corn pollen and gravel dust, is smudged.  This is the first August I can ever remember going outside after lunch to find it refreshing instead of repressing.  The sun is as bright as on a crisp fall afternoon and the humidity is nowhere to be found—grinding, grinding, grinding.

I like to hear the corn grow and without the humidity there is nothing from which the growing pains can echo.  An ambulance, siren blaring, leaves town.  The sirens grow louder until the emergency vehicle turns north on the state highway.  The sirens begin to fade.

It has been like this all summer and  I am being robbed.  I like the heat.  It is the humidity and heat that makes my vegetables grow.  I have nothing growing in my garden this year.  By rights I should be eating okra.  I should have so much zucchini I have to feed it to the chickens.  I should be looking forward to garden succotash and fried chicken but my lima beans died long ago in the continual down pours of early spring. I should be picking fresh field peas and pole beans but I never even got the baskets down from the cabinet.  I should be cutting sweet corn from the cob and freezing it.

I rock gently in an easy chair on the front porch and eat a pimento cheese sandwich.  From out across the fields I can hear the announcer for the high school football game calling plays.  I think back to all my first days back at school.  I feel the butterflies in my stomach,  another summer grows quite.


Pimento Cheese

(Makes 2 cups)

3 cups cheddar cheese, grated (about an 8oz. block)

2 teaspoons yellow onion, grated on a micro plane

3 tablespoons jarred pimentos plus 1 tablespoon pimento juice

2/3 cup mayonnaise

1 tablespoon Nathan’s mustard

1 tablespoon cider vinegar

1 tablespoon Tabasco sriracha

1 tablespoon ketchup

fresh ground black pepper to taste

  1. Place all the ingredients into a mixing bowl.  Stir gently with a spoon until everything is combined.  Let sit for an hour before serving.  Store in the refrigerator tightly covered.


Standard
best in the world, Bread, Easy, Sandwiches, Seafood

Pan Bagnat – Summer’s Best Sandwich

DSC_0785In a sense, to smush, press, or mash a sandwich could feel redundant but it’s not.  It is a tool employed to make certain kinds of sandwiches better.  Case in point, a Cuban, panini, a shooter’s sandwich, and pan bagnat.

I love all these sandwiches.  Classics, each and everyone.

In the heat of summer, I rely on the pan bagnat, which when translated means bathed bread.  It is a vegetable based sandwich from the south of France, it is light and I find it refreshing.  Often the ingredients list is patterned after a Salad Nicoise subbing in anchovies for the tuna.  For me I like to use omega-3 oil rich sardines but use whatever tinned fish you fancy.

The sandwich is built in layers, wrapped tightly in plastic wrap, and then some sort of weight is put on top of it.  At my house the sandwich gets sandwiched between sheet trays and the milk and juice jugs set on top compress it.  Because the sandwich is lightly salted and weighted after a couple of hours under pressure a lot of liquid is released only to be soaked back up by the bread.

And that’s the genius of this sandwich.  In my experience it never gets soggy but instead it becomes meltingly tender, the juices mingle, and in the end this makes for a perfect sandwich on a hot summer day.

Pan Bagnat (makes 1 sandwich)

a 6-inch (15.25cm) piece of French baguette

1 tin skinless, bonleless, sardines in oil

1 small cucumber, peeled

1 medium sized tomato, sliced

5 or 6 thinly sliced red onion rings, skin removed

8 picholine olives or olive of you choice

salsa verde

mayonnaise

kosher salt

fresh ground black pepper

  1. Slice the baguette in half lengthwise.  On one piece of the bread coat the interior with mayonnaise.  On the other spread out a tablespoon or two of salsa verde.
  2. Using the peeler, peel thin strips of cucumber, 10 or more of them.  Lay them in an even layer across the salsa verde side.  Give the cucumbers a sprinkle of salt.
  3. Top the cucumber with the sardines, on top of the sardines lay out the tomatoes.  Season the tomatoes with a sprinkle of salt and fresh ground black pepper.
  4. Top the tomato with red onion.  Place the olives onto the mayonnaise so they stick.
  5. Place the olive/mayonnaise bread on top of the sandwich.  Wrap it tightly with plastic wrap and then either place a brick on top, a sheet tray with weight, something heavy.  Let the sandwich remain weighted for at least three hours to overnight.
  6. To serve remove the plastic wrap, slice on the diagonal, and serve with a glass of chilled dry white wine.


Standard
Dinner, dog-eared, Easy, Main Dishes, Seafood, Short Time

Greek Style Shrimp in Tomato Sauce (+ 10 Tips to Better Sautéing)

Greek Style Shrimp There is something wonderful about a one-pan sauté. Sure, a quick dinner and easy clean-up would be enough to pass muster for most, but what I love is how wonderfully delicious dinner becomes as you build flavors in the pan. Starting at the bottom of the pan, there is an order to how things go; it is not a dump-it-and-go process. Continue reading

Standard
Chicken and Poultry, Dinner, dog-eared, Gluten-free, Main Dishes, Medium Time, Moderate

Chicken Legs in Tomato Gravy ( + 5 Tips to a Better Braise)


Finally, the long standing blanket of snow has begun to recede and melt back into the dark earth, but not without leaving behind a disheveled landscape — like lifting an area rug you have meant to clean under for the past year. It is ugly outside, and depressing too. It is the worst time of year. The melt-off signals the beginning of the end of winter, but the skeptic in me knows that the weather is more than likely crying wolf. Either way it sets a spark to the natural cycle of things.


A bee flying in the orchard still bare of leaves, lands on my arm, walks around a moment, then looks up at me with sad puppy dog eyes and flies off. A couple of raccoons out during daylight forage the field for last season’s spilt corn. At the wood’s edge an opossum trips on a branch and falls fifty feet before landing with a thud in the remnants of a wet snow bank. I realize it is time to join the others as well — to come out of hibernation, to replenish.

But I have a problem. I am sick of kale. Even my beloved collards put me off. The hell with you turnip and rutabaga, for you’ve left a bitter taste in my mouth. I push bowls of Brussels sprouts away as if I am a child again, and my mother is trying to force feed them to me (she even threatens me with no dessert). I have eaten my greens in all forms, and I can’t stand them anymore. I have hit the winter vegetable wall. With the exception of but a few, the only way vegetables are still palatable is with heavy cream and bits of bacon.

Through it all, somehow potatoes taste good — more then good — amazing. Anything resembling a jar of sunshine helps (like last summer’s canned tomatoes with basil tucked into the red pulp). Going outside helps, too, because the musty smell of thawing earth and the gentle heat of the midday sun gives me hope for what is to come. Luckily, any food on a platter that resembles comfort is still a hit at the table– such as these chicken legs, tenderly covered with a parchment lid and slow cooked in a Dutch oven until they become sticky. A dish that’s good anytime of the year, but especially welcome during the wait until spring.

Tips for Better Braising:

1. Always caramelize the protein. Mind you, many times the vegetables are caramelized too, but not always. The deeper the caramelization, the deeper the flavor of the finished dish. Be mindful of the fond (the brown bits stuck to the bottom of the pan) — don’t let them burn. The ideal braise includes a beautiful fond, which occurs when the bottom of the pot is schmeared with brown bits of cooked-on-goodness that releases into the sauce when you add liquid. For good measure, always use a wooden spoon and scrape along the bottom of the pot to make sure that nothing is left behind.

2. If a recipe calls for vegetables, always add more. If a recipe calls for 1-cup of mirepoix, don’t be afraid to add 2 cups. A braise, as far as I know, has never been hurt by too many vegetables.

3. A parchment lid is one of my favorite kitchen cooking methods. I don’t know the exact science behind it other than that it works (and makes your food better). It allows, at least in my mind, the food that sits atop the liquid to brown and caramelize while preventing the liquid from evaporating.

4. Just because meat is cooked in a liquid doesn’t mean it won’t dry out. Have you ever eaten a piece of pot roast that is so hard to swallow that it gives you the hiccups? It is most likely because the roast was too lean or overcooked. Be mindful of cooking times and fat content.

5. If a braise only calls for a mirepoix to be used in the broth, at the end of the cooking time I will oftentimes remove the meat, degrease the braising liquid, and purée the vegetables to make the sauce creamy without having to add even a touch cream.

Serves 4 or more

For the chicken legs:

olive oil

8 to 10 chicken legs, skin-on

1 cup celery, diced

1 1/2 cup yellow onion, diced

1 1/2 cup carrots, thinly sliced on a bias

12 to 18 garlic cloves, chopped

1 cup dry white wine

2 cups tomato purée

1 cup vegetable broth or water

2 bay leaves

1 1/2 tablespoon rosemary, minced

1 1/2 tablespoon flat leaf parsley, minced

Kosher salt and fresh ground pepper

1. Season the chicken on all sides with salt and pepper. Heat the oven to 375˚ F.

2. Place a large sauté over medium high heat. Add enough olive oil to the pan so that the bottom is just coated. Add the chicken legs and brown them generously on all sides. Adjust the heat as necessary. Add the carrots, celery, and onions to the pan. Season them with salt and pepper. Let the vegetables brown.

3. Once the veggies brown add the garlic and rosemary. Stir the veggies around and once the garlic is fragrant nestle the chicken legs comfortably with the veggies. You want you veggies and chicken spooning. Add the white wine and let it reduce to almost nothing. While the wine is reducing use a wooden spoon to scrape up all the good bits stuck to the bottom of the pan. Add tomato and vegetable broth. Bring the liquid to a boil, cover with a parchment lid, then slide it into the heated oven for 45 minutes to 1 hour.

For the mashed potatoes:

6 to 8 russet potatoes, depending on their size, peeled and cut into 1 inch rounds

6 tablespoons unsalted butter

1/3 cup whole milk, possibly more

kosher salt and fresh ground white pepper

1. While the chicken is in the oven make the mashed potatoes. Place the sliced peeled potatoes into a large pot and add enough cold water to cover them by 4 inches. Add a tablespoon of kosher salt. Place the pot over high heat and bring it to a boil. Once it is boiling reduce the heat to keep the pot from boiling over. After about 15 minutes check the potatoes to see if they are done by inserting a kitchen knife into the middle of one of the larger pieces of potato. If the larger ones are done you are assured the smaller ones will be too. The knife should easily pierce the potato.

2. Drain the potatoes into a colander. Let them steam for a few minutes to rid themselves of excess moisture. Then using a ricer, a mixer or a stand mixer with a paddle attachment either rice, or mix the potatoes till broken down. Add the butter and mix some more. Season the potatoes with a touch of salt and fresh ground white pepper. Add the 1/3 cup of milk. Mix and then taste for seasoning. Adjust the seasoning as necessary and add more milk if the potatoes are too stiff. Be careful as to how liquidy you make the potatoes. Error on the stiff side because the tomato gravy will loosen them up a lot as they co-mingle on the platter.

3. Plate the potatoes onto a large platter. Top the potatoes with the chicken legs then the carrots, onions and celery. Ladle the tomato gravy over all and sprinkle on the parsley. Serve.

Standard
Grains/Legumes, Main Dishes, Noodles/pasta, Seafood

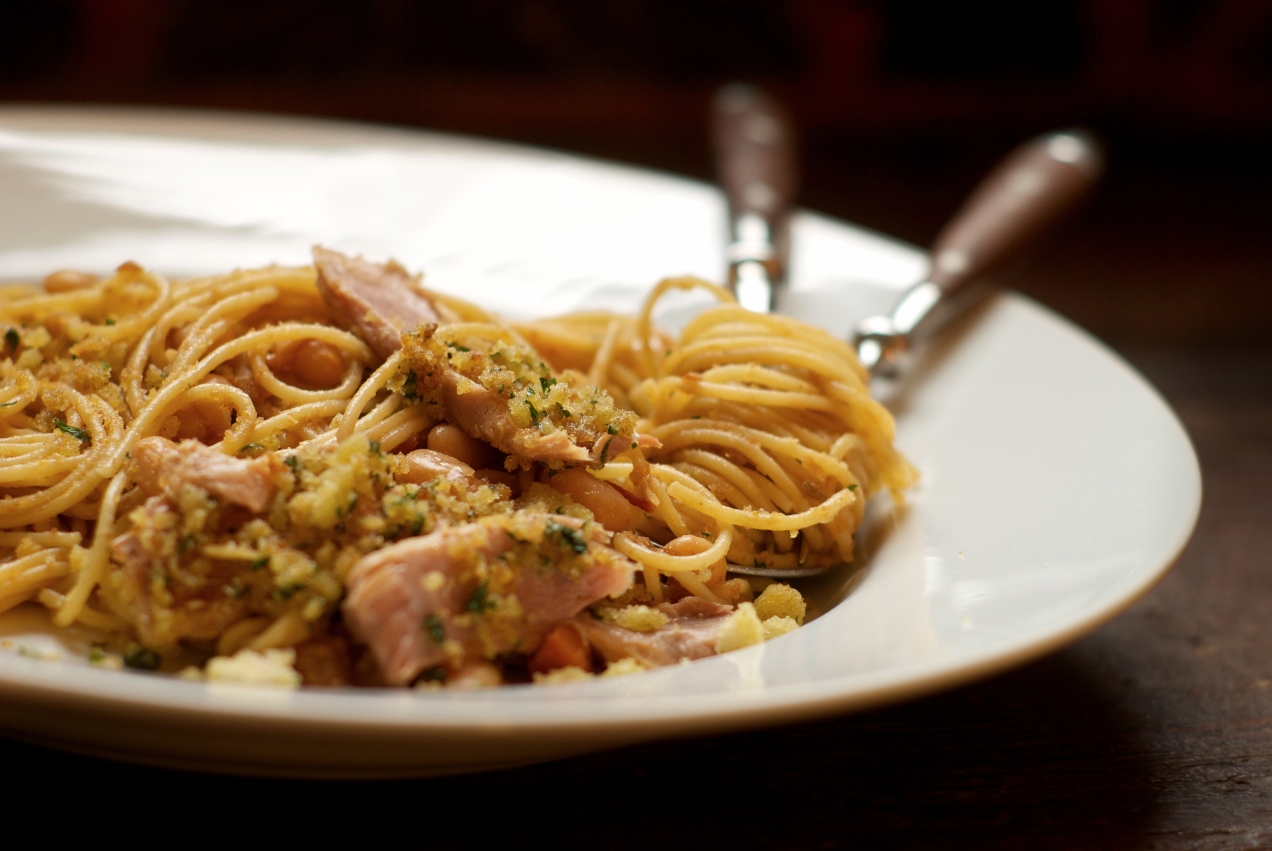
Tuna with White Beans and Spaghetti

White beans and tuna have always been combined in salads and pasta and have long been purveyor’s of pantry dinners in Italy. I have taken up the habit of pantry pasta myself and while I don’t keep many canned goods I do keep tomato sauce, tuna in olive oil, dried beans and pasta on hand.

The cheese rind is imperative here. It is to the broth what bones are to stock. Besides you know it makes you mad to have to pay for this usually unusable part. So here is your opportunity. I Always try to have at least one cheese rind on hand and just store it in the fridge amongst the other cheeses.

This is not a skillet pasta but a long simmering sauce because it takes some time to build the flavors in the beans. As with all beans everyone has their own method to their bean madness. I have tried many and the one I use yields a tender beans with tooth. That is not to say it is crunchy or undercooked but what it means is it holds its shape while being tenders. I want to know I am eating a bean when I bite into one.

I also don’t make home made pasta for this dish because this is one time were store bought spaghetti noodles are the right choice.

I served this with a green side vegetable and after the pasta served a salad, as the Italians would.

Serves 6 to 8

2 heads of garlic, the top 1/4 inch of which has been sliced off

1/2 pound white beans

4 whole cloves of garlic, peeled and trimmed

10 sun dried tomatoes (dried, not in olive oil)

water

1/2 cup yellow onion, small dice

1/4 cup carrot, small dice

1/4 cup celery, small dice

1 1/2 teaspoons fennel seed, ground

1/4 to 1/2 teaspoon red pepper flakes

2 bay leaves

1/2 cup strained tomatoes or tomato sauce

1 each 2 x 2 inch parmesan cheese rind

olive oil

kosher salt and fresh ground pepper

1/3 cup bread crumbs, toasted in olive oil then seasoned with salt and pepper then mixed

with 1 tablespoon of minced parsley

12 oz. tuna in olive oil

1 pound spaghetti, cooked according to the instructions on the box

  1. Preheat the oven to 300˚F. Place the heads of garlic in a small ovenproof dish and drizzle each with olive oil then season them with salt and pepper.
  2. Cover the dish with foil and bake the garlic for 1 hour. At the end of the hour make sure they have taken on alight tobacco color and are tender. Cook them another 15 minutes if you need to. Once they are done remove them from the oven and set them aside.
  3. Place the beans, garlic cloves and the sun dried tomatoes into a sauce pan and cover by at least 2 inches of water. Place the pan over high heat and bring it to a boil and let it boil for 2 minutes. Cover and remove the pan from the heat and let it sit covered for two hours or longer.
  4. At the end of two hours drain the beans. Rinse out the pot. Remove the sun dried tomatoes and chop them. Place the pot over medium heat and add a good 2 tablespoons of olive oil. When it is hot add the onion, carrots and celery and let them saute until they begin to become tender. Add the fennel, bay leaves and red pepper and saute until fragrant. Add the beans, sun dried tomatoes and garlic back into the pot. Cover the beans with water by 1 inch. Add the tomato sauce and cheese rind.
  5. Bring the pot to a boil then reduce the heat so the liquid is at a lazy bubble. Season them with pepper. Stir occasionally to keep anything from sticking to the bottom of the pot.
  6. Near the end of the cooking season the beans with salt to taste and take the roasted garlic and squeeze out the garlic paste then add the paste to the beans. Stir it all in and taste. Adjust the seasoning.
  7. When the beans are tender cook the pasta. Once the pasta is done drain it and immediately toss the pasta with some of the oil from the tuna. Toss the beans and pasta together.
  8. Put the pasta into a serving bowl, top with tuna crumbles and then the bread crumbs. Serve immediately.
Standard
Chicken/Poultry, Dinner, Gluten-free, Main Dishes

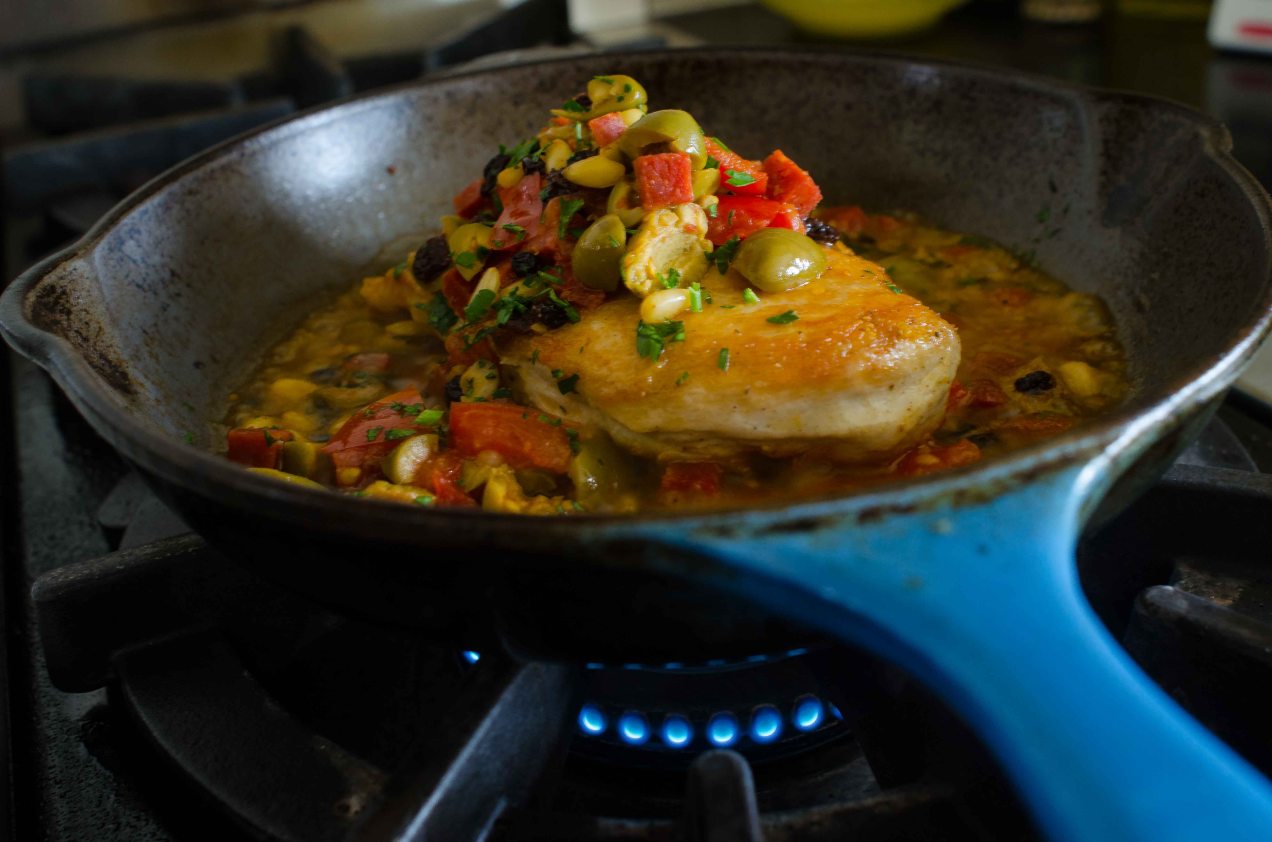
Sautéed Chicken with Pepperoni and Olives

I can tell you, with great certainty, how good a restaurant is going to be by the temperature of their plates.  If I get a stone cold plate with hot food chances are the dinner will be average.  If I get a cold salad on a warm plate just out of the dish machine, again, I know the rest of my dinner has more of a chance being bad then good.  It tells me whether or not the kitchen cares.

When I worked in commercial kitchens it was a bone of contention with me and those who worked for me.  Your plates needed to be hot for hot food and cold for cold food, period.

There was a time at home, back before we had kids, when I would always warm our plates in the oven.  Probably sounds completely retentive, for all I know it might be, but I have never really given a rats butt what others think.  I did it because my wife and I enjoyed being at the table together, taking our time eating, and having some quality conversation.  Hots plates keeping your food warm is a nice touch.

We had this for dinner the other day, I warmed the plates.

Serves 2

olive oil

2 each 6 ounce boneless skinless chicken breast

1/4 cup pepperoni, 1/4 inch dice

1/4 cup Picholine olives, pitted and halved

1/4 cup tomato, diced

1/2 cup dry white wine

1 tablespoon pine nuts

1 tablespoon currants

2 teaspoons flat leaf parsley, minced

kosher salt and fresh ground pepper

1. Season the chicken on both sides with salt. 

2. Place a heavy bottomed sauté pan over medium high heat.  When the pan is hot but not smoking add enough oil to coat the bottom of the pan.  Gently lay the chicken breast, what would be skin side down, into the pan being careful not to splash hot oil.

3. Brown the chicken on both sides.  Adjust the heat as necessary to keep the oil from burning.  Once both sides have caramelized remove them to a plate or pan and let them rest.  Pour out any excess grease.

4. Meanwhile put the pan back on the heat and add the pepperoni, olives and tomato.  Stir and toss it around until fragrant then add the white wine to deglaze the pan.   Using a wooden spoon scrape up any brown bits from the bottom of the pan.  Once the wine has reduced by half add the pine nuts and currants.

5. Give everything a stir and then place the breast back into the pan.  If the liquid in the pan seems at all dry add a 1/4 cup of water.  Braise the breast until they are cooked through which shouldn’t be long if you browned them well.  Taste and adjust the seasoning, add the parsley and stir to combine. 

6. Place the chicken breast onto warm plates skin side up,  top with the sauce, serve immediately.

Standard
Noodles/pasta

Duck Sugo on Noodles

These kinds of dishes are always a personal favorite for two reasons.  It is very kid friendly but it is mature enough for adults.   I mean how can that be wrong?

Sugo basically means “gravy”.  I have always been a big fan of ragu too.   The difference between the two is sugo uses a good dose of tomato sauce while ragu traditionally uses red wine, stock and a small amount of tomato if any at all.

If duck isn’t your thing and lamb is make a lamb sugo, or beef, pork and even rabbit sugo.  The meat used is really up to the cook so be creative.  You could add all kinds of things to this but realize the simple recipe posted below is very satisfying.

Serves 4 to 6

oil

1 pound duck meat, trimmed of skin and fat, cut into small cubes, a chunk of fat reserved

1 cup yellow onion, peeled, trimmed and small dice

1/2 cup carrot, peeled, small dice

1/2 cup celery, small dice

1 tablespoon fresh garlic, minced

1 bay leaf

1/3 cup tomato paste

2 cups Pomi brand strained tomatoes

1 1/2 cup vegetable broth

1 tablespoon fresh rosemary, chopped

Kosher salt and fresh ground pepper

1 pound of long noodles such as spaghetti, I used spaghetti made with corn flour

1. Place the duck fat into then add enough oil to barely coat the bottom of a 3 quart enameled Dutch oven.  Place the pot over medium heat.

2. Let the duck fat render.  Once it is spent remove the duck skin and add the onions, carrots, and celery.  Season the vegetables with kosher salt and fresh ground pepper.  Sweat the vegetables until they are tender.

3. Add the garlic.  Once the garlic is fragrant add the tomato paste.  Stir the tomato paste around and let it caramelize a little.

4. Add the bay leaf, rosemary, tomato sauce, broth and meat.  Bring the sauce to a boil, season it with salt and pepper, then reduce the heat and let it simmer for at least an hour, the sauce has reduced and thickened and the duck is tender.  Let it simmer longer if you have used a tough cut of meat.

5.  Somewhere very close to the end of the sugo cooking time,  cook the noodles in lots of heavily salted water according to the time and directions on the box.  When the noodles are tender, drain them.

6. Plate the noodles,  sauce and serve.

Standard
Side Dishes, Vegetables

Fried Green Tomatoes

More often then not, actually to many times to count, I have seen fried green tomatoes served one way, sliced, Cajun spiced and dredged almost always in cornmeal.

Then last year Amy and I went to The Publican restaurant in Chicago.  It is an everything pig restaurant.  Crispy pigs ears, everything fried in lard, boudin blanc  and, well, you get the picture.

It is great restaurant so it isn’t surprising they have amazing side dishes too.  The one that caught my attention was the fried green tomatoes.  I almost didn’t order it but,  then as I often do,  at the last minute I went back to it and did.  I was very, very happy I did.   It was simply the most delicious version of fried green tomatoes I have ever eaten.

This was a midwinter outing.  So green tomatoes at home were out, at least until summer, but I was impressed enough I looked for the recipe online and was surprised to find nothing, well,  not nothing there were zillions of fried green tomato recipes cooked like I mentioned earlier.

Nevertheless this dish resonated with me.  I made it once earlier this summer and it wasn’t to my standards.  It was really good but it just didn’t work like I wanted from a technical standpoint.  Now it is late fall and I have come back to it and this time it came out great.

It is so good for several reasons.  The tomatoes are cut into wedges which keeps them a little firmer when cooked, not tough, and you get more tomato jelly with the wedge shape then if you had a slice.  Also oatmeal and pig are like bread and butter, they just go together, and it feels good to have these two flavors co-mingling and you can accomplish this without buying buckets of lard.

It is time to share this recipe.  I hope you enjoy it.

Note: I made this gluten-free and egg free.  If you don’t need to be gluten-free or egg free then substitute in all-purpose flour for the Cup4Cup and instead of using the egg replacer use three egg whites beaten to stiff peaks.

Makes 4 servings

7 to 10 green tomatoes, about the size of a small tangerine, cut into 4 or 6 wedges

1/3 cup quick cooking oats, not instant oats

1/3 cup quick cooking oats, coarsely ground

1/2 cup Cup4Cup flour (or all-purpose flour)

1 tablespoon paprika

1 1/2 teaspoon ground garlic

2 tablespoons egg replacer mixed in a large bowl with 1/4 cup water (or 3 egg whites whipped to medium peaks, also in a large bowl)

1 teaspoon salt

1/2 teaspooon black pepper

 peanut oil for frying

1 thick slice pancetta or bacon

1. Combine the oats, flour, paprika, garlic powder salt and pepper in a large mixing bowl.

2. Heat the oven to 250˚ F.  Pour enough peanut oil into a 6 inch deep cast iron Dutch oven to come 1/3 the way up the sides of the pan.  Add the pancetta to the oil.  Place it over medium high heat and heat the oil to 375˚ F. on a fry thermometer.  Make sure to remove the pancetta when it is crispy and has rendered its fat to the oil and make sure you, as the cook, eat the pancetta because it is within the rights of every good cook to eat the best bits while standing at the stove and if the peanut gallery doesn’t like it tell them to learn how to cook.

3. When the oil is just about to temperature toss half the tomatoes with the flour mix making sure to coat the tomatoes well.  Place them into the bowl with the egg replacer or egg whites and toss them to coat.  Put them back into the flour mix and coat them well.  Remove them to a cookie cooling rack.  Repeat this step with the remaining tomatoes.

4.  If the oil is to temperature carefully add  half , or less, of the tomatoes to the oil making sure not to crowd them.  When they start to take on color and brown remove them from the hot oil, sprinkle them with salt,  and place them onto the cookie rack.  Add the rest of the uncooked tomatoes to the pot then slide the fried tomatoes into the oven to keep them warm.

5. Serve with you favorite tartar sauce, aioli, or hot sauce

Standard
Chicken/Poultry, Noodles/pasta

Chicken, Basil, and Tomato Sausage with Cavatelli

Chicken and Basil Sausage with Cavatelli

The sausages used in this dish come from the book Charcuterie by Michael Ruhlman and Brian Polcyn and is a book I highly recommend if you want to make sausage and any charcuterie in general.  Pictured at left are trays of home made ricotta cavatelli.

Serves 6

Chicken Basil and Tomato Sausage with Cavatelli

6 sausages, Italian sausages would be great too

olive oil

3 onions, peeled, halved and julienned

9 large garlic cloves, peeled and chopped, about a 1/2 cup

36 ounces strained tomatoes or sauce

1 tablespoon double concentrated tomato paste

kosher salt and fresh ground pepper

1/4 cup cream

a handful of fresh basil

1 1/2 lbs of fresh cavatelli or dried gemelli pasta

lots of grating cheese of your choice, parmesan, romano etc.

1. Place a 4 quart pot over medium high heat and add good glugs of olive oil, a little more than just coating the bottom of the pan. When it is hot add the sausage and sear it until is is deeply browned but take care not to over heat it and split the sausage casings. Remove the sausage to a platter.

2. Add the onions to the pot, season them with salt and pepper, and let them cook until they become tender then add the garlic. Cook the garlic until it becomes fragrant and then add the tomato sauce.

3. Bring the sauce to a boil and then reduce it to a simmer. You will want to stir it occasionally so it doesn’t stick to the bottom and burn. You want the sauce to reduce slowly and the sugars in the tomatoes to break out and concentrate. Season the sauce with salt and pepper and taste. Let the sauce simmer for 1 1/2 to 2 hours. What I call mato gum will form on the sides of the pan and the sauce will be thick. Add the cream to the sauce, stir and raise the heat a little to get the sauce good and hot. Be careful with the sauce though it will burn easily at this point because of the concentrated sugars. You can either add the sausage back to the sauce or you can finish cooking them in a 400 degree oven.

4. Bring a large pot of salted water to a boil and cook the pasta according to the instructions. When it is done, strain it and put it into a large bowl and toss it with the tomato sauce. Plate it, dress it with the basil, sausages, cheese and serve.

Standard
Vegetables

Oven Roasted Plum Tomatoes in Olive Oil

I make these tomatoes often, mostly at the end of garden season,  and have done so ever since I opened the cover of the French Laundry cookbook and found Chef Thomas Keller’s recipe.  You can use a recipe other than Keller’s recipe but at least do as Keller does and make sure you season the tomatoes with salt and pepper before roasting them and make sure you cook them over a long period of time in a low heat oven.

I say this for a simple reason.  If they aren’t seasoned before you cook them they just aren’t very good and why go to the trouble if they aren’t going to be good, you won’t eat them and they will just sit in the fridge taking up space.  Season them agressively and you will be happy.

One thing to make note of.  I don’t peel the tomatoes until I use them.  The skin, I think, holds them together while in the jar but is really easy to peel off before you use them.

If you try them on a thin crust homemade pizza some Friday night don’t blame me when pizza is never again the same.

20110915-DSCF2320Recipe adapted from The French Laundry Cookbook

Makes 1 quart

30 to 36 Roma or San Marzano tomatoes, perfectly ripe, stemmed and halved

kosher or sea salt

fresh ground black pepper

a handful of fresh savory or thyme sprigs

extra virgin olive oil

1. Heat the oven to 275˚F. 

2. Spread to tomato halves out onto a half sheet tray lined with foil.  Season the tomatoes evenly with salt and fresh ground pepper.  Spread the savory or thyme out over the tomatoes.  Place the sheet tray into the oven.

3. Bake the tomatoes for 3 hours or until they have shrunk but still tender.  It may take longer then three hours depending on how juicy the tomatoes are to begin with.

4.  Remove the tomatoes from the oven and let them cool.

5. Once they have cooled pack them into a 1 quart jar, or a smaller jar if need be, and then use a spatula to get all the oil, accumulated juices and herbs off the tray and into the jar.  Top the jar off with olive oil to cover.

6. Store in the fridge but remember pull them out about an hour before you need them so the oil warms and you can easily remove the tomatoes without breaking them.

Standard
dog-eared, Noodles

Baked Rigatoni with Currants and Pine Nuts

Baked Rigatoni with Currants and Pine Nuts

The most beautiful San Marzano tomatoes have been coming out, by the  bushel,  of the garden.  I have been canning sauce, making paste and oven dried tomatoes like it is my civic duty to waste not one tomato.  I am loving it.

I can’t wait to open a jar of sauce in the middle of winter.  One that has a sprig of basil hidden in the middle of the red liquid like a secret ingredient.  I lift the lid with a bottle opener and it lets out the familiar gasp of home canned goods.  The smell of last summer’s sunshine rises upward to my nose.

I hoard the stuff.  I don’t want to use it now but rather save it for later.  Then I realize how stupid this is.   So I use the left over sauce, the extra that wouldn’t fill a jar and make this dish.  It is very American-Sicilian in my mind but what do I know.  Well, I know it’s good.

Note: I use a box brand in the recipe but by all means if you have a great home canned tomato sauce use it.

Makes a 9 x 13 casserole

1 pound rigatoni, cooked and cooled according to the directions on the box

3 tablespoons olive oil

2 onions, small dice about 2 cups

2 tablespoons garlic, minced

1 tablespoon balsamic vinegar

1 teaspoon pomegranate molasses

2 each 28 oz. box Pomi brand chopped tomatoes

1 pound cottage cheese, drained

2 tablespoons flat leaf parsley, minced

1/3 cup currants

1/4 cup pinenuts

1/2 cup pecorino romano

2 cups or more, mozzarella, grated

1. Heat a 3 1/2 quart heavy bottomed pot over medium heat. Add the olive oil and onions and let them sweat until they are soft and become golden around the edges.

2. Add the garlic and when it becomes fragrant add the balsamic and pomegranate syrup. Season with salt and pepper and let the liquid reduce some and then add the chopped tomatoes.

Reduce the sauce to a simmer and let the tomato become thick. It will take about an hour or so. Add the currents to the sauce about 15 minutes before you have finished cooking the sauce so the begin to soften and release some of their flavor.

3. Combine the cooked rigatoni with the cottage cheese, parsley and pecorino cheeses. I usually do this right in the pasta cooking pot after I have drained all the water from the pasta.

4. Now add the tomato sauce and mix to combine.

5. Using a little olive oil oil a 9 x 13 casserole and then pour the noodles into the dish. Top with the mozzarella and bake in a preheated 375˚ F oven for 35 to 40 minutes or until the cheese is browned nicely. About 10 minutes before it is done sprinkle the pine nuts across the top so they brown up nicely. Don’t do this any earlier or the nuts will burn.

6. Let the casserole rest for 5 to 10 minutes and then serve.

Standard